Core components of a Kubernetes Cluster
Kubernetes is an open source platform for managing containerized workloads and services that facilitates declarative configuration and automation. The name Kubernetes had originated from Greek, meaning helmsman or pilot. It is portable as well as extensible and has a rapidly growing ecosystem. Kubernetes’ services and tools are widely available.
In this article, we will be going through a 10,000-foot view of the main Kubernetes components, from what each container is composed of, to how a container in a pod is deployed and scheduled across each of the workers. It is crucial to understand full particulars of the Kubernetes cluster in order to be able to deploy and design a solution based on Kubernetes as an orchestrator for containerized applications.
Here is a brief regarding the things that we are going to cover in this article:
- Control panel components
- The Kubernetes worker’s components
- Pods as basic building blocks
- Kubernetes services, load balancers, and Ingress controllers
- Kubernetes deployments and Daemon Sets
- Persistent storage in Kubernetes
The Kubernetes Control Plane
The Kubernetes master nodes are where the core control plane services live; not all services have to reside on the same node; however, for centralization and practicality, they are often deployed this way. This obviously raises services availability questions; however, they can easily be overcome by having several nodes and providing load balancing requests to achieve a highly available set of master nodes.
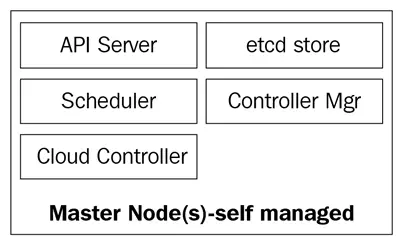
The master nodes are composed of four basic services:
- The kube-apiserver
- The kube-scheduler
- The kube-controller-manager
- The etcd database
Master nodes can either run on bare metal servers, virtual machines, or a private or public cloud, but it is not recommended to run container workloads on them. We will see more on this later.
The following diagram shows the Kubernetes master nodes components:
The kube-apiserver
The API server is what ties everything together. It is the frontend REST API of the cluster that receives manifests to create, update, and delete API objects such as services, pods, Ingress, and others.
The kube-apiserver is the only service that we should be talking to; it is also the only one that writes and talks to the etcd database for registering the cluster state. With the kubectl command, we will send commands to interact with it. This will be our Swiss Army knife when it comes to Kubernetes.
The kube-controller-manager
The kube-controller-manager daemon, in a nutshell, is a set of infinite control loops that are shipped for simplicity in a single binary. It watches for the defined desired state of the cluster and it makes sure that it is accomplished and satisfied by moving all the bits and pieces necessary to achieve it. The kube-controller-manager is not just one controller; it contains several different loops that watch different components in the cluster. Some of them are the service controller, the namespace controller, the service account controller, and many others. You can find each controller and its definition in the Kubernetes GitHub repository: https://github.com/kubernetes/kubernetes/tree/master/pkg/controller.
The kube-scheduler
The kube-scheduler schedules your newly created pods to nodes with enough space to satisfy the pods' resource needs. It basically listens to the kube-apiserver and the kube-controller-manager for newly created pods that are put into a queue and then scheduled to an available node by the scheduler. The kube-scheduler definition can be found here: https://github.com/kubernetes/kubernetes/blob/master/pkg/scheduler.
Besides compute resources, the kube-scheduler also reads the nodes' affinity and anti-affinity rules to find out whether a node can or cannot run that pod.
The etcd database
The etcd database is a very reliable consistent key-value store that's used to store the state of the Kubernetes cluster. It contains the current status of the pods in which the node is running on, how many nodes the cluster currently has, what is the state of those nodes, how many replicas of deployment are running, services names, and others.
As we mentioned before, only the kube-apiserver talks to the etcd database. If the kube-controller-manager needs to check the state of the cluster, it will go through the API server in order to get the state from the etcd database, instead of querying the etcd store directly. The same happens with the kube-scheduler if the scheduler needs to make it known that a pod has been stopped or allocated to another node; it will inform the API server, and the API server will store the current state in the etcd database.
With etcd, we have covered all the main components for our Kubernetes master nodes so that we are ready to manage our cluster. But a cluster is not only composed of masters; we still require the nodes that will be performing the heavy lifting by running our applications.
Kubernetes Worker Nodes
The worker nodes that perform this task in Kubernetes are simply called nodes. Previously, around 2014, they were called minions, but this term was later replaced with just nodes, as the name was confusing with Salt's terminologies and made people think that Salt was playing a major role in Kubernetes.
These nodes are the only place that you will be running workloads, as it is not recommended to have containers or loads on the master nodes, as they need to be available to manage the entire cluster. The nodes are very simple in terms of components; they only require three services to fulfil their task:
- Kubelet
- Kube-proxy
- Container runtime
Let's explore these three components in a little bit more depth.
The kubelet
The kubelet is a low-level Kubernetes component and one of the most important ones after the kube-apiserver; both of these components are essential for the provisioning of pods/containers in the cluster. The kubelet is a service that runs on the Kubernetes nodes and listens to the API server for pod creation. The kubelet is only in charge of starting/ stopping and making sure that containers in pods are healthy; the kubelet will not be able to manage any containers that were not created by it.
The kubelet achieves the goals by talking to the container runtime via container runtime interface (CRI). The CRI provides pluggability to the kubelet via a gRPC client, which is able to talk to different container runtimes. As we mentioned earlier, Kubernetes supports multiple container runtimes to deploy containers, and this is how it achieves such diverse support for different engines.
You can check for kubelet’s source code via https://github.com/kubernetes/kubernetes/tree/master/pkg/kubelet.
The kube-proxy
The kube-proxy is a service that resides on each node of the cluster and is the one that makes communications between pods, containers, and nodes possible. This service watches the kube-apiserver for changes on defined services (service is a sort of logical load balancer in Kubernetes; we will dive deeper into services later on in this article) and keeps the network up to date via iptables rules that forward traffic to the correct endpoints. Kube-proxy also sets up rules in iptables that do random load balancing across pods behind a service.
Here is an example of an iptables rule that was made by the kube-proxy:
-A KUBE-SERVICES -d 10.0.162.61/32 -p tcp -m comment --comment "default/example: has no endpoints" -m tcp --dport 80 -j REJECT --reject-with icmp-port-unreachable
Note that this is a service with no endpoints (no pods behind it).
Container runtime
To be able to spin up containers, we require a container runtime. This is the base engine that will create the containers in the nodes kernel for our pods to run. The kubelet will be talking to this runtime and will spin up or stop our containers on demand.
Currently, Kubernetes supports any OCI-compliant container runtime, such as Docker, rkt, runc, runsc, and so on.
You can refer this https://github.com/opencontainers/runtime-spec to learn more about all the specifications from the OCI Git-Hub page.
Now that we have explored all the core components that form a cluster, let’s now take a look at what can be done with them and how Kubernetes is going to help us orchestrate and manage our containerized applications.
Kubernetes Objects
Kubernetes objects are exactly that: they are logical persistent objects or abstractions that will represent the state of your cluster. You are the one in charge of telling Kubernetes what your desired state of that object is so that it can work to maintain it and make sure that the object exists.
To create an object, there are two things that it needs to have: a status and its spec. The status is provided by Kubernetes, and it is the current state of the object. Kubernetes will manage and update that status as needed to be in accordance with your desired state. The spec field, on the other hand, is what you provide to Kubernetes, and is what you tell it to describe the object you desire. For example, the image that you want the container to be running, the number of containers of that image that you want to run, and so on.
Each object has specific spec fields for the type of task that they perform, and you will be providing these specifications on a YAML file that is sent to the kube-apiserver with kubectl, which that transforms it into JSON and sends it as an API request. We will dive deeper into each object and its spec fields later in this article.
Here is an example of a YAML that was sent to kubectl:
cat << EOF | kubectl create -f -kind: ServiceapiVersion: v1metadata: Name: frontend-servicespec: selector: web: frontend ports: - protocol: TCP port: 80 targetPort: 9256EOF
The basic fields of the object definition are the very first ones, and these ones will not vary from object to object and are very self-explanatory. Let's take a quick look at them:
- kind: The kind field tells Kubernetes what type of object you are defining: a pod, a service, a deployment, and so on
- apiVersion: Because Kubernetes supports multiple API versions, we need to specify a REST API path that we want to send our definition to
- metadata: This is a nested field, which means that you have several more subfields to metadata, where you will write basic definitions such as the name of your object, assigning it to a specific namespace, and also tag a label to it to relate your object to other Kubernetes objects
So, we have now been through the most-used fields and their contents; you can learn more about the Kuberntes API conventions at https://github.com/kubernetes/community/blob/master/contributors/devel/api-conventions.md
Some of the fields of the object can later be modified after the object has been created, but that will depend on the object and the field that you want to modify.
The following is a short list of the various Kubernetes objects that you can create:
- Pod
- Volume
- Service
- Deployment
- Ingress
- Secret
- ConfigMap
And there are many more.
Let's take a closer look at each one of these items.
Pods – the basis of Kubernetes
Pods are the most basic objects in Kubernetes and also the most important ones. Everything revolves around them; we can say that Kubernetes is for the pods! All of the other objects are here to serve them, and all the tasks that they do are to make the pods achieve your desired state.
So, what is a pod and why are pods so important?
A pod is a logical object that runs one or more containers together on the same network namespace, the same inter-process communication (IPC), and, sometimes, depending on the version of Kubernetes, the same process ID (PID) namespace. This is because they are the ones that are going to run our containers and hence will be the center of attention. The whole point of Kubernetes is to be a container orchestrator, and with pods, we make orchestration possible.
As we mentioned before, containers on the same pod live in a "bubble" where they can talk to one another via localhost, as they are local to one another. One container in a pod has the same IP address as the other container because they are sharing a network namespace, but in most cases, you will be running on a one-on-one basis, that is to say, a single container per pod. Multiple containers per pod are only used on very specific scenarios, such as when an application requires a helper such as a data pusher or a proxy that needs to communicate in a fast and resilient way with the primary application.
The way you define a pod is the same way you would do so for any other Kubernetes object: via a YAML that contains all the pod specs and definitions:
kind: PodapiVersion: v1metadata:name: hello-podlabels: hello: podspec: containers: - name: hello-container image: alpine args: - echo - "Hello World"
Let's go through the basic pod definitions needed under the spec field to create our pod:
- Containers: A container is an array; therefore, we have a set of several subfields under it. Basically, it's what defines the containers that are going to be running on the pod. We can specify a name for the container, the image that is going to be a spin-off from, and the arguments or command that we need it to run. The difference between arguments and commands is the same as the difference between CMDand ENTRYPOINT. Take note that all the fields that we just went through are for the containers array. They are not directly part of the spec of the pod.
- restartPolicy: This field is exactly that: it tells Kubernetes what to do with a container, and it applies to all the containers in the pod in the case of a zero or non-zero exit code. You can choose from either option, Never, OnFailure or Always. Always will be the default in case a restartPolicy is not defined.
These are the most basic specs that you are going to declare on a pod; other specs will require you have a little bit more background knowledge on how to use them and how they interact with various other Kubernetes objects. We will revisit them later in this article; some of them are as follows:
- Volume
- Env
- Ports
- dnsPolicy
- initContainers
- nodeSelector
- Resource limits and requests
To view the pods that are currently running in your cluster, you can run kubectl get pods:
dsala@MININT-IB3HUA8:~$ kubectl get podsNAME READY STATUS RESTARTS AGEbusybox 1/1 Running 120 5d
Alternatively, you can run kubectl describe pods without specifying any pod. This will print out a description of every pod running in the cluster. In this case, it will be only the busybox pod, as it is the only one that's currently running:
dsala@MININT-IB3HUA8:~$ kubectl describe podsName: busyboxNamespace: defaultPriority: 0PriorityClassName: <none>Node: aks-agentpool-10515745-2/10.240.0.6Start Time: Wed, 19 Sep 2018 14:23:30 -0600Labels: <none>Annotations: <none>Status: RunningIP: 10.244.1.7Containers: busybox:[...] (Output truncated for readability)Events:Type Reason Age From Message---- ------ ---- ---- -------Normal Pulled 45s (x121 over 5d) kubelet, aks-agentpool-10515745-2 Container image "busybox" already present on machineNormal Created 44s (x121 over 5d) kubelet, aks-agentpool-10515745-2 Created containerNormal Started 44s (x121 over 5d) kubelet, aks-agentpool-10515745-2 Started container
Pods are mortal. Once it dies or is deleted, it cannot be recovered. Its IP and the containers that were running on it will be gone; they are totally ephemeral. The data on the pods that is mounted as a volume may or may not survive, depending on how you set it up. If our pods die and we lose them, how do we ensure that all our microservices are running? Well, deployments are the answer.
Deployments
Pods by themselves are not very useful since it is not very efficient to have more than a single instance of our application running in a single pod. Provisioning hundreds of copies of our application on different pods without having a method to look for them all will get out of hand really quickly.
This is where deployments come into play. With deployments, we can manage our pods with a controller. This allows us to not only decide how many we want to run, but we can also manage updates by changing the image version or the image itself that our containers are running. Deployments are what you will be working with most of the time. With deployments as well as pods and any other objects that we mentioned before, they have their own definition inside a YAML file:
apiVersion: apps/v1kind: Deploymentmetadata: name: nginx-deployment labels: deployment: nginxspec: replicas: 3 selector: matchLabels: app: nginx template: metadata: labels: app: nginx spec: containers: - name: nginx image: nginx:1.7.9 ports: - containerPort: 80
Let's start exploring their definition.
At the beginning of the YAML, we have more general fields, such as apiVersion, kind, and metadata. But under spec is where we will find the specific options for this API Object.
Under spec, we can add the following fields:
Selector: With the Selector field, the deployment will know which pods to target when changes are applied. There are two fields that you will be using under the selector: matchLabels and matchExpressions. With matchLabels, the selector will use the labels of the pods (key/value pairs). It is important to note that all the labels that you specify here will be ANDed. This means that the pod will require that it has all the labels that you specify under matchLabels.
Replicas: This will state the number of pods that the deployment needs to keep running via the replication controller; for example, if you specify three replicas, and one of the pods dies, the replication controller will watch the replicas spec as the desired state and inform the scheduler to schedule a new pod, as the current status is now 2 since the pod died.
RevisionHistoryLimit: Every time you make a change to deployment, this change is saved as a revision of the deployment, which you can later either revert to that previous state or keep a record of what was changed. You can consult your history with kubectl rollout history deployment/<name of deployment>. With revisionHistoryLimit, you can set up a number stating how many records you want to save.
Strategy: This will let you decide how you want to handle any update or horizontal pod scale. To overwrite the default, which is rollingUpdate, you need to write the type key, where you can choose between two values: recreate or rollingUpdate.
While recreate is a fast way to update your deployment, it will delete all the pods and replace them with new ones, but it will imply that you will have to take into consideration that a system downtime will be in place for this type of strategy. The rollingUpdate, on the other hand, is smoother and slower and is ideal for stateful applications that can rebalance their data. The rollingUpdate opens the door for two more fields, which are maxSurge and maxUnavailable.
The first one will be how many pods above the total amount you want when performing an update; for example, a deployment with 100 pods and a 20% maxSurge will grow up to a maximum of 120 pods while updating. The next option will let you select how many pods in the percentage you are willing to kill in order to replace them with new ones in a 100 pod scenario. In cases where there is 20% maxUnavailable, only 20 pods will be killed and replaced with new ones before continuing to replace the rest of the deployment.
Template: This is just a nested pod spec field where you will include all the specs and metadata of the pods that the deployment is going to manage.
We have seen that, with deployments, we manage our pods, and they help us maintain them in a state that we desire. All these pods are still in something called the cluster network, which is a closed network in which only the Kubernetes cluster components can talk to one another, even having their own set of IP ranges. How do we talk to our pods from the outside? How do we reach our application? This is where services come into play.
Services:
The name service doesn't fully describe what services actually do in Kubernetes. Kubernetes services are what route traffic to our pods. We can say that services are what tie pods together.
Let's imagine that we have a typical frontend/backend type of application where we have our frontend pods talking to our backend ones via the IP addresses of the pods. If a pod in the backend dies, we lose communication with our backend. This is not only because the new pod will not have the same IP address of the pod that died, but now we also have to reconfigure our app to use the new IP address. This issue and similar issues are solved with services.
A service is a logical object that tells the kube-proxy to create iptables rules based on which pods are behind the service. Services configure their endpoints, which is how the pods behind a service are called, the same way as deployments know which pods to control, the selector field, and the pods' labels.
This diagram shows you how services use labels to manage traffic:

Services will not only make kube-proxy create rules to route traffic; it will also trigger something called kube-dns.
Kube-dns is a set of pods with SkyDNS containers that run on the cluster that provides a DNS server and forwarder, which will create records for services and sometimes pods for ease of use. Whenever you create a service, a DNS record pointing to the service's internal cluster IP address will be created with the form service-name.namespace.svc.cluster.local. You can learn more about the Kubernetes DNS specifications here: https://github.com/kubernetes/dns/blob/master/docs/specification.md.
Going back to our example, we will now only have to configure our application to talk to the service fully qualified domain name (FQDN) in order to talk to our backend pods. This way, it won’t matter what IP address the pods and services have. If a pod behind the service dies, the service will take care of everything by using the A record, as we will be able to tell our frontend to route all traffic to my-svc. The logic of the service will take care of everything else.
There are several types of service that you can create whenever you are declaring the object to be created in Kubernetes. Let's go through them to see which one will be best suited for the type of work we need:
ClusterIP: This is the default service. Whenever you create a ClusterIP service, it will create a service with a cluster-internal IP address that will only be routable inside the Kubernetes cluster. This type is ideal for pods that only need to talk to one another and not go outside the cluster.
NodePort: When you create this type of service, by default a random port from 30000 to 32767 will be allocated to forward traffic to the endpoint pods of the service. You can override this behaviour by specifying a node port in the ports array. Once this is defined you will be able to access your pods via <Nodes-IP>:<Node-Port>. This is useful to access your pods from outside the cluster via the Node IP address.
LoadBalancer: Most of the time, you will be running Kubernetes on a cloud provider. The LoadBalancer type is ideal for these situations, as you will be able to allocate public IP addresses to your service via your cloud provider's API. This is the ideal service for when you want to communicate with your pods from outside your cluster. With LoadBalancer, you will be able to not only allocate a public IP address but also, using Azure, allocate a private IP address from your virtual private network. So, you can talk to your pods from the internet or internally on your private subnet.
Let’s review YAML’s definition of a service:
apiVersion: v1kind: Servicemetadata: name: my-servicespec: selector: app: front-end type: NodePort ports: - name: http port: 80 targetPort: 8080 nodePort: 30024 protocol: TCP
A service's YAML is very simple, and the specs will vary, depending on the type of service that you are creating. But the most important thing you have to take into account is port definitions. Let's take a look at these:
- port: This is the service port that is exposed
- targetPort: This is the port on the pods to where the service is sending traffic
- nodePort: This is the port that will be exposed
Although we now understand how we can communicate with the pods in our cluster, we still need to understand how we are going to manage the problem of losing our data every time a pod is terminated. This is where Persistent Volumes (PV) comes to use.
Kubernetes and persistent storage
Persistent storage in the container world is a serious issue. The only storage that is persistent across container runs is the layers of the image, and they are read-only. The layer where the container runs is read/write, but all data in this layer is deleted once the container stops. With pods, this is the same. When a container dies, the data written to it is gone.
Kubernetes has a set of objects to handle storage across pods. The first one that we will discuss is volumes.
Volumes
Volumes solve one of the biggest problems when it comes to persistent storage. First of all, volumes are not actually objects, but a definition of a pod's spec. When you create a pod, you can define a volume under the pod's spec field. Containers in this pod will be able to mount the volume on their mount namespace, and the volume will be available across container restarts or crashes. Volumes are tied to the pods, though, and if the pod is deleted, the volume will be gone as well. The data on the volume is another story; data persistence will depend on the backend of that volume.
Kubernetes supports several types of volumes or volume sources and how they are called in the API specifications, which range from filesystem maps from the local node, cloud providers' virtual disks, and software-defined storage-backed volumes. Local filesystem mounts are the most common ones that you will see when it comes to regular volumes. It's important to note that the disadvantage of using local node filesystem is that the data will not be available across all the nodes of the cluster, and just on that node where the pod was scheduled.
Let's examine how a pod with a volume is defined in YAML:
apiVersion: v1kind: Podmetadata: name: test-pdspec: containers: - image: k8s.gcr.io/test-webserver name: test-container volumeMounts: - mountPath: /test-pd name: test-volume volumes: - name: test-volume hostPath: path: /data type: Directory
Note how there is a field called volumes under spec and then there is another one called volumeMounts.
The first field (volumes) is where you define the volume you want to create for that pod. This field will always require a name and then a volume source. Depending on the source, the requirements will be different. In this example, the source would be hostPath, which is a node's local filesystem. hostPath supports several types of mappings, ranging from directories, files, block devices, and even Unix sockets.
Under the second field, volumeMounts, we have mountPath, which is where you define the path inside the container where you want to mount your volume to. The name parameter is how you specify to the pod which volume to use. This is important because you can have several types of volumes defined under volumes, and the name will be the only way for the pod to know which
You can learn more about the different types of volumes here https://kubernetes.io/docs/concepts/storage/volumes/#types-of-volumes and in the Kubernetes API reference document (https://kubernetes.io/docs/reference/generated/kubernetes-api/v1.11/#volume-v1-core).
Having volumes die with the pods is not ideal. We require storage that persists, and this is how the need for PVs came to be.
Persistent Volumes, Persistent Volume Claims, and Storage Classes
The main difference between volumes and PVs is that, unlike volumes, PVs are actually Kubernetes API objects, so you can manage them individually like separate entities, and therefore they persist even after a pod is deleted.
You might be wondering why this subsection has PV, persistent volume claims (PVCs), and storage classes all mixed in. This is because all of them depend on one another, and it is crucial to understand how they interact among one another to provision storage for our pods.
Let's begin with PVs and PVCs. Like volumes, PVs have a storage source, so the same mechanism that volumes have applies here. You will either have a software-defined storage cluster providing a logical unit number (LUN), a cloud provider giving virtual disks, or even a local filesystem to the Kubernetes node, but here, instead of being called volume sources, they are called persistent volume types instead.
PVs are pretty much like LUNs in a storage array: you create them, but without a mapping; they are just a bunch of allocated storage waiting to be used. PVCs are like LUN mappings: they are backed or bound to a PV and also are what you actually define, relate, and make available to the pod that it can then use for its containers.
The way you use PVCs on pods is exactly the same as with normal volumes. You have two fields: one to specify which PVC you want to use, and the other one to tell the pod on which container to use that PVC.
The YAML for a PVC API object definition should have the following code:
apiVersion: v1kind: PersistentVolumeClaimmetadata: name: gluster-pvc spec: accessModes: - ReadWriteMany resources: requests: storage: 1Gi
The YAML for pod should have the following code:
kind: PodapiVersion: v1metadata: name: mypodspec: containers: - name: myfrontend image: nginx volumeMounts: - mountPath: "/mnt/gluster" name: volume volumes: - name: volume persistentVolumeClaim: claimName: gluster-pvc
When a Kubernetes administrator creates PVC, there are two ways that this request is satisfied:
- Static: Several PVs have already been created, and then when a user creates PVC, any available PV that can satisfy the requirements will be bound to that PVC.
- Dynamic: Some PV types can create PVs based on PVC definitions. When PVC is created, the PV type will dynamically create a PV object and allocate the storage in the backend; this is dynamic provisioning. The catch with dynamic provisioning is that you require a third type of Kubernetes storage object, called a storage class.
Storage classes are like a way of tiering your storage. You can create a class that provisions slow storage volumes, or another one with hyper-fast SSD drives. However, storage classes are a little bit more complex than just tiering. As we mentioned in the two ways of creating PVC, storage classes are what make dynamic provisioning possible. When working on a cloud environment, you don't want to be manually creating every backend disk for every PV. Storage classes will set up something called a provisioner, which invokes the volume plug-in that's necessary to talk to your cloud provider's API. Every provisioner has its own settings so that it can talk to the specified cloud provider or storage provider.
You can provision storage classes in the following way; this is an example of a storage class using Azure-disk as a disk provisioner:
kind: StorageClassapiVersion: storage.k8s.io/v1metadata: name: my-storage-classprovisioner: kubernetes.io/azure-diskparameters: storageaccounttype: Standard_LRS kind: Shared
Each storage class provisioner and PV type will have different requirements and parameters, as well as volumes, and we have already had a general overview of how they work and what we can use them for. Learning about specific storage classes and PV types will depend on your environment; you can learn more about each one of them by clicking on the following links:
- https://kubernetes.io/docs/concepts/storage/storage-classes/#provisioner
- https://kubernetes.io/docs/concepts/storage/persistent-volumes/#types-of-persistent-volumes
In this article, we learned about what Kubernetes is, its components, and what are the advantages of using orchestration are. With this, identifying each of Kubernetes API objects, their purpose and their use cases should be easy. You should now be able to understand how the master nodes control the cluster and the scheduling of the containers in the worker nodes.
If you found this article useful, ‘Hands-On Linux for Architects’ should be helpful for you. With this book, you will be covering everything from Linux components and functionalities to hardware and software support, which will help you implementing and tuning effective Linux-based solutions. You will be taken through an overview of Linux design methodology and core concepts of designing a solution. If you’re a Linux system administrator, Linux support engineer, DevOps engineer, Linux consultant or anyone looking to learn or expand their knowledge in architecting, this book is for you.

