
As a developer, you are probably working on a project that uses Git as a version control system.
When developing a new feature, you will do it separately by creating a new Git branch.
Git branches are created in order to isolate specific Git commits from the rest of your main Git history.
If you main Git history is based on the master branch, you can create a separate Git branch in order to develop new features and merge them later on.
In this tutorial, we are going to see how you can easily create a Git branch.
Create Git branch using checkout
The easiest way to create a Git branch is to use the “git checkout” command with the “-b” option for a new branch. Next, you just have to specify the name for the branch you want to create.
$ git checkout -b <branch-name>As an example, let’s say that you want to create a new Git branch from the master branch named “feature”
To achieve that, you will run the “git checkout” command with the “-b” option and add “feature” as the branch name.
$ git checkout -b feature
Switched to new branch 'feature'
As you can see, by using the “git checkout” command, you are creating a new branch and you are switching to this new branch automatically.
But what if you wanted to create a Git branch without switching to the new branch automatically?
Create Git Branch without switching
In order to create a new Git branch, without switching to this new branch, you have to use the “git branch” command and specify the name of the Git branch to be created.
$ git branch <branch_name>You can later on switch to your new Git branch by using the “git checkout” function.
$ git checkout <branch_name>Going back to our previous example, let’s say that you want to create a branch named “feature”.
$ git branch featureYou can inspect existing branches by running the “git branch” command with the “-a” option for all branches.
$ git branch -a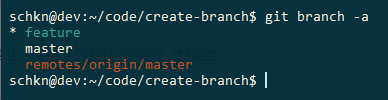
Awesome, you have successfully created a new Git branch and you switched to it using the checkout command.
Create Git Branch from Commit
In the last sections, we have seen how you can create a new Git branch from the HEAD commit of the current branch.
In some cases, you want to create a Git branch from a specific commit in your Git history.
In order to create a Git branch from a commit, use the “git checkout” command with the “-b” option and specify the branch name as well as the commit to create your branch from.
$ git checkout -b <branch_name> <commit_sha>Alternatively, you can use the “git branch” command with the branch name and the commit SHA for the new branch.
$ git branch <branch_name> <commit_sha>Going back to our previous example, let’s say that you want to create a Git branch from a specific commit in your Git history.
To get commits SHA from your history, you have to use the “git log” with the “–oneline” option.
$ git log --oneline --graph

* 9127753 (HEAD -> master) Commit 3
* f2fcb99 Commit 2
* cab6e1b (origin/master) master : initial commit
To create a new Git branch from the second commit (f2fcb99), you would run the following command
$ git checkout -b feature f2fcb99
Switched to a new branch named 'feature'
Using the “git log” command, you can verify that your branch was created from the second commit of your history.
$ git log --oneline --graph

* f2fcb99 (HEAD -> feature) Commit 2
* cab6e1b (origin/master) master : initial commit
Awesome, you have successfully created a new Git branch from a specific commit!
Create Git Branch from Tag
In previous tutorials, we have seen that Git tags are pretty useful : they can be use as reference points in your development.
As a consequence, it can be quite useful to create Git branches from existing tags.
In order to create a new Git branch from a tag, use the “git checkout” command with the “-b” option and specify the branch name as well the tag name for your new branch.
$ git checkout -b <branch_name> <tag_name>Alternatively, if you don’t want to switch to your new branch, you can use the “git branch” with the branch name and the tag name.
$ git branch <branch_name> <tag_name>Back to our previous example, let’s say that you want to create a new Git branch from a tag named “v1.0” in your history.
In order to list your existing tags, you can use the “git tag” command. Alternatively, you can use the “git log” command to identify a tag associated with a commit.
$ git tag
v1.0
Now that you have identified your tag, you can create a new branch from it using the “git checkout” command.
$ git checkout -b feature v1.0Next, you can inspect your Git history in order to make sure that your new branch was indeed created from the tag.

Alternatively, you could have used the “git branch” in order to create this branch.
$ git branch feature v1.0Note on Ambiguous Names
When you are creating new Git objects (whether they are branches, tags or commits), you might run into this error
fatal: Ambiguous object name: <object>So why does this error happens?
This exception occurs whenever two objects are named in the exact same way : a branch and a tag for example.
Whenever you are running a command involving one of those objects, Git can not tell the difference between the two and it returns this exception.
You might run into this error when running the “checkout” command.
If you are creating a new branch from a tag named “v1.0”, but one of your branches is already named “v1.0”, you will be presented with this error
$ git checkout -b feature v1.0
warning: refname 'v1.0' is ambiguous.
warning: refname 'v1.0' is ambiguous.
fatal: Ambiguous object name: 'v1.0'.
In order to solve this issue, you have to specify that your last argument is a tag and not the branch name.
To solve ambiguous notation, simply append the refs notation to the object that is ambiguous
$ git checkout -b feature refs/tags/v1.0
Switched to a new branch 'feature'
Conclusion
In this tutorial, you learnt how you can easily create Git branches using the “git checkout” command.
You also learnt that you can the “git branch” command if you don’t want to switch automatically to your new branch.
Finally, you have seen more advanced use-cases : creating branches from specific commits or from specific tags in your Git history.
Curious about Git, you can check our latest tutorials :
If you are interested in Git or in software engineering, we have a complete section dedicated to it on the website, so make sure to check it out!

3 comments
[…] Monitoring Linux Processes using Prometheus and Grafana How To Create Git Tags How To Create a Git Branch Network Manager on Linux with Examples Docker Exec Command With Examples How To Undo Last Git […]
[…] How To Create a Git Branch […]
[…] the destination branch does not exist, you have to specify the “-c” option (for “create branch“), otherwise you will get an error message when switching to that […]