
Effectively navigating the command line is an essential skill for Linux users. In this article we will show you how to use pushd and popd. These tools allow you to add, remove and recall directories from the stack. You can then use this directory stack as an efficient way to navigate directories.
The directory stack is a history of previous visited directories. You can push a directory (pushd) into the stack. Or you can pop (popd) a directory out of the stack. Building the stack can come in handy when working with long directories. It also allows you to easily jump back to a starting point after navigating to several directories. Let's take a look at the pushd, popd and dirs commands, then some examples and interesting use cases.
NOTE: The functionality discussed below is based on the Bash implementation of pushd and popd.
Table of Contents
Using pushd to Add Directories to the Stack
When you use pushd the shell adds the directory to the top of the stack, and moves you into that directory.
[savona@putor ~]$ pushd ~/Desktop
~/Desktop ~
[savona@putor Desktop]$
Now our directory stack has ~ (our home directory) and ~/Desktop in it. It's much easier to understand the stack when using dirs -v.
[savona@putor Desktop]$ dirs -v
 0  ~/Desktop
 1  ~
Let's add more directories to our stack. As we use pushd to add directories, we will be moved into those directories and they will be added to the top of the stack.
[savona@putor Desktop]$ pushd ~/Videos
~/Videos ~/Desktop ~
[savona@putor Videos]$ pushd ~/Music
~/Music ~/Videos ~/Desktop ~
[savona@putor Music]$ pushd ~/Documents
~/Documents ~/Music ~/Videos ~/Desktop ~
[savona@putor Documents]$ dirs -v
 0  ~/Documents
 1  ~/Music
 2  ~/Videos
 3  ~/Desktop
 4  ~
Using pushd without any arguments will send you to the second directory in the stack. Similar to how cd - takes you to the last directory you were in. It also will move the first directory (position 0) to the second slot (position 1).
[savona@putor Documents]$ dirs
~/Documents ~/Music ~/Videos ~/Desktop ~

[savona@putor Documents]$ pushd
~/Music ~/Documents ~/Videos ~/Desktop ~

[savona@putor Music]$ pushd
~/Documents ~/Music ~/Videos ~/Desktop ~
[savona@putor Documents]$
When you use the cd command to move to another directory it is also added to the stack. However, there is one major difference. When you use cd to navigate around directories the first entry in the stack will continually be overwritten. Whereas when you use pushd, it is added to the top of the stack pushing the rest down.
[savona@putor Documents]$ cd /usr/share/
[savona@putor share]$ dirs -v
 0  /usr/share
 1  ~/Music
 2  ~/Videos
 3  ~/Desktop
 4  ~
[savona@putor share]$ cd /opt
[savona@putor opt]$ dirs -v
 0  /opt
 1  ~/Music
 2  ~/Videos
 3  ~/Desktop
 4  ~
[savona@putor opt]$ pushd /var/tmp
/var/tmp /opt ~/Music ~/Videos ~/Desktop ~
[savona@putor tmp]$ dirs -v
 0  /var/tmp
 1  /opt
 2  ~/Music
 3  ~/Videos
 4  ~/Desktop
 5  ~
Adding a Directory to the Stack without Changing Directories
You can use the -n option to push a directory into the stack without changing to it.
[savona@putor Documents]$ pushd -n /usr/share
~/Documents /usr/share ~/Music ~/Videos ~/Desktop ~
[savona@putor Documents]$
The directory will be added to the second slot without your position in the file system changing. Remember, your current directory is always the first slot in the stack. This is why it pushes the directory to the second slot (number position 1).
Manipulating the Directory Stack with pushd
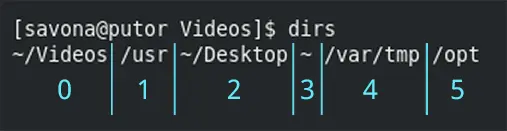
There are multiple ways you can manipulate the stack. You can rotate the stack from either direction using + and - symbols followed by the number position you want at the top (or beginning). Let's look at an example. This is a our current stack.
[savona@putor Videos]$ dirs
~/Videos /usr ~/Desktop ~ /var/tmp /opt
We can use pushd +4 to rotate the stack and place the fourth directory (counting from the left) at the beginning.
Now let's execute pushd +4 and see what happens.
[savona@putor Videos]$ dirs
~/Videos /usr ~/Desktop ~ /var/tmp /opt

[savona@putor Videos]$ pushd +4
/var/tmp /opt ~/Videos /usr ~/Desktop ~

[savona@putor tmp]$ pwd
/var/tmp
As you can see, using pushd +4 did not add a directory, it simply rotated the stack to put the fourth entry in spot zero. It also moved us into that directory, which is the default behavior.
If you use the - symbol with pushd it does the same thing. But when using the minus symbol, it counts the directories in reverse order (the last directory in the stack being zero).
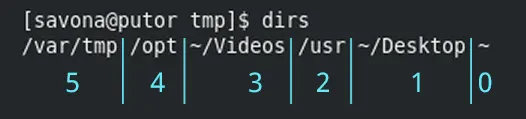
Here is an example using the - sign.
[savona@putor tmp]$ dirs
/var/tmp /opt ~/Videos /usr ~/Desktop ~

[savona@putor tmp]$ pushd -2
/usr ~/Desktop ~ /var/tmp /opt ~/Videos

[savona@putor usr]$ pwd
/usr
Removing Directories From the Stack Using popd
The popd commands basic function is to remove directories from the stack. It's syntax and operations are similar to pushd, but it behaves a little differently.
When using popd without any arguments, it removes the first directory from the stack and moves you to the second (which is now the new top directory in the stack).
[savona@putor Documents]$ dirs
~/Documents /usr/share ~/Music ~/Videos ~/Desktop ~

[savona@putor Documents]$ popd
/usr/share ~/Music ~/Videos ~/Desktop ~

[savona@putor share]$ pwd
/usr/share
You can use the -n option to suppress the directory change.
[savona@putor share]$ dirs
/usr/share ~/Music ~/Videos ~/Desktop ~

[savona@putor share]$ popd -n
/usr/share ~/Videos ~/Desktop ~
The results of using the -n option with popd is not so obvious. The end result is it removes the second directory in the stack.
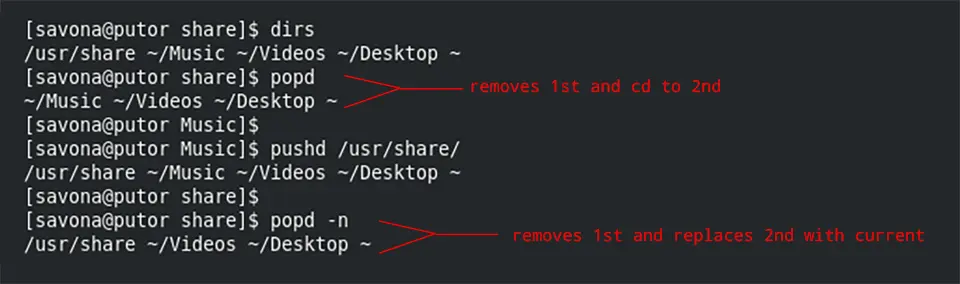
It is actually doing the same thing as it would without the -n options. But since we requested not to be moved, it places the current directory back in the first slot. Remember, the current directory is always first (or top) of the stack.
Manipulating the Directory Stack with popd
The + and - options are available with popd as well. However, the difference with popd is you will NOT be moved into the directory. It will simply remove the directory in that slot from the stack.
[savona@putor share]$ dirs
/usr/share ~/Music ~/Videos ~/Desktop ~

[savona@putor share]$ popd +1
/usr/share ~/Videos ~/Desktop ~

[savona@putor share]$ pwd
/usr/share
The same holds true when using the - option:
[savona@putor share]$ dirs
/usr/share ~/Videos ~/Desktop ~

[savona@putor share]$ popd -1
/usr/share ~/Videos ~
Viewing the Directory Stack
Now that we talked about adding and removing directories from the stack, let's talk about viewing (and clearing) the stack. The dirs command allows you to view the current stack.
[savona@putor ~]$ dirs
~
The current working directory is always the first in the stack. The stack will not grow until you use pushd.
[savona@putor ~]$ cd ~/Videos
[savona@putor Videos]$ dirs
~/Videos
[savona@putor Videos]$ cd ~/Pictures
[savona@putor Pictures]$ dirs
~/Pictures
[savona@putor Pictures]$ cd ~/Desktop
[savona@putor Desktop]$ dirs
~/Desktop
Let's take a look at the dirs command options.
Print Number Position for Each Directory in the Stack
To see a verbose listing of the stack, including their number position, use dirs -v command.
[savona@putor Desktop]$ dirs -v
 0  ~/Desktop
Using the -v options to show the number positions becomes more important as your stack grows. It also make it easy to jump to any position in the stack using the number position (more on that later).
TIP: You can create an alias so dirs always uses the -v options.
alias dirs='dirs -v'To learn more about creating aliases (and how to make them permanent) read "Using Aliases to Quickly Execute Commands".
Remove Tilde Prefix for Directories in Stack
By default the dirs command will print the tilde in place of your home directory. You can change this behavior by using the -l option.
[savona@putor Music]$ dirs
~/Music ~/Videos ~/Documents /usr/share

[savona@putor Music]$ dirs -l
/home/savona/Music /home/savona/Videos /home/savona/Documents /usr/share
Clearing the Directory Stack
You can clear the directory stack by using the dirs -c command.
[savona@putor Videos]$ dirs -v
 0  ~/Videos
 1  ~/Pictures
 2  ~/Videos
 3  ~/Documents
 4  ~
[savona@putor Videos]$ dirs -c

[[savona@putor Videos]$ dirs -v
 0  ~/Videos
Remember the current directory is always the first in the stack. When you clear the stack, a new one is created and the current directory starts the new stack.
Using the Directory Stack with other Commands
The directories in your stack can be referenced by other commands. You can use the tilde '~' followed by the number position of the directory as a shortcut. For example, let's say you had the following stack.
[savona@putor ~]$ dirs -v
 0  ~
 1  ~/Documents
 2  ~/Music
 3  ~/Videos
 4  ~/Pictures
You can now reference the ~/Videos directory as ~3 on the command line.
[savona@putor ~]$ ls ~3
2019-11-07_19-54-02.mkv  2019-11-07_19-57-53.mkv
2019-11-07_19-55-48.mkv  2019-11-07_20-00-05.mkv
It works with most commands and comes in handy when working with a lot of long directory paths.
[savona@putor ~]$ touch ~1/test.txt

[savona@putor ~]$ mv ~1/test.txt ~3

[savona@putor ~]$ ls ~3
2019-11-07_19-54-02.mkv  2019-11-07_19-57-53.mkv  test.txt
2019-11-07_19-55-48.mkv  2019-11-07_20-00-05.mkv
Interesting Uses for pushd and popd
The pushd and popd commands are used for navigating the Linux directory structure. I have a fellow co-worker who swears by it. He uses it so much that he instinctively knows where he will be when issuing one of the commands (me... not so much).
Personally I find using pushd and popd a but clumsy for everyday use. However, there are some situations where it could save you a lot of keystrokes. It hasn't been around all these years (and ported to every OS known to man) for no reason. Anyway, here are a few interesting ways I have seen it used.
Use The Directory Stack as a Path Warehouse
I have mentioned "Bob the UNIX admin" before in my articles. He was 71 when he retired and taught me a ton of good tricks before he did. He used pushd to create a warehouse of paths that he could quickly reference.
Let's say you had a few directories that you use quite often. You could add them to your .bashrc file like so:
pushd ~/Documents/Putorius/Articles/Drafts > /dev/null
pushd ~/Documents/Recipes > /dev/null
pushd ~ > /dev/null
Now every shell you open will have the following contents in the stack.
[savona@putor ~]$ dirs -v
 0  ~
 1  ~/Documents/Recipes
 2  ~/Documents/Putorius/Articles/Drafts
 3  ~
The interesting thing about this, is the directories you need are at position 1 & 2. This means that as long as you don't use pushd or popd they will never shift positions. You can always quickly reference them using ~1 and ~2 no matter where you are in the directory tree. Bob used this for so long it was second nature to him.
Set a Temporary Home Base with Pushd
Another convenient use for pushd it to create a temporary home base. Let's say you have a project you are working on. This project has a deep directory structure under it.
Project/
├── another
│   └── long
│       └── tree
└── then
    └── a
        └── really
            └── deep
                └── directory
If you are moving around inside this directory structure and need to go back to the base Projects folder it can be a pain. You can do cd ../../../.. or your can do cd /path/to/Projects which are both fine. However, if you cd into the base Projects folder and do pushd . it sets a new "home base". You can then use cd to navigate around and use popd to return to your base.
[savona@putor Project]$ pushd .
/var/tmp/Project /var/tmp/Project
[savona@putor Project]$ cd then/a/really/deep/directory/
[savona@putor directory]$ popd
/var/tmp/Project
[savona@putor Project]$ pwd
/var/tmp/Project
[savona@putor Project]$ pushd .
/var/tmp/Project /var/tmp/Project
[savona@putor Project]$ cd another/long/tree/
[savona@putor tree]$ popd
/var/tmp/Project
[savona@putor Project]$ pwd
/var/tmp/Project
Once you use popd to get back to your temporary home base, you will have to issue pushd . again to re-set it.
Wrap Up
In this article we discussed how to use the directory stack to aid navigation through the Linux filesystem on the command line. We used pushd to add paths to the directory stack and popd to remove them. We also learned how to use the dirs command to view and clear the stack.
Pushd and popd are kind of obscure these days. You don't often see people using them to navigate a filesystem. They are still occasionally used in Bash scripts. However, because of the way to function they can be used in interesting ways.