


Ansible is a great automation tool for system and network engineers, with Ansible we can automate small network to a large scale enterprise network. I have been using Ansible to automate both Aruba, and Cisco switches from my Fedora powered laptops for a couple of years. This article covers the requirements and executing a couple of playbooks.
Configuring Ansible
If Ansible is not installed, it can be installed using the command below
$ sudo dnf -y install ansible
Once installed, create a folder in your home directory or a directory of your preference and copy the ansible configuration file. For this demonstration, I will be using the following.
$ mkdir -pv /home/$USER/network_automation
$ sudo cp -v /etc/ansible.cfg /home/$USER/network_automation
$ cd /home/$USER/network_automation
$ sudo chown $USER:$USER ansible.cfg && chmod 0600 ansible.cfg
To prevent lengthy commands from failing, edit the ansible.cfg and append the following lines. We must add the persistent connection and set the desired time in seconds for the command_timeout as demonstrated below. A use case where this is useful is when you are performing backups of a network device that has a lengthy configuration.
$ vim ansible.cfg
[persistent_connection]
command_timeout = 300
connection_timeout = 30
Requirements
If SELinux is enabled, you will need to install SELinux binding, which is required when using the copy module.
# Install SELinux bindings
$ sudo dnf -y install python3-libselinux python3-libsemanage
Creating the inventory
The inventory holds the names of the network assets, and grouping of the assets are in square brackets [], below is a sample inventory.
[site_a]
Core_A ansible_host=192.168.122.200
Distro_A ansible_host=192.168.122.201
Distro_B ansible_host=192.168.122.202
Group vars can be used to address the common variables, for example, credentials, network operating system, and so on. Ansible document on inventory provides additional details.
Playbook
Playbooks are Ansible’s configuration, deployment, and orchestration language. They can describe a policy you want your remote systems to enforce, or a set of steps in a general IT process. Ansible Playbook
Read Operations
Let us create a simple playbook to run a show command to read the configuration on a few switches.
  1 ---
  2 - name: Basic Playbook
  3   hosts: site_a
  4   connection: local
  5
  6   tasks:
  7   - name: Get Interface Brief
  8     ios_command:
  9       commands:
 10         - show ip interface brief | e una
 11     register: interfaces
 12
 13   - name: Print results
 14     debug:
 15       msg: "{{ interfaces.stdout[0] }}
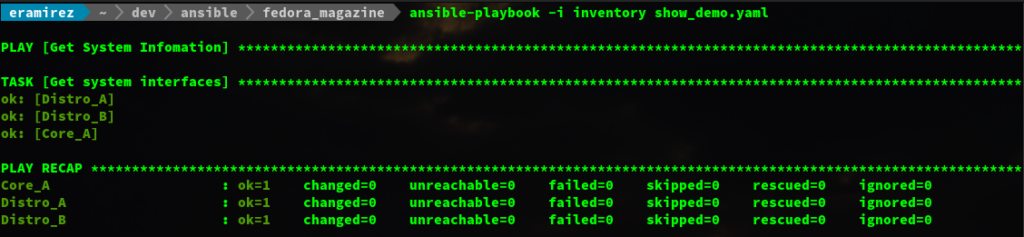
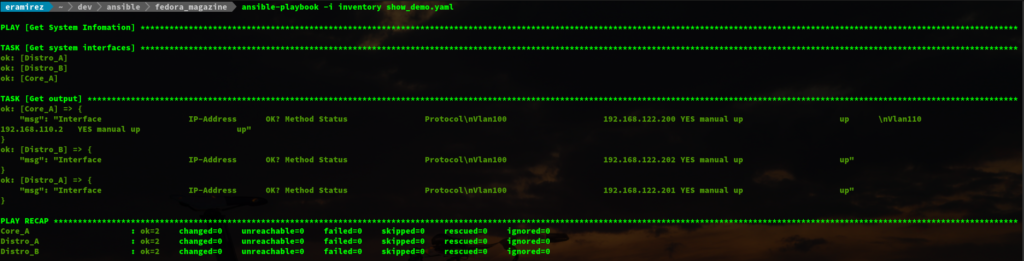
The above images show the differences without and with the debug module respectively.
Let’s break the playbook into three blocks, starting with lines 1 to 4.
- The three dashes/hyphens starts the YAML document
- The hosts defines the hosts or host groups, multiple groups are comma-separated
- Connection defines the methodology to connect to the network devices. Another option is network_cli (recommended method) and will be used later in this article. See IOS Platform Options for more details.
Lines 6 to 11 starts the tasks, we will be using ios_command and ios_config. This play will execute the show command show ip interface brief | e una and save the output from the command into the interfaces variable, with the register key.
Lines 13 to 15, by default, when you execute a show command you will not see the output, though this is not used during automation. It is very useful for debugging; therefore, the debug module was used.
The below video shows the execution of the playbook. There are a couple of ways you can execute the playbook.
- Passing arguments to the command line, for example, include -u <username> -k to prompt for the remote user credentials
ansible-playbook -i inventory show_demo.yaml -u admin -k
- Include the credentials in the host or group vars
ansible-playbook -i inventory show_demo.yaml
Never store passwords in plain text. We recommend using SSH keys to authenticate SSH connections. Ansible supports ssh-agent to manage your SSH keys. If you must use passwords to authenticate SSH connections, we recommend encrypting them with Using Vault in Playbooks
If we want to save the output to a file, we will use the copy module as shown in the playbook below. In addition to using the copy module, we will include the backup_dir variable to specify the directory path.
---
- name: Get System Infomation
  hosts: site_a
  connection: network_cli
  gather_facts: no

  vars:
    backup_dir: /home/eramirez/dev/ansible/fedora_magazine

  tasks:
  - name: get system interfaces
    ios_command:
      commands:
        - show ip int br | e una
    register: interface

  - name: Save result to disk
    copy:
      content: "{{ interface.stdout[0] }}"
      dest: "{{ backup_dir }}/{{ inventory_hostname }}.txt"
To demonstrate the use of variables in the inventory, we will use plain text. This method Must not be used in production.
[site_a]
Core_A ansible_host=192.168.122.200
Distro_A ansible_host=192.168.122.201
Distro_B ansible_host=192.168.122.202
[all:vars]
ansible_connection=network_cli
ansible_network_os=ios
ansible_user=admin
ansible_password=fedora
ansible_become=yes
ansible_become_password=yes
ansible_become_method=enable
Write Operations
In the previous section, we saw that we could get information from the network devices; in this section, we will write (add/modify) the configuration on these network devices. To make changes to the network device, we will be using the ios config module.
Let us create a playbook to configure a couple of interfaces in all of the network devices in site_a. We will first take a backup of the current configuration of all devices in site_a. Lastly, we will save the configuration.
---
- name: Get System Infomation
  hosts: site_a
  connection: network_cli
  gather_facts: no

  vars:
    backup_dir: /home/eramirez/dev/ansible/fedora_magazine

  tasks:
  - name: Backup configs
    ios_config:
      backup: yes
      backup_options:
        filename: "{{ inventory_hostname }}_running_cfg.txt"
        dir_path: "{{ backup_dir }}"

  - name: get system interfaces
    ios_config:
      lines:
        - description Raspberry Pi
        - switchport mode access
        - switchport access vlan 100
        - spanning-tree portfast
        - logging event link-status
        - no shutdown
      parents: "{{ item }}"
    with_items:
      - interface FastEthernet1/12
      - interface FastEthernet1/13

  - name: Save switch configuration
    ios_config:
      save_when: modified
Before we execute the playbook, we will first validate the interface configuration. We will then run the playbook and confirm the changes as illustrated below.
Conclusion
This article is a basic introduction to whet your appetite that demonstrates how Ansible is used to manage network devices. Ansible is capable of automating a vast network, which includes MPLS routing and performing validation before executing the next task.

Stuart Howlette
I would include a reference to other modules you can use for these tasks too.
For example, you can set descriptions, VLANs and switchport modes using ios_l2_interfaces – https://docs.ansible.com/ansible/latest/modules/ios_l2_interfaces_module.html
Presumably this post is just meant to be a simple introduction, but it’s worth adding this so people know that there is more to it than just being able to apply lines of config
Earl Ramirez
Thanks for your input, this is a basic introduction and I plan to write a couple more articles on the subject. In future I will include your recommendations.
Jonathan Levitt
Thank you for the practical network equipment configuration with Ansible. I did see a lot of the network modules are getting love in 2.5. Looking forward to experimenting with them. Jonathan from https://redbytesite.com
Esa Varemo
$ sudo chown $USER.$USER && chmod 0600 ansible.cfg
The
here is missing the file. Also should that be
?
Earl Ramirez
Good catch will update the article to reflect the complete code. Both colon and period work for chown; however, moving forward I will use the commands that are specified in the man pages.