


Nowadays, many open source projects offer container images for easy deployment. This is very handy when running a home server or lab environment. A previous Fedora Magazine article covered installing Nextcloud from the source package. This article explains how you can run Nextcloud on Fedora 33 as a container deployment with Podman.
What is Nextcloud?
Nextcloud started in 2016 as a fork of Owncloud. Since then, it evolved into a full-fledged collaboration software offering file-, calendar-, and contact-syncing, plus much more. You can run a simple Kanban Board in it or write documents collaboratively. Nextcloud is fully open source under the AGPLv3 License and can be used for private or commercial use alike.
What is Podman?
Podman is a container engine for developing, managing, and running OCI Containers on your Linux System. It offers a wide variety of features like rootless mode, cgroupv2 support, pod management, and it can run daemonless. Furthermore, you are getting a Docker compatible API for further development. It is available by default on Fedora Workstation and ready to be used.
In case you need to install podman, run:
sudo dnf install podman
Designing the Deployment
Every deployment needs a bit of preparation. Sure, you can simply start a container and start using it, but that wouldn’t be so much fun. A well-thought and designed deployment should be easy to understand and offer some kind of flexibility.
Container / Images
First, you need to choose the proper container images for the deployment. This is quite easy for Nextcloud, since it offers already a pretty good documentation for container deployments. Nextcloud supports two variations: Nextcloud Apache httpd (which is fully self-contained) and Nextcloud php-fpm (which needs an additional nginx container).
In both cases, you also need to provide a database, which can be MariaDB (recommended) or PostgreSQL (also supported). This article uses the Apache httpd + MariaDB installation.
Volumes
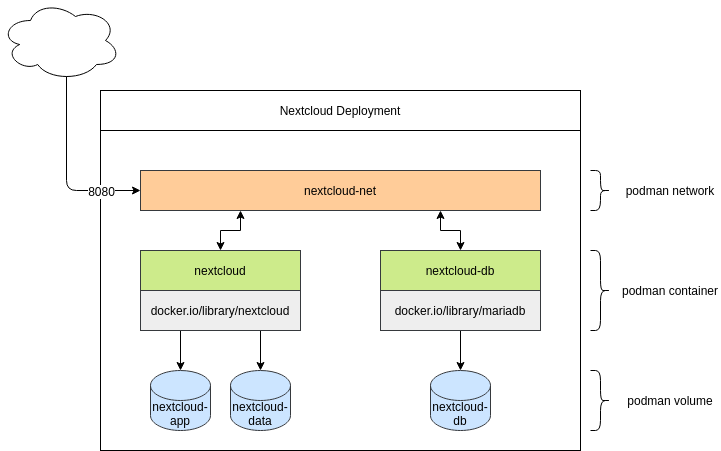
Running a container does not persist data you create during the runtime. You perform updates by recreating the container. Therefore, you will need some volumes for the database and the Nextcloud files. Nextcloud also recommends you put the “data” folder in a separate volume. So you will end up with three volumes:
- nextcloud-app
- nextcloud-data
- nextcloud-db
Network
Lastly, you need to consider networking. One of the benefits of containers is that you can re-create your deployment as it may look like in production. Network segmentation is a very common practice and should be considered for a container deployment, too. This tutorial will not add advanced features like network load balancing or security segmentation. You will need only one network which you will use to publish the ports for Nextcloud. Creating a network also provides the dnsname plugin, which will allow container communication based on container names.
The picture
Now that every single element is prepared, you can put these together and get a really nice understanding of how the development will look.
Run, Nextcloud, Run
Now you have prepared all of the ingredients and you can start running the commands to deploy Nextcloud. All commands can be used for root-privileged or rootless deployments. This article will stick to rootless deployments.
Sart with the network:
# Creating a new network
$ podman network create nextcloud-net

# Listing all networks
$ podman network ls

# Inspecting a network
$ podman network inspect nextcloud-net
As you can see in the last command, you created a DNS zone with the name “dns.podman”. All containers created in this network are reachable via “CONTAINER_NAME.dns.podman”.
Next, optionally prepare your volumes. This step can be skipped, since Podman will create named volumes on demand, if they do not exist. Podman supports named volumes, which it creates in special locations, so you don’t need to take care of SELinux or alike.
# Creating the volumes
$ podman volume create nextcloud-app
$ podman volume create nextcloud-data
$ podman volume create nextcloud-db

# Listing volumes
$ podman volume ls

# Inspecting volumes (this also provides the full path)
$ podman volume inspect nextcloud-app
Network and volumes are done. Now provide the containers.
First, you need the database. According to the MariaDB image documentation, you need to provide some additional environment variables,. Additionally, you need to attach the created volume, connect the network, and provide a name for the container. Most of the values will be needed in the next commands again. (Note that you should replace DB_USER_PASSWORD and DB_ROOT_PASSWORD with unique passwords.)
# Deploy Mariadb
$ podman run --detach
  --env MYSQL_DATABASE=nextcloud
  --env MYSQL_USER=nextcloud
  --env MYSQL_PASSWORD=DB_USER_PASSWORD
  --env MYSQL_ROOT_PASSWORD=DB_ROOT_PASSWORD
  --volume nextcloud-db:/var/lib/mysql
  --network nextcloud-net
  --restart on-failure
  --name nextcloud-db
  docker.io/library/mariadb:10

# Check running containers
$ podman container ls
After the successful start of your new MariaDB container, you can deploy Nextcloud itself. (Note that you should replace DB_USER_PASSWORD with the password you used in the previous step. Replace NC_ADMIN and NC_PASSWORD with the username and password you want to use for the Nextcloud administrator account.)
# Deploy Nextcloud
$ podman run --detach
  --env MYSQL_HOST=nextcloud-db.dns.podman
  --env MYSQL_DATABASE=nextcloud
  --env MYSQL_USER=nextcloud
  --env MYSQL_PASSWORD=DB_USER_PASSWORD
  --env NEXTCLOUD_ADMIN_USER=NC_ADMIN
  --env NEXTCLOUD_ADMIN_PASSWORD=NC_PASSWORD
  --volume nextcloud-app:/var/www/html
  --volume nextcloud-data:/var/www/html/data
  --network nextcloud-net
  --restart on-failure
  --name nextcloud
  --publish 8080:80
  docker.io/library/nextcloud:20

# Check running containers
$ podman container ls
Now that the two containers are running, you can configure your containers. Open your browser and point to “localhost:8080” (or another host name or IP address if it is running on a different server).
The first load may take some time (30 seconds) or even report “unable to load”. This is coming from Nextcloud, which is preparing the first run. In that case, wait a minute or two. Nextcloud will prompt for a username and password.

Enter the user name and password you used previously.

Now you are ready to go and experience Nextcloud for testing, development ,or your home server.
Update
If you want to update one of the containers, you need to pull the new image and re-create the containers.
# Update mariadb
$ podman pull mariadb:10
$ podman stop nextcloud-db
$ podman rm nextcloud-db
$ podman run --detach
  --env MYSQL_DATABASE=nextcloud
  --env MYSQL_USER=nextcloud
  --env MYSQL_PASSWORD=DB_USER_PASSWORD
  --env MYSQL_ROOT_PASSWORD=DB_ROOT_PASSWORD
  --volume nextcloud-db:/var/lib/mysql
  --network nextcloud-net
  --restart on-failure
  --name nextcloud-db
  docker.io/library/mariadb:10
Updating the Nextcloud container works exactly the same.
# Update Nextcloud

$ podman pull nextcloud:20
$ podman stop nextcloud
$ podman rm nextcloud
$ podman run --detach
  --env MYSQL_HOST=nextcloud-db.dns.podman
  --env MYSQL_DATABASE=nextcloud
  --env MYSQL_USER=nextcloud
  --env MYSQL_PASSWORD=DB_USER_PASSWORD
  --env NEXTCLOUD_ADMIN_USER=NC_ADMIN
  --env NEXTCLOUD_ADMIN_PASSWORD=NC_PASSWORD
  --volume nextcloud-app:/var/www/html
  --volume nextcloud-data:/var/www/html/data
  --network nextcloud-net
  --restart on-failure
  --name nextcloud
  --publish 8080:80
  docker.io/library/nextcloud:20
That’s it; your Nextcloud installation is up-to-date again.
Conclusion
Deploying Nextcloud with Podman is quite easy. After just a couple of minutes, you will have a very handy collaboration software, offering filesync, calendar, contacts, and much more. Check out apps.nextcloud.com, which will extend the features even further.

Shyzus
Thanks a lot for this post/magazine entry! It is very useful and clear to follow.
However, how difficult would it be to have an SSL enabled instance of nextcloud 20 running within podman?
dschier
Hi,
thank you for reaching out. Setting up TLS encryption can be done in various ways. I am having a setup where traefik proxy is in front of the setup. I will check, if an article about this setup can be done during the next weeks 🙂
marc
a such article regarding a reverse proxy to handle the certificates is greatly appreciated ! Looking forward to reading the article.
icewreck
I usually use apache httpd or caddy to act as a reverse proxy for services hosted with podman.
laolux
Thanks for the nice article. Podman and Nextcloud sure are a great combination. Only thing I am missing here is tls encryption. As is, I would not recommend anyone to go and experience as their home server.
An alternative to podman network one can also put the containers in a common pod and then they can reach each other via localhost.
Updates can be simplified by creating containers with
. Then to update all you need to run is
.
And of course, podman offers thousands of more options such as resource control, but I think it was a good choice to keep this article focused on getting started.
dschier
Hi,
yep using pods is another way, but for me, it has some downsides like not being able to have multiple containers in one pod providing the same exposed port. Maybe I can arrange an article for the usage of pods on fedora in the coming weeks.
Regarding the
, this is true, if you also have a system service. This is also an option for a future article. For the time beeing, you can have a look here for a better explanation: https://www.redhat.com/sysadmin/improved-systemd-podman
laolux
Ah, yes, I did not run into that problem (yet). Due to the environment here I usually end up changing ports of the services anyways, but it could be quite interesting to use podman network instead.
About the auto-update: Thanks for pointing out the limitation. I heavily rely on systemd, so it did not occur to me that this would fail without it.
bhavin192
Thank you for sharing this tip, I just discovered this and the generate kube (mentioned by Elliott), play kube commands, I think I should take a look at the man pages of podman 🙂
Elliott
Nice. I’d also recommend passing the “–label=io.containers.autoupdate” on creation so later on you can run “podman auto-update” and have it do the update for you.
Afterwards once it’s running how I’d like, I would also then do “podman generate kube -s nextcloud -f nextcloud.yaml
dschier
Hi, unfortunately this is not 100% correct. “podman auto-update” only works, if the containers is also provided as systemd service. Otherwise podman is not able to fully automatically update running containers: https://www.redhat.com/sysadmin/improved-systemd-podman
I hope this clarifies the situation a bit. I hope to provide a proper guide in a future article.
Elliott
You are correct. I got distracted and submitted my comment before it was complete. I was going to suggest adding the label since that is needed at the time of deployment, adding a systemd unit, and also generating a kubeconfig to easily redeploy the stack.
Eric The IT Guy
Great article! I just deployed Nextcloud via Podman a couple weeks ago, it runs great!
I wanted to ask if there was an advantage to running these containers in a pod vs deploying into their own network?
Elliott
When you use a pod it deploys an infrastructure container and all containers in the pod use it’s network interface so it’s like they’re on a shared host. This makes it so you don’t need to create a separate network first.
Edmundo Paulino
How can I deploy with pod instead?
dschier
Putting a complete guide together is a bit too much for a comment, but you should be good to go with:
$ podman run --detach \
--env MYSQL_DATABASE=nextcloud \
--env MYSQL_USER=nextcloud \
--env MYSQL_PASSWORD=DB_USER_PASSWORD \
--env MYSQL_ROOT_PASSWORD=DB_ROOT_PASSWORD \
--volume nextcloud-db:/var/lib/mysql \
--restart on-failure \
--name nextcloud-db \
docker.io/library/mariadb:10
$ podman run --detach \
--env MYSQL_HOST=localhost \
--env MYSQL_DATABASE=nextcloud \
--env MYSQL_USER=nextcloud \
--env MYSQL_PASSWORD=DB_USER_PASSWORD \
--env NEXTCLOUD_ADMIN_USER=NC_ADMIN \
--env NEXTCLOUD_ADMIN_PASSWORD=NC_PASSWORD \
--volume nextcloud-app:/var/www/html \
--volume nextcloud-data:/var/www/html/data \
--restart on-failure \
--name nextcloud-app \
docker.io/library/nextcloud:20
But haven’t tested it actually. You should also have a look here: https://developers.redhat.com/blog/2019/01/15/podman-managing-containers-pods/
james
I couldn’t get nextcloud functioning properly inside a pod using these settings. I just got the nextcloud 500 message.
I want to make a collabora container visible to the nextcloud container, so that I can see the nextcloud collabora plugin functioning. Normally I’d do that using a pod to share localhost between the containers.
However, I am definitely going to read up about the podman network option, particularly after reading the comment that states that postgres risks security issues with localhost inside a pod.
I see that podman pod create has a network option. Perhaps I’ll try that.
Alternatively I can use the commands in the article, but the ease of use that accompanies using a pod, like starting, stopping, deleting etc means that I’ll continue to try and get a pod running.
james
Sorry, I ought to add, that the commands in the comment above need the –pod switch added, so that the containers will run in the network namespace of the pod.
dschier
I missed the an option in my example above. Both containers need:
additionally.
terminhell
Does it matter where in the flags?
dschier
Hi, at least for the above nextcloud installation there is no real advantage (operational wise) for using pods over networks or the other way around. The moment you extend the setup to nginx+php-fpm+redis+mariadb+cron+clamav+collabora you may run into pod limitations like “only one container is allowed to expose port 80”. Furthermore, you cannot manage pods via systemd for now.
laolux
Hi, I don’t quite understand your last comment. For me,
does generate nice systemd unit files for both the pod and the containers therein. And putting the files in ~/.config/systemd/user enables me to start the pod via systemd. It will automatically start the containers as well.
dschier
Hi, thanks for the response. I think “cannot manage pods” was a bit biased from my side and quite strong formulated. But, let me give an example. 🙂
$ podman container run -d --pod app01 --name web01 httpd
$ podman container run -d --pod app01 --name db01 mariadb
$ podman generate systemd --new --name app01
This will create a pod, with 2 containers in it and 3 unit files.
Putting new containers in this pod also means, that one has to generate the pod unit again. Publishing a port (which must be done on pod level) or attaching the pod to a new network also means, that all unit files must be re-created.
It gets even more interesting, if I run:
This will generate a systemd unit file attaching to the pod, but not having the Binds and After statements for the same, whereas the generate command for pods includes these statements for the containers.
For me, this is a lot of pain, and it is way easier to manage containers (without pods) via systemd. Some of these issues are known and will be fixed over time, I assume.
Don’t get me wrong there are also benefits like having a watchdog (in addition to systemd) or the way of using “localhost” to address containers in the pod.
For me it’s just not usable in the current state. 🙂
laolux
Thanks for your example. I usually regenerate the entire service units anyways, but that does not happen very often.
One thing I just became aware of is that having images accessing each other via “localhost” might have security implications. PostgreSQL apparently treats all connections from “localhost” as trusted and this has caused issues for people running PostgreSQL containers via rootless podman (which until recently changed all source IP address to 127.0.0.1). I assume the same issue would persist within pods.
So I will start using podman network from now, thanks for introducing that to me!
Carlos
With podman-compose now packaged by Fedora (since 31), it might be simpler to define complex container setups in a compose file.
dschier
There is even something better. With podman 3.0 you will have docker-compose compatibility 😉
https://podman.io/releases/2021/02/11/podman-release-v3.0.0.html
Elliott
Well currently you can generate a kubeconfig file once it’s running. Afterwards you can redeploy it with:
dschier
A very nice option, too 🙂 Especially, if you are used to kubernetes syntax.
Creak
Indeed, I think this would make a terrific second blog post! This one is very good to understand docker/podman, but when you need to run and maintain several services on your server, docker/podman-compose helps a lot! And it’s basically the same you did here, but in a yaml file.
George
Error
Error while trying to create admin user: Failed to connect to the database: An exception occurred in driver: SQLSTATE[HY000] [2002] php_network_getaddresses: getaddrinfo failed: Name or service not known
dschier
Hi, could you please elaborate the environment you are running in and where you can see this error? 🙂
George
Environment is CentOS.
I can see this error after first-time submitting login page with correct user/pass data.
Foivos
Hi George I had the same issue and solved it by installing the podman-plugins package.
You might also need to remove and create the podman network after installing it.
Mehdi
Nice article. Thanks.
Sampsonf
Thank you very much for the article.
I would like to know if special considerations are needed for backup / restore to the same/different host machine?
dschier
Hi,
taking backups works quite the same way as with regular nextcloud installations. A very easy option would be to:
stop the containers
inspect the actual path of named volumes (podman volume inspect VOLUMENAME)
copy/rsync the volumes mountpoints
There are other options, like running the official commands in the containers (podman exec -it CONTAINER COMMAND) and copy the generated backups afterwards. This will not need a downtime and can be automated via systemd timer or cron.
https://docs.nextcloud.com/server/20/admin_manual/maintenance/backup.html
james
I am unable to install the collabora code server inside the nextcloud install. I am guessing that it has something to do with the container network setup.
Rui Seabra
Data should never reside under /var/www/html, junt the nextcloud app.
dschier
Thanks for the feedback.
It is true, Nextcloud recommends adjusting it to another location, which can be done as below:
adjust the line “–volume nextcloud-data:ANOTHER_DIR \”
add “–env NEXTCLOUD_DATA_DIR=ANOTHER_DIR”
Simon Fink
This article is just great for people who want to run nextcloud locally. However, most of the times nextcloud will run on some server to be accessed from anywhere from the internet. I really would appreciate further instructions on how to setup httpd or nginx to deploy nextcloud on a server. This would help me a lot!
Don’t get me wrong, I really appreciate and like the articles of this magazine, but most of the time they leave me half way finished. Everything seems so easy and simple, well, unitl you need to puzzle together the rest of the steps required.
Frederik
I installed nextcloud on plain fedora 33 with the nginx plugin and only had to setup nginx to do https (use certbot). This was much easier than using podman, but currently the version in Fedora is version 19.
Sampsonf
I got the login prompt using Firefox to localhost:8080, but got below error:
Error
Error while trying to create admin user: Failed to connect to the database: An exception occurred in driver: SQLSTATE[HY000] [1045] Access denied for user ‘nextcloud’@’10.88.2.3’ (using password: YES)
Benson
Deploying nextcloud on my fedora server is great.
However the latest client is broken in wayland and Gnome, which is really a shame. Something that has forced me to use the older version 2.6.5 as an App Image (which means no autostart etc..).
Made a ticket, but there doesn’t seem to be a fix. https://help.nextcloud.com/t/nextcloud-client-behaving-strange-in-fedora-33-gnome/100772
I could of course just use Online Accounts in Gnome to access nextcloud, but that wouldn’t give me the option to sync local folders.
Hopefully this will get fixed at some point.
Ricardo Inacio
For some reason, it did not work for me in rootless mode. The most near the cause I could get is that I discovered that using a user defined network instead of the default was causing connection to break. When I tried in rootless mode but without defining a named network, it worked.
And also it worked with named network in rootfull mode.