
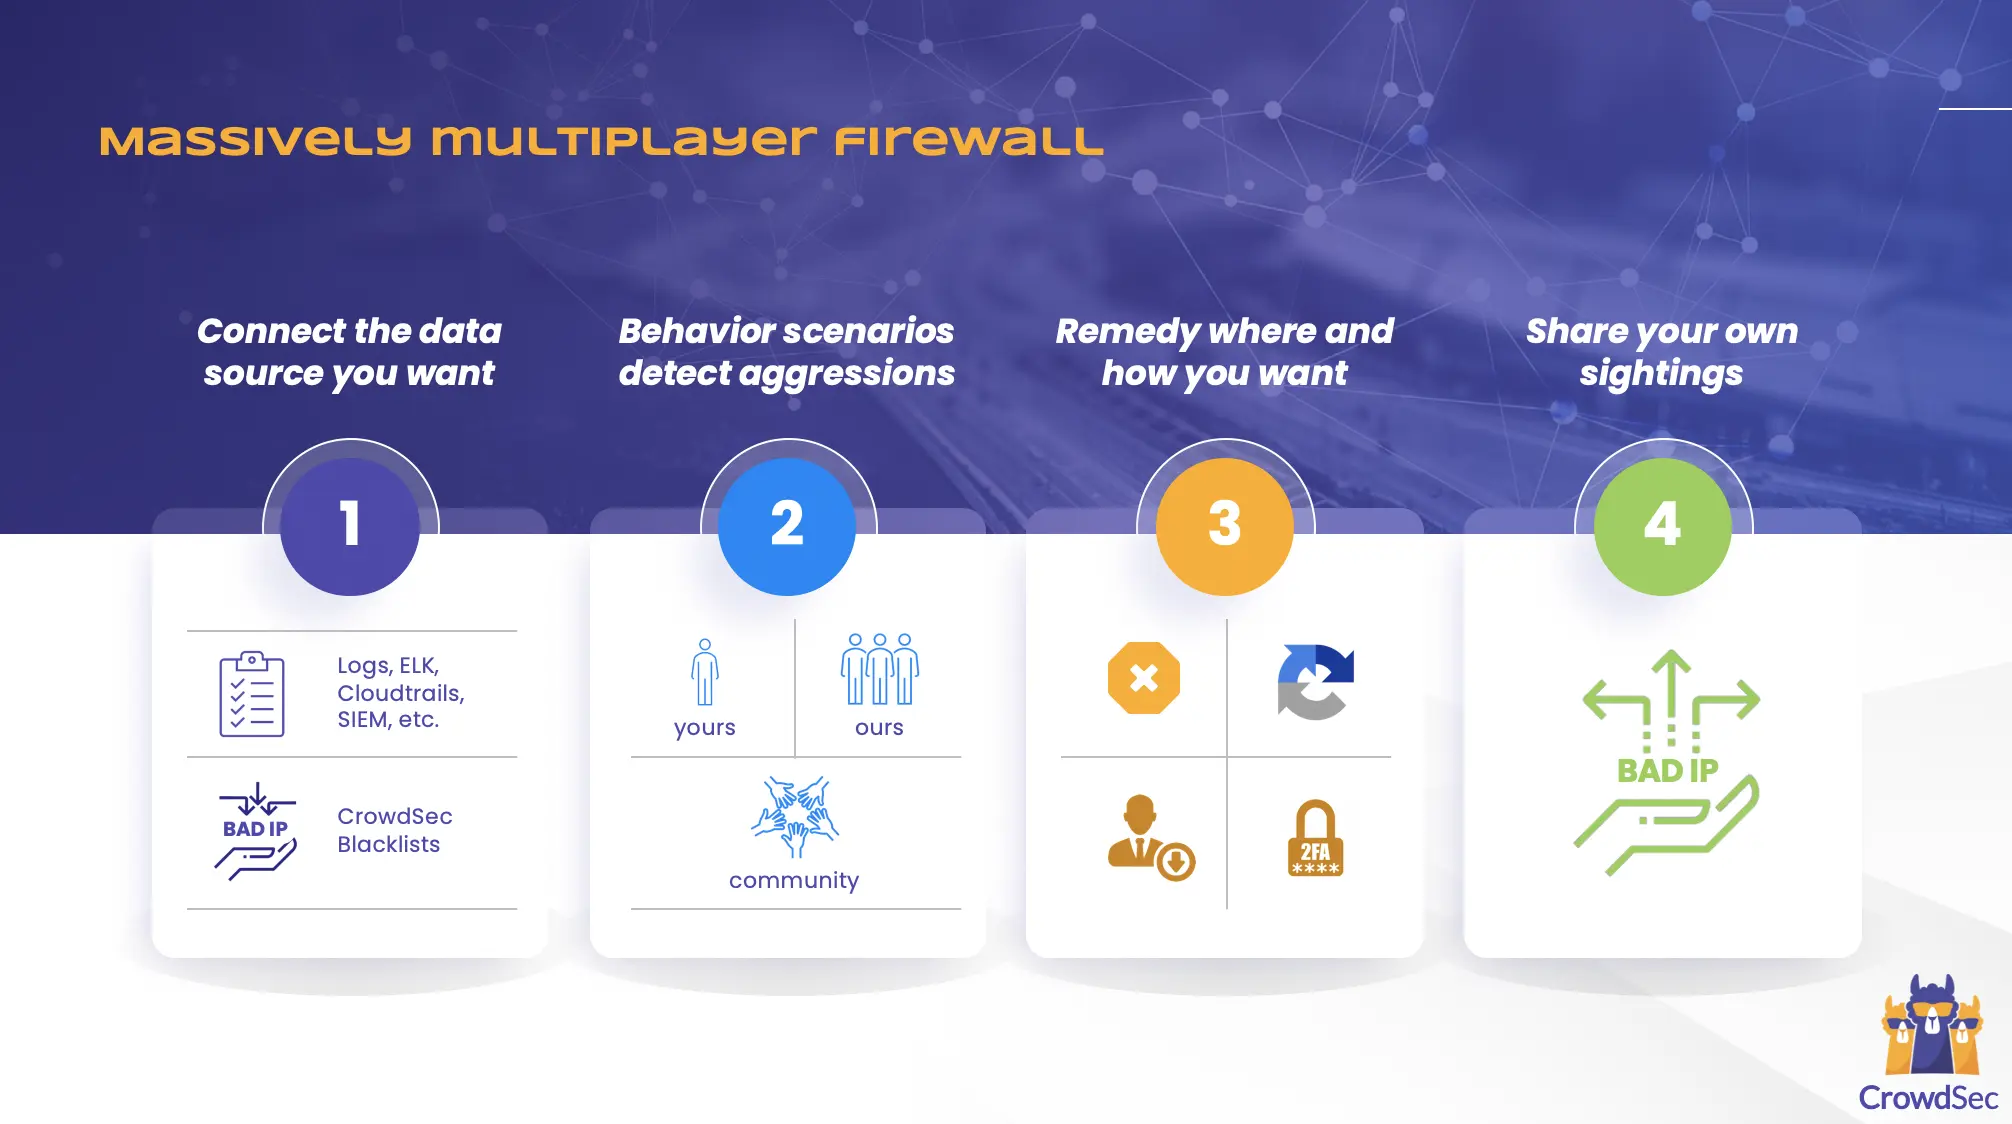
CrowdSec is a massively multiplayer firewall designed to protect Linux servers, services, containers, or virtual machines exposed on the internet with a server-side agent. It was inspired by Fail2Ban and aims to be a modernized, collaborative version of that intrusion-prevention tool.
CrowdSec is free and open source (under an MIT License), with the source code available on GitHub. It is using a behavior analysis system to qualify whether someone is trying to hack you, based on your logs. If your agent detects such aggression, the offending IP is then dealt with and sent for curation. If this signal passes the curation process, the IP is then redistributed to all users sharing a similar technological profile to “immunize” them against this IP.
The goal is to leverage the crowd power to create a real-time IP reputation database. As for the IP that aggressed your machine, you can choose to remedy the threat in any manner you feel appropriate. Ultimately, CrowdSec leverages the power of the crowd to create an extremely accurate IP reputation system that benefits all its users.
It was clear to the founders that open source was going to be one of the main pillars of CrowdSec. First because they have been working on open source projects for decades. They didn’t just jump on the train. They are strong open source believers. Second because the crowd is key to the mass hacking plague and open source is the best lever to create a community and have people bring their knowledge to contribute to the project and make it better.
The solution recently turned 1.x, introducing a major architectural change: the introduction of a local REST API.
Table of Contents
How CrowdSec Works
CrowdSec is written in Golang and was designed to run on modern, complex architectures such as clouds, lambdas, and containers. To achieve this, it's "decoupled," meaning you can "detect here" (e.g., in your database logs) and "remedy there" (e.g., in your firewall or rproxy).
The tool uses leaky buckets internally to allow for tight event control. Scenarios are written in YAML to make them as simple and readable as possible without sacrificing granularity. The inference engine lets you get insights from chain buckets or meta-buckets, meaning if several buckets (e.g., web scan, port scan, and login attempt failed) overflow into a "meta-bucket," you can trigger a "targeted attack" remediation.
Aggressive IPs are dealt with using bouncers. The CrowdSec Hub offers ready-to-use data connectors, bouncers (e.g., Nginx, PHP, Cloudflare, Netfilter), and scenarios to deter various attack classes. Bouncers can remedy threats in various ways.
It works on bouncers such as Captcha, limiting applicative rights, multi-factor authentication, throttling queries, or activating Cloudflare attack mode just when needed. You can get a sense of what's happening locally (and where it's occurring) with a lightweight visualization interface and strong Prometheus observability.
Crowdsourcing Security
While the software currently looks like a spruced up Fail2Ban, the goal is to leverage the power of the crowd to create a very accurate IP reputation database. When CrowdSec bounces a specific IP, the triggered scenario and the timestamp are sent to our API to be checked and integrated into the global consensus of bad IPs.
While we are already redistributing a blocklist to our community (you can see it by entering cscli ban list --api on the command line), we plan to really improve this part as soon as we have dealt with other prerequisite code lines. The network already has sightings of 100,000+ IPs (refreshed daily) and is able to redistribute ~10% (10,000) of those to our community members. The project has also been designed to be GDPR compliant and privacy respectful, both in technical and legal terms.
Our vision is that once the CrowdSec community is large enough, we will all generate, in real time, the most accurate IP reputation database available. This global reputation engine, coupled with local behavior assessment and remediation, should allow many businesses to achieve tighter security at a very low cost.
Getting Started with CrowdSec
The official release of CrowdSec v.1.0.X introduces several improvements to the previous version, including a major architectural change: the introduction of a local REST API.
This local API allows all components to communicate more efficiently to support more complex architectures, while keeping it simple for single-machines users. It also makes the creation of bouncers (the remediation component) much simpler and renders them more resilient to upcoming changes, which limits maintenance time.
In the new 1.0 release, the CrowdSec architecture is modeled as per below:
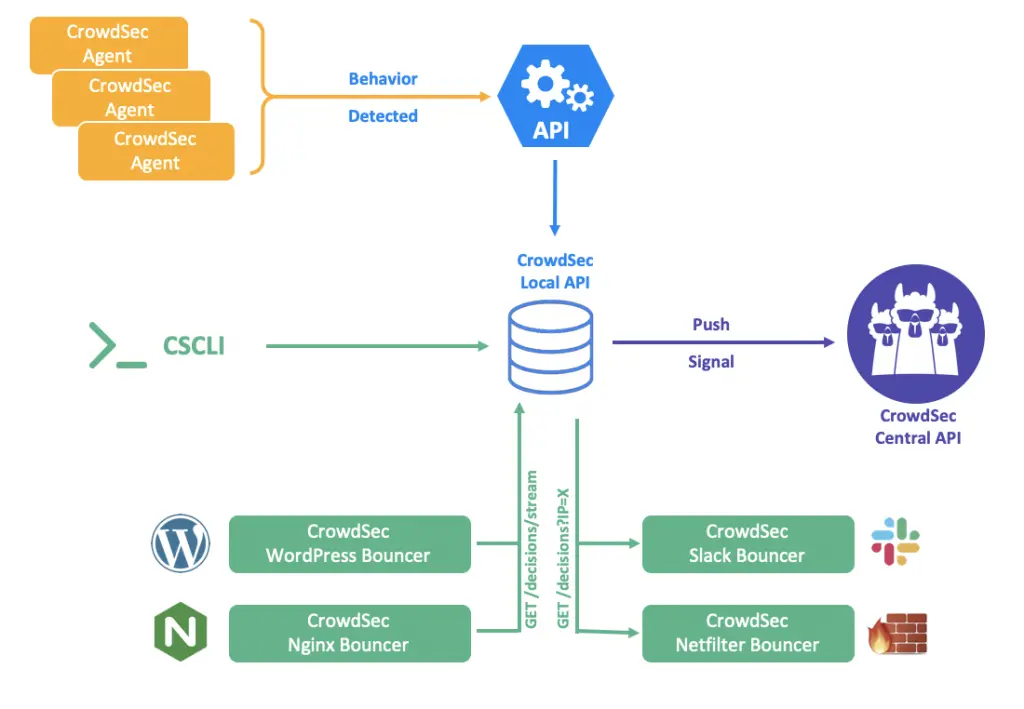
All CrowdSec components (the agent reading logs, cscli for humans, and bouncers to deter the bad guys) can now communicate via a REST API, instead of reading or writing directly in the database. With this new version, only the local API service will interact with the database (e.g. SQLite, PostgreSQL and MySQL).
In this tutorial, we are going to cover how to install and run CrowdSec on a Linux server:
- CrowdSec setup
- Testing detection capabilities
- Bouncer set up
- Observability
Set Up The Environment
The machine I used for this test is a Debian 10 Buster t2.medium EC2.
To make it more relevant, let’s start by installing nginx:
$ sudo apt-get update
$ sudo apt-get install nginx
Configure the security groups so that both secure shell (SSH) (tcp/22) and HTTP (tcp/80) can be reached from the outside world. This will be useful for simulating attacks later.
Install CrowdSec
Grab the latest version of CrowdSec:
$ curl -s https://api.github.com/repos/crowdsecurity/crowdsec/releases/latest | grep browser_download_url| cut -d '"' -f 4 | wget -i -You can also download it from our GitHub page.
Here is the installation process :
$ tar xvzf crowdsec-release.tgz
$ cd crowdsec-v1.0.0/
$ sudo ./wizard.sh -i
The wizard helps guide installation and configuration.
First, the wizard identifies services present on the machine.
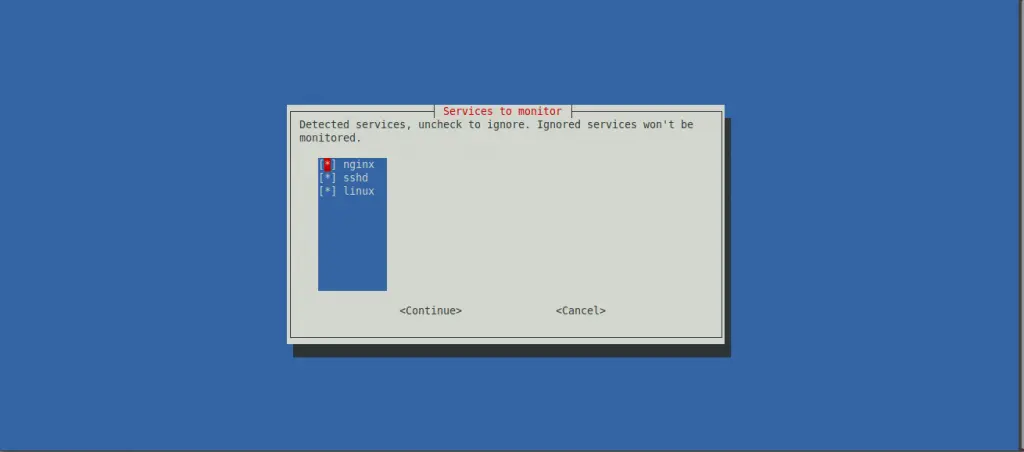
It allows you to choose which services to monitor. For this tutorial, go with the default option and monitor all three services: Nginx, SSHD, and the Linux system.
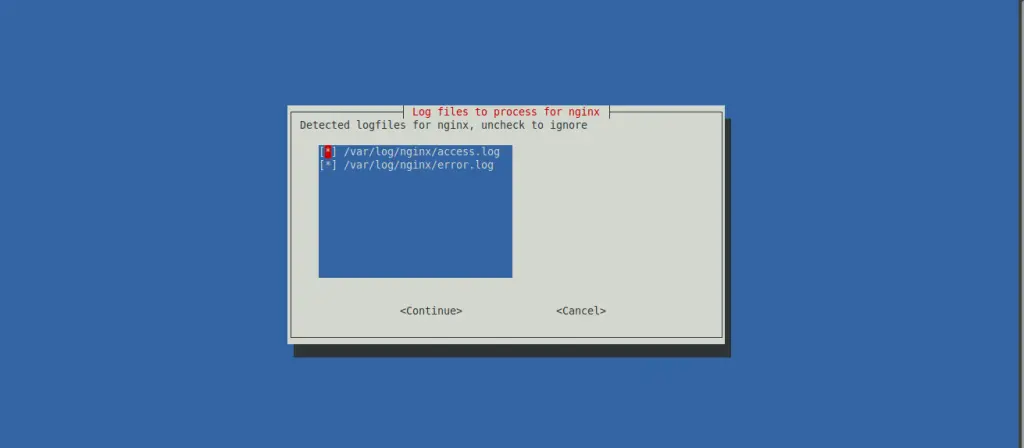
For each service, the wizard identifies the associated log files and asks you to confirm (use the defaults again):
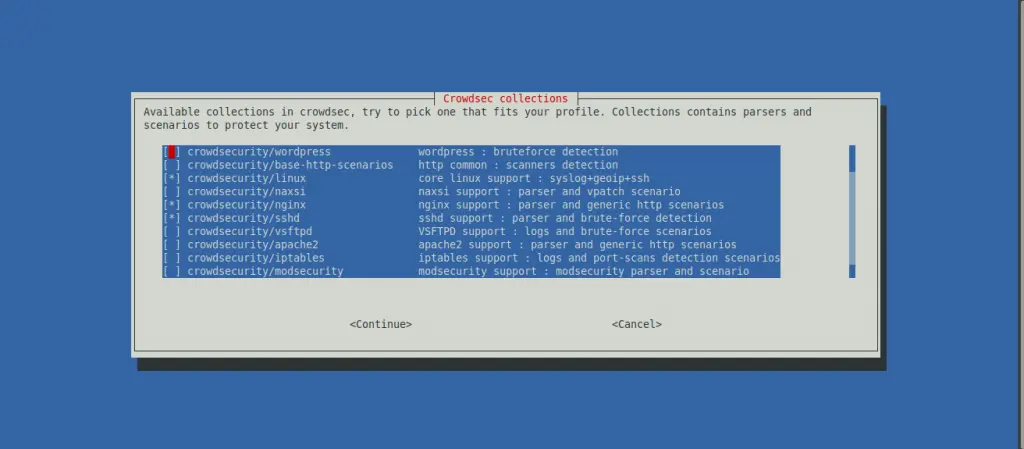
Once the services and associated log files have been identified correctly (which is crucial, as this is where CrowdSec will get its information), the wizard is prompts you with suggested collections.
A collection is a set of configurations that aims to create a coherent ensemble to protect a technological stack. For example, the crowdsecurity/sshd collection contains a parser for SSHD logs and a scenario to detect SSH bruteforce and SSH user enumeration.
The suggested collections are based on the services that you choose to protect.
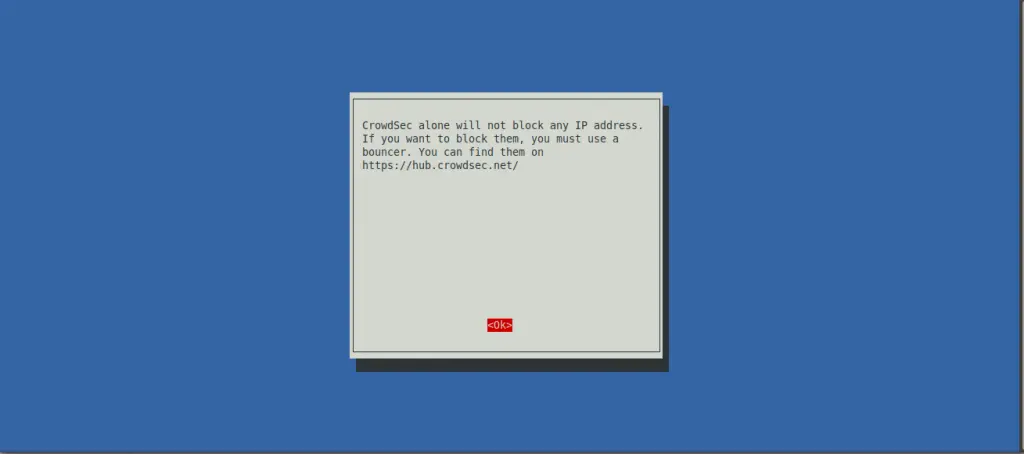
The wizard’s last step is to deploy generic whitelists to prevent banning private IP addresses. It also reminds you that CrowdSec will detect malevolent IP addresses but will not ban a any of them. You need to download a bouncer to block attacks.
This is an essential thing to remember: CrowdSec detects attacks; bouncers block them.
Now that the initial setup is done, CrowdSec should be up and running.

Deter Attacks with CrowdSec
By installing CrowdSec, you should already have coverage for common internet background noise. Check it out!
Attacking a Web Server with wapiti
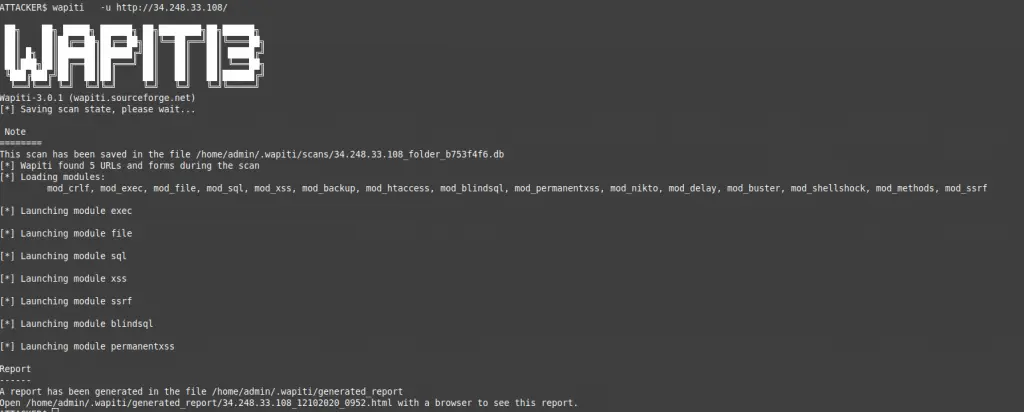
Simulate a web application vulnerability scan on your Nginx service using Wapiti, a web application vulnerability scanner. You need to do this from an external IP, and keep in mind that private IPs are whitelisted by default:
ATTACKER$ wapiti -u http://34.248.33.108/
[*] Saving scan state, please wait...

 Note
========
This scan has been saved in the file
/home/admin/.wapiti/scans/34.248.33.108_folder_b753f4f6.db
On your freshly equipped machine, we can see the attacks in the logs:
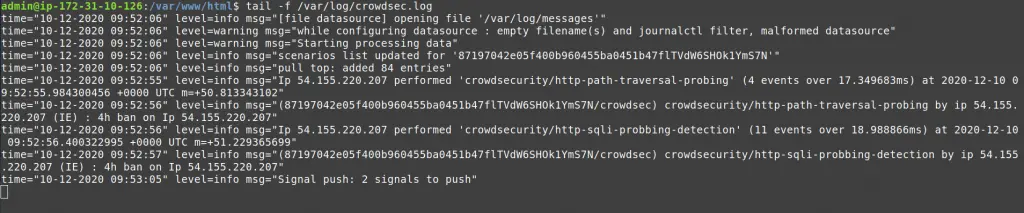
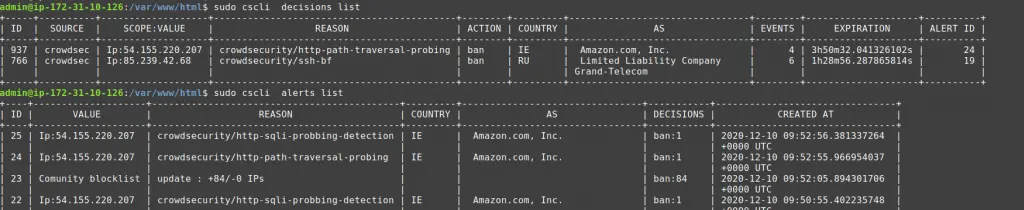
My IP triggered different scenarios :
- crowdsecurity/http-path-traversal-probing : detects path traversal probing attempts patterns in the URI or the GET parameters
- crowdsecurity/http-sqli-probbing-detection : detects obvious SQL injection probing attempts patterns in the URI or the GET parameters
Bear in mind that the website you attacked is an empty Nginx server. If this were a real website, the scanner would perform many other actions that would lead to more detections.
Checking Results with cscli
Cscli is one of the main tools for interacting with the CrowdSec service, and one of its features is visualizing active decisions and past alerts.
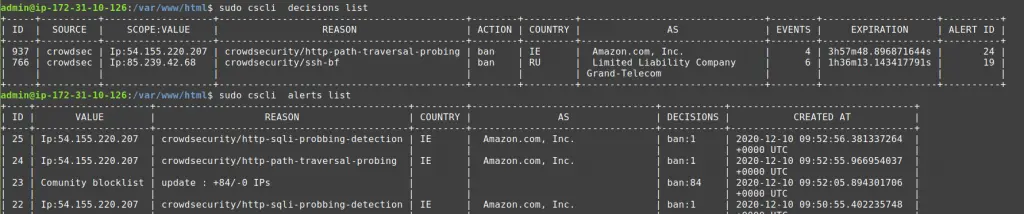
The cscli decisions list command displays active decisions at any time, while cscli alerts list shows past alerts (even if decisions are expired or the alert didn't lead to a decision).
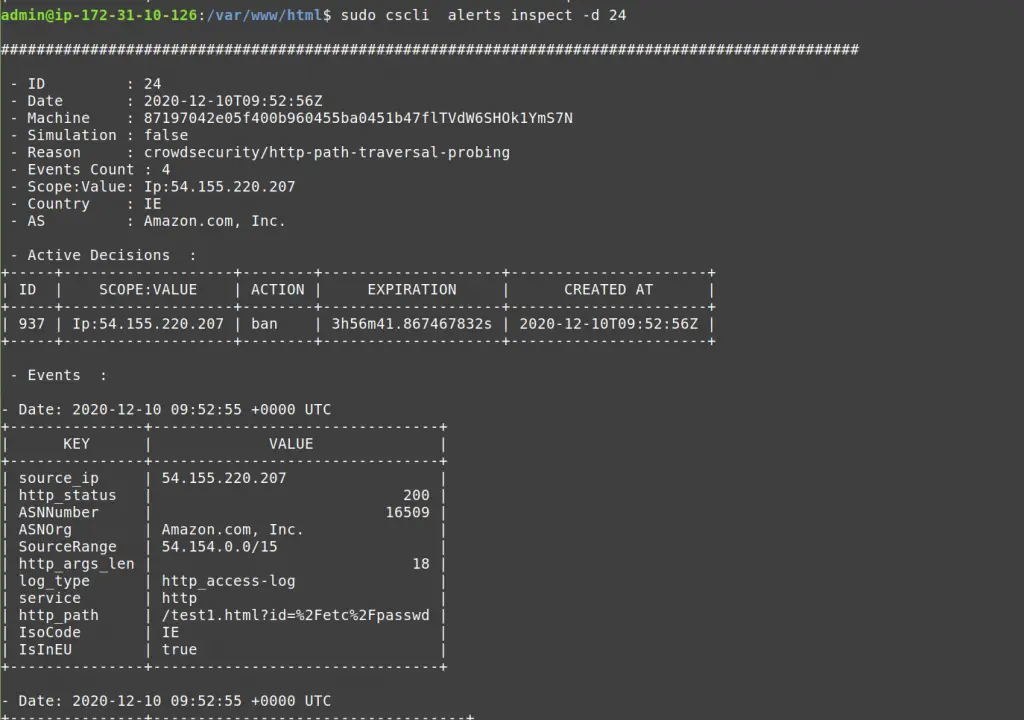
You can also inspect a specific alert to get more details with cscli alerts inspect -d <ID> (using the ID displayed in the left-hand column of the alerts list).
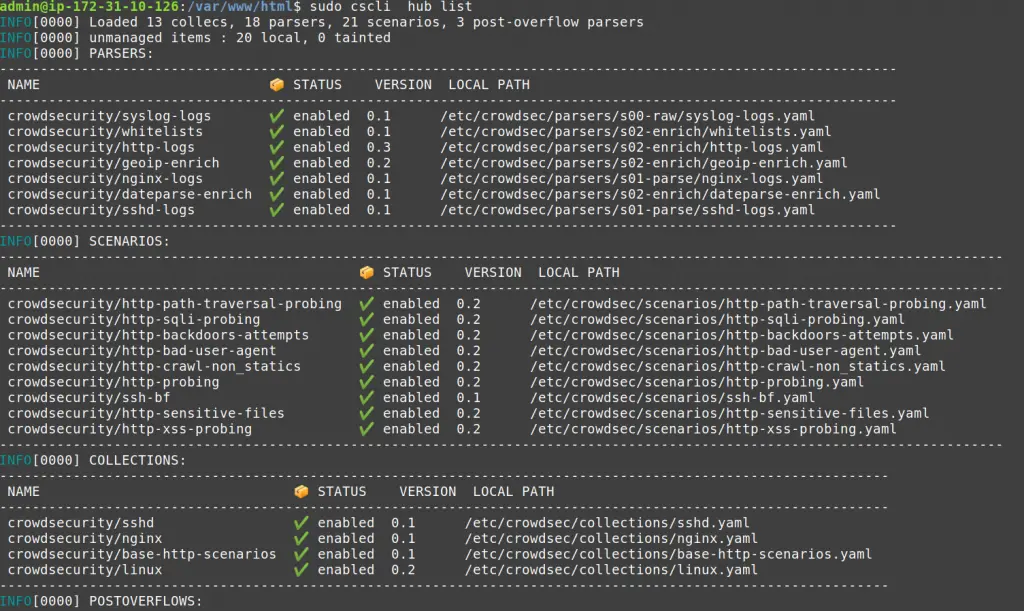
cscli offers other features, but one to look at now is to find out which parsers and scenarios are installed in the default setup.
Observability
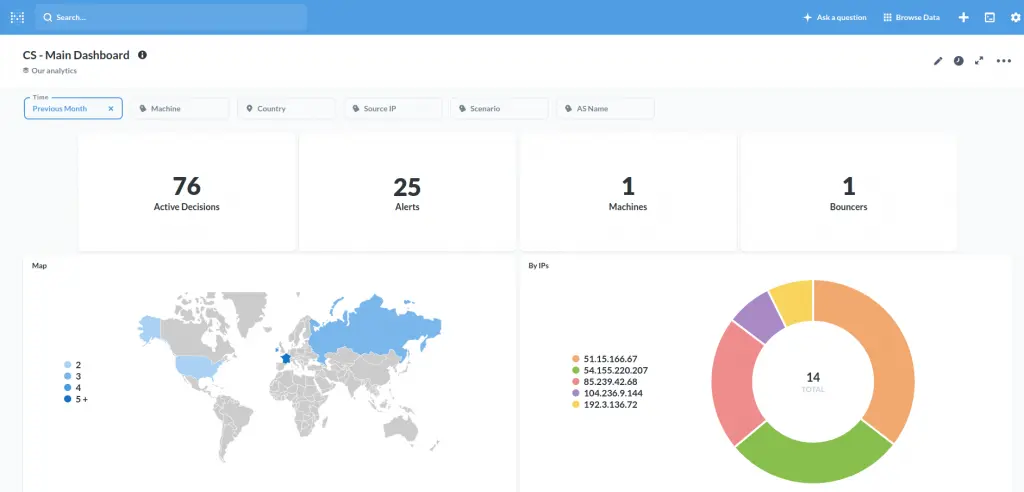
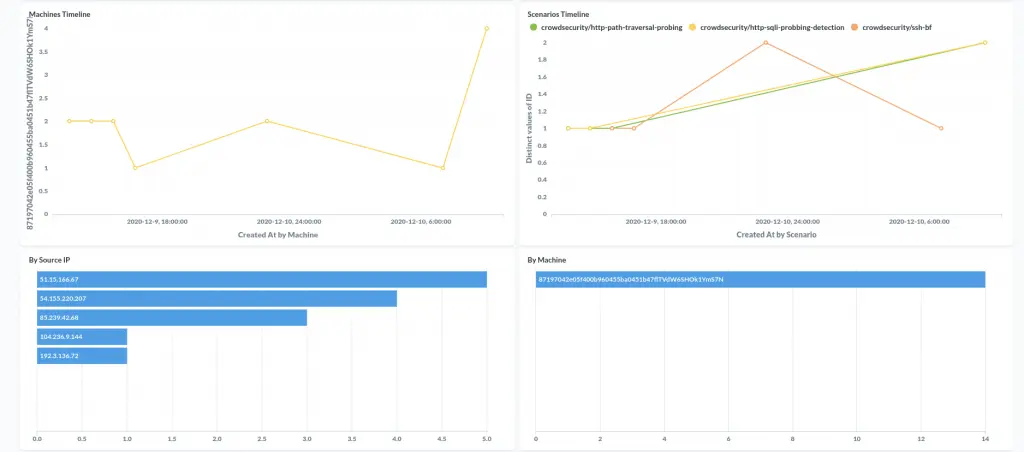
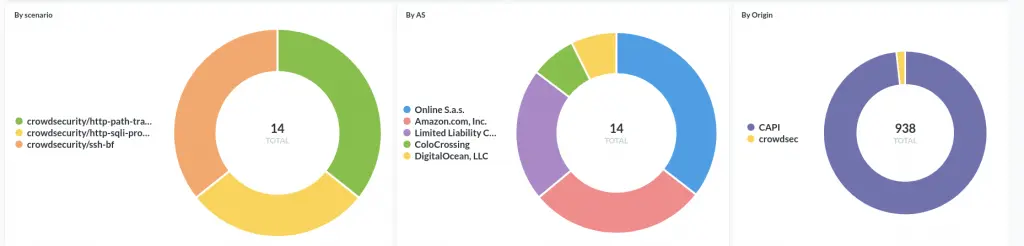
Observability (especially for software that might take defensive countermeasures) is always a key point for a security solution. Besides its "tail the logfile" capability, CrowdSec offers two ways to achieve this: Metabase dashboards, and Prometheus metrics.
Metabase Dashboard
cscli allows you to deploy a new Metabase and Docker. Begin by installing Docker using its official documentation.

If you’re using an AWS EC2 instance, be sure to expose tcp/3000 to access your dashboard.
cscli dashboard setup enables you to deploy a new Metabase dashboard running on Docker with a random password.
Prometheus Metrics
While some people love visual dashboards, others prefer different kinds of metrics. This is where CrowdSec’s Prometheus integration comes into play.
One way to visualize these metrics is with cscli metrics :

The cscli metrics command exposes only a subset of Prometheus metrics that are important for system administrators. You can find a detailed description of the metrics in the documentation. The metrics are split into various sections :
- Buckets: How many buckets of each type were created, poured or have overflowed since the daemon startup?
- Acquisition: How many lines or events were read from each of the specified sources, and were they parsed and/or poured to buckets later
- Parser: How many lines/events were delivered to each parser, and did the parser succeed in processing the mentioned events?
- Local API: How many times was each route hit and so on?
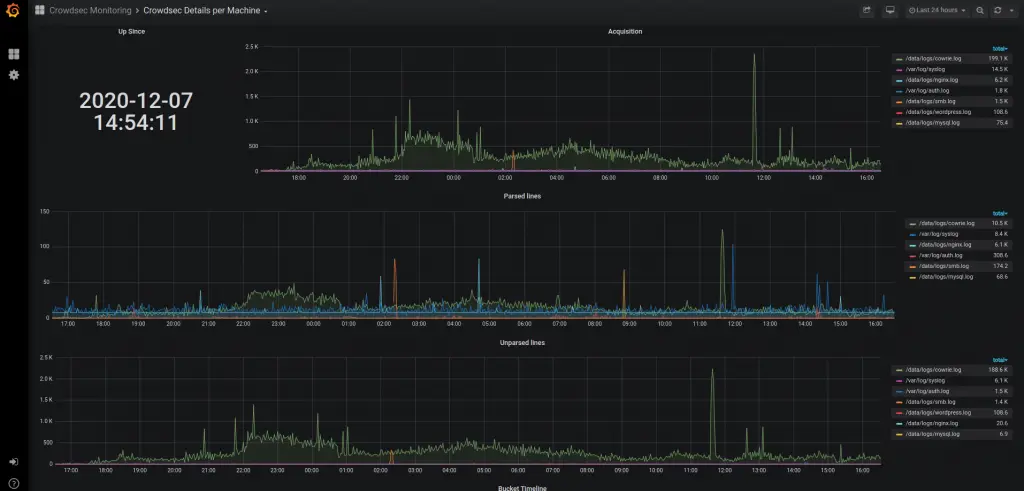
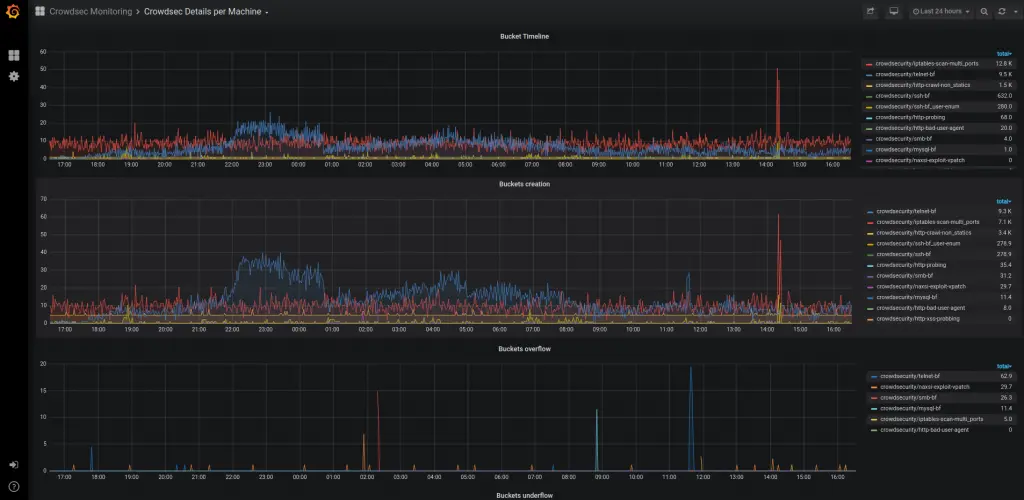
Viewing Crowdsec’s Prometheus metrics via cscli metrics is more convenient but doesn’t do justice to Prometheus. It is out of scope for this article to deep dive into Prometheus, but these screenshots offer a quick look at what CrowdSec's Prometheus metrics look like in Grafana.
Defend Attacks with Bouncers
CrowdSec's detection capabilities provide observability into what is going on. However, to protect yourself, you need to block attackers, which is where bouncers play a major part. Remember: CrowdSec detects, bouncers deter.
Bouncers work by querying CrowdSec’s API to know when to block an IP. You can download them bouncers directly from the CrowdSec Hub:
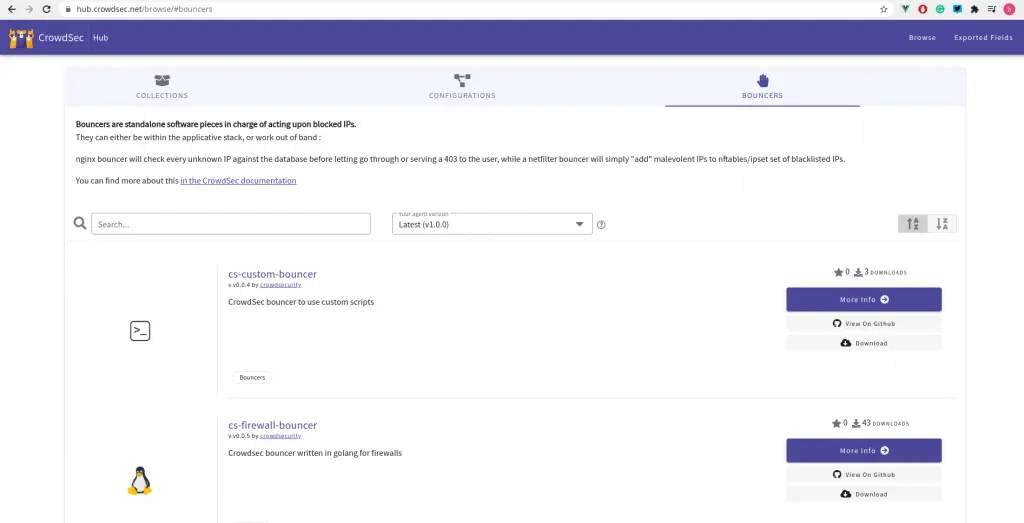
For this example, use cs-firewall-bouncer. It directly bans directly any malevolent IP at the firewall level using iptables or nftables
Note: If you used your IP to simulate attacks, unban your IP before going further:
sudo cscli decisions delete -i X.X.X.XInstall The Bouncer
First, download the bouncer from the Hub:
$ wget https://github.com/crowdsecurity/cs-firewall-bouncer/releases/download/v0.0.5/cs-firewall-bouncer.tgz
$ tar xvzf cs-firewall-bouncer.tgz
$ cd cs-firewall-bouncer-v0.0.5/
The bouncer can be installed with a simple install script:

The install script will check if you have iptables or nftables installed and prompt you to install if not.
Bouncers communicate with CrowdSec via a REST API, so check that the bouncer is registered on the API.
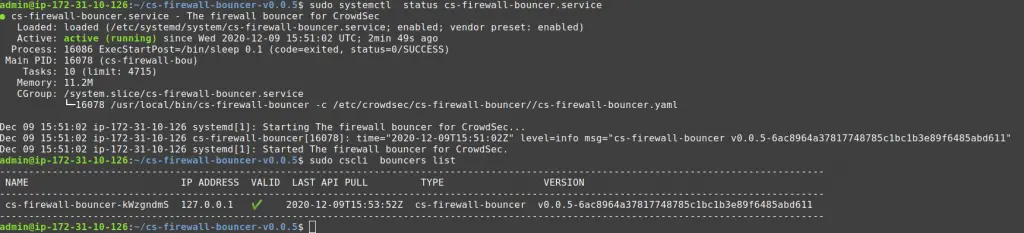
The last command (sudo cscli bouncers list) shows our newly installed bouncer.
Test the Bouncer
Warning: Before going further, ensure you have another IP available to access your machine and that you will not kick yourself out. Using your smartphone's internet connection will work.
Now that you have a bouncer to protect you, try the test again.
Try to access the server at the end of the scan:
ATTACKER$ curl --connect-timeout 1 http://34.248.33.108/
curl: (28) Connection timed out after 1001 milliseconds
See how it turns out from the defender’s point of view.
For the technically curious, cs-firewall-bouncer uses either nftables or iptables. Using nftables (used on Debian 10 by default) creates and maintainds two tables named crowdsec and crowdsec6 (for IPv4 and IPv6 respectively).
$ sudo nft list ruleset
…
table ip crowdsec {
	set crowdsec_blocklist {
		type ipv4_addr
		elements = { 3.22.63.25, 3.214.184.223,
			     3.235.62.151, 3.236.112.98,
			     13.66.209.11, 17.58.98.156, …
                        }
	}
	chain crowdsec_chain {
		type filter hook input priority 0; policy accept;
		ip saddr @crowdsec_blocklist drop
	}
}
table ip6 crowdsec6 {
	set crowdsec6_blocklist {
		type ipv6_addr
	}

	chain crowdsec6_chain {
		type filter hook input priority 0; policy accept;
		ip6 saddr @crowdsec6_blocklist drop
	}
}
You can change the firewall backend used by the bouncer in /etc/crowdsec/cs-firewall-bouncer/cs-firewall-bouncer.yaml by changing the mode from nftables to iptables (ipset is required for iptables mode).
Get Involved With CrowdSec
Currently, community members come from 70+ countries across six different continents and blocked 130,000+ malicious IPs.
The team would love to hear your feedback about this latest release. If you are interested in testing the software or would like to get in touch with them, check the following links: