Ideally, SSL certificates are issued by publicly trusted certificate authorities (e.g. Let’s Encrypt, Comodo, Verisign) to provide authentication and encryption on the internet. However, you could obtain an SSL certificate without going through a third-party certificate authority — this is what is referred to as a self-signed certificate.
This tutorial describes how to generate a self-signed SSL certificate by using OpenSSL in Linux. OpenSSL is an open-source software library used to implement secure communications on the Internet.
How to Install OpenSSL in Linux
OpenSSL comes preinstalled on major Linux distributions and you can confirm that OpenSSL is installed on your Linux machine using the following command.
$ openssl version
You should see an output with OpenSSL version info similar to what is shown in the figure below. I am using Ubuntu Linux 20.04.

If OpenSSL not installed, you can run the following command to install OpenSSL in Linux.
$ sudo apt install openssl    [On Debian/Ubuntu/Mint]
$ sudo yum install openssl    [On RHEL/CentOS/Fedora]
Generate Self-Signed SSL Certificates using OpenSSL
Once you have confirmed that the openssl tool is installed, you are now ready to generate your self-signed certificate as follows.
Generate OpenSSL Private Key
Firstly, run the command below to generate and save your private key which will be used to sign the SSL certificate. You can use anything in place of ubuntu_server.
$ openssl genrsa -out ubuntu_server.key

Your private key will be saved in the current working directory.
Generate Certificate Signing Request
Next, generate a Certificate Signing Request (CSR) with the following command. Note that you would need to specify the correct name of the private key which you generated earlier.
$ openssl req -new -key ubuntu_server.key -out ubuntu_server.csr
During the process of generating a CSR, you would be prompted to provide some information that will be associated with your certificate signing request. The CSR will be saved in the current working directory.
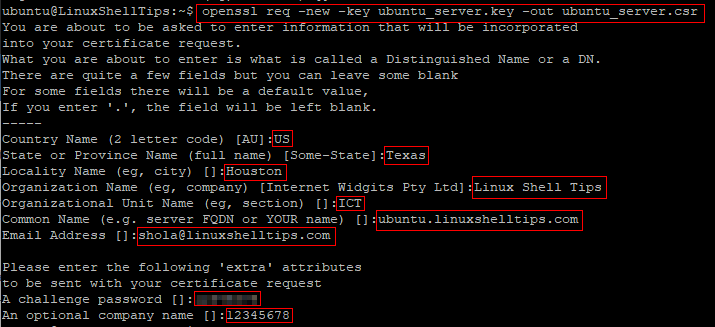
Note: You may leave some fields blank. For example, the fields under ‘extra’ attributes may be left blank by hitting enter on the keyboard.
After the CSR completes successfully, you are ready to sign your certificate by yourself.
Self-Sign Your Certificate
Run the command below to request a self-signed certificate which will be valid for 365 days. The x509 option refers to the X.509 international standard for creating and verifying public key certificates. Remember to replace ubuntu_server as appropriate.
$ openssl x509 -req -days 365 -in ubuntu_server.csr -signkey ubuntu_server.key -out ubuntu_server.crt

Your self-signed certificate will be saved in the current working directory and you can confirm by running the ls command.
$ ls

Also, you can review the certificate details with the following command.
$ openssl x509 -text -noout -in ubuntu_server.crt
At this point, your self-signed certificate is ready to be deployed to your web apps or sites.
Conclusion
In this guide, we described how to generate self-signed SSL certificates with the openssl tool in Linux. Do note that self-signed certificates are considered insecure by all major web browsers. Therefore, you should probably only use such certificates internally or for testing and development purposes.