Preamble:
Here is my method for installing Arch Linux. This can be a bit fiddly, but is a really great learning curve, especially if you are installing it on physical hardware. There are many methods to do everything, different partitioning tools, and lots of ways to carve up your disks (if you are using a virtual machine; LVM would be beneficial as it provides that dynamic disk allocation that is useful for extending your LUNs as required, etc).
I should also mention at this point, Arch it is a very lightweight bleeding edge operating system, whilst retaining stability. If you have any software that relies on LTS kernels, this may not be the best OS for you; one package of which I have experienced issues in the past, due to LTS requirements and older (stable) kernels, is VMware workstation for Linux. I found I had to use an older kernel to retain interoperability.
For this tutorial, I will be using VirtualBox, as I would have difficulty installing on a physical system while taking screenshots. There are already great tutorials on this site on how to set up and use VirtualBox. I’m not in possession of any HP or Dell server hardware at home with ILO, DRAC, etc. and I don’t have any of this fancy screen mirror recording equipment either to be able to show you this on any physical hardware.
What I will try and do in each section will be to give you the benefit of my experiences and frustrations at certain sections, especially when it comes to installing on UEFI instead of BIOS and the troubles that secure-boot can cause. Don’t be shy of a little trial and error here, it’s what makes it more fun, and it is how you will learn what works and what doesn’t! I for one will definitely be running through this install a couple of times for this tutorial to ensure I have captured everything
Section 1 – Pre-requisites
You will first need to download Arch Linux – Suggest that you do this from the site:
https://archlinux.org/download/
Section 2 – Decide how and where to install
-
If you are planning to install in a Virtual Machine, you don’t need to do much apart from mount the downloaded ISO as a boot device.
-
If you are planning to use this tutorial to install on some physical hardware, I would suggest using a USB drive for the install media. While you can do this with DD (assuming that you are already using a Linux / Mac OS) it is a bit clunky, I always prefer to use a graphical tool to do this for me. If you aren’t 100% sure what you are doing with DD you can make a real mess of your existing OS installation. The second thing that I would strongly suggest is that you have another device available nearby with internet access so that you can research any small (or hopefully not large) issues that you may find along the way.
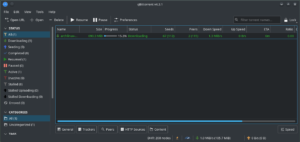
Here is how you can use a graphical tool to burn the ISO to a boot USB.
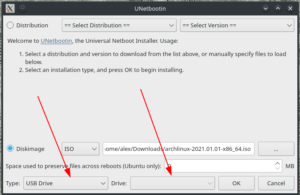
yay -S unetbootin
Fairly self-explanatory here, but if you select the ISO as the disk image, set the type as USB drive, select the drive to burn the ISO to, then click OK, you should end up with a bootable USB stick with the Arch Installer on.
There are a number of tools to help you do this, Fedora has one built in called Fedora Media Writer for example. A quick internet search will lead you to a number of different options for this.
Section 3 – Installation
This stage can be fairly daunting for the newcomer, but if you are patient it will provide a very good base knowledge that you can apply to any distribution, as the fundamentals are the same.
Prepare yourself to get deep into disk configuration, swap, editing core OS files, bootstrapping and lots more. Take your anxiety and turn it into excitement here, as the sense of achievement at the end makes it all worth while – you can build whatever you like, whenever you like, however you like, to make this an OS truly customised for how you want it. If there is one thing to be said about Arch (and I think the fan base would agree) it would be that the documentation is absolutely first rate, and really is a valuable asset when using this operating system. If any of my instructions don’t fit for you, or you want to try an alternative route, here is the Arch installation wiki:
https://wiki.archlinux.org/index.php/installation_guide
I will start with the basics:
Insert or attach your media, and boot up! NB: ensure that you have boot from USB in the BIOS. A recommendation from me would be to turn OFF secure boot if you can as this can cause additional complications, and let’s begin!
If you are installing on a Virtual Machine, chances are that it will be configured with BIOS and not UEFI – you will be able to tell from the way the boot menu is displayed.
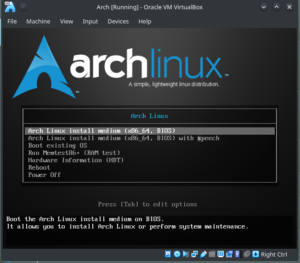
This shows that you are running with a BIOS configuration. If you are installing on a physical device, chances are that it will be configured with UEFI – I will continue this tutorial with this in mind and using UEFI, as it is more of a tricky implementation. UEFI has the following core benefits:
- Large HDD support (ver 2TB)
- Over 4 partitions on each physical HDD
- Faster booting
- Better power management and interoperability with hardware
- More reliable
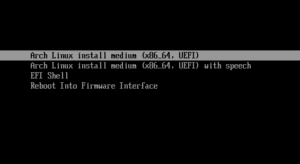
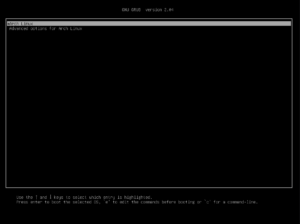
Here is what you will see if you have UEFI enabled when booting the install media:
If you have done everything correctly to this point, here is what you will be left with
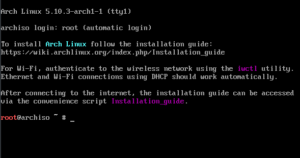
Now the fun begins!
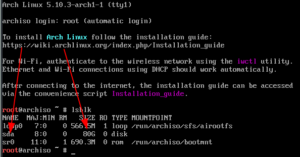
The first thing we are going to have a look at is the disk configuration to make sure everything is in order… My preferred tool of choice here is ‘lsblk’. As I am using a VM here, I have one drive attached (sda) it is likely that you will have some ‘nvme’ type devices if you are using PCIE SSDs
lsblk
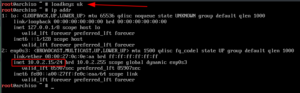
Next, let’s load my keyboard layout here (I’m in the UK so here are my defaults):
loadkeys uk
Let’s now check that the device is connected – if you have a LAN cable available, and are able to use it to connect your device to your local network, plug it in now. This will save some hassle. You can check if the device has picked up an ip address with the following command:
ip addr
You could also ping a site on the internet that you know accepts icmp requests (google being one of them)
ping google.com
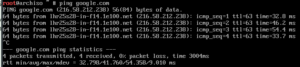
We can see from this that the ping requests are successful – don’t forget to quit out with “CTRL C” otherwise we may be here a while!
Disk Configuration
OK next comes a tricky bit. We will have to carve up that hard disk into at least two partitions. We will also need an EFI boot partition to handle the UEFI bootstrapper
fdisk /dev/sda <change ‘sda’ for whatever was listed as your primary disk when we looked at it from lsblk earlier>
We need to create a 512M partition here, its enough for the bootstrap
n
p
1
<press enter here to select the default start sector>
+512M
t
ef
Summary of what we just did:
-
Created a new partition
-
Made it a primary partition
-
Made it partition 1
-
Used the default start sector
-
Size of 512Mb
-
Changed the type;
-
To EFI partition
Next we will create a swap partition, while you do not have to do this, for lower spec systems it is recommended so that you can swap to disk if RAM is in short supply. The formula I used to use in the 2000s was QTY of RAM multiplied by 2, however for this example I will set to 2Gb
n
p
2
<press enter here for next available sector>
+2G
t
2
82
Summary of what we just did:
-
Created a new partition
-
Made it a primary partition
-
Made it partition 2
-
Used the next available start sector
-
Size of 2Gb
-
Changed the type;
-
(of partition 2);
-
to Linux SWAP
Next we will do the same thing, however we will create an ext4 root partition for all of our files to go using the remainder of the space.
n
p
3
<Press enter as before>
<Press enter for last available sector>
t
3
83
Summary of what we just did:
-
Created a new partition
-
Made it a primary partition
-
Made it partition 3
-
Used the next available start sector
-
Used the remaining space up to the last available sector
-
Set the type;
-
Of partition 3;
-
To Linux File Systems
Now. Let’s have a look and see if these are correct
p
this should list the three partitions that we have just created
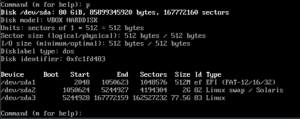
Should look a little like that. Let’s write the config if it looks correct
w
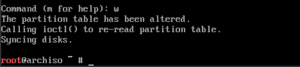
Let’s pause for thought here, and reflect.
What we have done, is created three partitions ready for the boot sector, the swap file and the OS to live on. Respectively (in my case) these are called:
/dev/sda1
/dev/sda2
/dev/sda3
What we can now see, if we run lsblk again, is the hierarchy (sda as the parent)
lsblk

Format the file system
We will need to initialise these partitions and format them with the respective file systems.
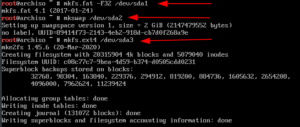
Let’s make /dev/sda1 (the EFI partition) FAT32
mkfs.fat -F32 /dev/sda1
Let’s make /dev/sda2 a swap partition
mkswap /dev/sda2
Let’s make /dev/sda3 an ext4 partition
mkfs.ext4 /dev/sda3
Now that we have formatted the partitions, let’s mount them.
Mount the partitions
mount /dev/sda3 /mnt
swapon /dev/sda2
mkdir /mnt/efi
mount /dev/sda1 /mnt/efi
Summary of what we have just done:
-
Mounted the physical hard drive to a mount pount /mnt
-
Turned swapping on for /sda2
-
Made a folder in the root partition called efi and mounted the efi partition there.
Pacstrap and ChangeRoot
Next comes the fun bit – we will pacstrap and changeroot – this will be the first time we will attempt to instal the operating system and interact with it.
Historically you would have had to define your closest mirror in the mirrorlist at this point, but these days it is all done for you, and the file at /etc/pacman.d/mirrorlist will contain the best available source for you. Let’s get this done!
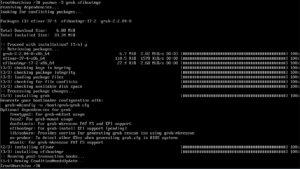
pacstrap /mnt base linux linux-firmware dhcpcd
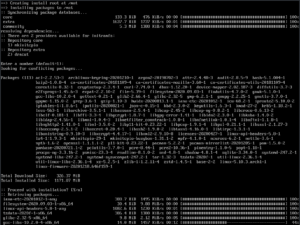
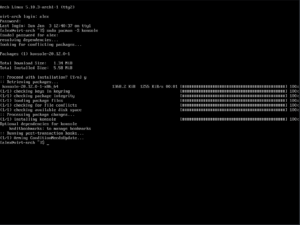
This will take some time, while the kernel and base OS is installed [and previously omitted network config tools (dhcp client daemon)]. Nothing more, nothing less. Go and get a well earned cup of tea at this point and stretch your legs a bit. When you come back you should have something similar to this:
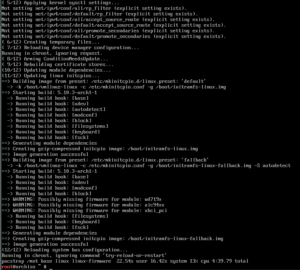
If you have got to this stage, congratulations, you now have an installed operating system! We are not using it yet, and the configuration is far from over, so don’t celebrate too much. Let’s press on!
Section 4 – Configuration
Let’s do a few post-install bits now that will be required to persist the install, and make it the one that you will boot from, rather than the installer iso.
We have to first generate the file system. We can do this with fstab
genfstab -U /mnt >> /mnt/etc/fstab
Change Root
OK so let’s get into chroot – this is how we will actually change our interaction to the installed system rather than the booted one.
arch-chroot /mnt
Let’s set a few more things up now that we are able to:
Time zone and clock sync
Meaning sync to the hardware clock (for me this is UK, but you can select yours from the appropriate folder)
ln -sf /usr/share/zoneinfo/GB /etc/localtime
hwclock --systohc
Set the Locale
Let’s set the system locale – first we will need an editor (I chose VIM)
pacman -S vim
vim /etc/locale.gen
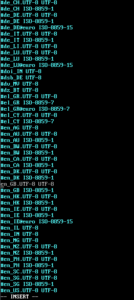
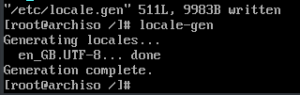
I simply un-commented the line I needed. Then you run:
locale-gen
to generate your locale
Set the language
Let’s set the language
vim /etc/locale.conf

Set the keyboard layout
Let’s now set the default keyboard layout
vim /etc/vconsole.conf

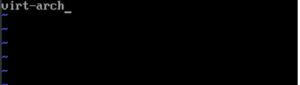
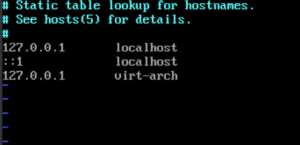
Set the hostname
Let’s do the hostname next – put in the Ipv4 localhost address and Ipv6 localhost address, and also the hostname (you can fully qualify this if you need a search suffix, or are in an environment with a domain etc.)
vim /etc/hostname
vim /etc/hosts
Password set for root account
Let’s set the password next
passwd
Bootloader Config
Now the majority of the config is done and will persist.
Next we need to choose a bootloader. There are an abundance of these available, and there is a nice comparison chart here to allow you to make the best choice:
https://wiki.archlinux.org/index.php/Arch_boot_process
I usually go for GRUB as it does everything that I need. I have been known to use LILO in the past, but this doesn’t support UEFI. I find GRUB works for me now, and I know how to customise it to how I like.
For this tutorial I will be using GRUB. As we are using a UEFI, this bit can be quite tricky. Full concentration required here!
I will suggest that you have a look at the Arch documentation here:
https://wiki.archlinux.org/index.php/GRUB#Installation_2
Manufacturers implement UEFI differently which may change the way that you proceed.
I will also go through how we will get it working for this virtual machine. So we need to install grub and efibootmgr.
Install the bootloader
pacman -S grub efibootmgr
Configure grub
Next we need to install grub based on our efi mount point location for our UEFI system (/efi)
grub-install --target=x86_64-efi --efi-directory=/efi --bootloader-id=GRUB

Generate grub config
Now let’s generate the config file for grub
grub-mkconfig -o /boot/grub/grub.cfg

Remove install media and reboot
OK now – time to remove the install media, and try this out!
If you are lucky this will work first time Let’s exit our changeroot environment (chroot) and reboot
exit
reboot
For me, I clearly got something wrong here, as I was faced with this EFI boot prompt
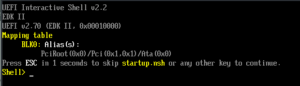
This was because I had forgotten to set the bootable option in fdisk for the EFI partition. Here’s how we will do that.
Step 1 for me was to put the live CD back in, this booted me straight in and I didn’t need to re-mount the disks or chroot back into the installed system.
(you login with ‘root’ username)
fdisk /dev/sda
a
1
w
What was this fix?
To put it simply, we used Fdisk to set the active boot bit on partition 1 where we put the grub config file and bootloader. you can see the before and after here:
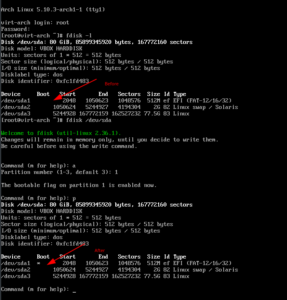
I took the disk back out and rebooted, this was now fixed.
Might not look much, but we now have a working install of Arch!
For your info, I had to go back here and start again, as I forgot to include dhcpcd in the pacstrap. This is fundamental to the network configuration post install. What I ended up with was a local only installation that did not connect to the network.
Section 5. Six things to do post-install
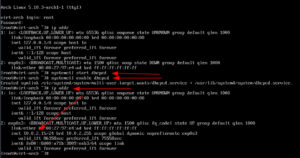
1. Start the network service, and make it start on boot with the enable command
systemctl start dhcpcd
systemctl enable dhcpcd
Let’s check now whether we have picked up an IP address from the network
ip addr
2. Update the system
There may well be no updates, but its worth a check
pacman -Syu
3. Install SUDO and vi (used for ‘safely’ editing the sudoers file)
pacman -S sudo
pacman -S vi
4. Create a user and add them to the sudoers file to give root type permission escalation ability to your user
useradd -m alex <substitute with what you would like your username to be>
Next let’s set a password for our newly created user
passwd alex <substitute for your username>
There are many ways of doing this, you can add your user and add the user to a group that has sudoers permissions, for now we will keep this basic and add the user directly to the sudoers file.
We need to find the “User privilage specification” section and add your user in here like the following. Let’s now set a password for the new user
sudo visudo

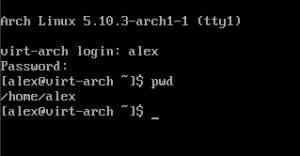
At this point let’s reboot and check to see if this user works by logging in as it, and also check we have created the home directory for this user
reboot
Log in
pwd
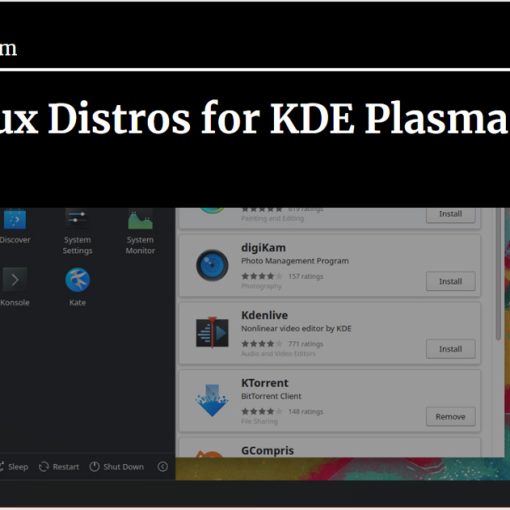
5. Install a desktop environment
OK Now that we have done all of the pre-requisites, its time to choose a desktop environment and login manager – for this example I will use SDDM as the login manager and KDE Plasma as this is my desktop environment of choice.
There are already comparisons on this site of different desktop environments that you could choose, and there is a list of supported ones for Arch here, both officially and unofficially supported: https://wiki.archlinux.org/index.php/desktop_environment#List_of_desktop_environments
Let’s dive in!
sudo pacman -S sddm plasma
I accepted all of the defaults here with regards to options for sources – there are quite a considerable amount of pre-requisite packages to get and install here, so this may be another good opportunity for another well earned cup of tea!
Now its worth noting that your newly installed desktop environment, while it is installed, will not start automatically on boot, so we will have to enable the service for SDDM in order for this to happen.
sudo systemctl enable sddm
Now let’s reboot and see if we are able to login to the desktop environment we just installed
reboot
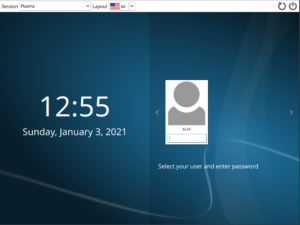
Looking good:

Here we are!
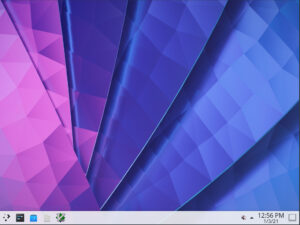
OK we have a minimal desktop!
Let’s move on to get some basic vital packages installed to the desktop environment, like konsole (a KDE Terminal Emulator)
Let’s press “CTRL + ALT + F2” to get us into a text console (right control and F2 if you are in virtualbox)
Log in
Run the following:
sudo pacman -S konsole
Let’s switch back to the GUI on TTY1 “CTRL + ALT + F1” (or right control and F1 for virtualbox)
We now have konsole installed here. Let’s switch to using this terminal emulator on the desktop environment now!
I would suggest an install of NetworkManager and a start of the NetworkManager service at this point if you are on physical hardware, especially if you want to use wifi.
sudo pacman -S networkmanager
systemctl enable NetworkManager
systemctl start NetworkManager
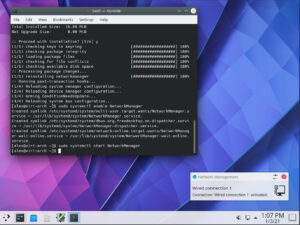
This will give you a way of managing the network in the GUI.
Let’s pick an internet browser – I will use Chromium for this example:
sudo pacman -S chromium
OK now we have a more than usable system! There are a few things that I do as a matter of course following an Arch install to customise it for my inner geek, if you want to have a look, I have a detailed walkthrough on how to change the terminal emulator to a very nice and informative place using ZSH on this site, but here are a few other bits that I like to do post-install…
6. Customise things & let your inner geek out
Insults
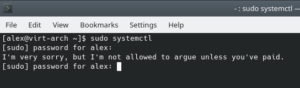
If you want to be insulted every time you get your password wrong (and who doesn’t) then you can add this line to your sudoers file:
sudo visudo
Add the following line, save and exit.

So when I enter the wrong password, the system will pick a humerous random insult each time:
Colours
Next, let’s have some more interesting colours on the terminal:
sudo vim /etc.pacman.conf
Just uncomment the line in the config file and save it out

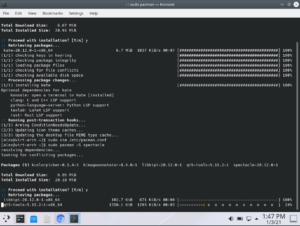
Pacman eating dots on progress bar
For a bit of fun, I like to have PacMan actually eating the progress bar when I install things.
For this we need to add this to the same pacman.conf file:
sudo vim /etc.pacman.conf
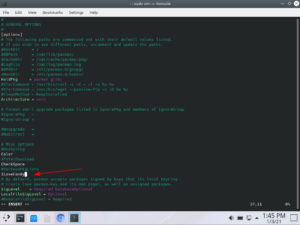
A look before

and after
Finally – Enjoy your installation of Arch! I hope that this tutorial has helped you in some way get up and running, and has given you a base understanding of how we create a complete tailored desktop to exactly how you want it, starting with nothing at all and building on this!

One thought on “How to Install and Configure Arch Linux with a Desktop Environment”
Thank you for your articl, I used to use Ubuntu, after that a little worked with Deepin and Debian. I working with Manjaro right now and this weeken I desided to install Arch on my laptop. Thank you for your great articl.