How to manage AWS EC2 instances using aws-cli
We can manage EC2 instances from the command-line using aws-cli. We can create, start, stop, reboot, terminate, modify and do a lot with EC2 instances using aws-cli. Click here to learn more about managing EC2 instances from using the aws-cli.
In this article, I will show you several commands to operate EC2 instances and this can be a guide to get started with aws-cli to manage EC2 instances from the terminal. It is assumed that you are already aware of EC2 service on AWS. Click here if you want to learn to create an EC2 instance from the AWS console. We will not go into detail about EC2 instances.
Pre-requisites
- AWS Account (Create if you don’t have one).
- Basic understanding of EC2 Instance (Click here to learn to create an EC2 instance from the AWS Console).
- AWS IAM user with AmazonEC2FullAccess policy attached to it and its access and secret keys (Click here to learn to create an IAM User).
- AWS CLI installed on your local machine.
- Key-Pair in the desired region.
What will we do?
- Check aws cli and export aws access & secret key on your local machine.
- Create an EC2 instance using aws cli.
- Perform the basic operation on the EC2 instance using aws-cli.
Check aws cli and export aws access & secret key on your local machine.
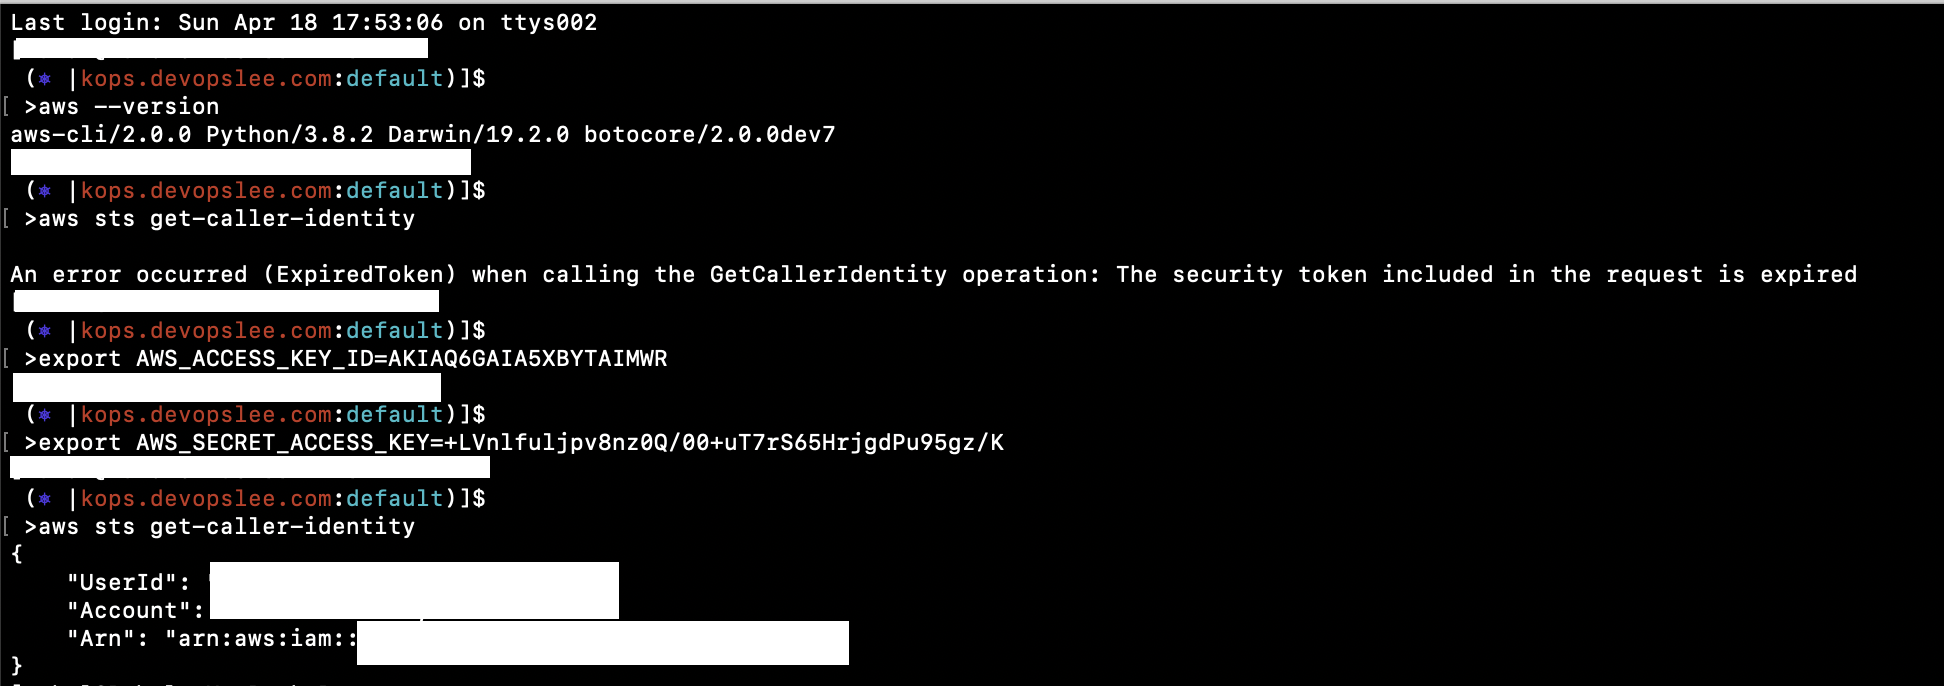
Check the version of aws-cli you have on your machine. If you do not have it, then refer to the official documentation here to install the aws-cli on your local machine
aws --version
If you execute the following command, you will get an error as you have not configured access to your AWS account in the terminal.
aws sts get-caller-identity
Export AWS IAM user access and secret keys on you terminal
export AWS_ACCESS_KEY_ID=<aws-user-access-key>
export AWS_SECRET_ACCESS_KEY=<aws-user-secret-key>
This time, you can check your identity by executing the following command
aws sts get-caller-identity
Create an EC2 instance using aws cli.
To create a new EC2 instance, execute the following command
aws ec2 run-instances --image-id ami-0a0d71ff90f62f72a --count 1 --instance-type t2.micro --key-name howtoforge-test --security-group-ids sg-7fa4d512 --subnet-id subnet-ae1a35c7 --region eu-west-3
In the above command, change all the values assigned to the following options.
- --image-id = ID of the AMI
- --count = Number of instances
- -instance-type = Type of the EC2 instance to be created
- --key-name = Name of the existing key in the specified region
- --security-group-ids = ID of the existing security group in the specified region
- --subnet-id = ID of the subnet in which EC2 instance is to be created
- --region = Region in which the instance is to be created.

You can go to the AWS EC2 console and see your new EC2 instance getting created.

Perform basic operations on the EC2 instance using aws-cli.
Before you modify your instance, you need to first stop it.
Get the ID of the instance to be stoped
aws ec2 describe-instances --filters Name=instance-state-name,Values=running --region eu-west-3 | grep InstanceId
If you try to modify the instance before you stop it, the operation will not be permited.
aws ec2 modify-instance-attribute --instance-id i-0f9a0305493735b13 --instance-type "{\"Value\": \"m1.small\"}" --region eu-west-3
You can stop the instance by specifying the Instance ID and region.
aws ec2 stop-instances --instance-id i-0f9a0305493735b13 --region eu-west-3
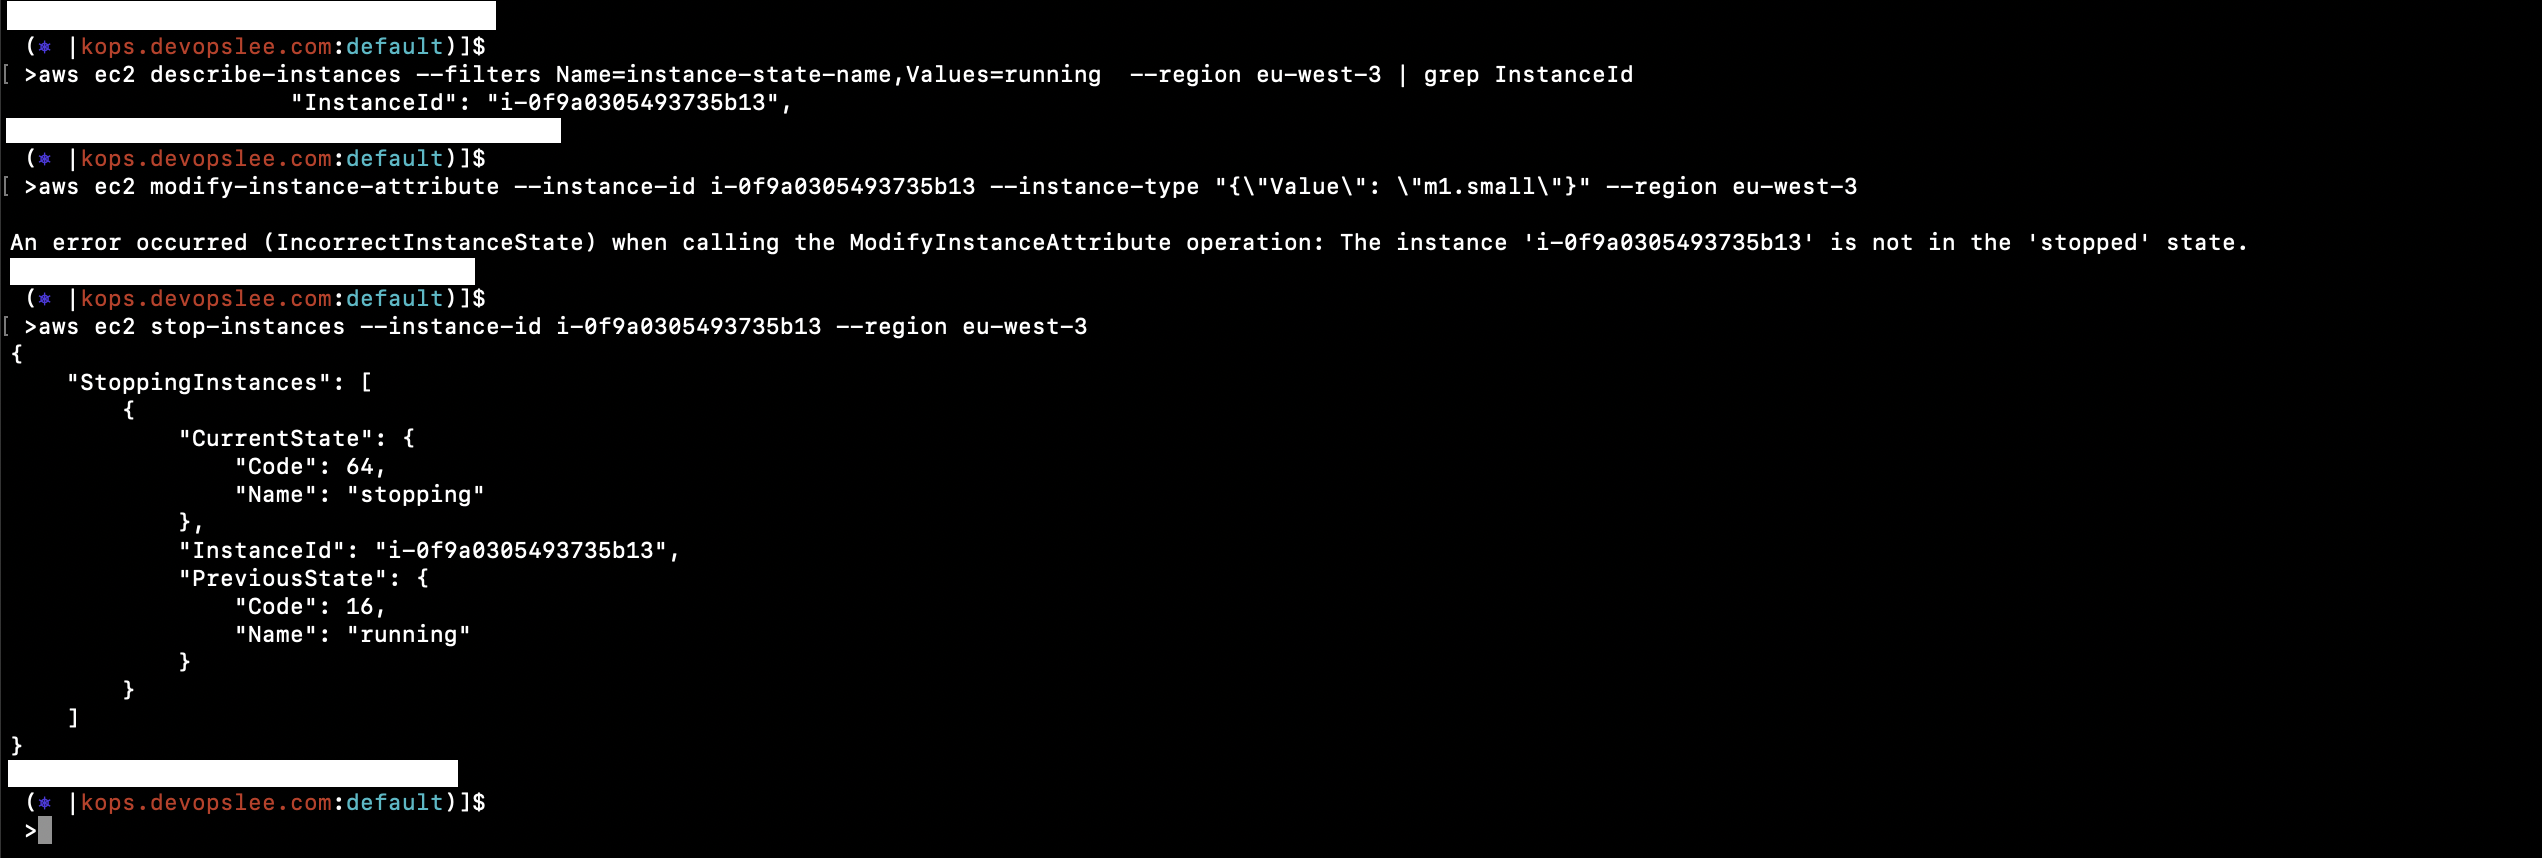
You can see in the console that the instance is being stopped.

If you want to change/modify the instance type of the instance we created, execute the following command.
aws ec2 modify-instance-attribute --instance-id i-0f9a0305493735b13 --instance-type "{\"Value\": \"t2.small\"}" --region eu-west-3
You can now start the instance by executing the following command.
aws ec2 start-instances --instance-id i-0f9a0305493735b13 --region eu-west-3
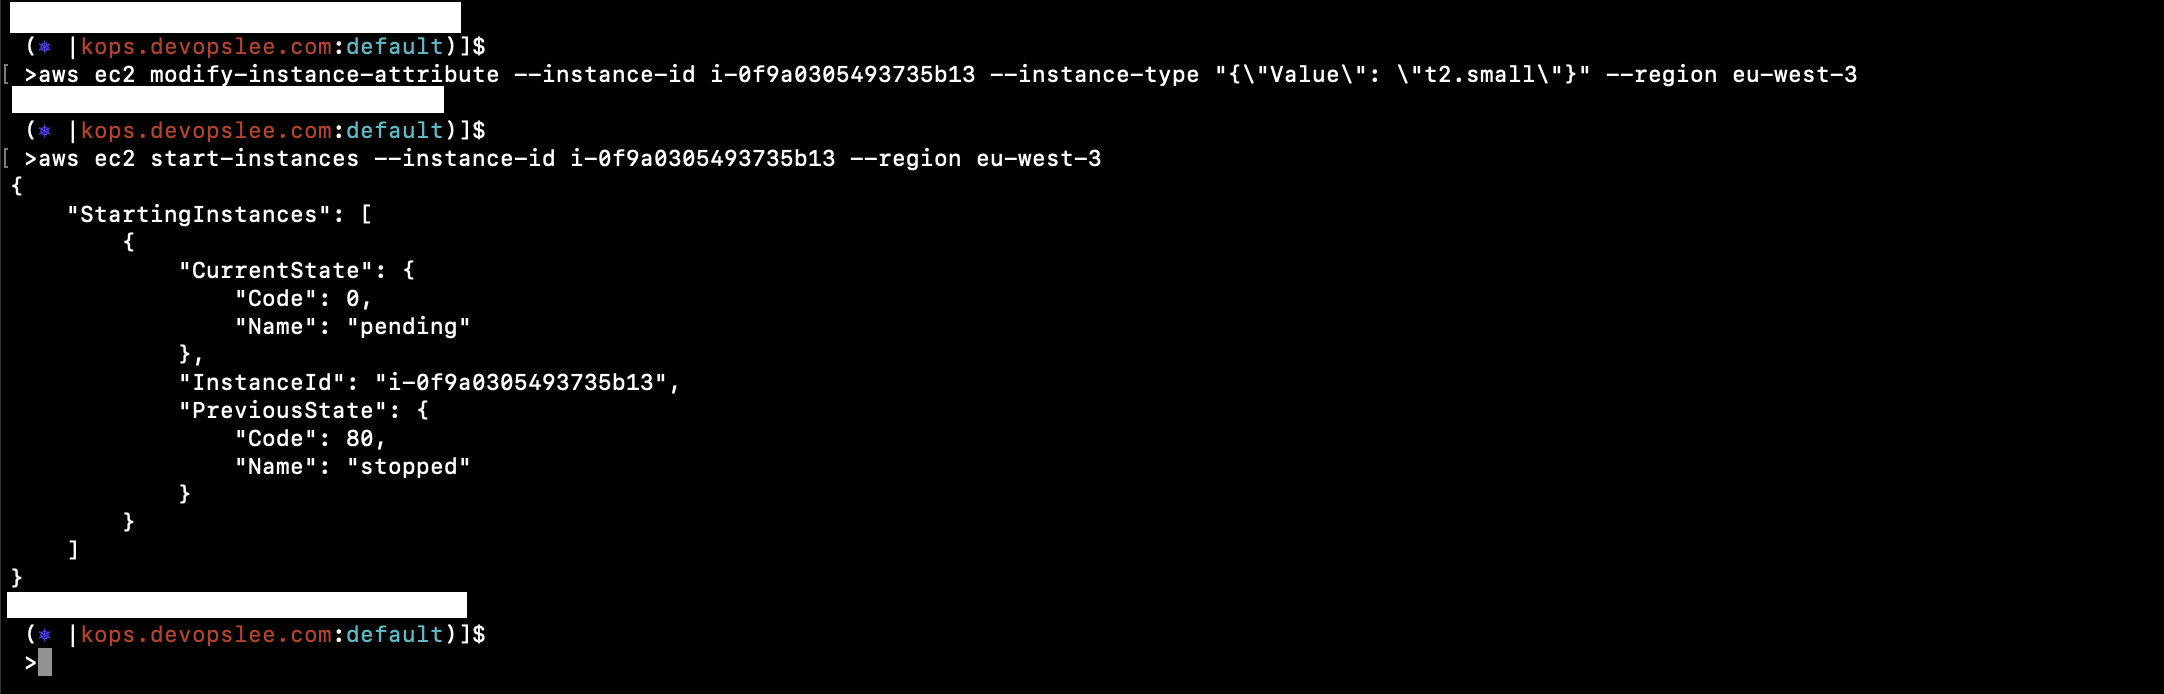
Check in the EC2 console, if the instance type is changed or not.

It is always a good idea to delete your resource when you no longer need them.
To delete the instance, execute the following command by replacing the instance id with the valid ID
aws ec2 terminate-instances --instance-id i-0f9a0305493735b13 --region eu-west-3
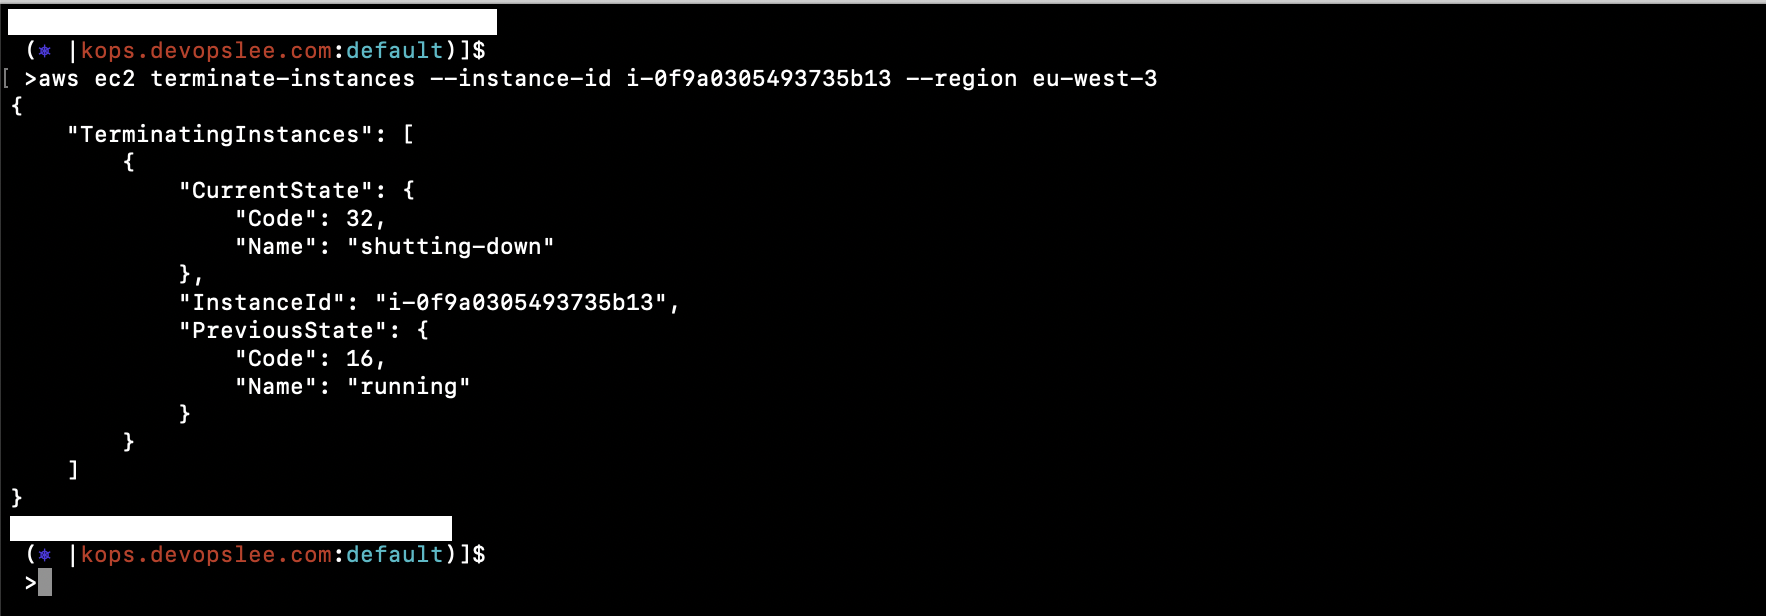
Go to the console and see your instance is terminated.

Conclusion
We can manage EC2 instances from the terminal the same way we manage them from the AWS Console. In this article, we saw basic commands to create, stop, modify, start and terminate the EC2 instance from the terminal using the aws-cli command-line utility. You can use this guide as a starting point to get started with managing EC2 instances from the terminal.

