What is Ingress Controller and how to deploy Nginx Ingress Controller in Kubernetes Cluster on AWS using Helm
On this page
- Pre-requisites
- What will we do?
- Create a Kubernetes Cluster using Kops
- Setup Nginx Ingress Controller using Helm
- Create a Recordset in Route53 pointing to the LoadBalancer created by the Nginx Ingress Controller
- Create Object definition files for a sample application
- Deploy sample applications
- Deploy an Ingress Object
- Conclusion
Before we proceed with the installation of the Nginx Ingress Controller, let's see in short what Ingress and Ingress Controller is. The focus of this article is on the setup, it is assumed that you are familiar with all the prerequisites for setting up Nginx Ingress Controller in the Kubernetes Cluster.
Kubernetes Ingress
It is a Kubernetes object that manages external access to the services in the Kubernetes Cluster. It exposes HTTP and HTTPS routes from outside the Kubernetes cluster to the services within the Kubernetes cluster.
Ingress Controller
To use Ingress, you must have the Ingress Controller in the Kubernetes cluster. It does not come as part of the Kubernetes cluster like other controllers in the cluster, it does not start automatically in the cluster. We can deploy any number of Ingress Controllers in the Kubernetes cluster. To do so, we should annotate each ingress with the appropriate ingress.class. There are a lot of different types of Ingress Controllers available. Ingress Controller is a LoadBalancer for Kubernetes Environments. It is used as a traffic management solution for Kubernetes environments.
In this article, we will see the installation of the Nginx Ingress Controller using Helm on the Kubernetes Cluster set up using Kops. To know about Nginx Ingress Controller in detail, visit the official documentation here.
Pre-requisites
- AWS Account ( Create if you don’t have one).
- Kops 1.18.2 installed on your machine(Click here to learn to create a Kubernetes Cluster using Kops and know more about it.)
- Helm v3.5.3 (Click here to learn to install Helm on Ubuntu Server)
- S3 Bucket ( Click here to learn to create an S3 Bucket on AWS).
- Domain Name (Click here to learn to register a Domain on AWS).
- IAM Role with admin permissions(Click here to learn to create an IAM role on AWS).
What will we do?
- Create a Kubernetes Cluster using Kops
- Setup Nginx Ingress Controller using Helm
- Create a Recordset in Route53 pointing to the LoadBalancer created by the Nginx Ingress Controller
- Create Object definition files for a sample application
- Deploy a sample application
- Deploy an Ingress Object
Create a Kubernetes Cluster using Kops
Before you proceed with the creation of the cluster, export your AWS IAM User access and secret keys using the following commands.
export AWS_ACCESS_KEY_ID=<your-aws-access-key-here> #Export AWS Access Key
export AWS_SECRET_ACCESS_KEY=<your-aws-secret-key-here> ##Export AWS Secret Key export
Now, export the KOPS_STATE_STORE variable with value as S3 bucket name on your terminal.
KOPS_STATE_STORE=s3://<s3-bucket-name>
If you are creating a cluster for the first time using Kops and using the above specified S3 Bucket for storing cluster configuration, you should not see any clusters when you try to get clusters using the following command.
kops get clusters
Visit the documentation specified in prerequisites to understand Kops in detail. Here, to create a Kubernetes cluster execute the following command by replacing values. I will not go into detail here.
kops create cluster --name <subdomain.domain.com> --state s3://<s3-bucket> --cloud aws --master-size t2.small --master-count 1 --master-zones us-east-1a --node-size t2.small --node-count 2 --zones us-east-1a,us-east-1b,us-east-1c

You can see a few commands in the suggestion.
Now, this time if you try to get cluster configuration you will see the cluster name in the output along with Cloud and Zones.

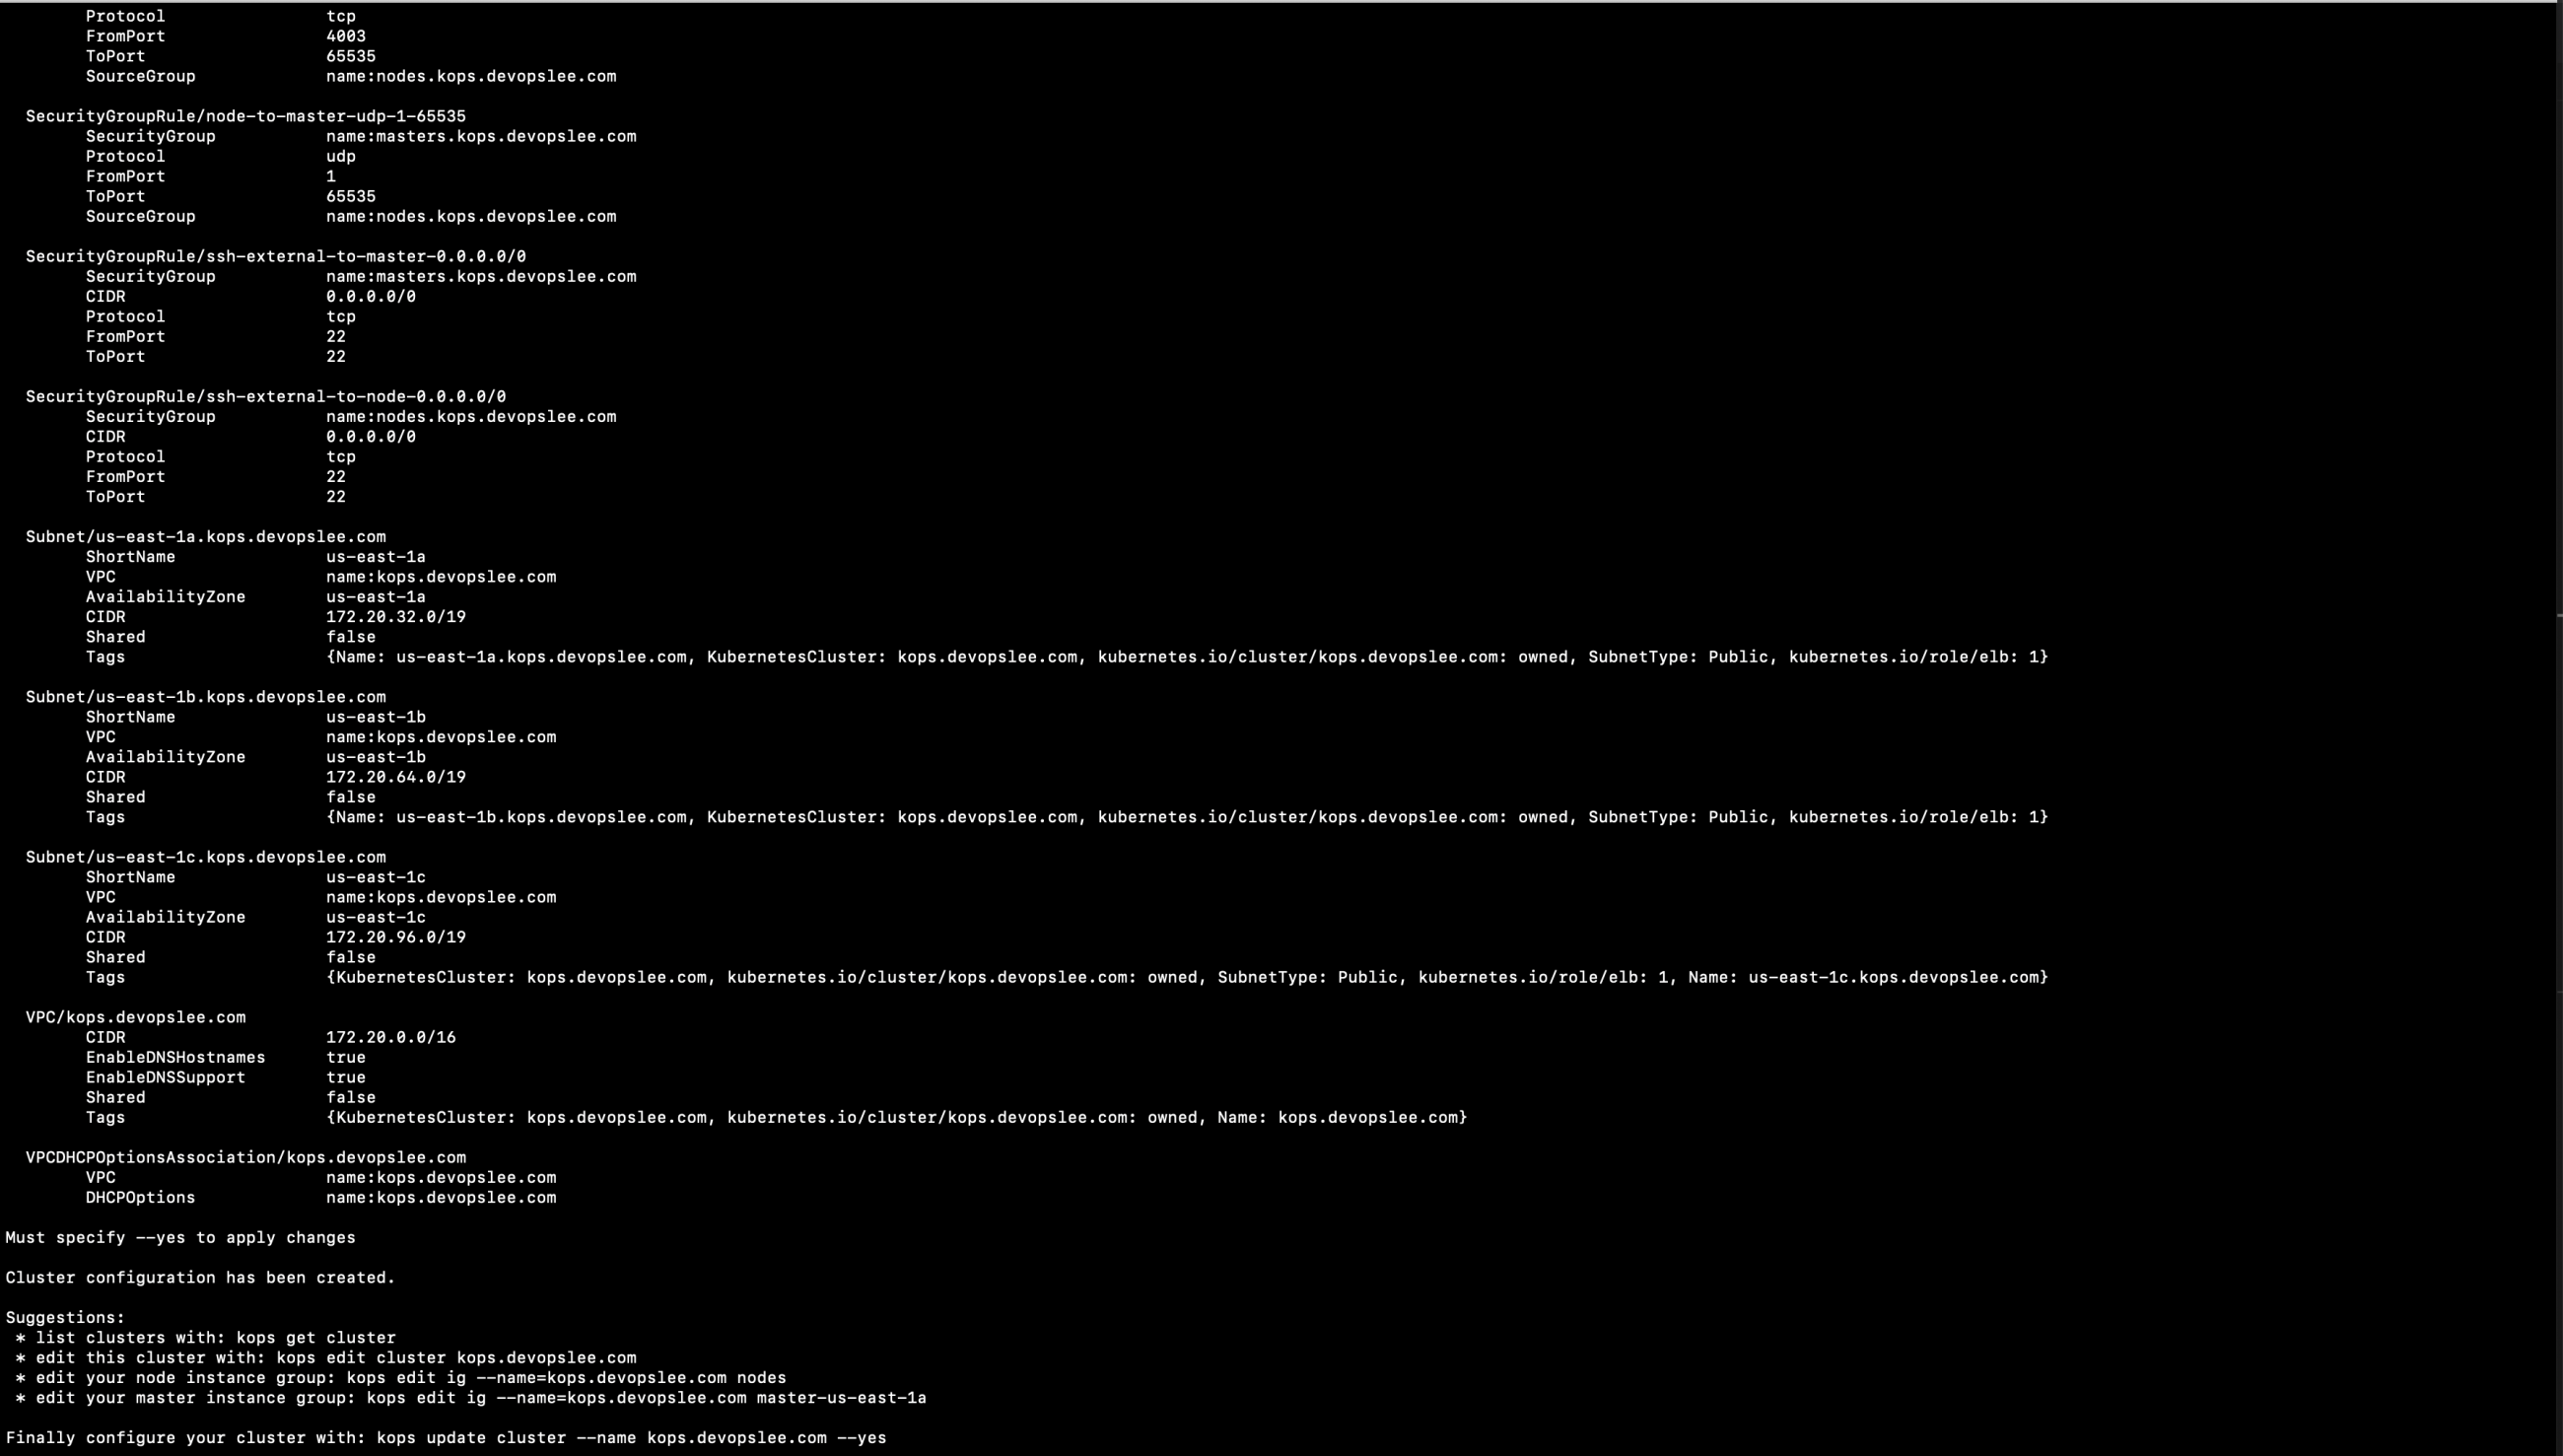
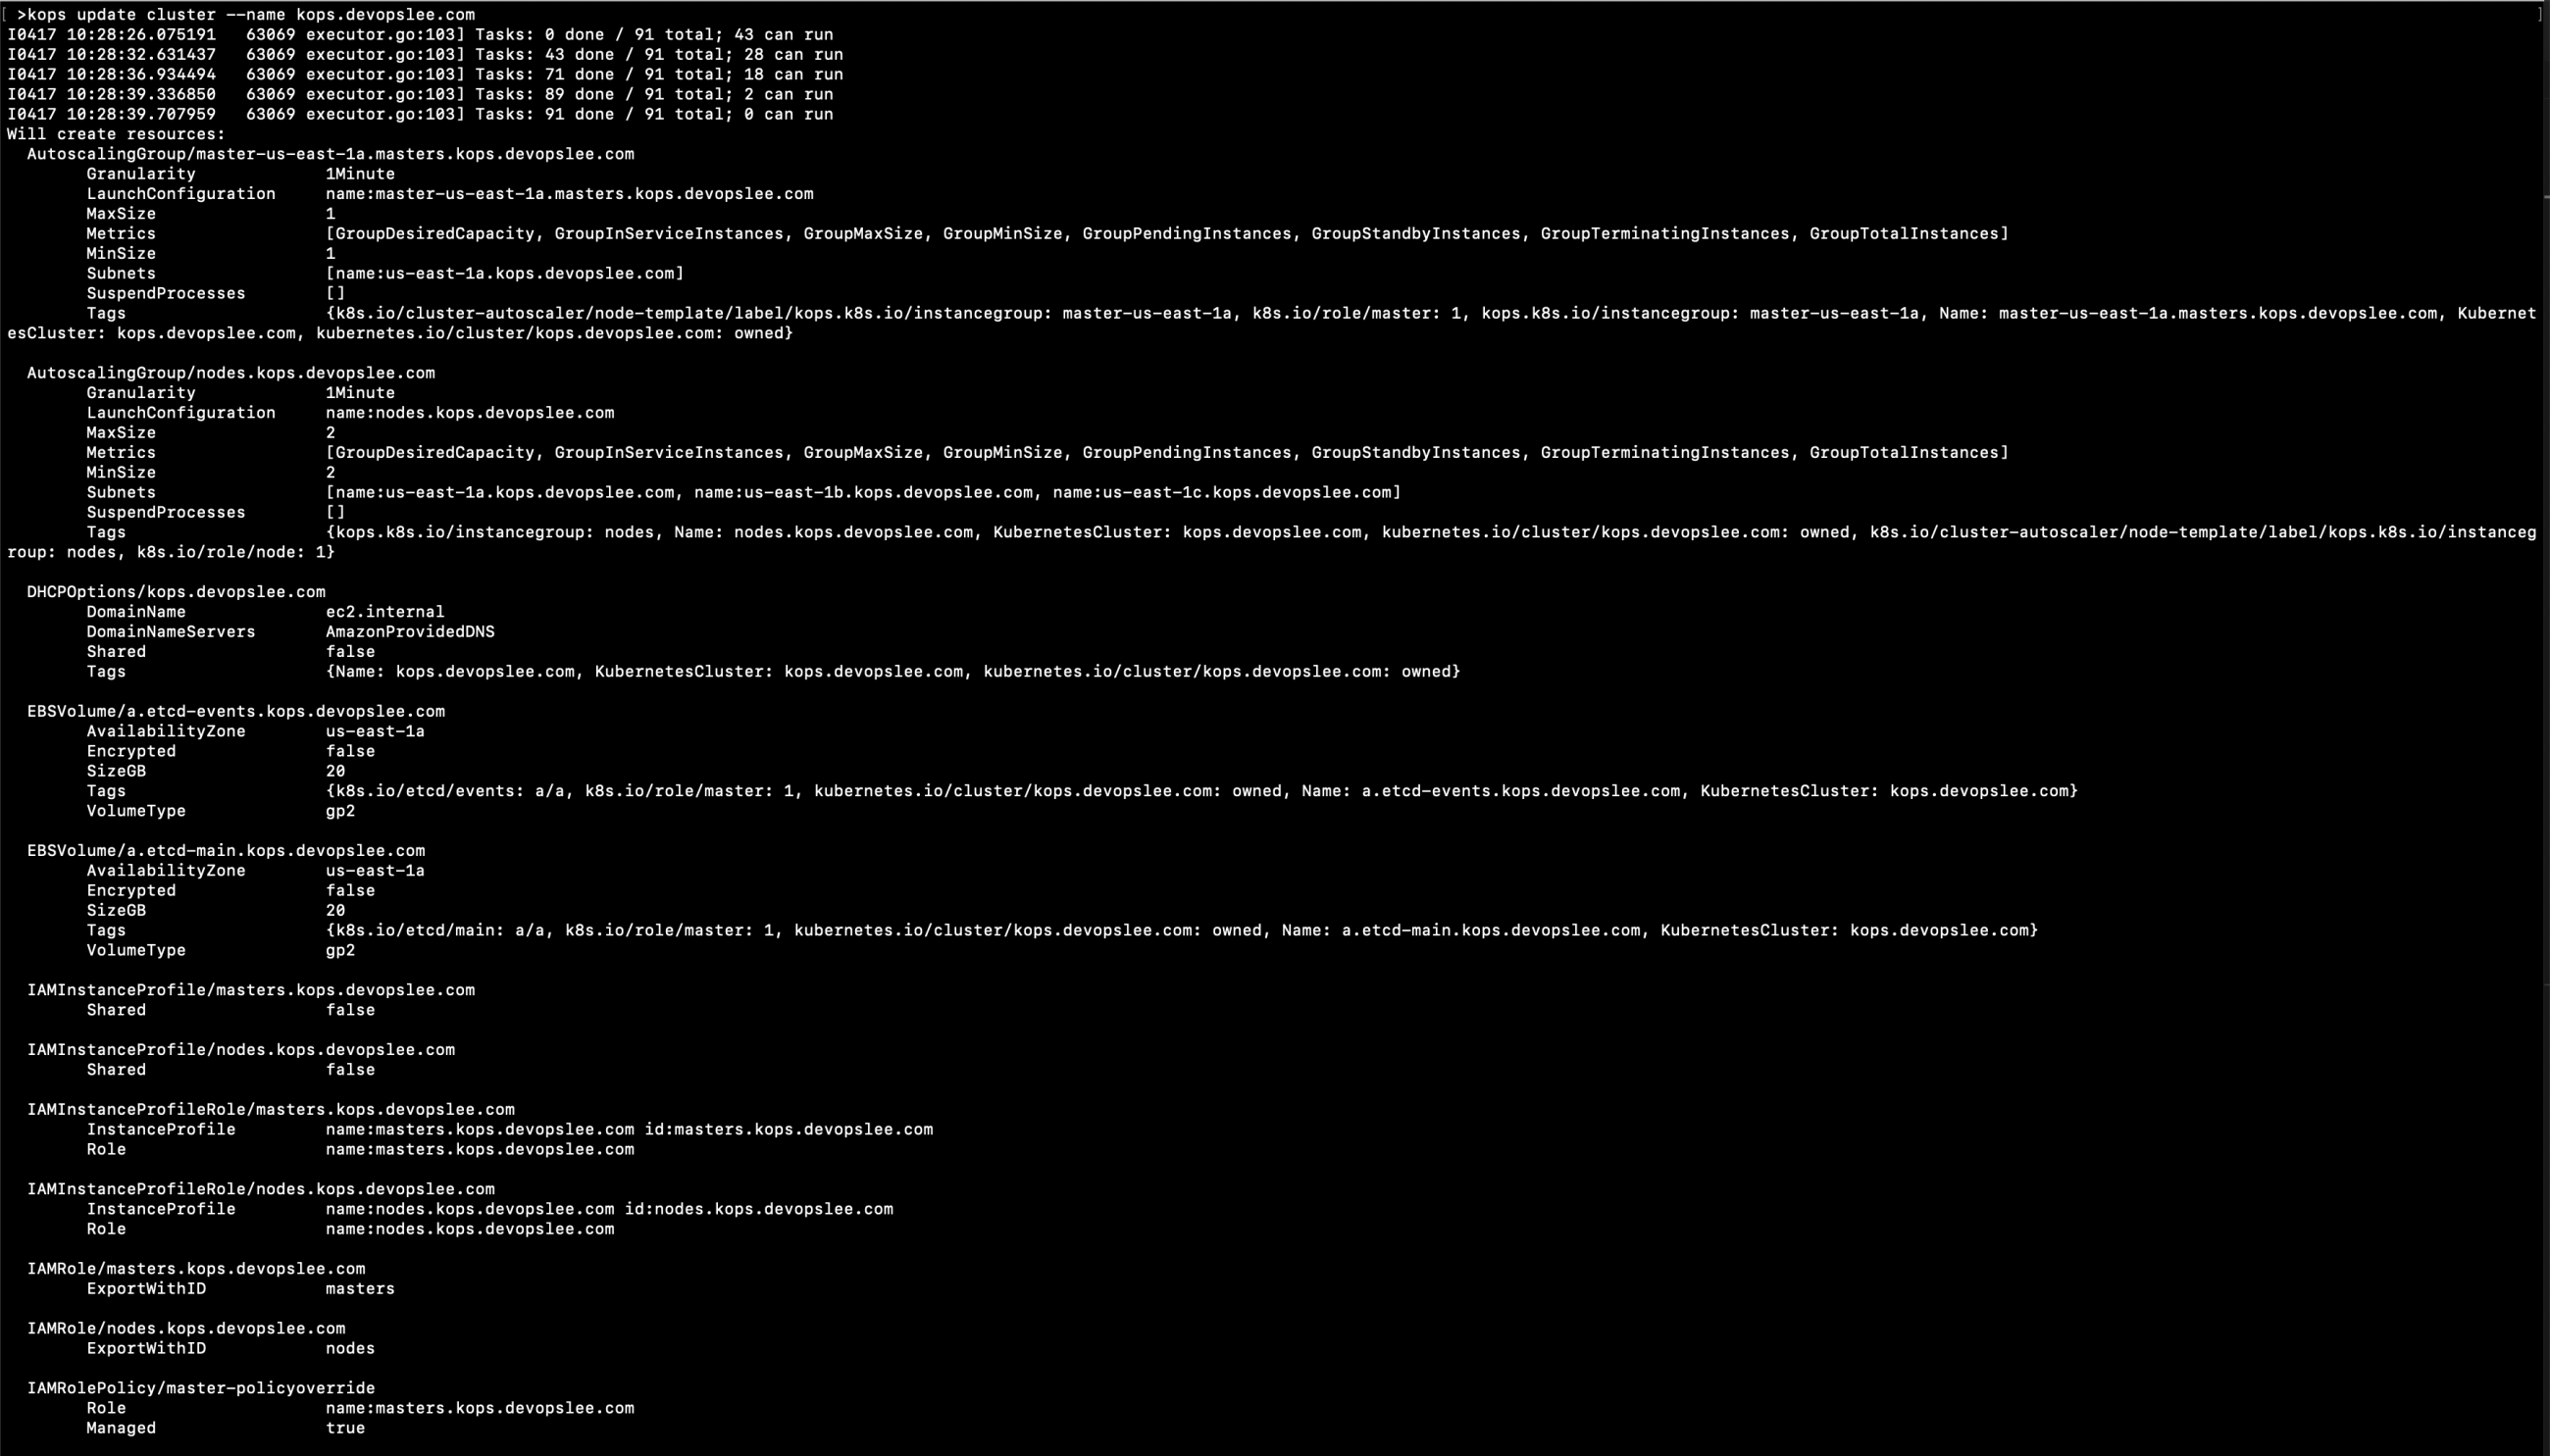
Till this point, the cluster has not been created, execute the following command to update the Cluster configuration.
kops update cluster --name kops.devopslee.com
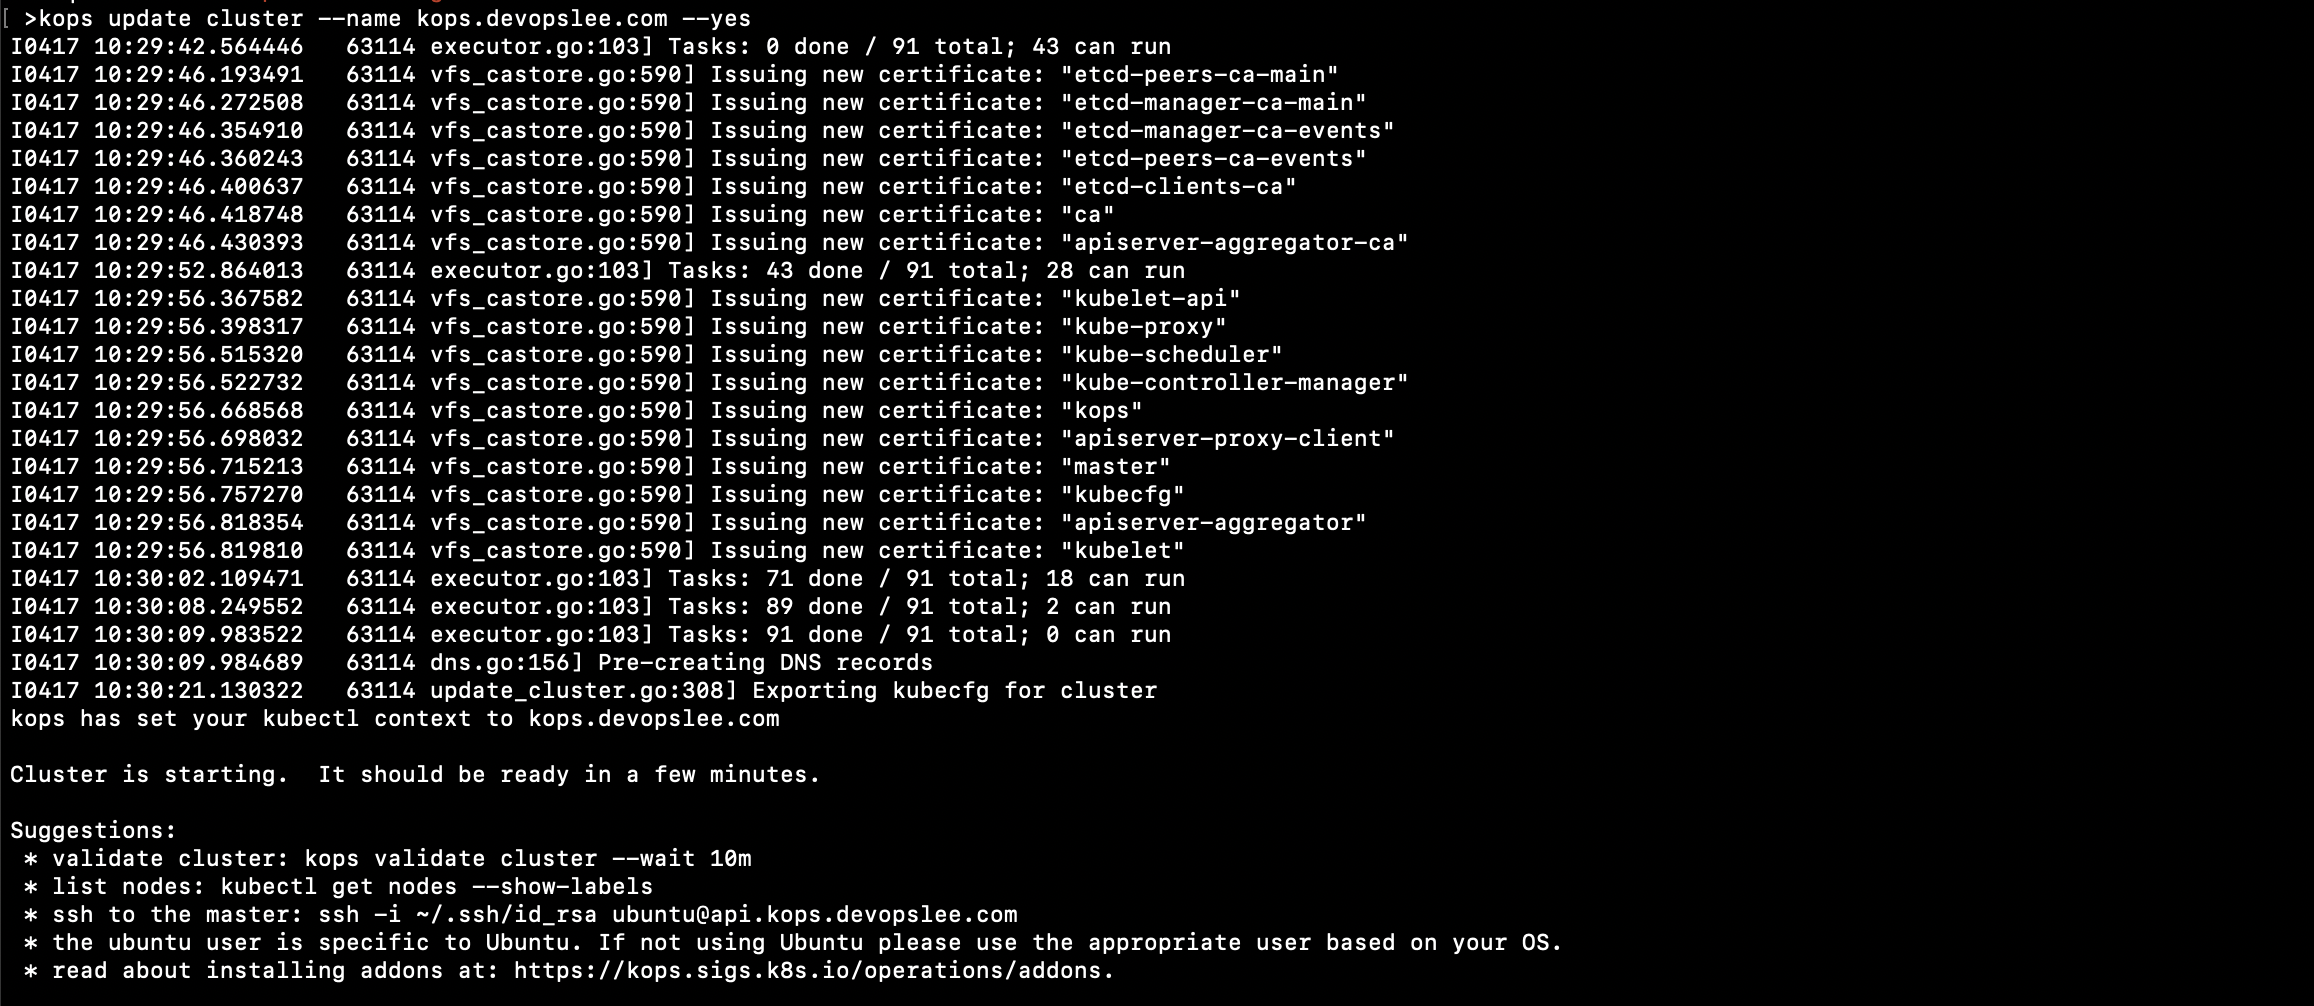
You will still need to execute the above command with --yes as an option so that cluster resources get created.
kops update cluster --name kops.devopslee.com --yes
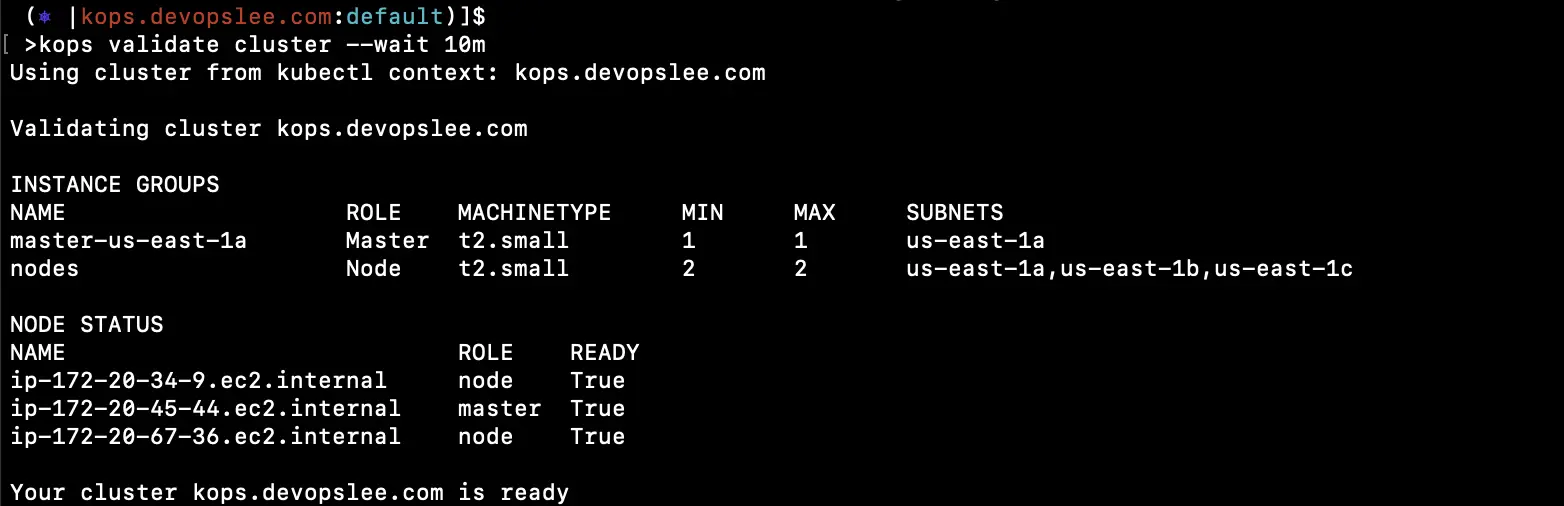
Validate if the cluster is ready or not.
kops validate cluster --wait 10m

You need to wait for some time while the cluster becomes healthy.
kops validate cluster --wait 10m
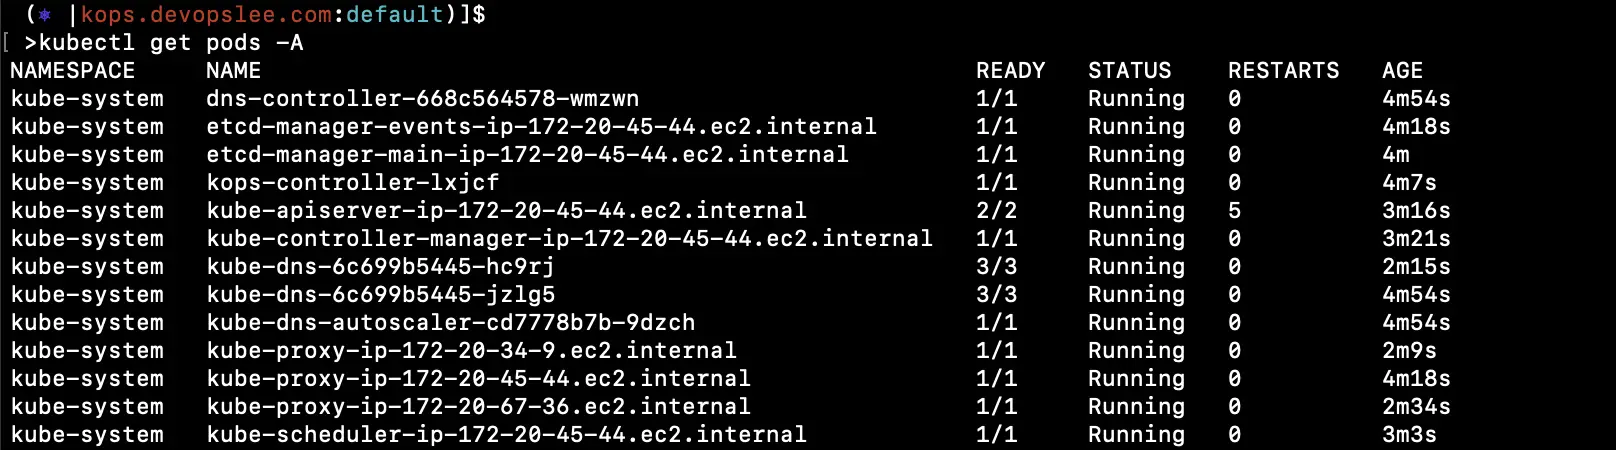
Once the cluster is healthy, you can check the default pods across all namespaces using the following command.
kubectl get pods -A
Setup Nginx Ingress Controller using Helm
Once the Kubernetes Cluster is ready and healthy, you are good to go and install Nginx Ingress Controller using Helm.
Before you proceed, verify that you have Helm v3.5.3.
Note: I have used Helm binary present at my current location, hence you can see ./helm in screenshots.
helm version
![]()
Add the repo and install the Nginx Ingress Controller Helm chart using the following commands. To understand Helm, refer to the documentation mentioned in the prerequisites section.
helm repo add ingress-nginx https://kubernetes.github.io/ingress-nginx
helm repo update
helm install nginx-ingress ingress-nginx/ingress-nginx --set controller.publishService.enabled=true

In the above screenshot, you can see that the Helm chart has been installed.
You can check the resources that have been created as part of the Ingress Controller.
kubectl get pods
kubectl get deployment
kubectl get service

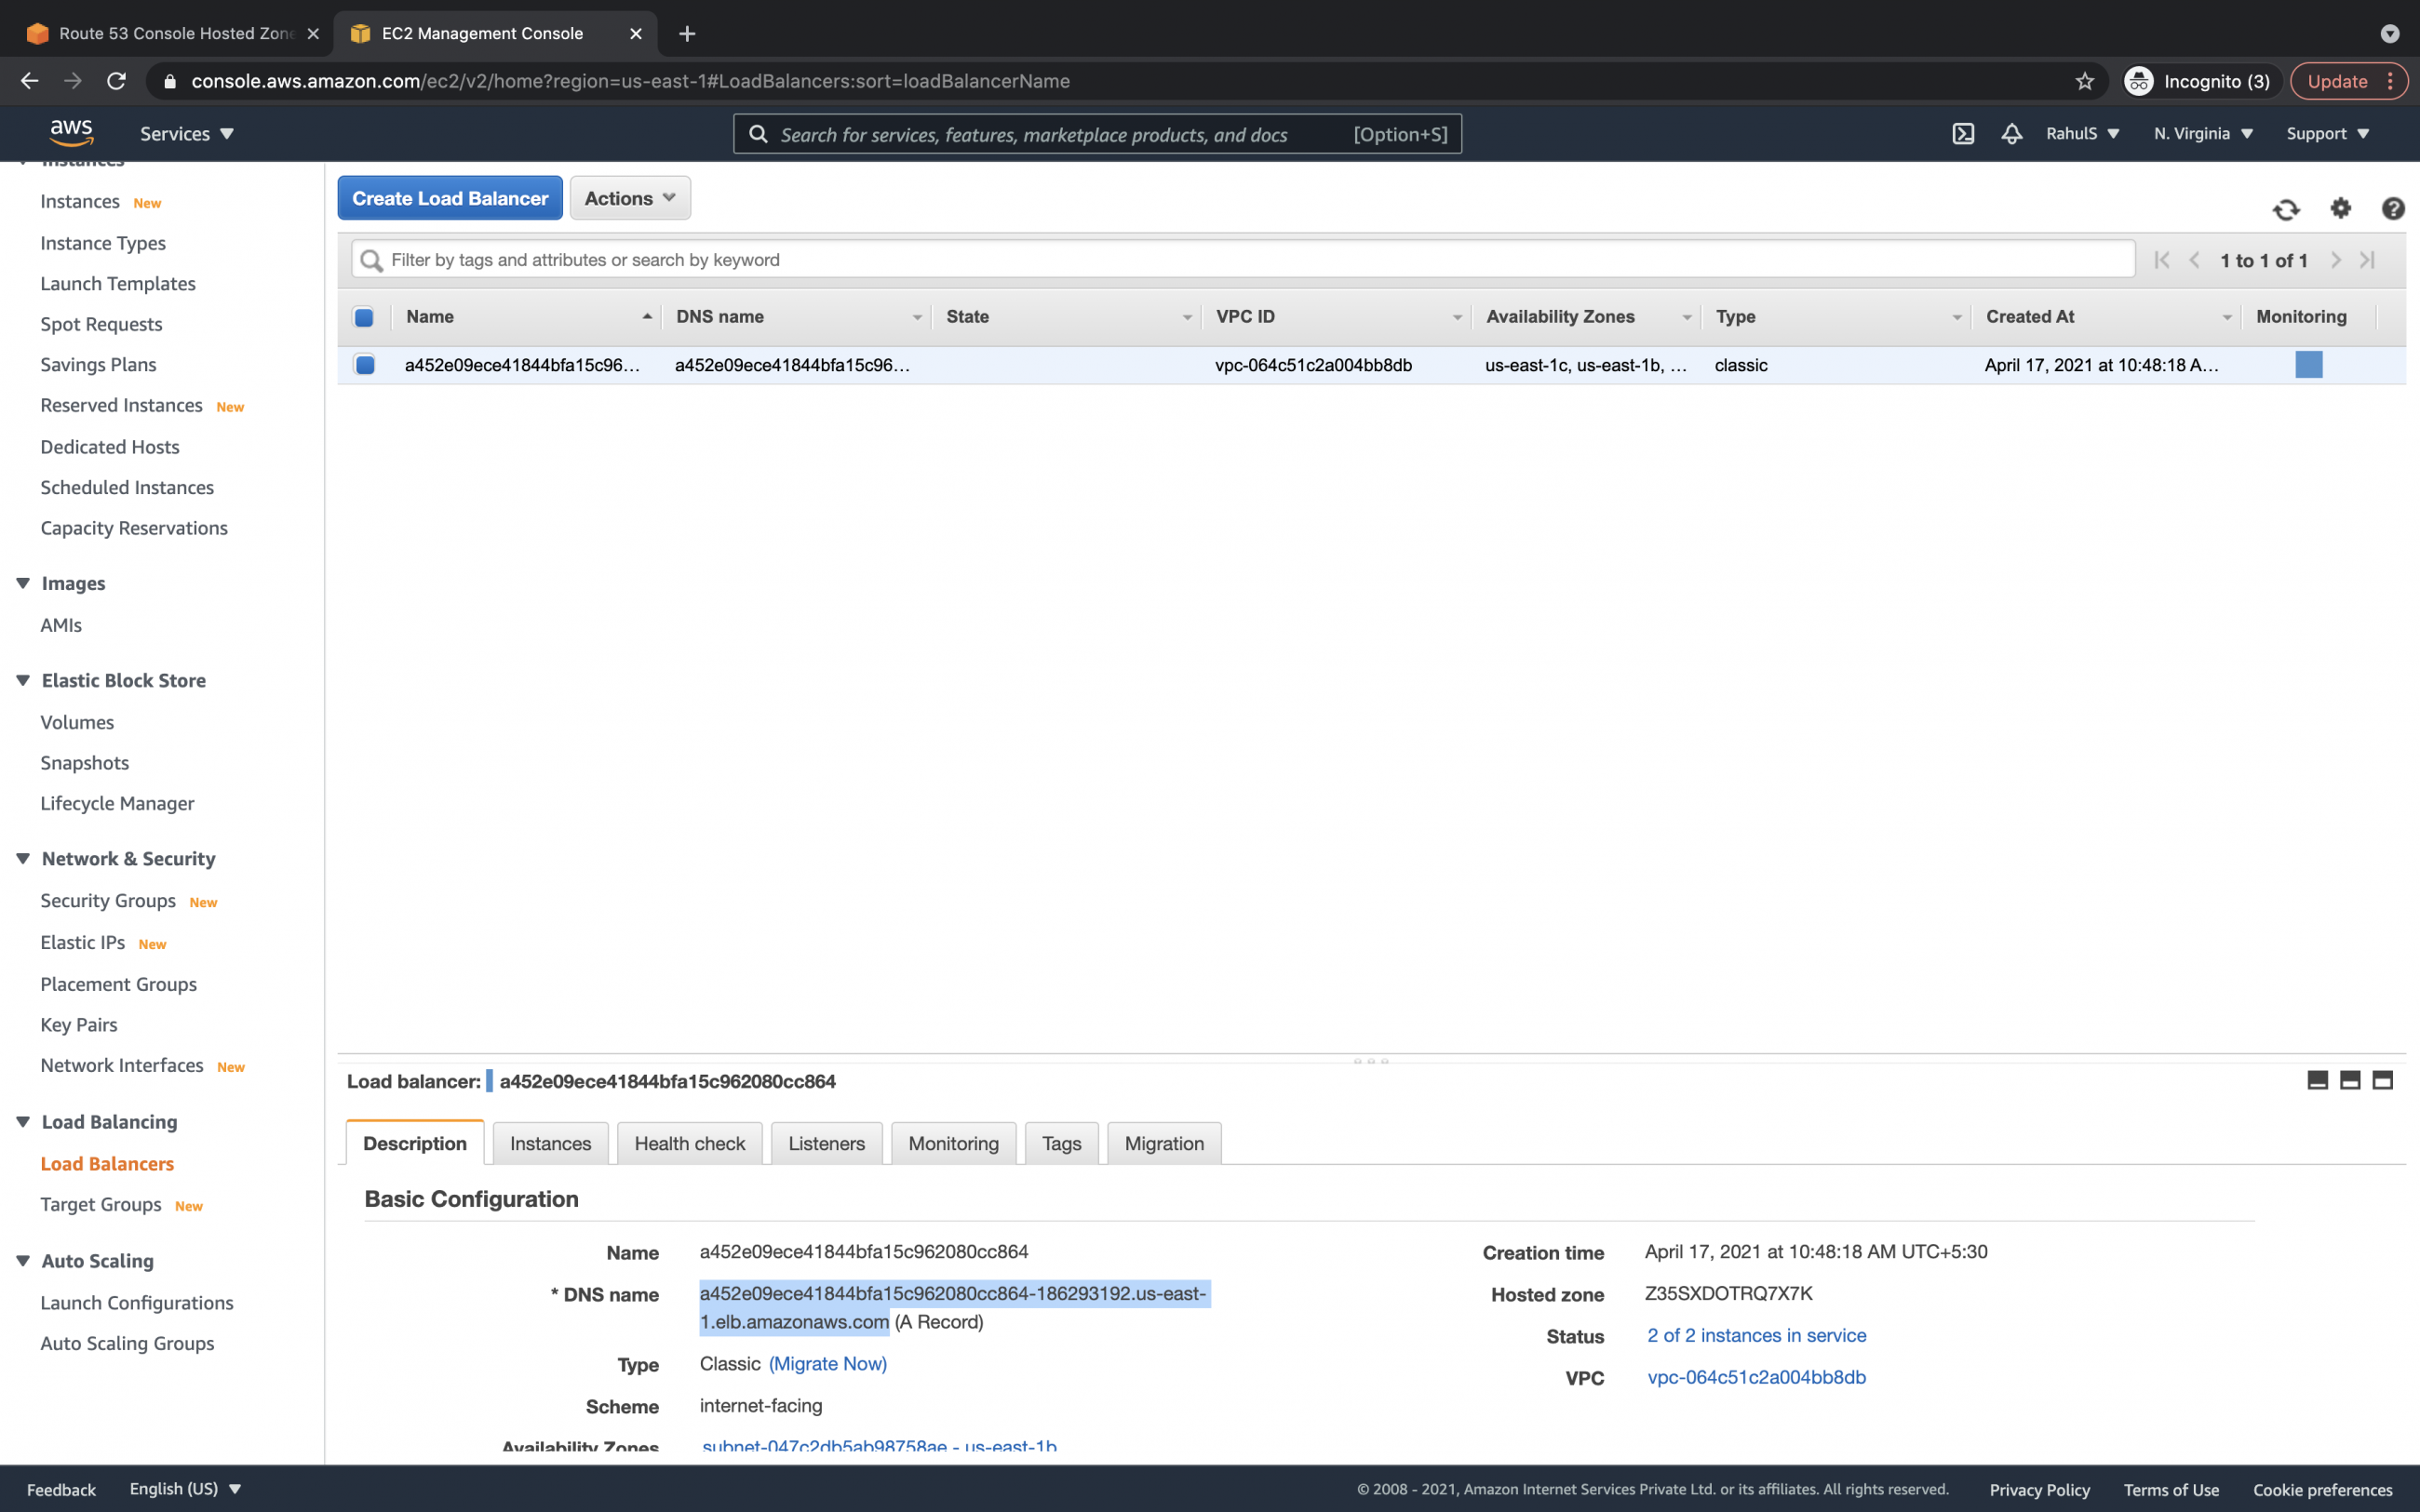
In the above screenshot, you can see that the Service "nginx-ingress-ingress-nginx-controller" of type LoadBalancer has also been created. It means a LoadBalancer has been created in the AWS account.
Create a Recordset in Route53 pointing to the LoadBalancer created by the Nginx Ingress Controller
Go to your AWS account in the region where you created your Kubernetes Cluster. Check the LoadBalancer and copy its DNS Name.
Now, go to Route53 and create a single A Record in the HostedZone.
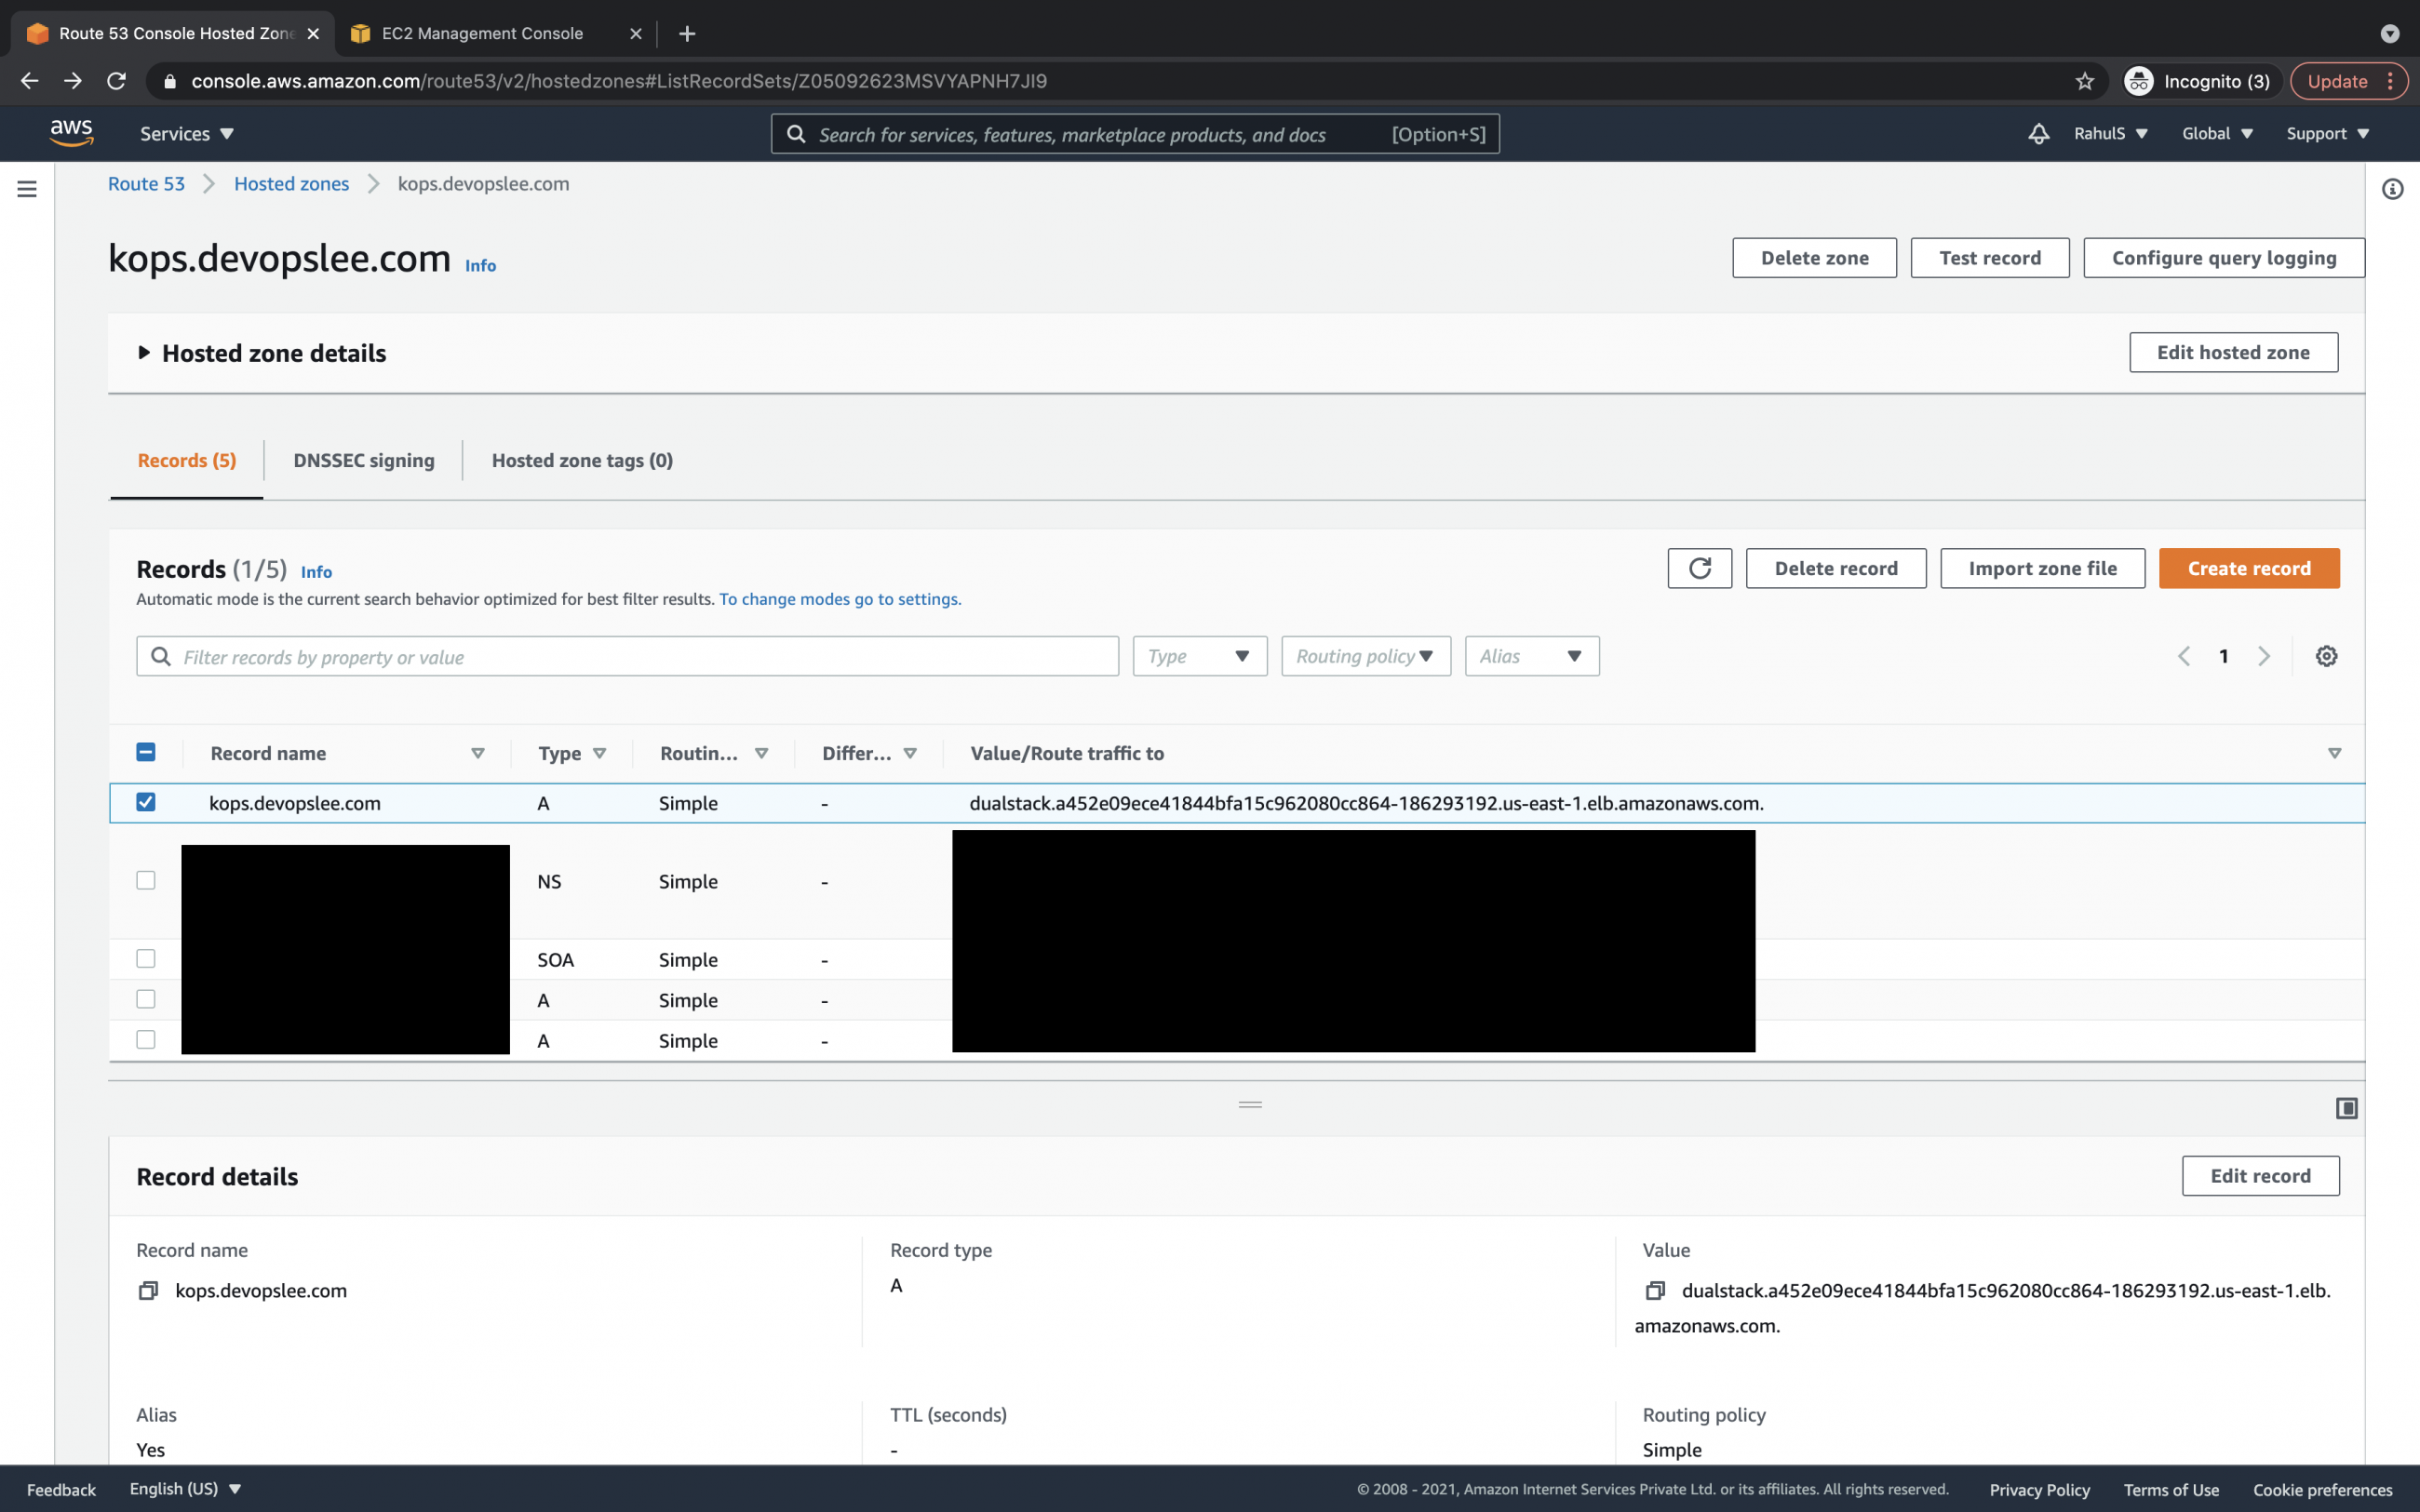
Once we create a valid record, the record we created will be used to route traffic to Kubernetes Cluster through the Nginx Ingress Controller we created. In this case, kops.devopslee.com will route traffic to Services in the Kubernetes cluster through the Nginx Ingress Controller.
Create Object definition files for a sample application
Now, let's create object definition files to deploy a sample application. We will deploy 3 applications using 3 Deployments and 3 respective Services for the deployments. We will then create an Ingress resource with path-based routing to route traffic to our applications using kops.devopslee.com based on the path.
Create 1-nginx-main-app.yaml for application 1.
Github Link: Click here to copy the file from my Github repo.
apiVersion: apps/v1
kind: Deployment
metadata:
  labels:
    run: nginx
  name: nginx-deploy-main
spec:
  replicas: 1
  selector:
    matchLabels:
      run: nginx-main
  template:
    metadata:
      labels:
        run: nginx-main
    spec:
      containers:
      - image: nginx
        name: nginx


---
apiVersion: v1
kind: Service
metadata:
  name: nginx-deploy-main
spec:
  type: ClusterIP
  ports:
  - port: 80
    targetPort: 80
  selector:
    run: nginx-main
Create 2-nginx-green-app.yaml for application 2.
Github Link: Click here to copy the file from my Github repo.
apiVersion: apps/v1
kind: Deployment
metadata:
  labels:
    run: nginx
  name: nginx-deploy-green
spec:
  replicas: 1
  selector:
    matchLabels:
      run: nginx-green
  template:
    metadata:
      labels:
        run: nginx-green
    spec:
      volumes:
      - name: webdata
        emptyDir: {}
      initContainers:
      - name: web-content
        image: busybox
        volumeMounts:
        - name: webdata
          mountPath: "/webdata"
        command: ["/bin/sh", "-c", 'echo "<h1>I am <font color=green>GREEN</font></h1>" > /webdata/index.html']
      containers:
      - image: nginx
        name: nginx
        volumeMounts:
        - name: webdata
          mountPath: "/usr/share/nginx/html"


---
---
apiVersion: v1
kind: Service
metadata:
  name: nginx-deploy-green
spec:
  type: ClusterIP
  ports:
  - port: 80
    targetPort: 80
  selector:
    run: nginx-green
Create 3-nginx-blue-app.yaml for application 3
Github Link: Click here to copy the file from my Github repo.
apiVersion: apps/v1
kind: Deployment
metadata:
  labels:
    run: nginx
  name: nginx-deploy-blue
spec:
  replicas: 1
  selector:
    matchLabels:
      run: nginx-blue
  template:
    metadata:
      labels:
        run: nginx-blue
    spec:
      volumes:
      - name: webdata
        emptyDir: {}
      initContainers:
      - name: web-content
        image: busybox
        volumeMounts:
        - name: webdata
          mountPath: "/webdata"
        command: ["/bin/sh", "-c", 'echo "<h1>I am <font color=blue>BLUE</font></h1>" > /webdata/index.html']
      containers:
      - image: nginx
        name: nginx
        volumeMounts:
        - name: webdata
          mountPath: "/usr/share/nginx/html"


---
apiVersion: v1
kind: Service
metadata:
  name: nginx-deploy-blue
spec:
  type: ClusterIP
  ports:
  - port: 80
    targetPort: 80
  selector:
    run: nginx-blue
Create 4-ingress.yaml for creating path-based Ingress rules.
Github Link: Click here to copy the file from my Github repo.
apiVersion: extensions/v1beta1
kind: Ingress
metadata:
  annotations:
    nginx.ingress.kubernetes.io/rewrite-target: /
  name: ingress-resource
spec:
  rules:
  - host: kops.devopslee.com
    http:
      paths:
      - path: /
        backend:
          serviceName: nginx-deploy-main
          servicePort: 80
      - path: /blue
        backend:
          serviceName: nginx-deploy-blue
          servicePort: 80
      - path: /green
        backend:
          serviceName: nginx-deploy-green
          servicePort: 80
You can find all these files on my Github repo here.
Deploy sample applications
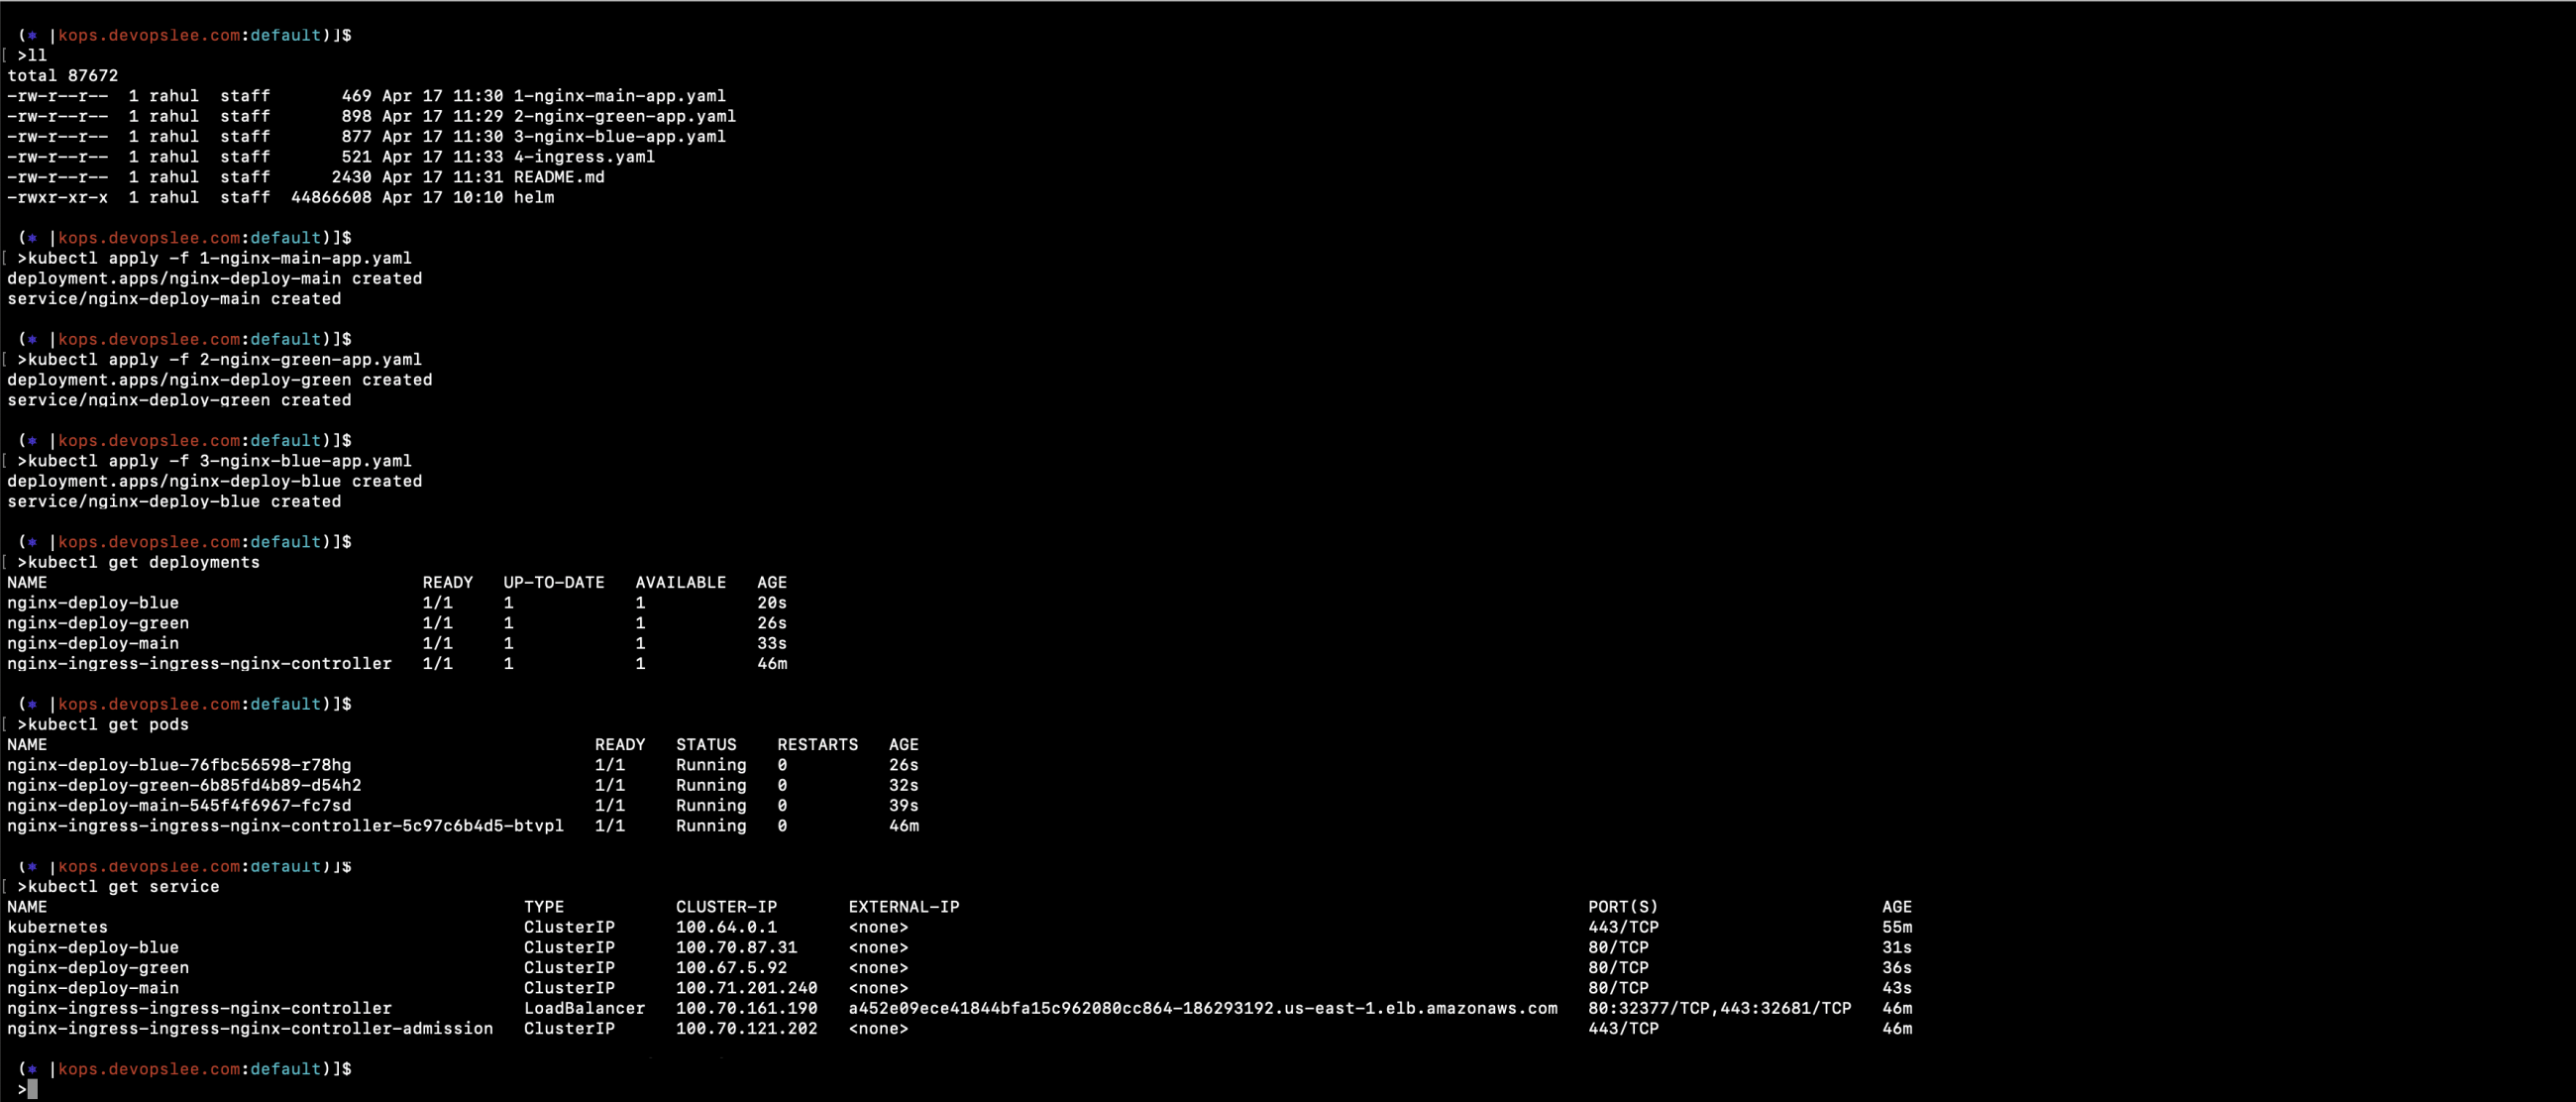
Let's deploy sample applications one by one and check their status.
kubectl apply -f 1-nginx-main-app.yaml
kubectl apply -f 2-nginx-green-app.yaml
kubectl apply -f 3-nginx-blue-app.yaml
kubectl get deployments
kubectl get pods
kubectl get service
Deploy an Ingress Object
Now, it's time to create a path-based routing Ingress resource. At the same time, check logs of the Nginx Pod.
kubectl logs nginx-ingress-ingress-nginx-controller-5c97c6b4d5-btvpl -f
kubectl apply -f 4-ingress.yaml
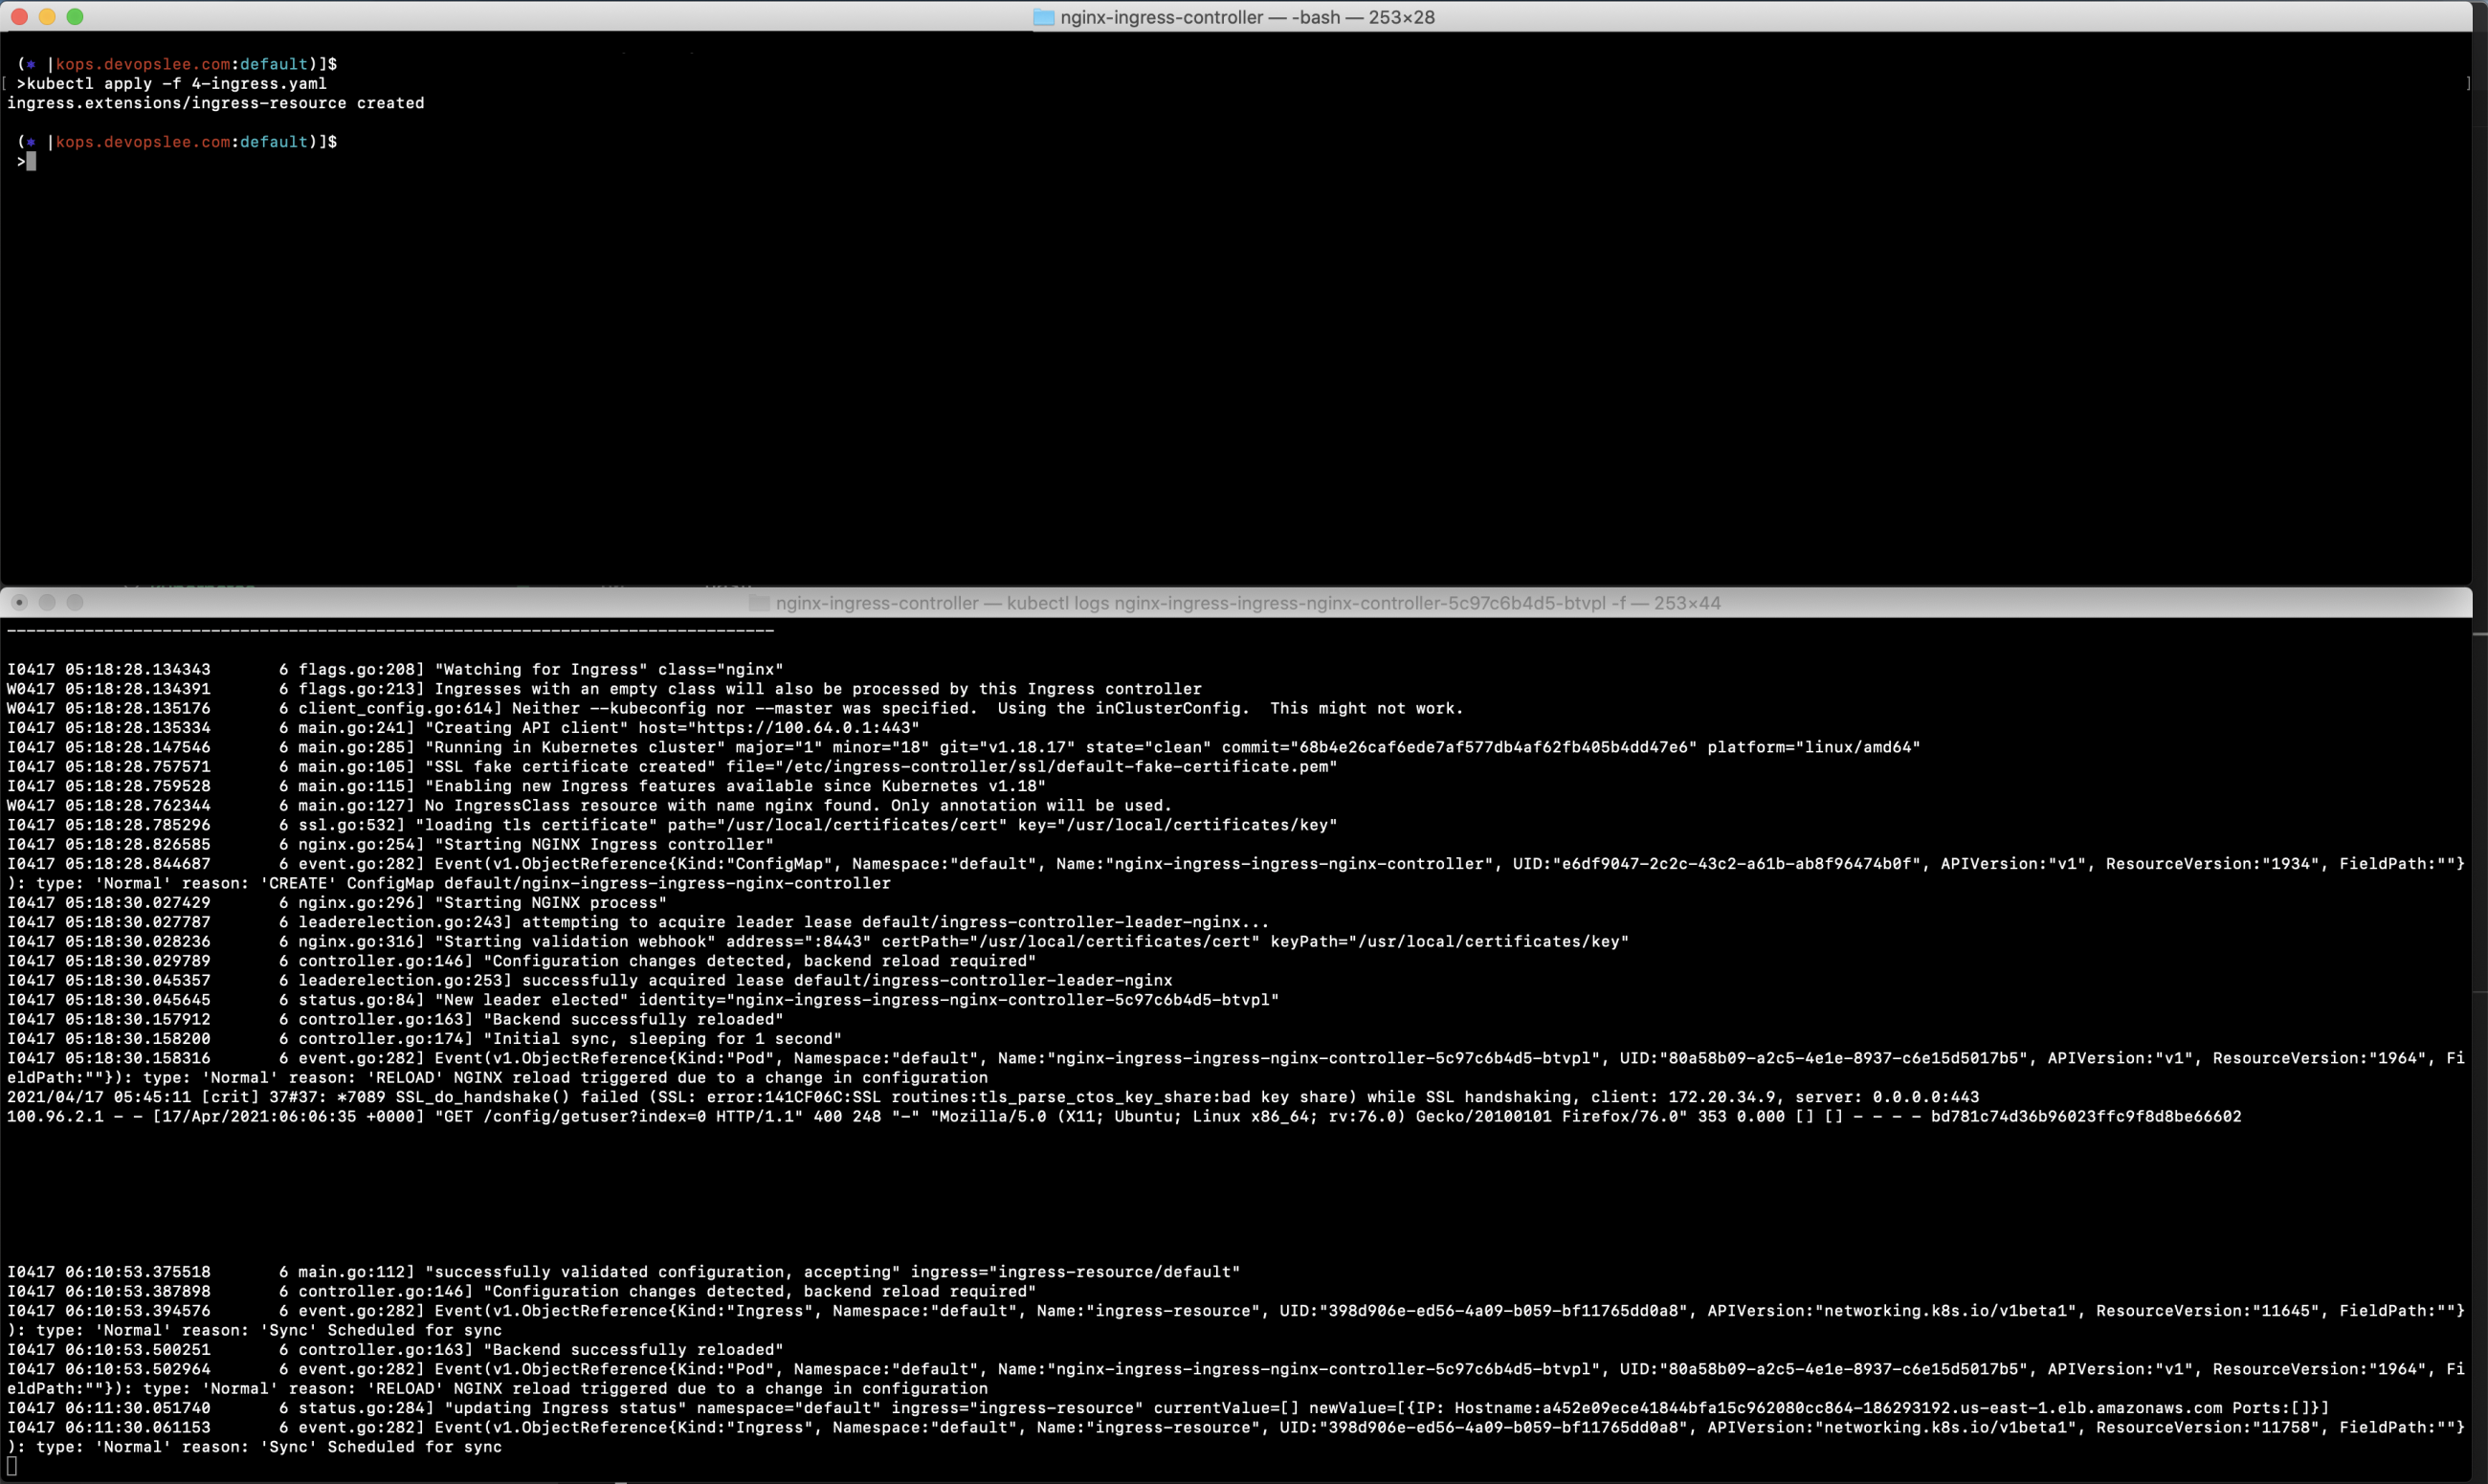
As soon as the Ingress resource is created, you can see that the Nginx has loaded its configuration.
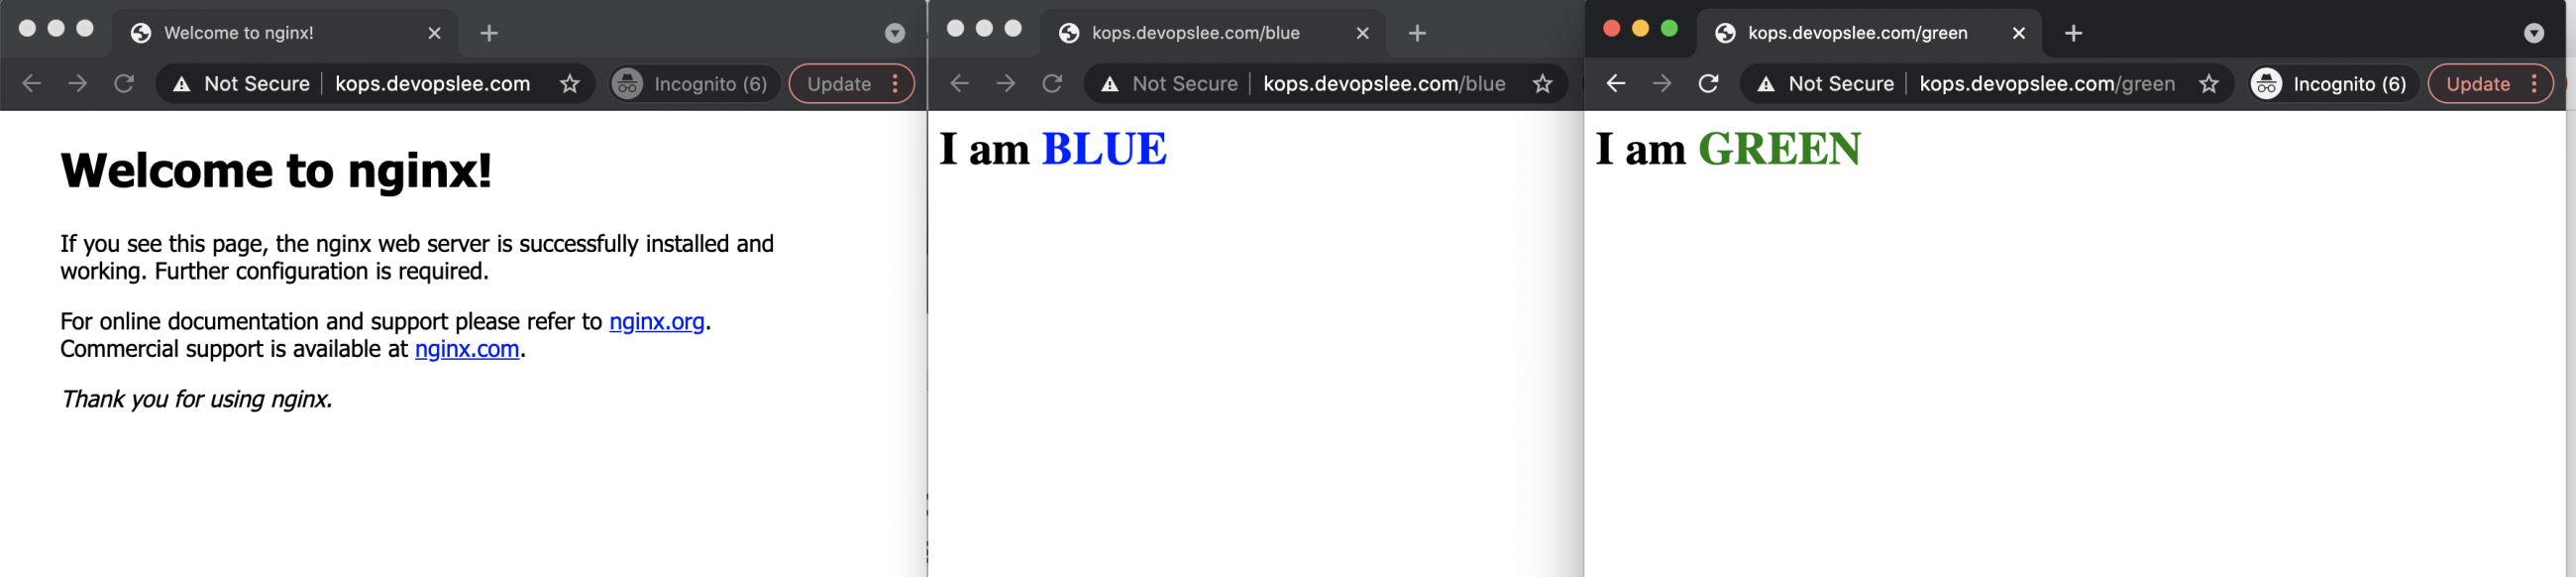
And now, 3 different applications are ready to be accessed using the same Host Name, i.e. kops.devopslee.com, on different paths.
URLs for the applications, the Hostname here name will be different for you.
nginx-deploy-main can be accessed on kops.devopslee.com
nginx-deploy-green can be accessed on kops.devopslee.com/green and
nginx-deploy-blue can be accessed on kops.devopslee.com/blue

You can see that 3 different applications can be accessed using the same Hostname based on the path.
Conclusion
In this article, we saw the steps to create a Kubernetes Cluster using Kops. This article mainly focused on setting up Nginx Ingress Controller using Helm and creating a path-based routing using Ingress resource. We deployed 3 different sample applications and tried accessing them using the same Hostname and different paths.

