How to Install Icinga 2 Monitoring Tool on CentOS 8
Monitoring is one of the most important components of the server infrastructure and data center. It will help you to detect problems and issues that will occur on your servers so you can solve that issues faster. There are some open-source monitoring tools available out there, and one of the most popular is 'Icinga 2'.
Icinga is created as a fork of the popular Nagios monitoring tool and now has been rewritten from scratch in C++. As fork from the Nagios project, Icinga has come with additional tools and features, including the icinga director, icinga modules, and icinga plugins. Also, it has support for distributed monitoring that allows you to manage multiple Icinga instances from one dashboard.
In this tutorial, we will show you step-by-step how to install and configure Icinga2 with Apache2 and MariaDB on CentOS 8 server.
Prerequisites
- An CentOS 8 server. Make sure it's updated to the latest version.
- At least 2GB RAM and 2 cores. If you've more, it will be better.
- A user with Sudo privileges.
Setup Repositories
First, you need to add the epel, remi, and icinga repository to the centos 8 system. Then you have to install the dnf `config-manager` tool and enable the `PowerTools` repository using that tool.
1. Add the epel and remi repository for the centos 8 servers by running the following commands.
sudo dnf install -y epel-release
sudo dnf install -y https://rpms.remirepo.net/enterprise/remi-release-8.rpm
2. Now run the command below to download and add the Icinga repository for the centos 8 system.
sudo dnf install -y https://packages.icinga.com/epel/icinga-rpm-release-8-latest.noarch.rpm
3. After that, execute the following commands to install the dnf config-manager tool and enable the PowerTools repository.
sudo dnf install -y 'dnf-command(config-manager)'
sudo dnf config-manager --set-enabled powertools
4. Once all process is completed, verify all enabled repository on your system using the command below.
sudo dnf repolist
You will see output similar as below, and make sure the epel, remi, icinga-*, and powertools repositories are on the list.
repo id                                                                                              repo name
appstream                                                                                            CentOS Linux 8 - AppStream
baseos                                                                                               CentOS Linux 8 - BaseOS
epel                                                                                                 Extra Packages for Enterprise Linux 8 - x86_64
epel-modular                                                                                         Extra Packages for Enterprise Linux Modular 8 - x86_64
extras                                                                                               CentOS Linux 8 - Extras
icinga-stable-release                                                                                ICINGA (stable release for epel)
powertools                                                                                           CentOS Linux 8 - PowerTools
remi-modular                                                                                         Remi's Modular repository for Enterprise Linux 8 - x86_64
remi-safe                                                                                            Safe Remi's RPM repository for Enterprise Linux 8 - x86_64
Installing and Configuring LAMP Stack
The Icinga monitoring tool has two main components, "icinga2" which handles all monitoring jobs, and the "icingaweb2" which is a powerful, clean, and fast web application based on PHP that allows you to manage your Icinga stack from a web browser. Now you will be installing and configuring the basic LAMP Stack on the centos 8 system.
1. Enable the remi module for PHP 7.4 using the command below.
sudo dnf module enable -y php:remi-7.4
Next, execute the following command to install basic LAMP Stack packages.
sudo dnf install -y httpd mariadb-server mariadb php php-cli php-devel php-pear make php-mysqlnd php-pecl-imagick php-pecl-imagick-devel
Now start both apache (httpd on centos) and mariadb services and enable both of them to start at system boot.
sudo systemctl enable --now httpd
sudo systemctl enable --now mariadb
And you will see similar output as follow, the apache and mariadb services started and enabled.
# Apache started and enabled
Created symlink /etc/systemd/system/multi-user.target.wants/httpd.service → /usr/lib/systemd/system/httpd.service.

# MariaDB started and enabled
Created symlink /etc/systemd/system/mysql.service → /usr/lib/systemd/system/mariadb.service.
Created symlink /etc/systemd/system/mysqld.service → /usr/lib/systemd/system/mariadb.service.
Created symlink /etc/systemd/system/multi-user.target.wants/mariadb.service → /usr/lib/systemd/system/mariadb.service.
2. After that, run the command below to set up the mariadb root password and for security reasons, you will be removing the default database test and anonymous user, also disabling the remote login for the root user.
sudo mysql_secure_installation
Below is the similar output you will get, and make sure to type a new strong password for the mariadb root user and type 'Y' to confirm all actions.
NOTE: RUNNING ALL PARTS OF THIS SCRIPT IS RECOMMENDED FOR ALL MariaDB
      SERVERS IN PRODUCTION USE!  PLEASE READ EACH STEP CAREFULLY!

To log into MariaDB to secure it, we'll need the current
password for the root user.  If you've just installed MariaDB, and
you haven't set the root password yet, the password will be blank,
so you should just press enter here.

Enter current password for root (enter for none): PRESS ENTER
OK, successfully used password, moving on...

Setting the root password ensures that nobody can log into the MariaDB
root user without the proper authorisation.

Set root password? [Y/n] Y
New password: TYPE STRONG PASSWORD
Re-enter new password: TYPE STRONG PASSWORD
Password updated successfully!
Reloading privilege tables..
 ... Success!


By default, a MariaDB installation has an anonymous user, allowing anyone
to log into MariaDB without having to have a user account created for
them.  This is intended only for testing, and to make the installation
go a bit smoother.  You should remove them before moving into a
production environment.

Remove anonymous users? [Y/n] Y
 ... Success!

Normally, root should only be allowed to connect from 'localhost'.  This
ensures that someone cannot guess at the root password from the network.

Disallow root login remotely? [Y/n] Y
 ... Success!

By default, MariaDB comes with a database named 'test' that anyone can
access.  This is also intended only for testing, and should be removed
before moving into a production environment.

Remove test database and access to it? [Y/n] Y
 - Dropping test database...
 ... Success!
 - Removing privileges on test database...
 ... Success!

Reloading the privilege tables will ensure that all changes made so far
will take effect immediately.

Reload privilege tables now? [Y/n] Y
 ... Success!

Cleaning up...

All done!  If you've completed all of the above steps, your MariaDB
installation should now be secure.

Thanks for using MariaDB!
Installing and Configuring Icinga2
Now you will be installing and configuring the main component of Icinga itself. This stage will cover the installation of icinga2 packages, creating the new database and user, importing the database schema, and setting up the Icinga REST API.
1. Execute the following command to install Icinga monitoring tool packages.
sudo dnf install -y icinga2 nagios-plugins-all
After that, start and enable the icinga2 service, then verify the Icinga service status.
sudo systemctl enable --now icinga2
sudo systemctl status icinga2
If you see similar output like the following, the Icinga service is up and running.
# Icinga2 started and enabled
Created symlink /etc/systemd/system/multi-user.target.wants/icinga2.service → /usr/lib/systemd/system/icinga2.service.

# Icinga2 status running
? icinga2.service - Icinga host/service/network monitoring system
   Loaded: loaded (/usr/lib/systemd/system/icinga2.service; enabled; vendor preset: disabled)
   Active: active (running) since Sun 2021-07-18 02:38:19 UTC; 6s ago
  Process: 31290 ExecStartPre=/usr/lib/icinga2/prepare-dirs /etc/sysconfig/icinga2 (code=exited, status=0/SUCCESS)
 Main PID: 31298 (icinga2)
    Tasks: 13 (limit: 4964)
   Memory: 20.9M
   CGroup: /system.slice/icinga2.service
           ??31298 /usr/lib64/icinga2/sbin/icinga2 --no-stack-rlimit daemon --close-stdio -e /var/log/icinga2/error.log
           ??31319 /usr/lib64/icinga2/sbin/icinga2 --no-stack-rlimit daemon --close-stdio -e /var/log/icinga2/error.log
           ??31324 /usr/lib64/icinga2/sbin/icinga2 --no-stack-rlimit daemon --close-stdio -e /var/log/icinga2/error.log
2. Next, if you have the SELinux up and running on the centos 8 system, then you need to install the 'icinga2-selinux' package. But if the SELinux is disabled, skip this part.
Execute the command below to check the SELinux status.
sudo sestatus
If you get similar output like the following, then your SELinux is 'enabled'. Otherwise, you will get the output 'disabled', which means you can skip the SELinux part.
SELinux status:                 enabled
SELinuxfs mount:                /sys/fs/selinux
SELinux root directory:         /etc/selinux
Loaded policy name:             targeted
Current mode:                   permissive
Mode from config file:          permissive
Policy MLS status:              enabled
Policy deny_unknown status:     allowed
Memory protection checking:     actual (secure)
Max kernel policy version:      32
Now install the icinga2-selinux package using the command below.
sudo dnf install -y icinga2-selinux
After that apply the new configuration by restarting the icinga2 service and verify that Icinga is up and running under the SELinux context.
sudo systemctl restart icinga2
ps -eZ | grep icinga2
Below is the similar output you will get.
system_u:system_r:icinga2_t:s0    33479 ?        00:00:00 icinga2
system_u:system_r:icinga2_t:s0    33499 ?        00:00:00 icinga2
system_u:system_r:icinga2_t:s0    33504 ?        00:00:00 icinga2
3. Next, install the IDO MySQL backend for the icinga2 using the following command.
sudo dnf install -y icinga2-ido-mysql
Now execute the command below to log in to the MySQL shell and type your root password.
sudo mysql -u root -p
Create a new database and user for the icinga2 service using mysql queries below.
MariaDB [(none)]> CREATE DATABASE icinga;
MariaDB [(none)]> GRANT SELECT, INSERT, UPDATE, DELETE, DROP, CREATE VIEW, INDEX, EXECUTE ON icinga.* TO 'icinga'@'localhost' IDENTIFIED BY 'icingapassdb';
MariaDB [(none)]> FLUSH PRIVILEGES;
MariaDB [(none)]> quit
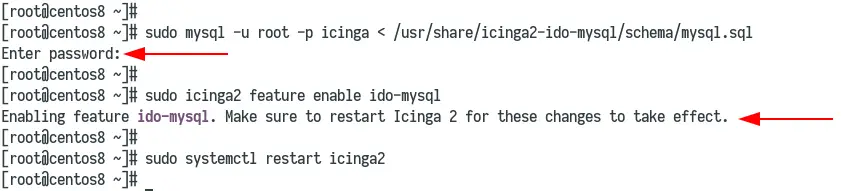
Now run the mysql command below to import the icinga2-ido-mysql database schema to the icinga database, and type the password of your mariadb root password.
sudo mysql -u root -p icinga < /usr/share/icinga2-ido-mysql/schema/mysql.sql
After that, enable the icinga2-ido-mysql feature and restart the icinga2 service to apply the new configuration using the commands below.
sudo icinga2 feature enable ido-mysql
sudo systemctl restart icinga2
And you will see similar output as in the picture below.
4. Next, you need to generate the icinga2 REST API configuration and certificates. The icingaweb2 requires the REST API to send actions related to monitoring jobs, such as rescheduling checks, query object details, etc.
Run the icinga2 command below to generate new API user, configuration, and TLS certificates.
sudo icinga2 api setup
And you will see similar output like the following, the new user root with password is available at the /etc/icinga2/conf.d/api-users.conf configuration file, and TLS certificates are available at the /var/lib/icinga2/certs/ directory.
information/cli: Generating new CA.
information/base: Writing private key to '/var/lib/icinga2/ca//ca.key'.
information/base: Writing X509 certificate to '/var/lib/icinga2/ca//ca.crt'.
information/cli: Generating new CSR in '/var/lib/icinga2/certs//centos8.csr'.
information/base: Writing private key to '/var/lib/icinga2/certs//centos8.key'.
information/base: Writing certificate signing request to '/var/lib/icinga2/certs//centos8.csr'.
information/cli: Signing CSR with CA and writing certificate to '/var/lib/icinga2/certs//centos8.crt'.
information/pki: Writing certificate to file '/var/lib/icinga2/certs//centos8.crt'.
information/cli: Copying CA certificate to '/var/lib/icinga2/certs//ca.crt'.
information/cli: Adding new ApiUser 'root' in '/etc/icinga2/conf.d/api-users.conf'.
information/cli: Reading '/etc/icinga2/icinga2.conf'.
information/cli: Enabling the 'api' feature.
Enabling feature api. Make sure to restart Icinga 2 for these changes to take effect.
information/cli: Updating 'NodeName' constant in '/etc/icinga2/constants.conf'.
information/cli: Created backup file '/etc/icinga2/constants.conf.orig'.
information/cli: Updating 'ZoneName' constant in '/etc/icinga2/constants.conf'.
information/cli: Backup file '/etc/icinga2/constants.conf.orig' already exists. Skipping backup.
Done.

Now restart your Icinga 2 daemon to finish the installation!
Optionally, to add the new API user manually, edit the configuration /etc/icinga2/conf.d/api-users.conf using the nano editor command as below.
sudo nano /etc/icinga2/conf.d/api-users.conf
Paste the following sample configuration as below, and make sure to define the API user, password, and define permission as you need.
object ApiUser "icingaweb2" {
  password = "Wijsn8Z9eRs5E25d"
  permissions = [ "status/query", "actions/*", "objects/modify/*", "objects/query/*" ]
}
Lastly, apply a new configuration by restarting the icinga2 service with the following command.
sudo systemctl restart icinga2
Installing and Configuring Icingaweb2
For this stage, you will be installing and configuring the icingaweb2 web application, including setting up the database and generate the installation token.
1. Execute the following command to install icingaweb2 packages.
sudo dnf install -y icingaweb2 icingacli
During the installation, the new apache configuration for icingaweb2 will be generated. Verify the new configuration using the following command.
cat /etc/httpd/conf.d/icingaweb2.conf
Below is the configuration you will see.
Alias /icingaweb2 "/usr/share/icingaweb2/public"

# Remove comments if you want to use PHP FPM and your Apache version is older than 2.4
#<IfVersion < 2.4>
#    # Forward PHP requests to FPM
#    SetEnvIf Authorization "(.*)" HTTP_AUTHORIZATION=$1
#    <LocationMatch "^{urlPath}/(.*\.php)$">
#        ProxyPassMatch "fcgi://127.0.0.1:9000/{documentRoot}/$1"
#    </LocationMatch>
#</IfVersion>

<Directory "/usr/share/icingaweb2/public">
    Options SymLinksIfOwnerMatch
    AllowOverride None
.......
To apply the new configuration, restart the apache/httpd service using the command below.
sudo systemctl restart httpd
2. Next, type the following command to log in to the mysql shell.
sudo mysql -u root -p
Execute some mysql queries below to create a new database and user for the icingaweb2.
MariaDB [(none)]> CREATE DATABASE icingaweb2;
MariaDB [(none)]> GRANT ALL ON icingaweb2.* TO icingaweb2@localhost IDENTIFIED BY 'icingaweb2passdb';
MariaDB [(none)]> FLUSH PRIVILEGES;
MariaDB [(none)]> quit
3. After that, generate the icingaweb2 setup token for the installation on the next stage using the following command.
sudo icingacli setup token create
sudo icingacli setup token show
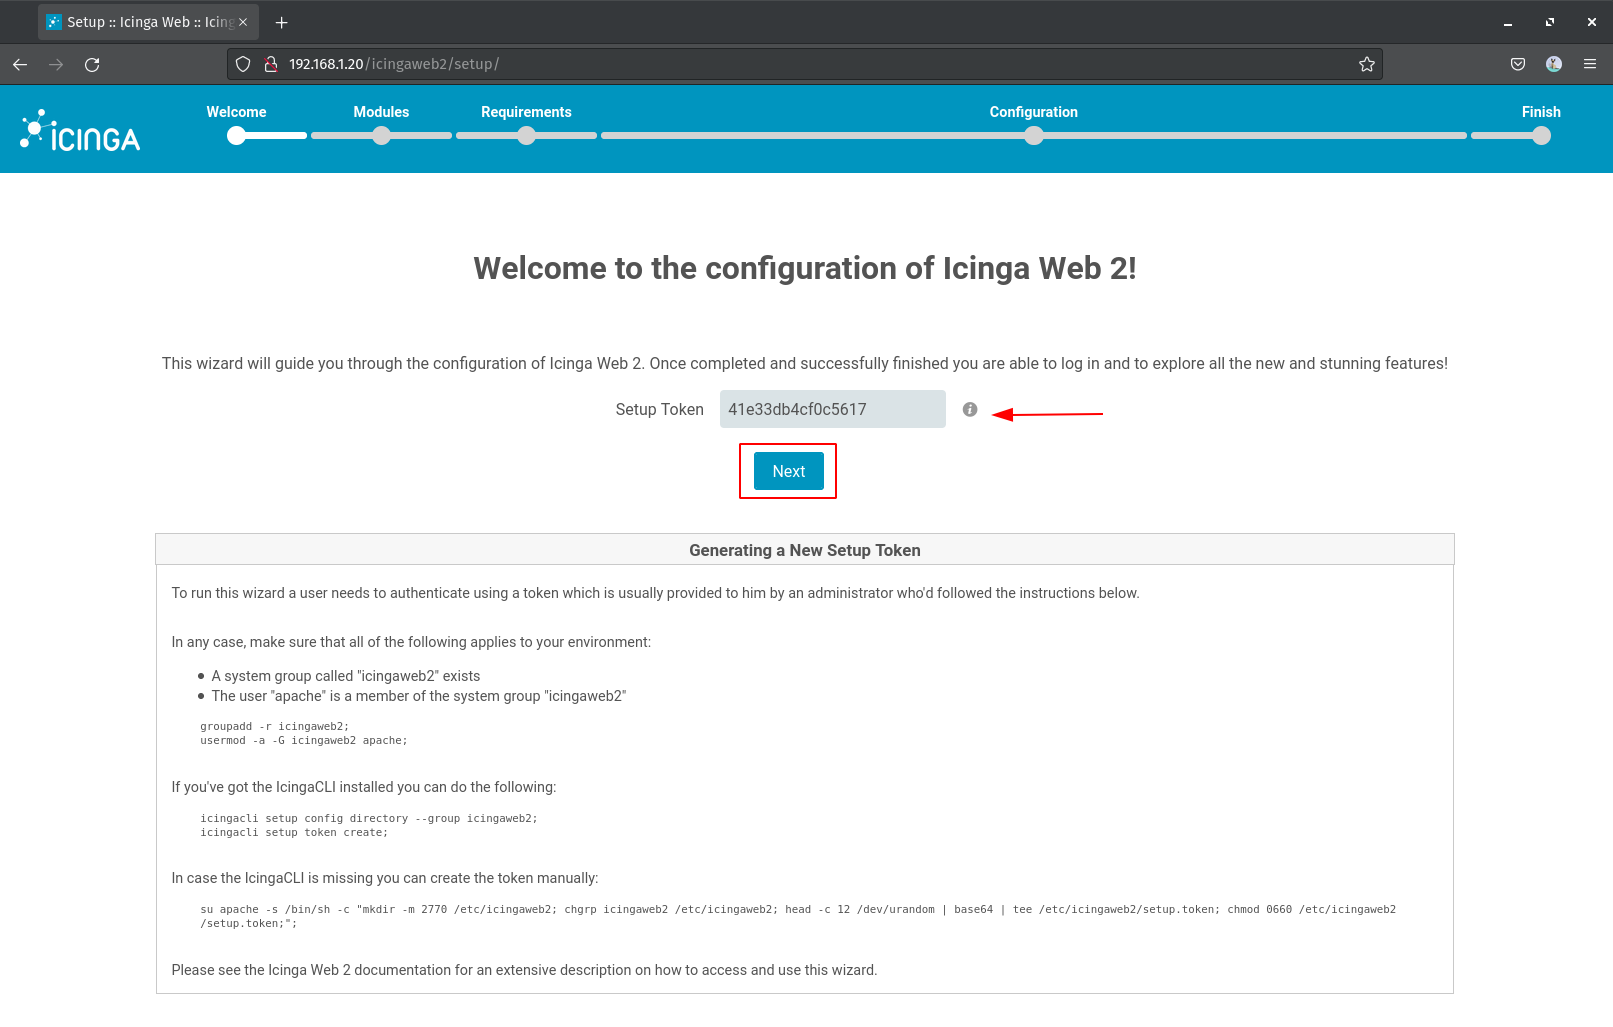
You will be shown as the following output. Make sure to copy the icinga2 installation token to your note.
# Generated setup token
The newly generated setup token is: 41e33db4cf0c5617

# Show generated token
The current setup token is: 41e33db4cf0c5617
Configuring Icinga Web 2 through Web Interface
Now, open your web browser and the URL http://SERVER-IP/icingaweb2/setup, and you will get the icinga2 installation page.
1. Paste the icingaweb2 setup token on the box and click Next.
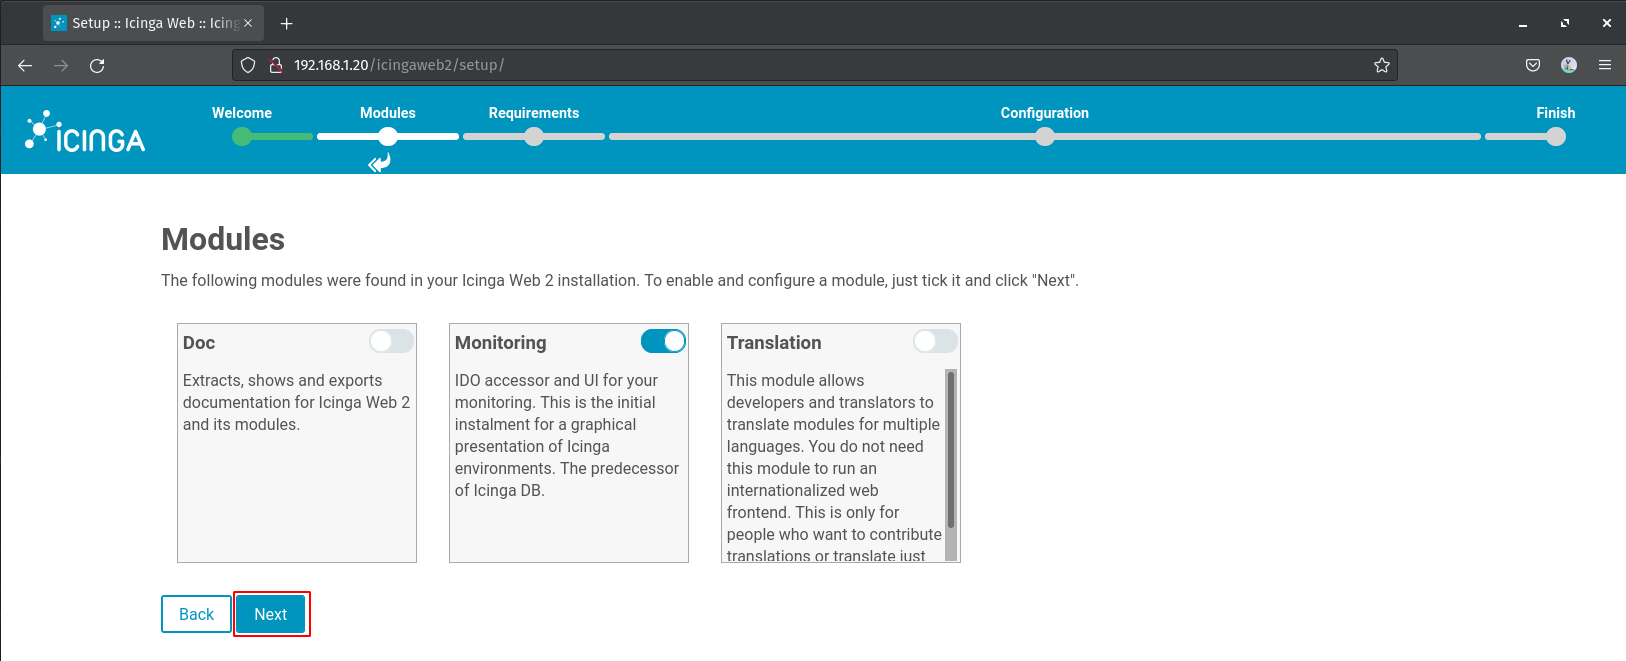
2. Here, leave Icinga modules as default and click Next.
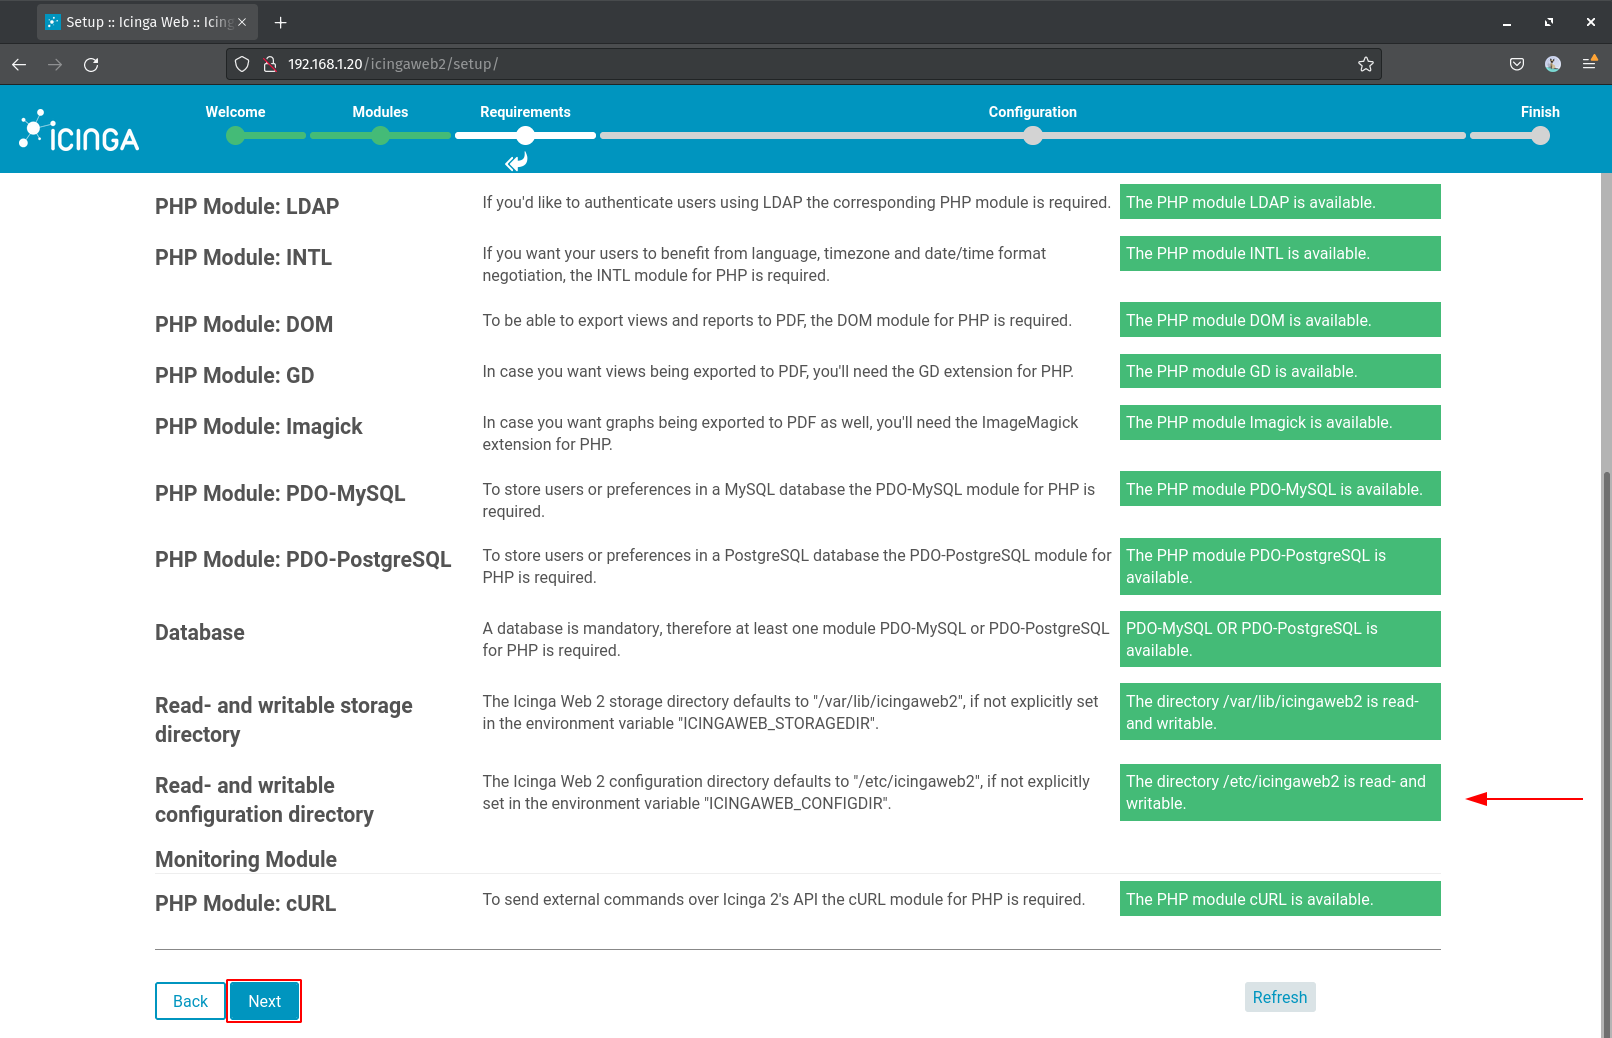
3. Now make sure all icingaweb2 system requirements have `green` colors, then click the Next button.
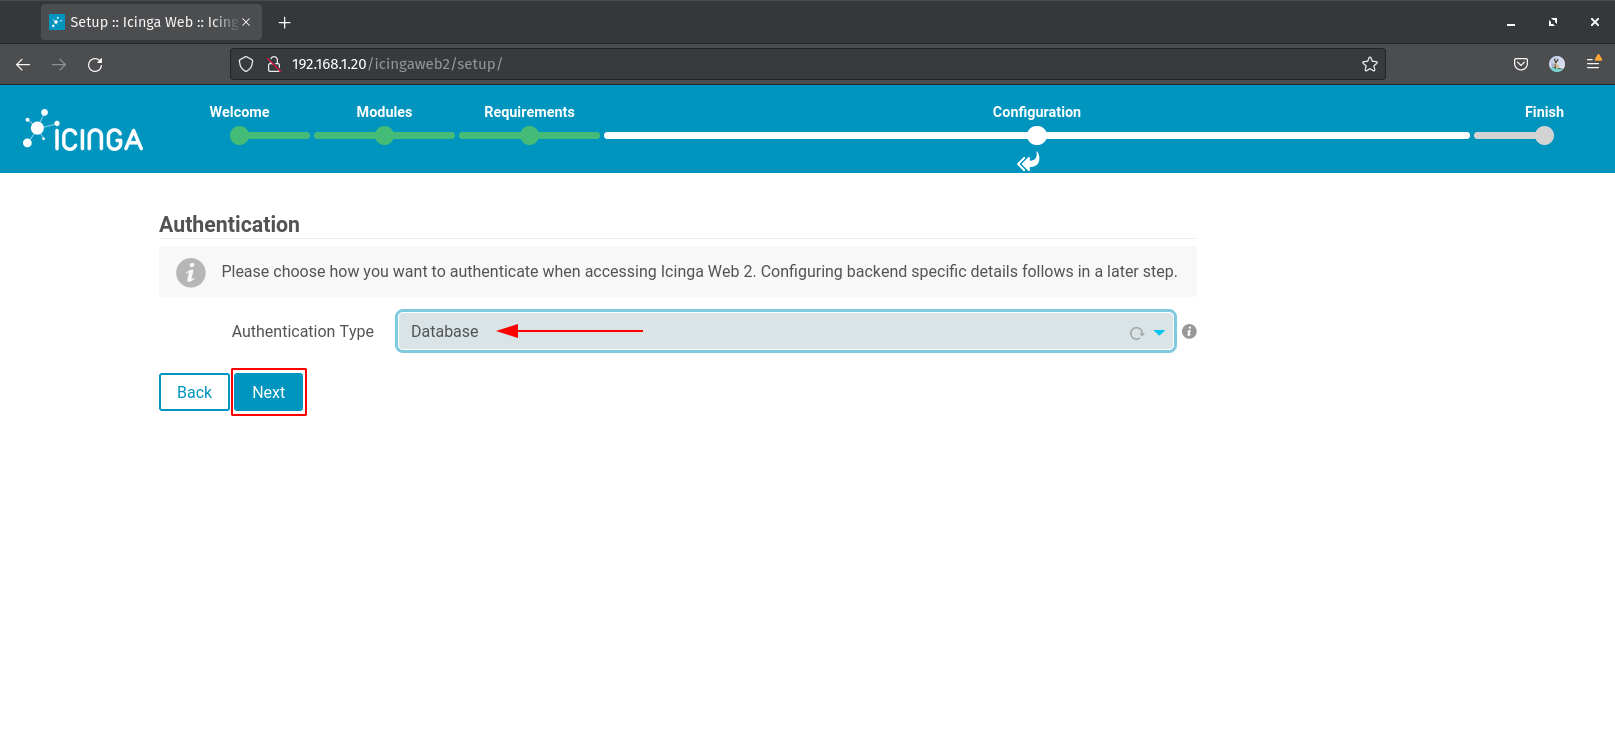
4. Leave the backend authentication as default 'Database' and click Next.
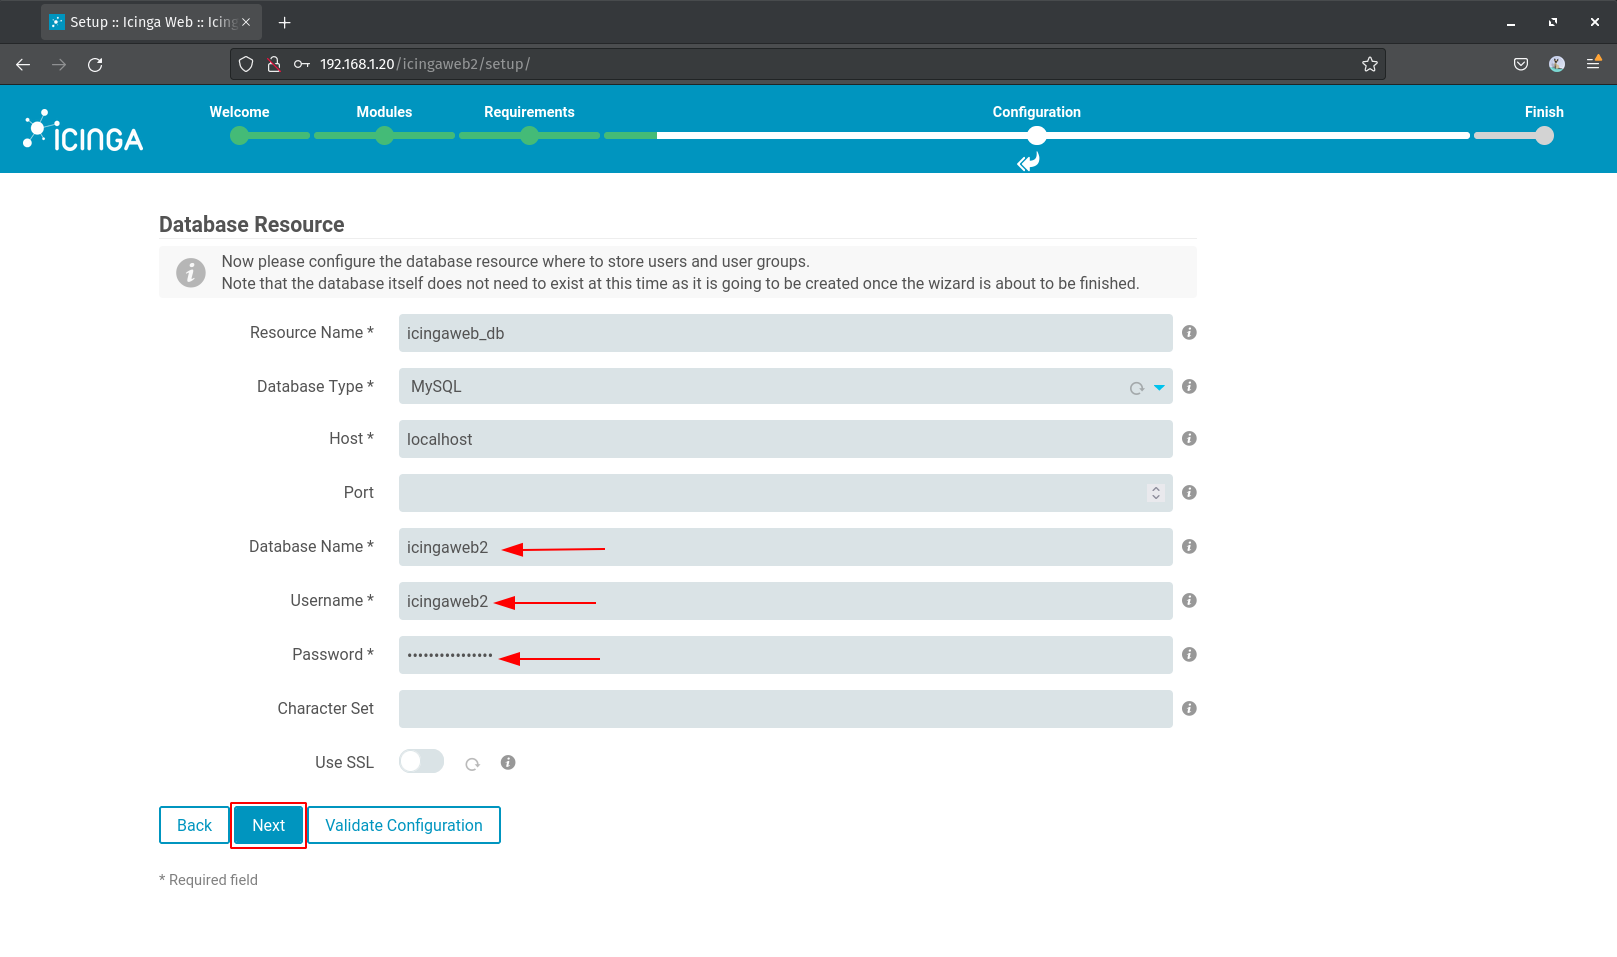
5. Type the database name, username, and password for the icingaweb2 and click Next again.
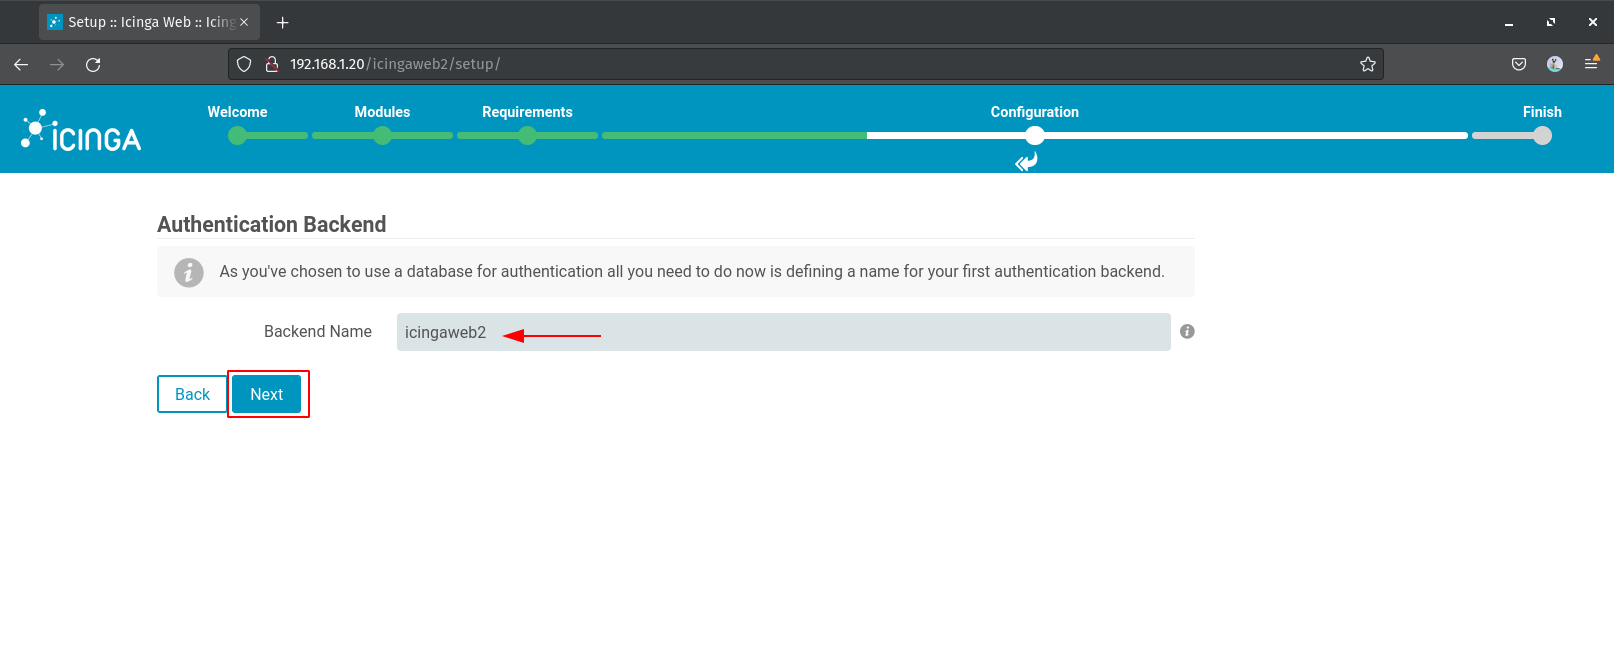
6. Leave the authentication backend name as default 'icingaweb2' and click Next.
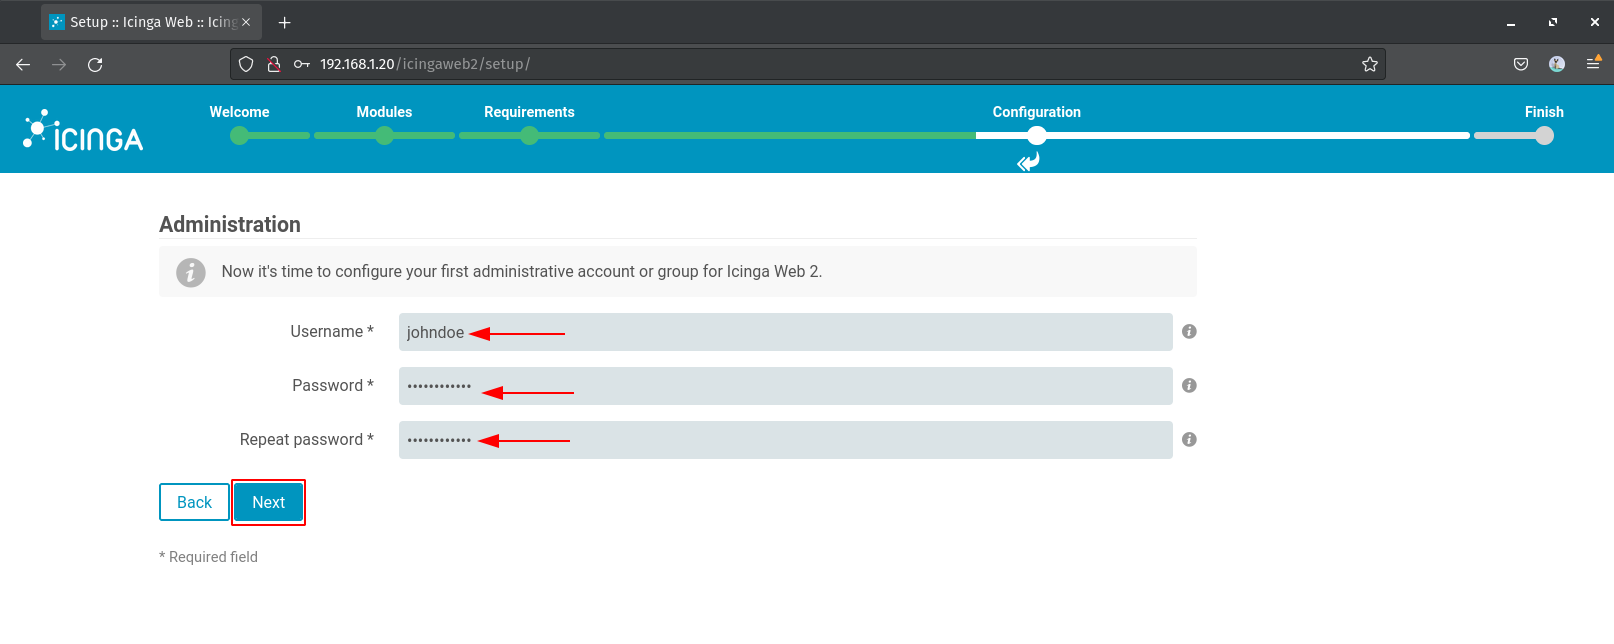
7. Now type the new user and password administration, then click Next.
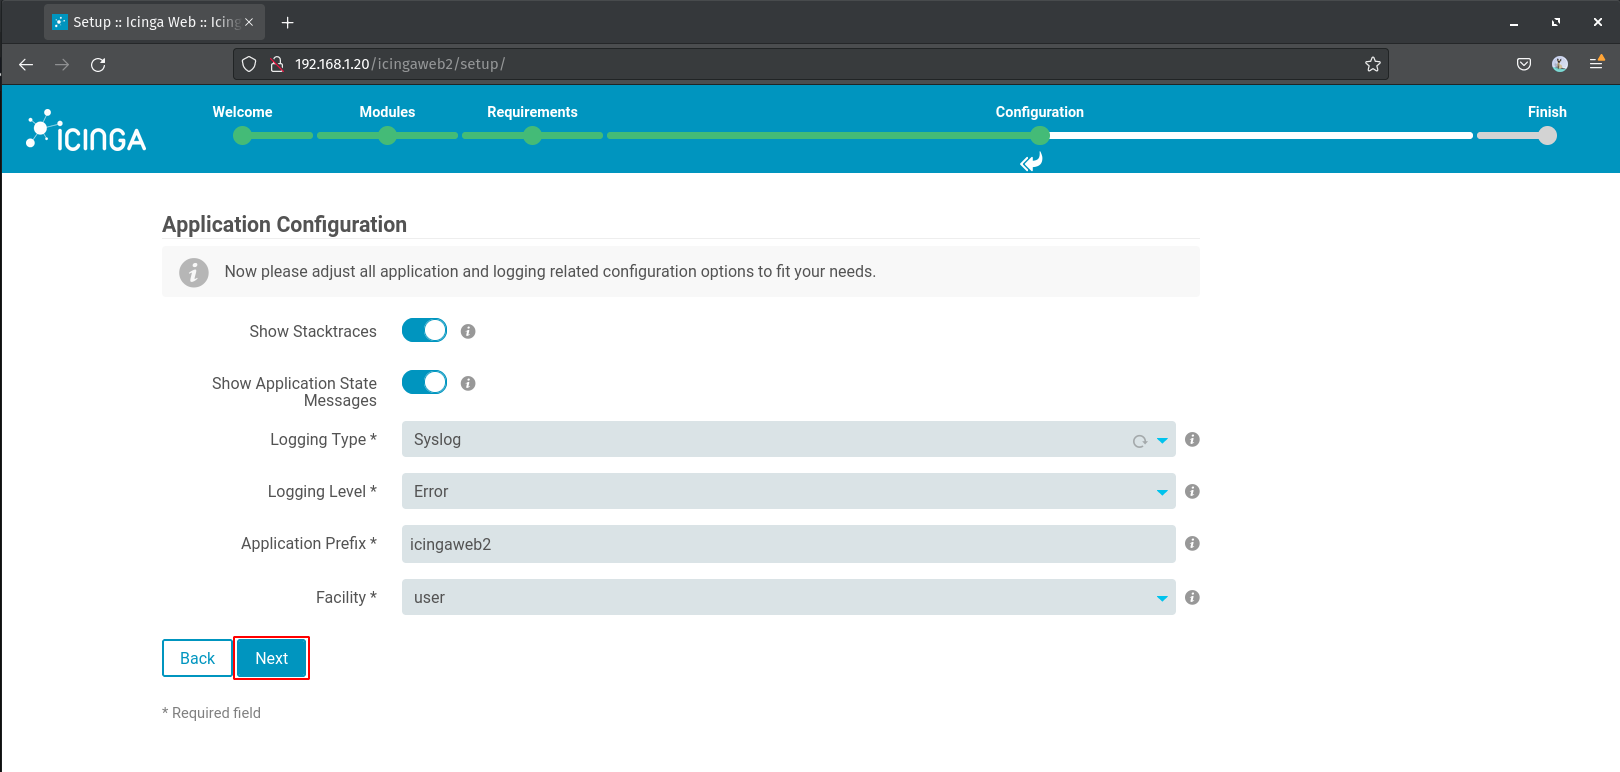
8. Leave the application and log configuration as default, then click Next.
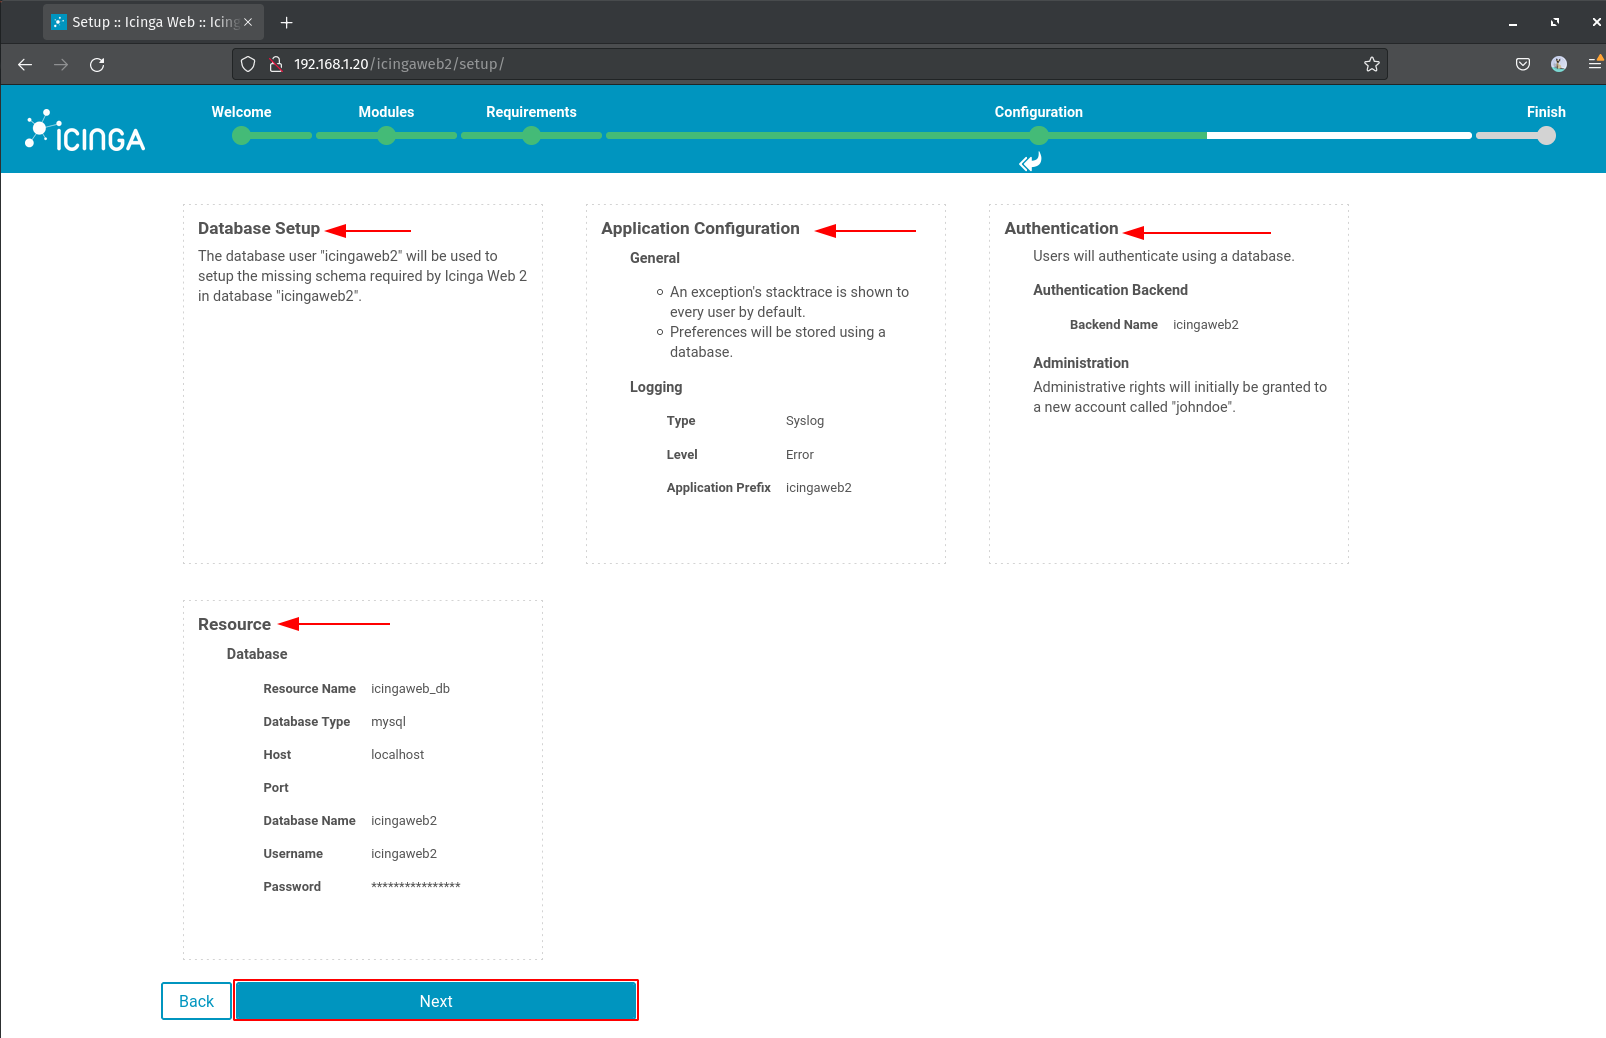
9. Double-checks all your configurations, then click Next to continue.
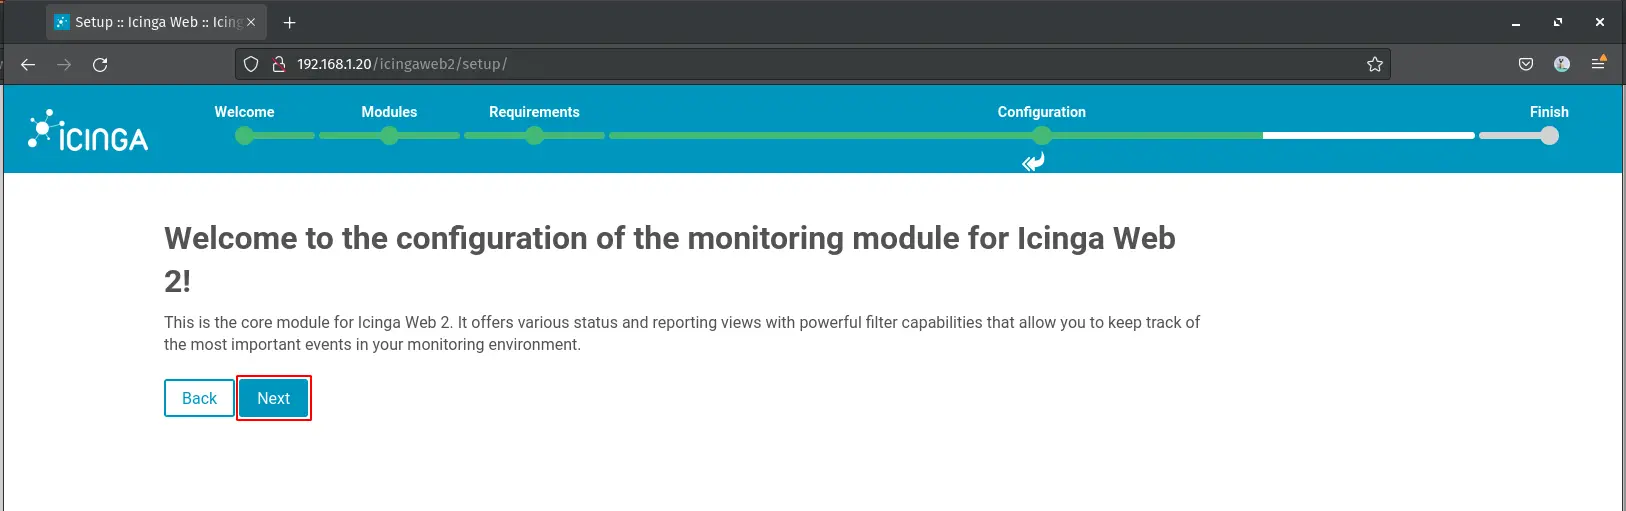
10. Now click Next to configure icinga2 monitoring modules.
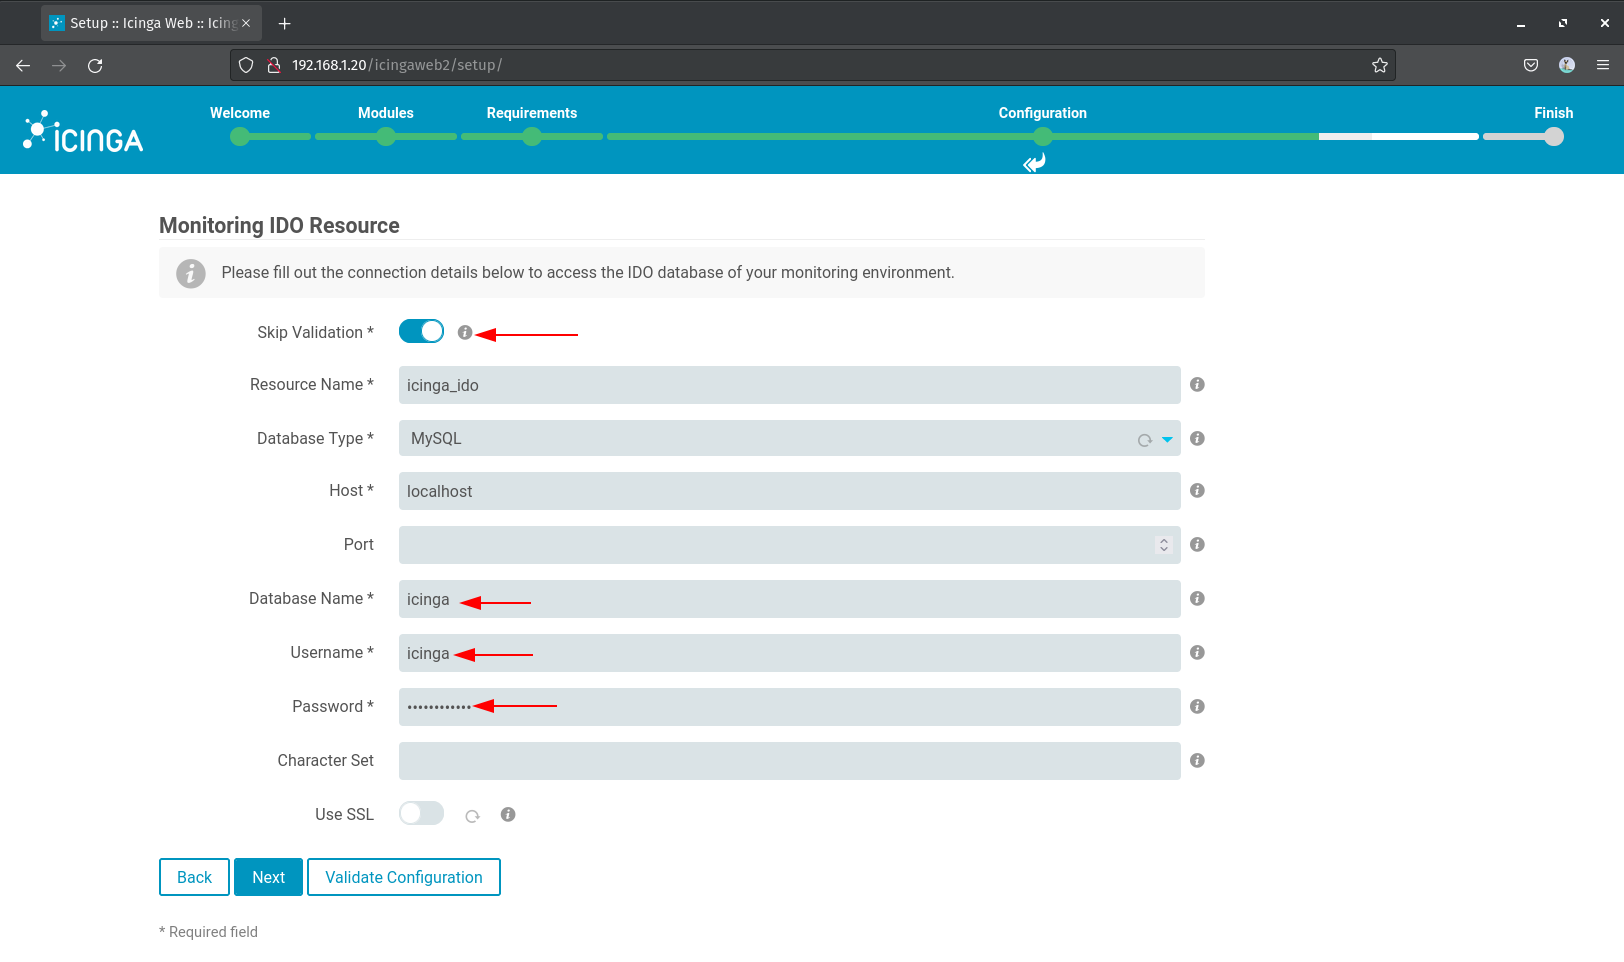
11. Type the database name, username, and password for the icinga2-ido-mysql, then click the Validate Configuration button.
If you have an error like 'There is currently no icinga instance writing to the IDO. Make sure that a icinga instance is configured and able to write to the IDO', back to your terminal and edit the configuration manually.
Run the following command to edit the IDO configuration.
sudo nano /etc/icinga2/features-available/ido-mysql.conf
Copy and paste the ido mysql configuration as below.
object IdoMysqlConnection "ido-mysql" {
  user = "icinga",
  password = "icingapassdb",
  host = "localhost",
  database = "icinga"
}
Now hit Ctrl+x then y then enter to save the file.
Next, restart the Icinga2 service using the following command.
sudo systemctl restart icinga2
Now back to the web browser and enable the option Skip Validation, then click Next again.
12. Now choose the transport type 'Local Command File' and click Next.

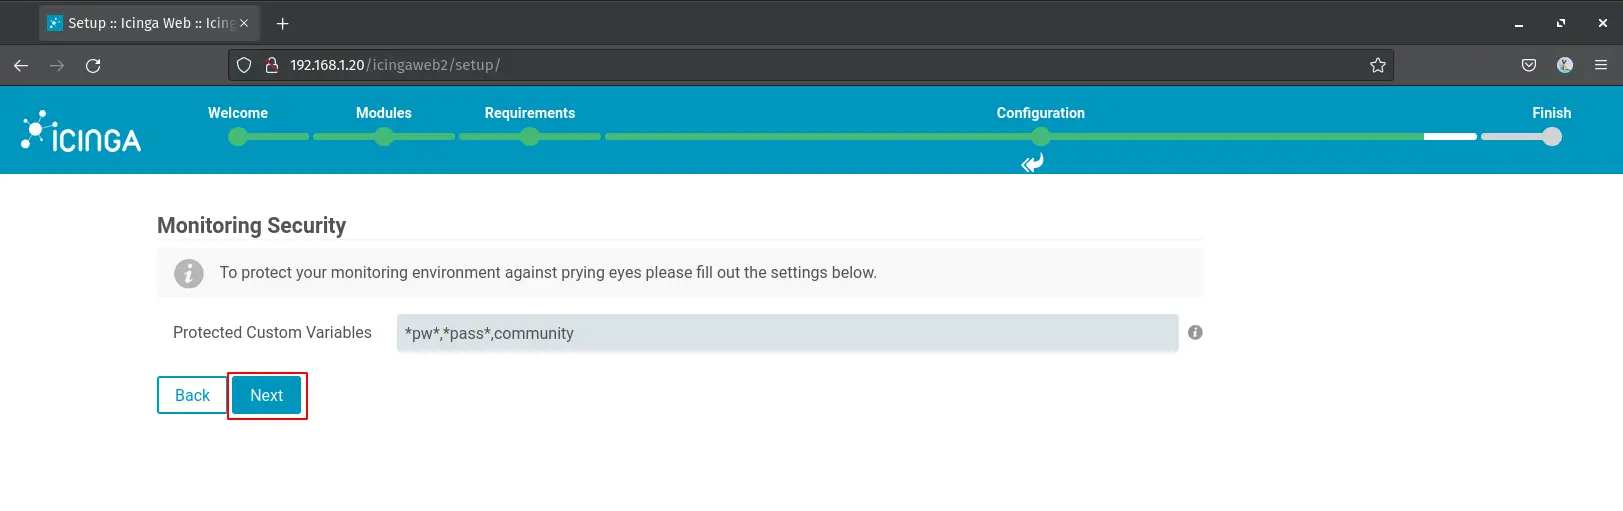
13. Leave the monitoring security configuration as default and click Next.
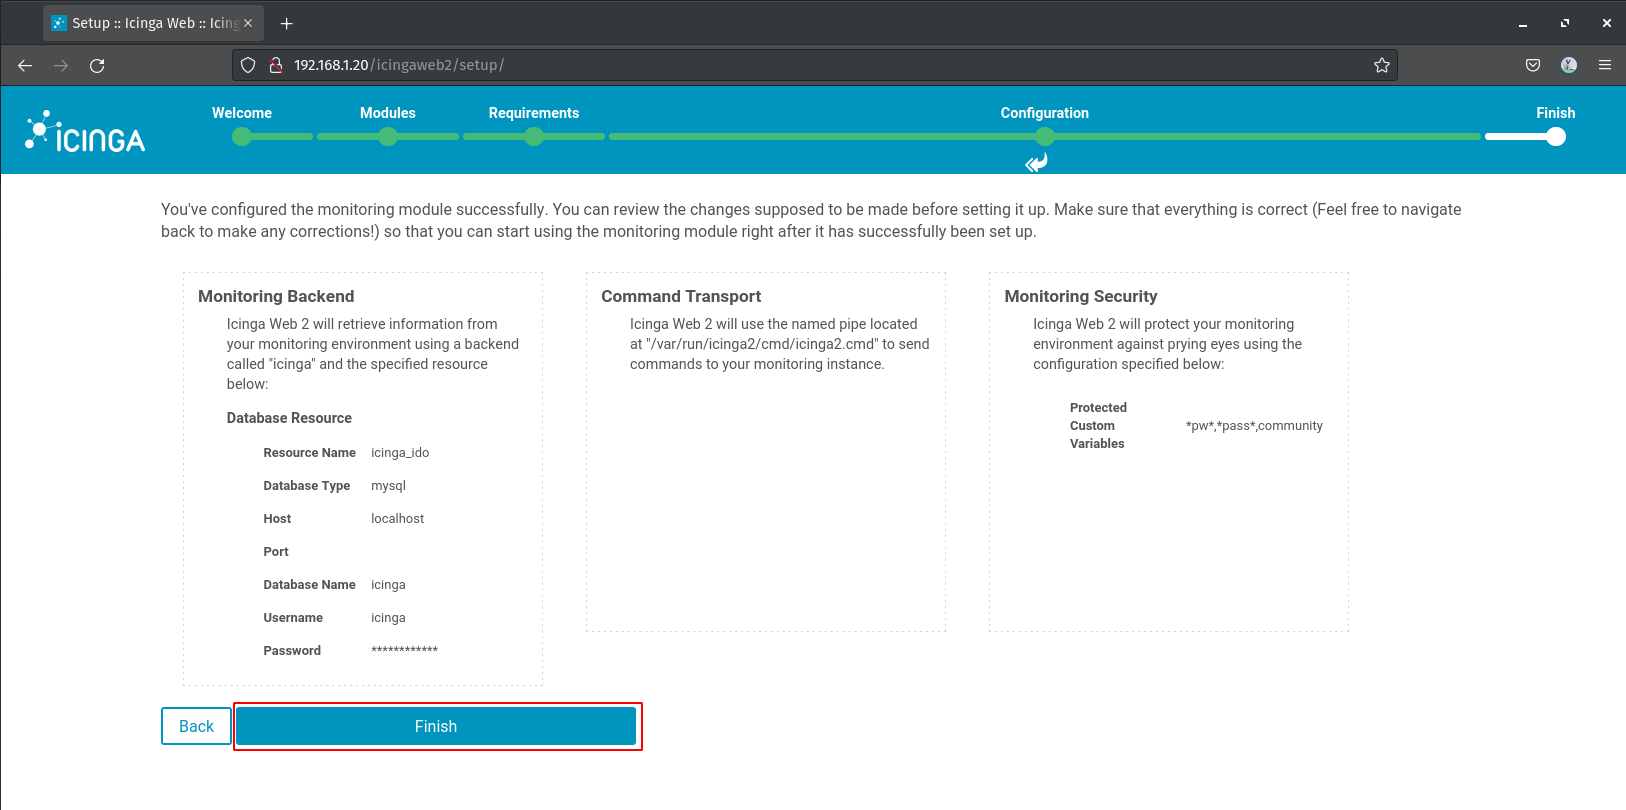
14. Double-check your Icinga installation configuration and click Finish to continue.
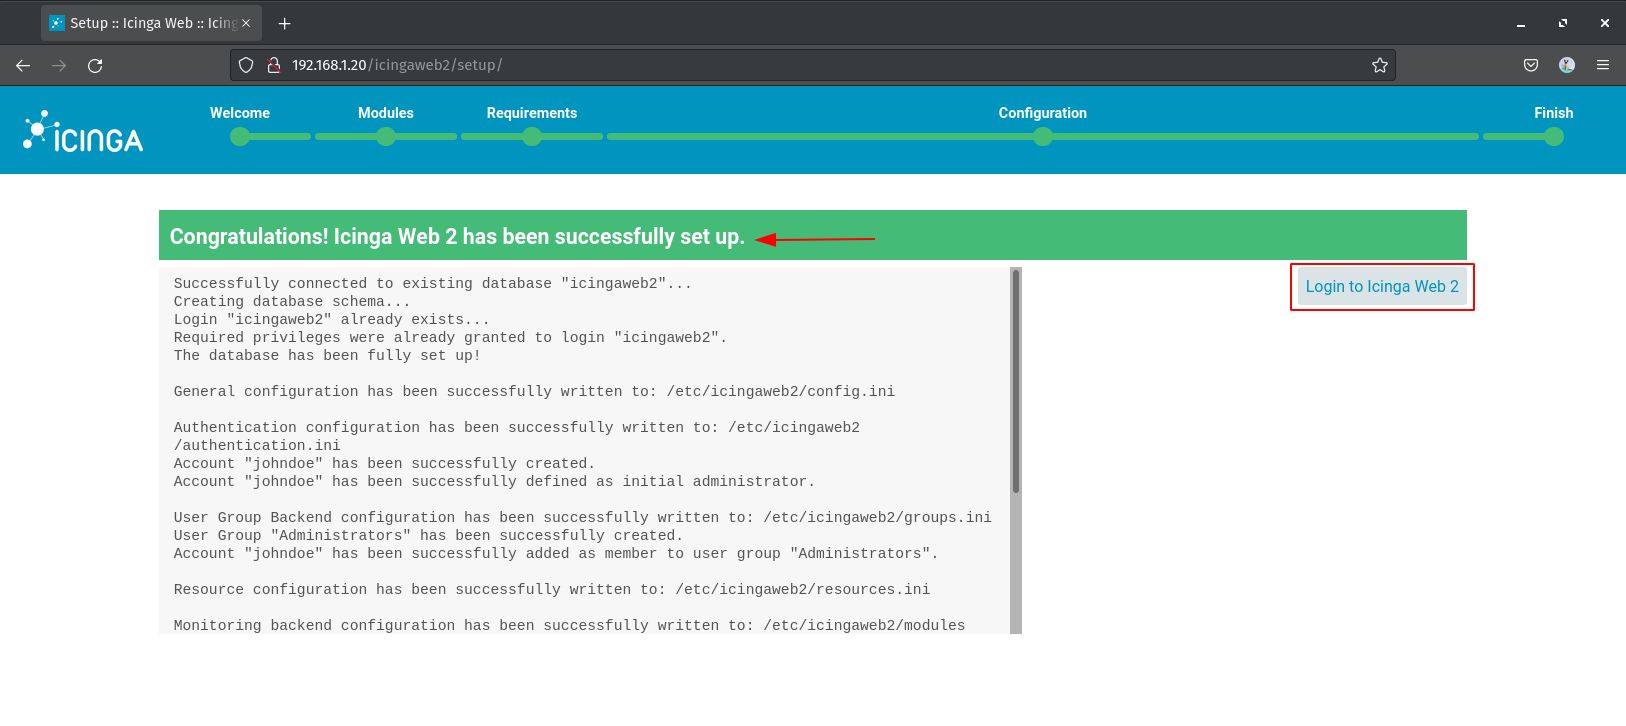
15. When the installation is successful, you will get the output as the picture below. Then click the Login to Icinga Web 2 button.
Verify Icinga 2 and Icinga Web 2 Installation
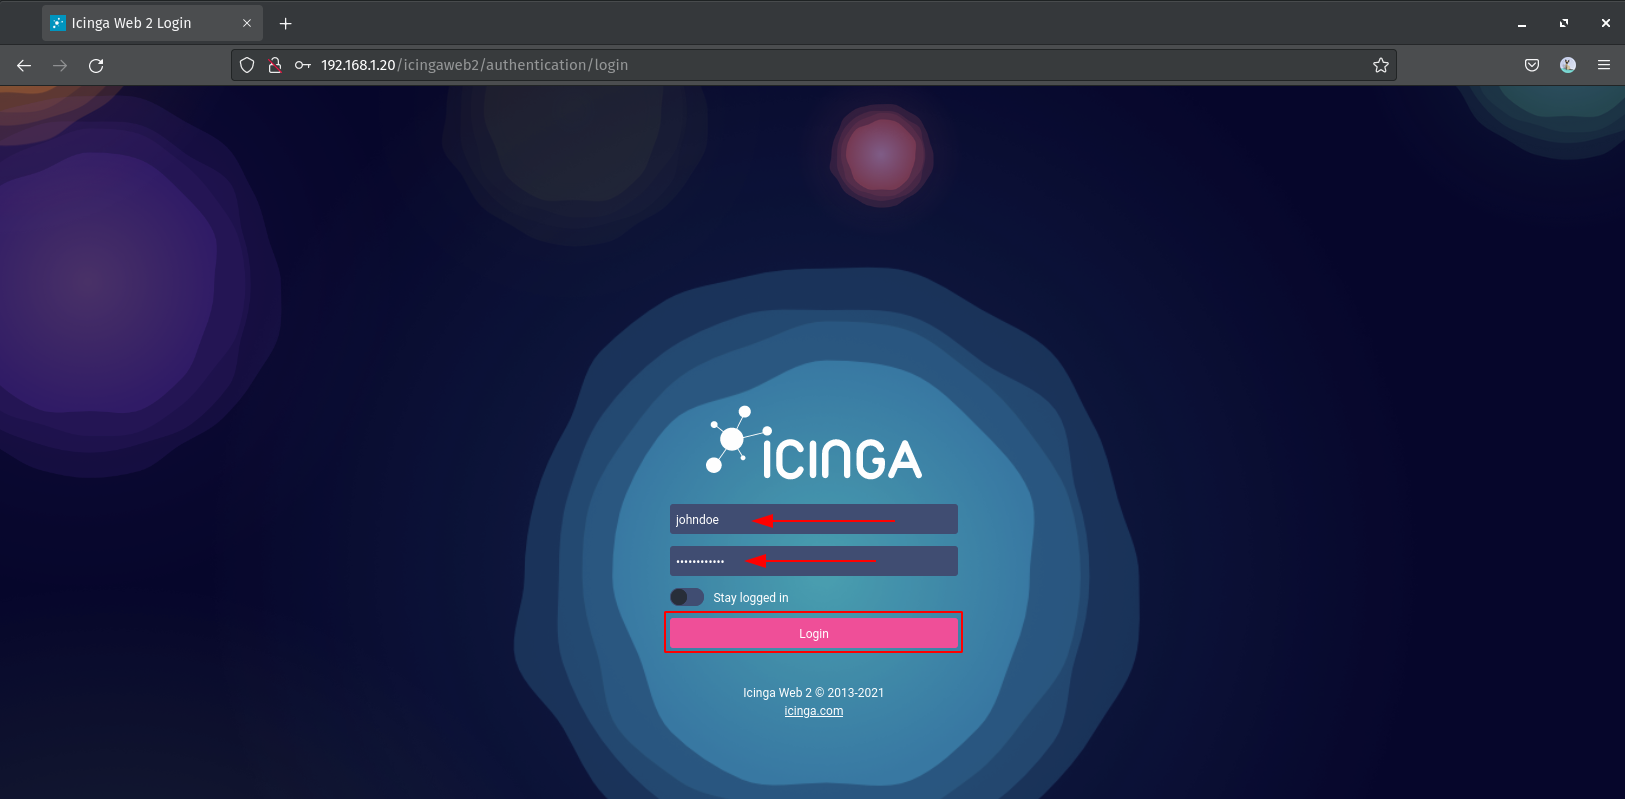
1. Type your Icinga administrator user and password, then click the Login button.
2. Now you will get a similar page as below.
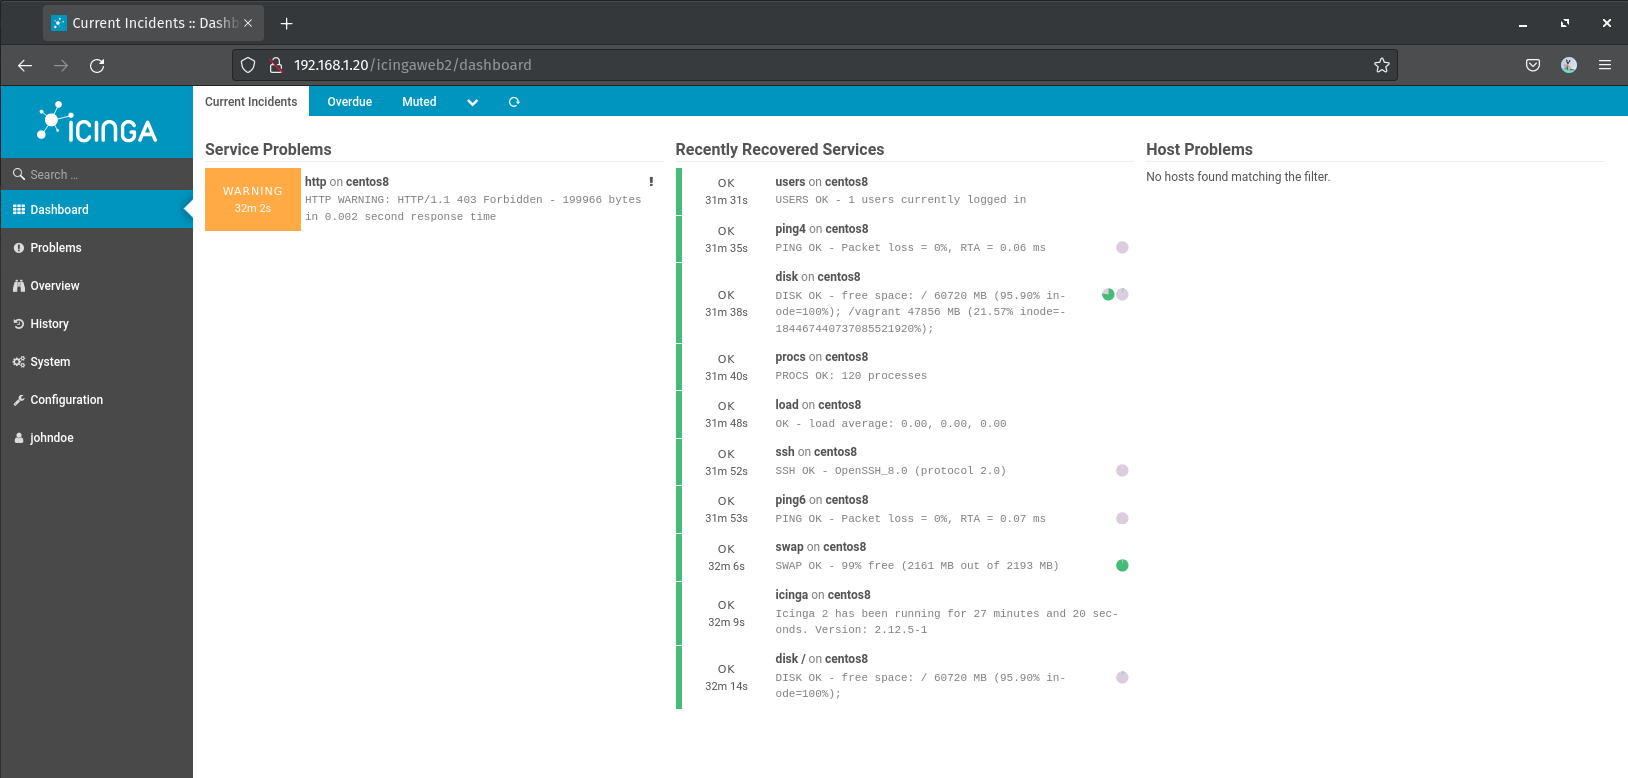
As you can see on the dashboard, there are some services automatically detected by the icinga2 monitoring tool. Services with the color green mean health, and the services with the color yellow mean a warning need to check. And error services will have red colors.
Conclusion
As the tutorial is completed, you've learned about the installation and configuration of the icinga2 monitoring tool on the latest CentOS 8 server with LAMP Stack. The icinga2 installation requires you to focus on each stage, and the most important thing is that you know what you're doing, not blindly executing commands.

