How to Install Redis Server on Rocky Linux
Redis is a popular and open-source in-memory key-value data store. It supports various data structures such as Hash, Lists, Sets, Strings, and much more. Redis is designed to be running in the trusted environment only, it can be used as a database, cache, and message broker. Redis is extensively known for its broad support, high performance, high availability, and flexibility.
You can install Redis as a standalone for small deployment. For large deployment, they provide additional components such as Redis Sentinel for high availability and Redis Cluster for partitioning data across multiple Redis node servers.
In this guide, you will learn how to install Redis on Rocky Linux. For an easy installation, you will be installing Redis from the AppStream repository, but if you want to get the latest version of Redis (which means more features), you can install Redis from source by compiling it to your system.
Prerequisites
- A Rocky Linux system. Make sure all packages and repositories updated to the latest version
- A root user or a user with root privileges. You will be using this user for installing new packages and editing system configurations.
Installing Redis from AppStream Repository
If you want to install Redis easily without compiling, you can install it from the AppStream repository provided by Rocky Linux. At this time, the Rocky Linux AppStream repository provided Redis version 5.x. And if you want to install Redis version 6.x, you must install it manually.
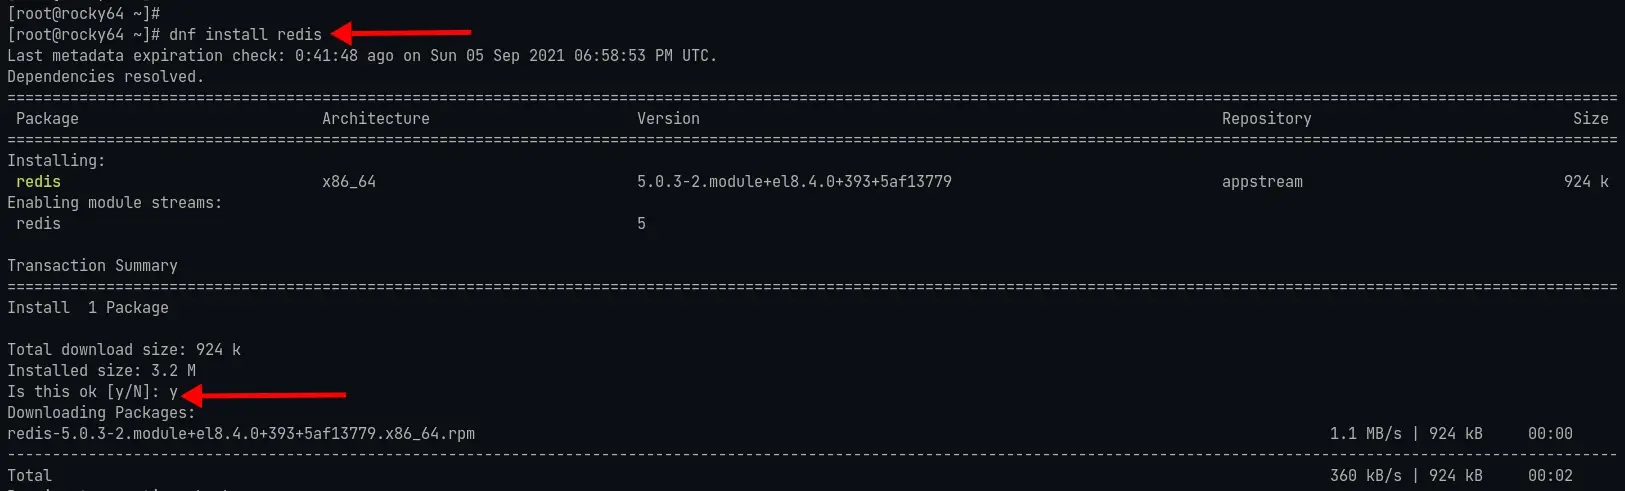
1. To install Redis from the AppStream repository, execute the dnf command below.
sudo dnf install redis
Now type 'Y' to install the Redis package.
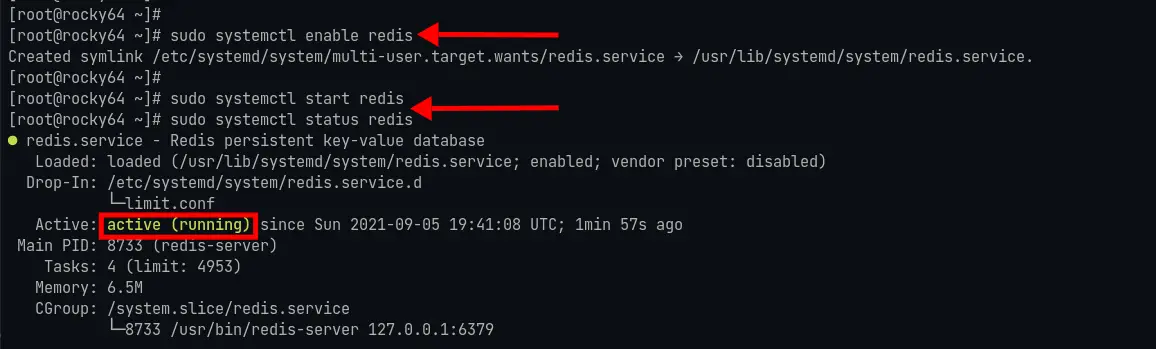
2. After the installation is complete, enable redis to be running at system startup using the systemctl command below.
sudo systemctl enable redis
3. After that, execute the following command to start the Redis service and check its status.
sudo systemctl start redis
sudo systemctl status redis
If Redis service is active and running, you will see similar output as below.
For the next stage, you will be configuring Redis as in the section below.
Installing Redis from Source
If you want to get the latest version of Redis, you can install it manually from the source code. The main advantage of installing the latest version of Redis is you always get the latest features and packages. At this time, get the latest stable version 6.2, and you will be installing it at this stage.
1. First, you must install some packages dependencies before compiling Redis.
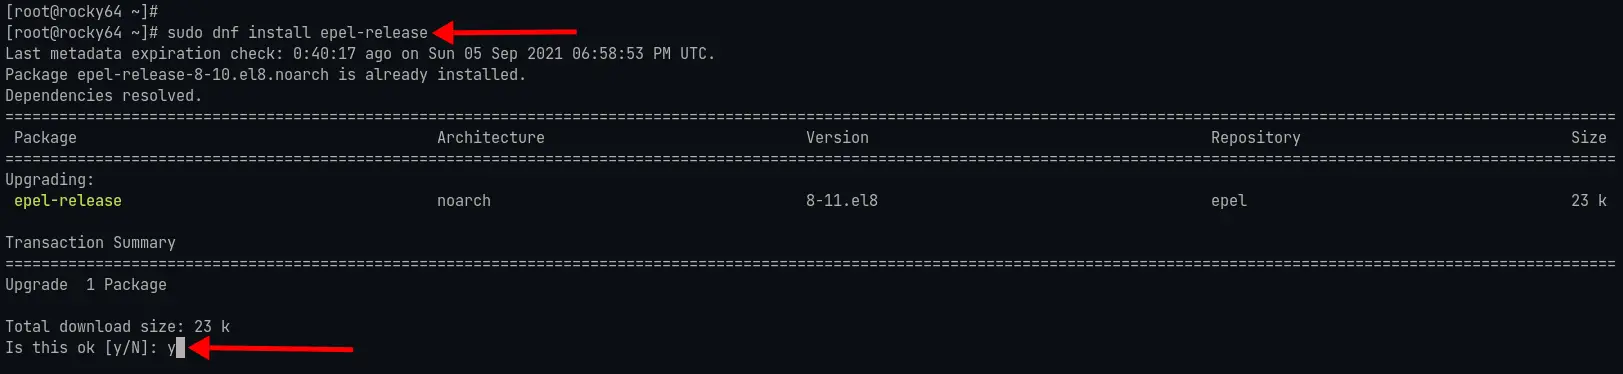
Add EPEL repository to your system using the following command.
sudo dnf install epel-release -y
Install group package 'Development Tools' and some additional packages for compiling Redis.
sudo dnf group install "Development Tools" -y
sudo dnf install jemalloc lua hiredis linenoise -y
After that, execute the following command to install openssl-devel (for TLS supports) and systemd-devel (for systemd supports) packages.
sudo dnf install openssl-devel systemd-devel -y
2. After all packages installation is complete, execute the following command to create a new user and group 'redis'.
sudo adduser --system --user-group --no-create-home --shell /sbin/nologin redis
Next, create a new data directory for Redis at '/var/lib/redis' and change the ownership of that directory to user 'redis' using the following command.
sudo mkdir -p /var/lib/redis
sudo chown -R redis:redis /var/lib/redis
And you're ready to compile and install redis.

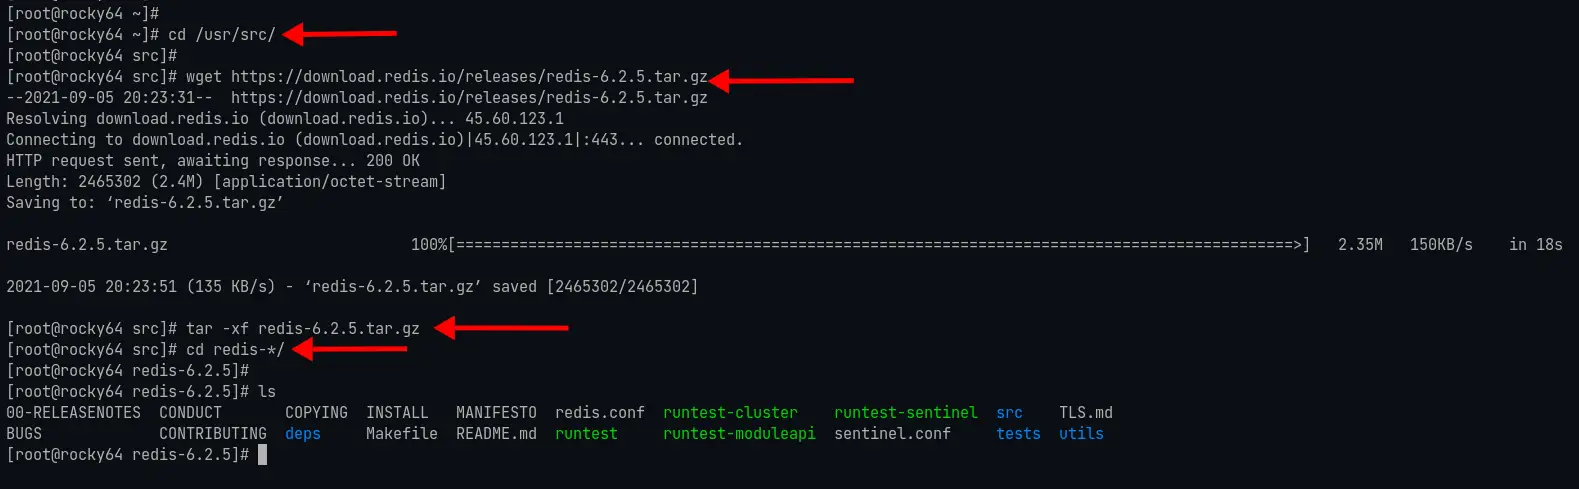
3. Change the working directory to '/usr/src' and download the latest stable version of Redis source code using the wget command as below.
cd /usr/src/
wget https://download.redis.io/releases/redis-6.2.5.tar.gz
Now extract the Redis source code and change the directory to the 'redis-*' directory.
tar -xzvf redis-6.2.5.tar.gz
cd redis-*/
4. Compile Redis source code using the following command.
sudo make BUILD_TLS=yes USE_SYSTEMD=yes
Options you must know:
- BUILD_TLS = enable TLS supports for Redis,
- USE_SYSTEMD = enable support for systemd, the Rocky Linux system using systemd as its init system.
Now execute the following command.
sudo make test
This test will take some time. When all is complete, you will see similar output as below.
\o/ All tests passed without errors!

Cleanup: may take some time... OK
make[1]: Leaving directory '/usr/src/redis-6.2.5/src'
Make sure all tests passed without any error.
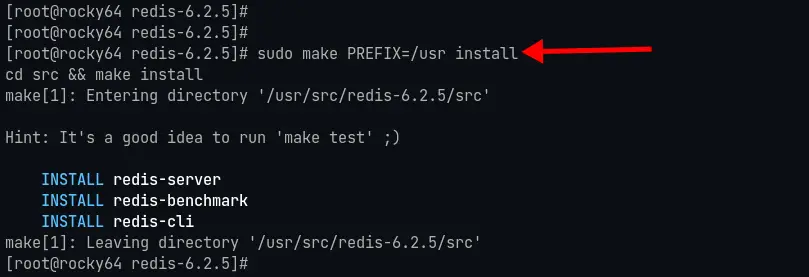
5. Next, you can install redis by executing the command below.
sudo make PREFIX=/usr install
The Redis command will be available at the '/usr/bin' directory, as we specify in the 'PREFIX=' option on top.
You can verify the Redis installation by running the following commands.
redis-server --version
redis-cli --version
If your installation is successful, you will see the version of Redis 6.2 as the screenshot below.

Configuring Redis
At this stage, you will be configuring Redis installation. You can implement this stage for all Redis installations (installing from source or installing from AppStream repository).
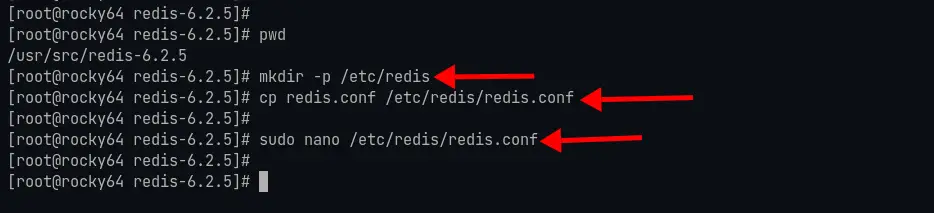
1. If you're installing Redis from source code, execute the following command to create a new Redis configuration directory.
mkdir -p /etc/redis
Now copy the sample configuration 'redis.conf' to the '/etc/redis' directory.
cp /usr/src/redis-*/redis.conf /etc/redis/redis.conf
2. Run the nano command below to edit the 'redis.conf' configuration file.
sudo nano /etc/redis/redis.conf
Change the default 'bind' address with your local network IP address.
bind 127.0.0.1
Uncomment the option 'daemonize' and change the value to 'yes' to enable Redis to run as a daemon.
daemonize yes
Uncomment the 'supervised' option and change the value to 'systemd'. This option allows Redis to interact with the system supervision tree.
supervised systemd
Specify the working and data directory for Redis to '/var/lib/redis' directory. All Redis databases will be available in this directory.
dir /var/lib/redis
Uncomment the 'requirepass' option and change the value with your password, and make sure to use a strong and long password. With this option, all interactions of clients will require a password for authentication.
requirepass AJds9dshsd8wqejdw82389r3ej3983jk
Save the configuration by pressing the 'Ctrl+x' button, type 'y', then press 'Enter'.
Configuring Service File for Redis
For the Redis manual installation, you must set up the Redis service file.
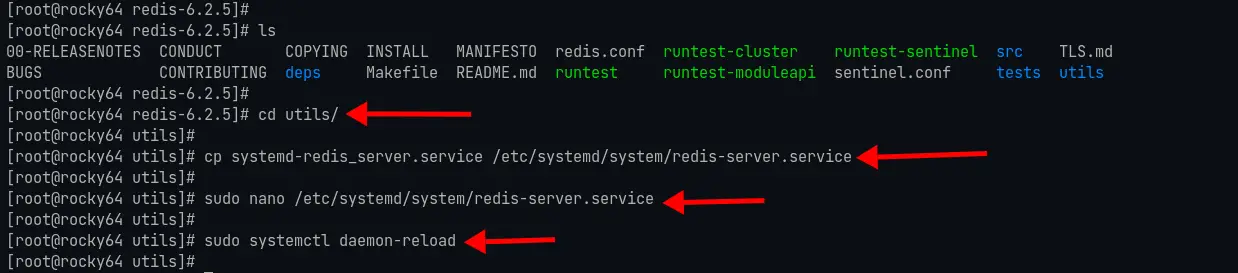
1. Execute the following command to change the working directory to '/usr/src/redis-*/utils' and copy the systemd service file to '/etc/systemd/system'.
cd /usr/src/redis-*/utils/
cp systemd-redis_server.service /etc/systemd/system/redis-server.service
2. Edit the 'redis-server.service' configuration using nano.
sudo nano /etc/systemd/system/redis-server.service
Change some options using the configuration as below.
[Unit]
...
AssertPathExists=/var/lib/redis

[Service]
...
ExecStart=/usr/bin/redis-server /etc/redis/redis.conf
ExecStop=/usr/bin/redis-cli shutdown
Restart=alway
...
User=redis
Group=redis
WorkingDirectory=/var/lib/redis
Press the 'Ctrl+x' button, type 'y', and press 'Enter' to save and exit.
3. Now execute the following command to reload the systemd-manager and apply the new configuration.
sudo systemctl daemon-reload
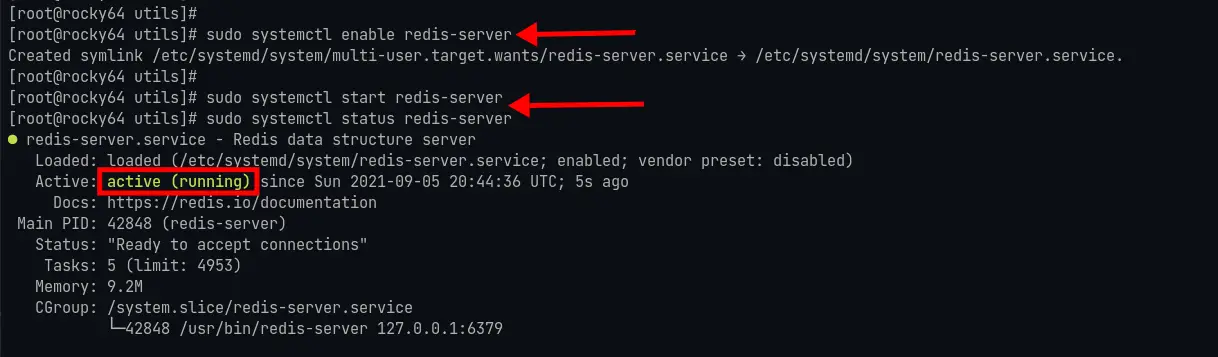
4. After that, execute the following command to enable the redis service to run automatically at system startup.
sudo systemctl enable redis-server
5. Start the redis service and check its status by running the following command.
sudo systemctl start redis-server
sudo systemctl status redis-server
If your Redis service is active and running, you should see similar output as below.
Renaming or Disabling Redis Dangerous Command
Redis provides a security feature that allows you to rename or completely disable some dangerous commands. And it's can be done simply through the redis configuration file 'redis.conf'.
1. Edit the redis configuration 'redis.conf' using the nano command.
sudo nano /etc/redis/redis.conf
2. To disable the Redis command completely, you can define the command name following by an empty quote as below.
rename-command FLUSHDB ""
rename-command FLUSHALL ""
rename-command DEBUG ""
3. To rename Redis commands, you can define the command name following by the new command as a replacement as below.
rename-command SHUTDOWN SHUT_ME_DOWN
rename-command CONFIG CONFIG_ME_NOW
Save the configuration by pressing the button 'Ctrl+x', type 'y', then press 'Enter'.
4. Next, execute the following command to restart the redis service and apply the configuration.
sudo systemctl restart redis-server
For the next step, you will be verifying the Redis authentication to make sure it works, then you will be verifying using some commands that you just renamed.
Verify Redis Installation
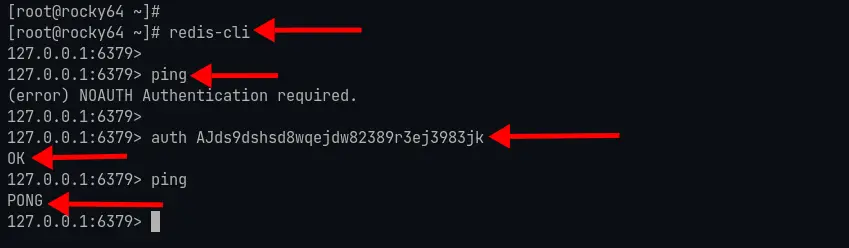
1. First, you must connect to the Redis server using the 'redis-cli' command as below.
redis-cli
Or you can specify the host and port using the command as below.
redis-cli -h 127.0.0.1 -p 6379
2. Next, authenticated yourself using the 'auth' command as below.
auth AJds9dshsd8wqejdw82389r3ej3983jk
If your authentication is successful, you will see the message 'OK'.
3. Run the 'ping' command below. This command will ensure the authentication and connection to the Redis server are successful.
ping
If your connection is successful, you will see the message 'PONG'
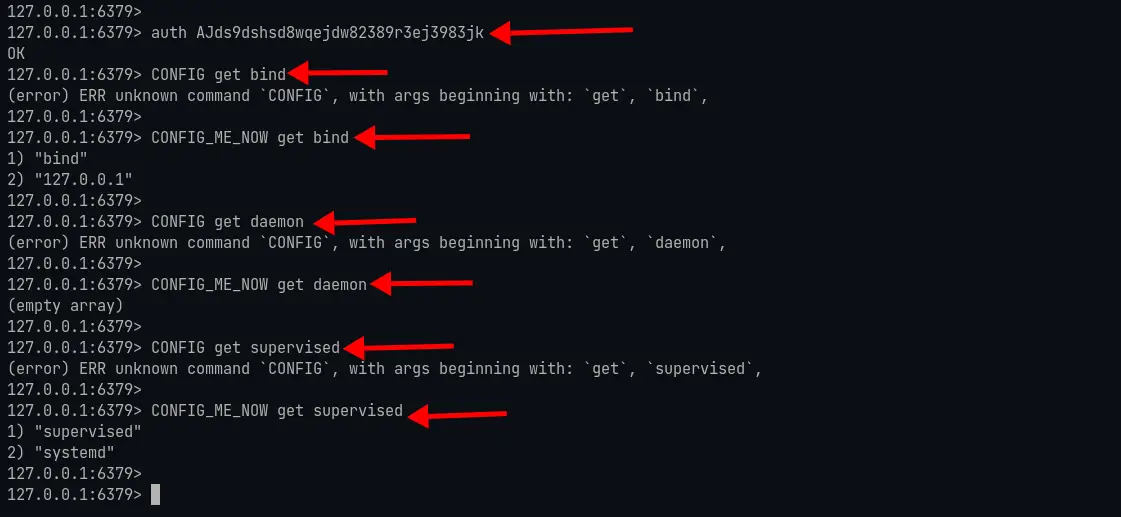
4. Next, verify some commands that you've disabled or renamed on top.
Run the 'CONFIG' command as below.
CONFIG get bind
And you will see the error message 'ERR unknown command 'CONFIG'' because the default 'CONFIG' command has been replaced with the 'CONFIG_ME_NOW'.
Now run the 'CONFIG_ME_NOW' command as below.
CONFIG_ME_NOW get bind
CONFIG_ME_NOW get supervised
If your installation is successful, you will see a similar output like the screenshot below.
Additionally, try to run some disabled commands 'FLUSHDB' and 'DEBUG', and you will get the same error message as 'ERR unknown command'.
Conclusion
Congratulations! Now you've successfully installed Redis on Rocky Linux using the two methods, installing from the AppStream repository or Installing from source code. Also, you've learned how to secure Redis deployment by enabling the authentication and renaming and disabling some dangerous Redis commands. For the next step, you can explore another Redis configuration such as implementing TLS, set up high availability using Redis Sentinel, etc.

