Setting up a backup server to take over a primary server’s operations when it becomes a victim of server downtime issues is a skill set that most Linux users and all Linux administrators need to master. It saves you from having to worry about the “what if” scenarios.
So during a worst-case scenario where some technicalities or server breach attempts might temporarily or permanently bring your primary server down, you can always rely on the presence of a backup server that is configured to function as a twin server environment of the primary/main server.
[ You might also like: How to Sync Two Web Servers in Linux Automatically ]
The backup server ensures that you do not lose your important system data configurations and user files.
Rsync Installation in Linux
Now that you understand the importance of having two servers in sync, it is time for a walkthrough on how to achieve this article’s objective. We are going to need two active and functioning servers together with their respective IP addresses or domain names.
- The IP address for the Main/Primary server: 3.135.207.xx.
- The IP address for the Backup/secondary server: 18.118.208.xx
To successfully sync these two servers automatically, we will need the aid of the rsync utility. Regardless of the Linux server distribution, you are using, install rsync from one of the following Linux installation commands.
Its installation should take place on both your primary/main server and your secondary/backup server.
$ sudo apt-get install rsync     [On Debian, Ubuntu and Mint]
$ sudo yum install rsync         [On RHEL/CentOS/Fedora and Rocky Linux/AlmaLinux]
$ sudo emerge -a net-mis/rsync   [On Gentoo Linux]
$ sudo pacman -S rsync           [On Arch Linux]
$ sudo zypper install rsync      [On OpenSUSE]
Syncing Targeted Directory Files in Linux Using Rsync
Let’s for example assume the main/primary server (3.135.207.xx) has the directory LinuxShellTips with the following highlighted files that need syncing with the backup/secondary server (18.118.208.xx).
$ ls

We need to access the backup/secondary server (18.118.208.xx) and create a similar directory that will host the files from the main/primary server (3.135.207.xx) when the rsync process begins.
$ mkdir LinuxShellTips_Backup
$ cd LinuxShellTips_Backup
Syncing Directories Using Rsync in Linux
Since rsync supports the use of ssh protocol, server access security is guaranteed. To manually test how rsync performs between these two servers, we are going to execute the following command.
We are running this command from the backup/secondary server (18.118.208.xx).
$ sudo rsync -avzhe ssh [email protected]:/home/ubuntu/LinuxShellTips/ /home/ubuntu/LinuxShellTips_Backup
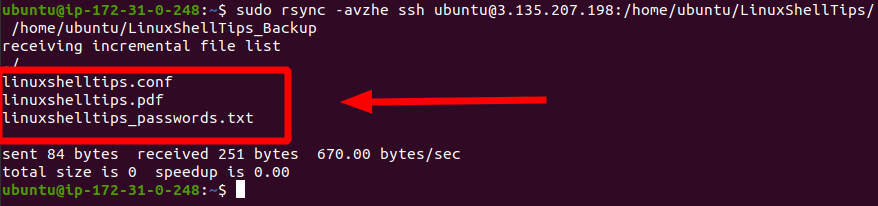
As you have noted, the three files from the main/primary server (3.135.207.xx) have been successfully copied to the backup/secondary server (18.118.208.xx).
Automatically Sync Directories Using Rsync in Linux
We need to accomplish the following two steps to fully automate rsync.
Step 1: Configure SSH Passwordless Login
While running the above command for testing rsync, you should have been prompted for the main/primary server’s access password. To get rid of the password request prompts while syncing your servers, we need to generate a public and private key.
Use the following command on your backup/secondary server:
$ sudo ssh-keygen -t rsa -b 2048
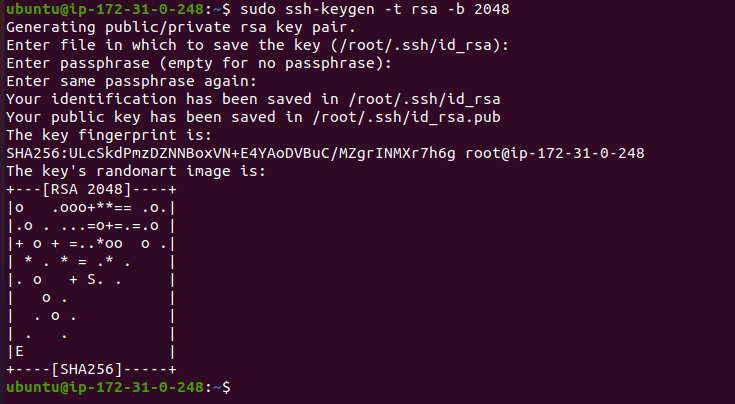
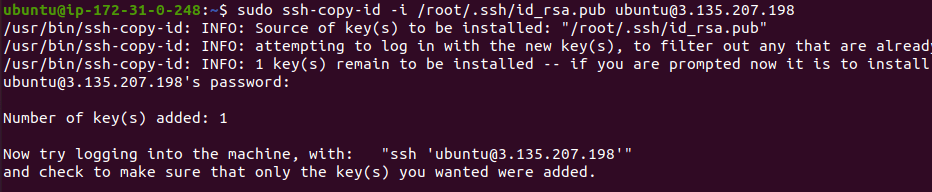
Press [Enter] when prompted for a passphrase to leave the field blank and copy the generated private and public keys to your main/primary server.
$ sudo ssh-copy-id -i /root/.ssh/id_rsa.pub [email protected]
You can now comfortably execute the previously covered rsync command without providing a server access password for the main/primary server.
$ sudo rsync -avzhe ssh [email protected]:/home/ubuntu/LinuxShellTips/ /home/ubuntu/LinuxShellTips_Backup
Step 2: Configure a Cron Job to Automate Rsync
Since SSH passwordless login between these two servers is now possible, the final step to automate the rsync process is to create a cron job by editing the crontab file on the backup/secondary server.
$ sudo crontab -e
Edit the crontab file by creating a cron job schedule for syncing your two Linux servers’ directory files.
*/5 * * * * sudo rsync -avzhe ssh [email protected]:/home/ubuntu/LinuxShellTips/ /home/ubuntu/LinuxShellTips_Backup
Save and close the crontab file.
The above-implemented cron job will automatically sync the backup/secondary server with the main/primary server after every 5 minutes.
Syncing two servers create the perfect solution to server downtime issues and server log errors. You also do not have to worry about losing your user and system data files as the backup server will be hosting a complete copy of those files.
If using a personal cron job for root, why use sudo in the command line?
Also if one of the machines are compromised they can mess up the other machine, so you shouldn’t sync as root and especially this example shouldn’t have any root access, the ubuntu user should be the one running the cron and sync the files as the files are owned by ubuntu in the first place.
For Amazon, I would recommend other options as EFS for storing backups.