How to Install Java 17 (JDK 17) on Debian 11
Java is an object-oriented programming language. Java is, by far, the most popular programming language in use throughout the world today. And according to Oracle, it's also one of the fastest-growing programming languages in terms of popularity. Companies large and small use Java for a wide range of applications, including banking software, device drivers, embedded systems, healthcare software, industrial automation control systems, weather stations, e-commerce servers and much more.
Java uses an object-oriented approach which means that everything is treated as an object. In contrast, other languages such as C++ are structured, meaning you have to instruct the program how to do things when writing code instead of having certain pre-defined capabilities built into objects. It is a simple, powerful, and object-oriented programming language which allows the programmer to write both object-oriented code and procedural-oriented code in the same program.
The Java Development Kit (JDK) is the name of the software development kit (SDK) for the Java programming language, which enables anyone to create both Java applications and applets for running on many operating systems.
It is one of three core software programs that are essential to the development of Java applications and is required in order to compile and run Java code. In short, it helps us develop our desired apps. It helps create different types of projects, debug them, compile and run them.
It can be frustrating when you first start to install Java on Linux, and it doesn't work. This article provides clear instructions for installing Java 17 on Debian 11. You will have your system running in no time.
Prerequisites
In order to install and run Java programs in Linux, you will need:
- A server running Debian 11 with a working Internet connection.
- Enough RAM (memory) to run your system smoothly. At least 3.5 GB should be available.
- A non-root user with sudo privileges.
Step 1. Update the System
Before you can install anything, you will need to make sure that your system is up-to-date. You can do this by running the following command in the terminal.
sudo apt update && sudo apt upgrade -y
The above command may take a few minutes, depending on the speed of your Internet connection.
Step 2. Installing Java JDK 17 on Debian 11
It's recommended to check if Java is already installed on your system. To do so, run the following command in the terminal.
java -version
If Java isn't installed yet, you will get an output similar to this one. The output shows that no Java installation has been found on the system. Otherwise, if it is installed, you should get a version number.

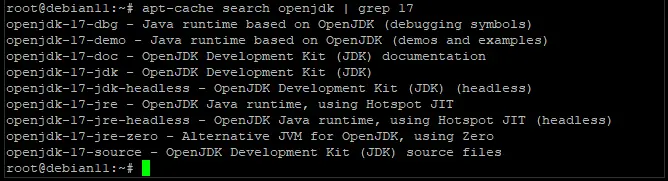
The easiest method of installing the JDK is by using the apt package manager. Debian 11’s default repository included Java 17, as shown in the screenshot below.
sudo apt-cache search openjdk | grep 17
Run the following command to install Java 17 on Debian 11. We will install both JDK and JRE in order to run Java applications and applets.
sudo apt install openjdk-17-jdk
sudo apt install openjdk-17-jre
Once the installation is completed, run the following command in order to check if it works properly. If everything works fine, you should get an output similar to the one shown below.
java -version

To verify if the JDK is installed properly, we will check the version of javac, which is the Java compiler.
javac -version
![]()
Step 3. Configuring the Environmental Variable
Some Java applications require the JAVA_HOME environmental variable in order to run properly. Some programs are very specific in how they are executed. If JAVA_HOME isn't set, you'll get an error. Setting JAVA_HOME will prevent this problem from arising.
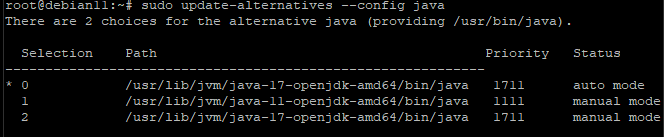
First, let's determine the path of Java where Java is installed using the update-alternatives command.
sudo update-alternatives --config java
This command will output the installation path of Java as you can see in the screenshot below.
- /usr/lib/jvm/java-11-openjdk-amd64/bin/java is the installation path of path of OpenJDK 11
- usr/lib/jvm/java-17-openjdk-amd64/bin/java is the installation path of path of OpenJDK 17
Copy the path you want to use. Now, open a new environment file with your favorite text editor. We will be using the nano editor in this example.
sudo nano /etc/environment
You have to paste the path that you've copied at the end of the line export JAVA_HOME=... into the file, like this.

This file will set the JAVA_HOME path of OpenJDK 17 as environmental variables for all users in the system. Save and exit the file by pressing CTRL+X, Y, and Enter.
To apply the change, run the following command.
sudo source /etc/environment
To verify that the path variable has been applied, run the following command.
echo $JAVA_HOME
The path should be set to the path of OpenJDK 17, which you have copied above.
![]()
From now on, you don't have to set the JAVA_HOME path every time when using Java programs. Also, if you want to use other OpenJDK versions instead of 17, adapt the path accordingly.
Step 4. Testing the Java Installation
In this step, we will test if Java was installed properly on your system by creating a simple helloworld Java application, compile, and execute it using the JRE.
First, run the following command to create a new directory called helloworld and navigate into it. Here, we will store all our files related to our first Java application.
mkdir helloworld && cd helloworld
Next, create a new file named helloworld.java using your favorite text editor.
sudo nano helloworld.java
Now, populate the file with the following content.
public class helloworld{
   public static void main(String[] args) {
      System.out.println("Howtoforge-Hello World");
   }
}
Save and exit the file by pressing CTRL+X, Y, and Enter.
Now that we have created our program, we need to compile the Java source code into bytecode (class file) using the javac compiler.
javac helloworld.java
You will get a new file called helloworld.class, which is the compiled Java class file.

The command above will only compile the Java source code into bytecode. In order to run the program, we run the java command with the name of our class file as an argument.
java helloworld
If everything works well, you'll see a message "Howtoforge-Hello World" on the screen.
![]()
You have successfully installed Java. For further reading on the Java language, refer to its official documentation.
Conclusion
In this tutorial, you have learned how to install Java 17 on a Debian 11 system. If you have any questions or thoughts, please leave a comment below. If you think this tutorial will be helpful to your friends and colleagues, don't hesitate to share it on social media!

