How to Install GoAccess Web Log Analyzer on Rocky Linux 8
GoAccess is an open-source lightweight log analyzer that can read and analyze log files of multiple formats, including Apache, Nginx, Amazon S3, Elastic Load Balancing, CloudFront, Caddy, etc. It is written in C language and uses the ncurses library for its dashboard interface, which can be accessed from the command line.
It can generate reports in HTML, JSON, and CSV format, which can be shared with others. You can even generate real-time HTML reports that can be displayed via a public link.
In this tutorial, you will learn to install GoAccess Analyzer on a Rocky Linux-based server and configure it to read Nginx logs and serve real-time reports.
Prerequisites
-
A server running Rocky Linux 8.
-
A non-root user having sudo privileges.
-
Nginx running on the server to access logs.
-
Make sure everything is updated.
$ sudo dnf update
Step 1 - Install Dependencies for GoAccess
The latest version of GoAccess v1.5.2 is not available in the default repository. To install the latest version of GoAccess, we will build it from the source. The first step is to download the dependencies required for building the GoAccess package.
$ sudo dnf install ncurses-devel libmaxminddb-devel openssl-devel
$ sudo dnf groupinstall 'Development Tools'
Step 2 - Download and Install GoAccess
Download the latest version of the GoAccess archive. You can find the latest version of GoAccess from the official download page.
$ wget https://tar.goaccess.io/goaccess-1.5.2.tar.gz
Extract the files from the archive.
$ tar -xzvf goaccess-1.5.2.tar.gz
Configure and Install the package.
$ cd goaccess-1.5.2
$ autoreconf -fi
$ sudo ./configure --enable-utf8 --enable-geoip=mmdb --with-openssl
$ sudo make
$ sudo make install
Verify that GoAccess is running.
$  goaccess --version
GoAccess - 1.5.2.
For more details visit: https://goaccess.io/
Copyright (C) 2009-2020 by Gerardo Orellana

Build configure arguments:
  --enable-utf8
  --enable-geoip=mmdb
  --with-openssl
Step 3 - Download GeoIP Database
You can download the GeoIP Database either from DB-IP or Maxmind. If you are going to download from Maxmind, you will need to create an account and generate a free license key. Downloading from DB-IP can be done directly.
Download the country zip file from either of the above sources. Once downloaded, extract them and upload the .mmdb file on the server to a custom folder like /home/<user>/geoip.
Step 4 - Configure GoAccess
GoAccess stores its configuration file at /usr/local/etc/goaccess/goaccess.conf. You can check the location of the file on your system using the following command.
$ goaccess --dcf
/usr/local/etc/goaccess/goaccess.conf
Open the file for editing.
$ sudo nano /usr/local/etc/goaccess/goaccess.conf
Most of the options are commented out. You can either use these options via the command line or set them in the file here. To enable an option, remove the # character in front of it.
First, let's enable the time-format option. We will be parsing Nginx files in our tutorial, so enable the option meant for Apache/Nginx logs.
# The following time format works with any of the
# Apache/NGINX's log formats below.
#
time-format %H:%M:%S
Next, enable the Nginx date-format option.
# The following date format works with any of the
# Apache/NGINX's log formats below.
#
date-format %d/%b/%Y
Next, enable the log-format option. In our tutorial, we will use the combinedlog format, which is what Nginx commonly uses.
log-format COMBINED
If your log files contain the Virtual Host field, enable the following option instead.
log-format VCOMBINED
Suppose you want more control over the log format. In that case, you can enable the following line instead (depending upon the log you are accessing) and add or remove parameters according to your needs.
log-format %v:%^ %h %^[%d:%t %^] "%r" %s %b "%R" "%u"
To enable the GeoIP module, enable the following option by entering the path to the GeoIP database.
# For GeoIP2 Country database:
# Download the GeoLite2-Country.mmdb.gz
# gunzip GeoLite2-Country.mmdb.gz
#
geoip-database /home/geoip/dbip-country-lite-2021-10.mmdb
Save the file by pressing Ctrl + X and entering Y when prompted once finished.
Step 5 - Run GoAccess
Normally, if you want to run GoAccess, you will need to use the following command.
$ sudo /usr/local/bin/goaccess /var/log/nginx/access.log
We need to use sudo because regular users can't open the log files. Also, you will need to use the full path for the executable with the sudo command because the sudo command doesn't recognize applications in the /usr/local/bin directory. You can, however, get around the limitation by creating a symlink.
To do that, run the following command.
$ sudo ln -s /usr/local/bin/goaccess /usr/bin/goaccess
Now, you can run GoAccess directly.
$ sudo goaccess /var/log/nginx/access.log
The Nginx log files keep a record of all incoming HTTP traffic. If your server has been running for a long time, you will see multiple access logs with the older logs in compressed .gz format. The older log files are generated as a result of log rotation.
Once you run the command, you will be greeted with the following dashboard.
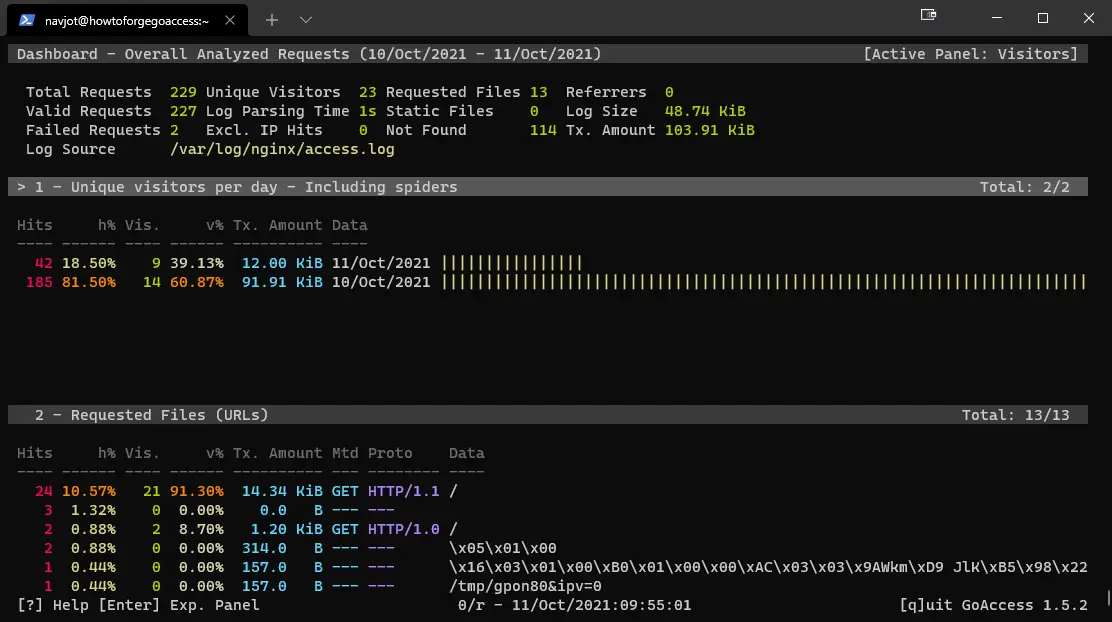
GoAccess provides you with several keyboard shortcuts to navigate the dashboard.
TABto move forward through the available modules andSHIFT+TABto move backward.F5to refresh the dashboard.gto move to the top of the dashboard screen andGto move to the bottom.oorENTERto expand the selected module.jandkto scroll down and up within the active module.sto display the sort options for the active module./to search across all modules andnto move to the next match.0-9andSHIFT+0to quickly activate the respective numbered module.?to view the quick help dialog.qto quit the program.
Let us go through all the panels in brief.
-
Unique visitors per day - This panel is self-explanatory. It lists unique visitors, hits and cumulative bandwidth for each date. It also includes web crawlers and spiders by default.
-
Requested Files (URLs) - This panel provides the statistics concerning the most requested non-static files on your server.
-
Static Requests - It is similar to the above panel except that it handles static files like images, CSS, JavaScript, etc.
-
Not Found URLs (404s) - This panel logs all the requests to files and paths not found on your server.
-
Visitor Hostnames and IPs - This panel gives more info about the visitors to your site. You can press
oto expand the panel to get detailed information such as country of origin, city, and reverse DNS. -
Operating Systems - This panel displays different Operating systems used by the visitors.
-
Browsers - This panel shows the various browsers used by the visitors.
-
Time Distribution - This panel will give an hourly report for the number of hits, unique visitors, and bandwidth consumed.
-
Virtual Hosts - This panel displays the virtual hosts parsed from the log file. It will only show up if you use the
VCOMBINEDlog format in the configuration file above or if%vis part of the log-format configuration. -
Referrer URLs - This lists the URLs that refer visitors to your server. This panel is disabled by default. To enable it, comment out the following line in the configuration file by adding
#in front of it.#ignore-panel REFERRERS
-
Referring Sites - This panel displays the IP addresses of the referring hosts.
-
Keyphrases - This panel displays the keywords used on Google Search, Google cache or Google Translate that lead to your site. This panel is also disabled by default. Enable it by commenting out the following line in the configuration file.
#ignore-panel KEYPHRASES
-
HTTP Status Codes - This panel shows the statistics for HTTP status codes returned by your server when it responds to a request.
-
Remote User (HTTP Authentication) - This panel shows the user ID of the person accessing a document on your server, protected by HTTP authentication. This panel only works if
%eis part of the log-format configuration. -
Cache status - This panel determines if a request is being cached and served from it. This panel only works if
%cis part of the log-format configuration. -
Geo Location - This panel provides a list of geographical locations of the visitors accessing your site. It will show up only if you have downloaded and added its location in the configuration file.
Step 6 - Run GoAccess as unprivileged
As a good security practice, the less the code that works as root, the better. To run GoAccess without root, it needs permissions to read log files.
The server log files are usually part of the adm group. You can verify that using the following command.
$ ls -l /var/log/nginx
total 68
-rw-r----- 1 nginx adm 30547 Oct 10 12:47 access.log
-rw-r----- 1 nginx adm 35063 Oct 10 12:47 error.log
As you can see, you don't need to be a root user to open the log files. Any user belonging to the adm group can open the files.
The easiest way to run GoAccess without root is to add the currently logged-in user to the adm group. That way, you can run GoAccess under that user without sudo.
Run the following command to add the current user to the adm group.
$ sudo usermod -aG adm $USER
Now, log out and log back in to apply the change. Or you can run the following command without needing to log out to implement the change.
$ su $USER
You should be able to run GoAccess directly without needing sudo.
$ goaccess /var/log/nginx/access.log
Step 7 - Generate HTML Reports
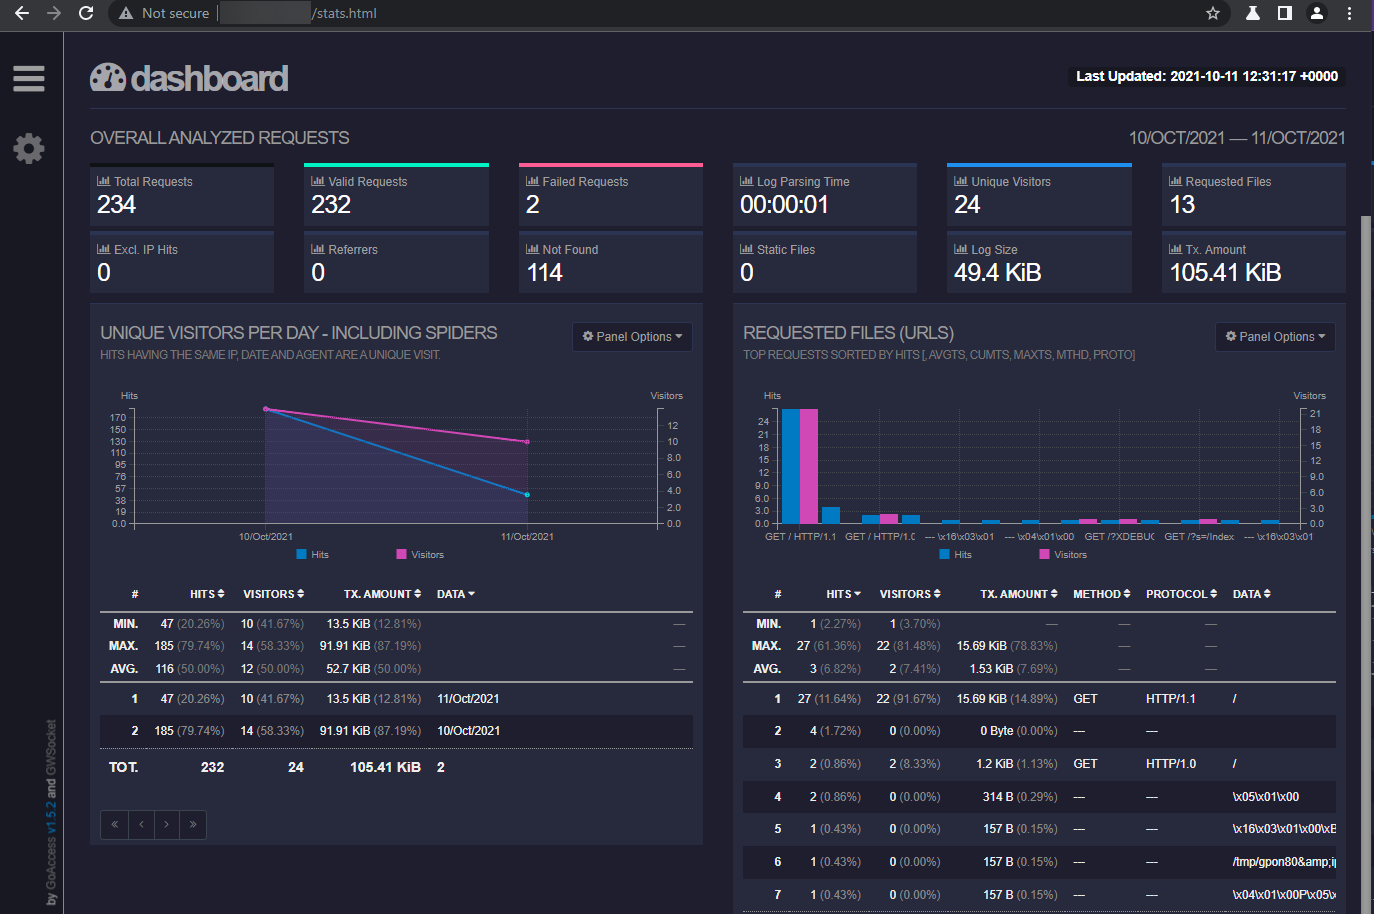
GoAccess can be used to generate HTML reports which you can serve them online. Use the following command to generate an HTML report.
$ goaccess /var/log/nginx/access.log -o stats.html
You can either download the file on your local PC for yourself or your website folder to serve publicly.
You can even generate a real-time HTML report using GoAccess. But first, you need to open the 7890 port for GoAccess Websocket to run. Open the port using the following command.
$ sudo firewall-cmd --permanent --add-port=7890/tcp
Reload the firewall to apply the change.
$ sudo firewall-cmd --reload
Now, run the following command to generate a real-time HTML report.
$ goaccess /var/log/nginx/access.log -o /usr/share/nginx/html/livereport.html --real-time-html
This would generate a real-time report at the location specified. The above command will keep GoAccess running in the foreground as a WebSocket listening for connections.
There is a small caveat with running the above command. The above command will work when GoAccess has user permissions on the /usr/share/nginx/html directory. Since we are running GoAccess under the currently logged-in user, you need to give that user permissions on the /usr/share/html directory. If you can't wait for some reason, you will need to run GoAccess using sudo.
$ sudo goaccess /var/log/nginx/access.log -o /usr/share/nginx/html/livereport.html --real-time-html
If you want to run GoAccess in the background, you can run it as a daemon instead by using the following command.
$ goaccess /var/log/nginx/access.log -o /usr/share/nginx/html/livereport.html --real-time-html --daemonize
Daemonized GoAccess: 78315
To stop the GoAccess Daemon, kill the process with the following command.
$ sudo kill -9 78315
Here, we are using the process ID which we got in our earlier command. If you don't remember the process ID, you can also use the following command to kill the process.
$ sudo kill -9 `pidof goaccess`
Notice that we are using the backquote (`) in our command. Using regular quotes will fail the command.
Conclusion
This concludes our tutorial about installing and running GoAccess Log Analyzer on Rocky Linux 8 server. If you have any questions, post them in the comments below.

