

The XanMod Kernel offers a cutting-edge computing experience, designed to elevate the performance of Debian-based systems. This guide will specifically demonstrate how to install the XanMod Kernel on Debian versions 12, 11, or 10, ensuring users can leverage its full potential. The XanMod Kernel is renowned for its enhancements in core processing and system efficiency, making it an ideal choice for those seeking to optimize their Debian systems.
Key Features of the XanMod Kernel:
- Optimized Core Processing: Tailored for heavy workloads with improved process scheduling, load balancing, caching, and a virtual memory manager.
- High I/O Throughput: Utilizes a multi-core block layer runqueue for superior input/output performance.
- Advanced Debugging: Implements the ORC Unwinder for precise kernel stack traces.
- Real-time Capabilities: Offers a PREEMPT_RT build for real-time kernel applications.
- Enhanced CPU Support: Includes AMD’s P-state CPPC driver for Zen2/3/4 processors and Intel’s SMT task migration scheduler.
- Wine / Proton Fsync Support: Integrates Futex waitv and legacy WAIT_MULTIPLE implementation.
- Network Optimization: Features Cloudflare’s TCP collapse processing and Google’s BBRv3 TCP congestion control for high throughput and low latency.
- Efficient Packet Processing: Employs Netfilter nf_tables and FLOWOFFLOAD target for faster packet handling.
- Additional Enhancements: WineSync driver, PCIe ACS Override, Graysky’s GCC and Clang CPU options, and more.
The XanMod Kernel transforms Debian systems into highly efficient machines, suitable for a wide range of applications from everyday computing to complex professional tasks. With the following instructions, users can seamlessly integrate this powerful kernel into their Debian environment, unlocking new levels of performance and reliability.
Import XanMod APT Repository on Debian 12, 11 or 10
Step 1: Update Debian Before XanMod Installation
Prior to the XanMod kernel installation, updating your Debian system is a necessary step. This update minimizes potential conflicts during the XanMod installation. To perform the update, run:
sudo apt update && sudo apt upgradeThis command refreshes your package lists and upgrades the packages to their latest versions.
Step 2: Install Required Initial Packages
Before installing the XanMod kernel, certain dependencies must be in place. These packages might already be installed, but to ensure their presence, execute:
sudo apt install software-properties-common apt-transport-https ca-certificates curl -yThis command installs key packages necessary for managing repositories and secure communication.
Step 3: Import the XanMod GPG Key and Repository
The first major step in installing the XanMod kernel is adding the XanMod repository to your system. Here, we’ll use the apt package manager for simplicity.
Import the XanMod GPG Key
Begin by importing the GPG key:
curl -fSsL https://dl.xanmod.org/gpg.key | gpg --dearmor | sudo tee /usr/share/keyrings/xanmod.gpg > /dev/nullThis command retrieves the XanMod GPG key and integrates it into your system’s keyring, a crucial step for verifying the authenticity of the XanMod packages.
Add the XanMod Repository
Next, add the XanMod repository:
echo 'deb [signed-by=/usr/share/keyrings/xanmod.gpg] http://deb.xanmod.org releases main' | sudo tee /etc/apt/sources.list.d/xanmod-kernel.listThis command adds the XanMod repository to your APT sources, enabling you to install packages from it.
Verify the Repository Addition
To confirm the successful addition of the repository, use:
grep xanmod /etc/apt/sources.list.d/xanmod-kernel.listA successful addition will produce an output resembling:
deb [signed-by=/usr/share/keyrings/xanmod.gpg] http://deb.xanmod.org releases main
Step 4: Update Packages List After Import
Now, update your APT repository source listing to include the newly added XanMod repository:
sudo apt updateInstall XanMod Kernel on Debian 12, 11 or 10
Download and Prepare the XanMod Kernel Check Script
To align the XanMod Kernel with your system’s CPU, begin by acquiring the XanMod Kernel Check Script. This script is instrumental in identifying the most compatible XanMod Kernel package for your Debian system.
Execute the following commands to download the script and modify its permissions:
wget https://dl.xanmod.org/check_x86-64_psabi.sh
chmod +x check_x86-64_psabi.sh
This step is crucial because the XanMod Kernel comes in various versions like linux-xanmod-x64v1, x64v2, x64v3, and x64v4. Each version is specifically optimized for different CPU architectures.
The script’s output will display the compatible x86-64 version. For instance, you might see:
CPU supports x86-64-v2Your CPU might support different versions like x86-64-v1, v3, or v4, as indicated by the script.
Install the XanMod Kernel Using APT
Once you have identified the correct version, proceed to install the XanMod Kernel. For example, if your CPU supports x86-64-v2, the installation command would be:
sudo apt install linux-xanmod-x64v2Remember to adjust the command based on the CPU version (v1, v3, or v4) that you determined earlier.
For comprehensive information on each kernel version and its CPU compatibility, consult the XanMod Kernel’s official website or check out the information below.
Quick Overview of XanMod Versions:
- MAIN Versions:
linux-xanmod-x64v1: Best for older CPUs like AMD K8-family and Intel Pentium 4 / Xeon (Nocona).linux-xanmod-x64v2: Fits newer CPUs, such as AMD Family 10h (Barcelona) and Intel Core 2 variants.linux-xanmod-x64v3: Ideal for modern CPUs including AMD Family 17h (Zen) and Intel 6th Gen Core (Skylake).linux-xanmod-x64v4: Suitable for the latest CPUs, like AMD Family 19h (Zen4) and Intel Xeon / 10th Gen Core (Ice Lake).
- EDGE Versions:
linux-xanmod-edge-x64v2: Tailored for CPUs like AMD Family 16h (Jaguar) and Intel 2nd Gen Core (Sandybridge).linux-xanmod-edge-x64v3: Optimal for CPUs including AMD Family 17h (Zen+) and Intel 7th Gen Core (Kaby Lake).linux-xanmod-edge-x64v4: Designed for advanced CPUs such as Intel 11th Gen (Rocket Lake) and AMD Family 19h (Zen3).
- LTS Versions:
linux-xanmod-lts-x64v1: Supports older, long-term stable CPUs, like Intel Core 2 and AMD K10-family.linux-xanmod-lts-x64v2: Compatible with various CPUs, including Intel 3rd Gen Core (Ivybridge) and AMD Family 15h (Steamroller).linux-xanmod-lts-x64v3: Fits recent CPUs such as Intel 10th Gen Core (Comet Lake) and AMD Family 17h (Zen2).linux-xanmod-lts-x64v4: For the newest CPUs offering long-term stability, like Intel 13th Gen (Raptor Lake) and AMD Family 19h (Zen3).
- RT Versions:
linux-xanmod-rt-x64v2: Real-time version for CPUs like Intel 1st Gen Core (Nehalem) and AMD Family 15h (Bulldozer).linux-xanmod-rt-x64v3: Real-time version optimized for newer CPUs, including Intel 8/9th Gen Core (Coffee Lake) and AMD Family 17h (Zen+).linux-xanmod-rt-x64v4: The most advanced real-time version for CPUs such as Intel Xeon (Cooper Lake) and AMD Family 19h (Zen4).
Selecting the appropriate version for your CPU architecture is essential for optimizing performance with the XanMod Kernel on Debian systems.
Verify XanMod Kernel Installation on Debian 12, 11, or 10
Confirming the XanMod Kernel Installation
After restarting your Debian system, it’s important to confirm the successful installation of the XanMod Kernel. This verification step ensures that your system is running the new kernel.
Check the Installed Kernel Version
To verify the installed kernel version, execute:
cat /proc/versionThis command will output the currently active kernel version. If the installation was successful, the output will display the XanMod kernel version.
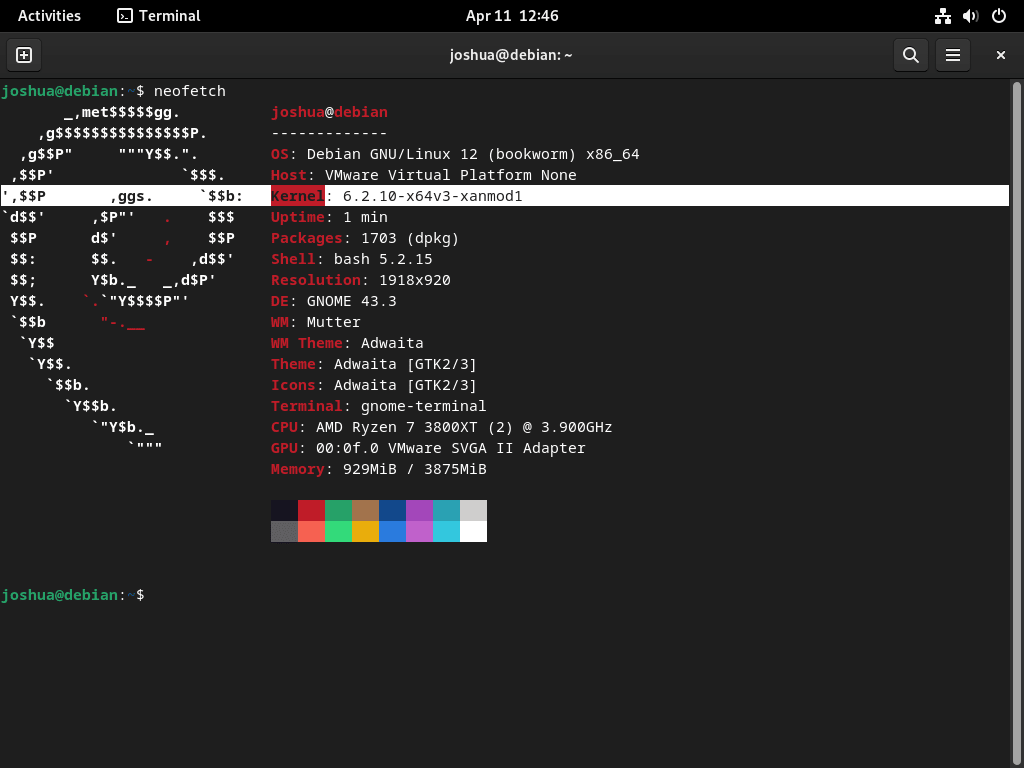
Example of Kernel Verification
Using additional tools like Neofetch can provide a more detailed view of your system information, including the kernel version.
Managing XanMod Kernel on Debian 12, 11 or 10
Update XanMod Kernel on Debian
After adding the XanMod APT repository, you can update the kernel just like any other package. Use the following command to check for updates and apply them:
sudo apt update && sudo apt upgradeThis command refreshes your package list and upgrades your system to the latest kernel version available in the XanMod repository.
Remove XanMod Kernel from Debian
Step 1: Remove the XanMod Source from the Repository
To begin removing the XanMod Kernel, first delete its source from your repository list:
sudo rm /etc/apt/sources.list.d/xanmod-kernel.listThis command removes the XanMod repository, preventing future updates from being fetched.
Step 2: Remove the GPG Key
If you do not intend to use XanMod in the future, it’s a good security practice to remove its GPG key:
sudo rm /usr/share/keyrings/xanmod.gpgThis step ensures the security integrity of your system by removing external authentication keys.
Step 3: List Installed XanMod Kernel Packages
Identify the XanMod Kernel packages installed on your system:
dpkg --list | grep `uname -r`This command lists all XanMod Kernel packages associated with your current running kernel.
Step 4: Remove the XanMod Kernel Packages
To remove the identified XanMod Kernel packages, execute:
sudo apt remove linux-image-*.*.*-xanmod* linux-headers-*.*.*-xanmod* --purgeThis command purges XanMod Kernel packages from your system.
Step 5: Restart Your System
Reboot your computer to apply the changes:
rebootThis step is crucial to switch back to the default kernel.
Step 6: Verify the Installation Rollback
After rebooting, confirm that the XanMod Kernel has been successfully removed and the default Debian kernel is active:
cat /proc/versionThe output should display the default Linux Kernel version, indicating a successful rollback to the standard Debian kernel.
Conclusion: Installing XanMod Kernel on Debian
The XanMod Kernel is valuable to Debian Linux systems, offering various optimizations and improvements over the generic kernel. It provides enhanced performance, lower latency, and support for the latest CPU generations and features. By carefully selecting and installing the appropriate XanMod Kernel version, Debian users can experience a more responsive and optimized system. However, following the correct installation and removal procedures is crucial to maintain system stability and compatibility.