How to Install Redis on Ubuntu 20.04
This tutorial exists for these OS versions
- Ubuntu 22.04 (Jammy Jellyfish)
- Ubuntu 20.04 (Focal Fossa)
- Ubuntu 18.04 (Bionic Beaver)
On this page
Redis is an open-source, in-memory key/value store, used as a database, cache, and message broker. It's a distributed in-memory key-value database with optional durability. It supports common data structures such as string, hashes, lists, sets, bitmaps, sorted sets, HyperlogLogs, stream, and geospatial indexes with radius queries.
In this tutorial, we will show you how to install and configure Redis Server on Ubuntu 20.04 LTS. We will first install the Redis Server, and then secure the installation to make it production-ready.
Prerequisites
For this guide, we will install the Redis Server on Ubuntu 20.04 with 1GB of RAM and 2CPU cores. This is for testing only, and you will need more than this for your production.
What we will do:
- Install Redis Server
- Redis Server Basic Configuration
- Securing Redis Server
- Testing
Step 1 - Install Redis Server
Firstly, we will update all repositories on the Ubuntu system and upgrade all packages.
Run the apt commands below.
sudo apt update
sudo apt upgrade
After that, install the Redis-server package from the official Ubuntu repository using the apt command below.
sudo apt install redis-server
Once the installation is complete, you will get an error messages about the Redis service failing to start, ignore the message error and we will configure it on the next step.
Step 2 - Redis Server Basic Configuration
In this step, we're going to set up the basic Redis server. On the Linux system, the Redis configuration is located at the '/etc/redis' directory.
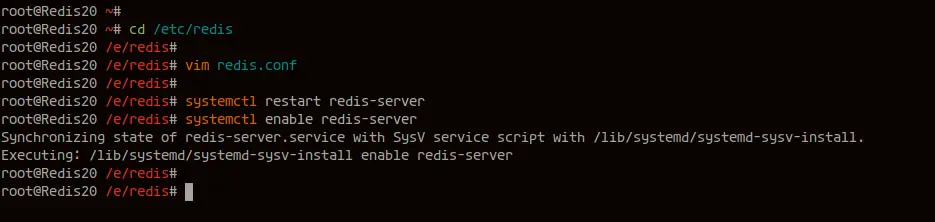
Go to the '/etc/redis' directory and edit the configuration file 'redis.conf' using vim editor.
cd /etc/redis/
vim redis.conf
Firstly, we need to choose a 'bind' IP address will run the Redis service. It's not recommended to use the public IP address for the Redis service, or if you're running the multiple/cluster Redis service, you should use the internal network.
Change the 'bind' address with the localhost IP address for this example.
bind 127.0.0.1
After that, we need to set up how the Redis service will run on the server. Since we're using the Ubuntu server and systemd, so we need to change the 'supervised' line configuration to 'systemd'.
supervised systemd
Save and close.
Now restart the Redis service and add it to the boot time.
systemctl restart redis-server
systemctl enable redis-server
Now make sure there is no error and then check its status.
systemctl status redis-server
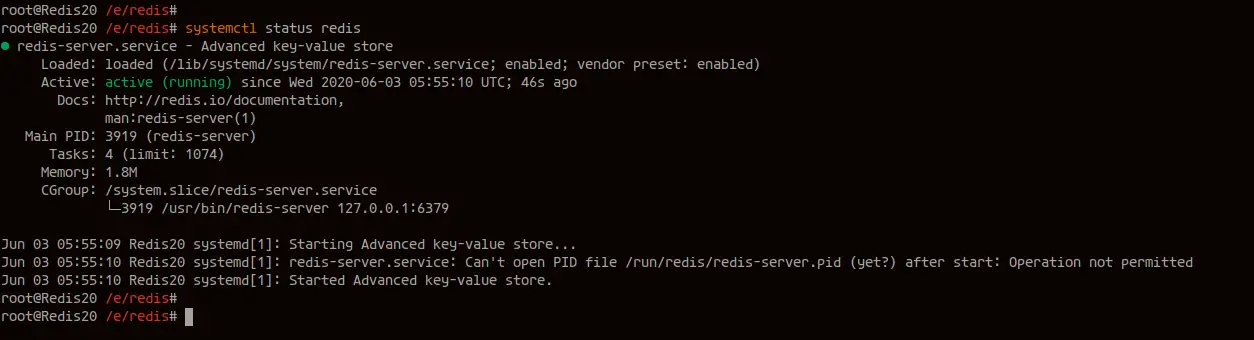
As a result, the Redis service is up and running on Ubuntu 20.04 Server.
Now check the default Redis port '6379' using netstat command below.
ss -plnt4
And you will get the result the Redis service is running on the localhost IP address with default '6379'.
Now check the Redis using the 'redis-cli' commands as below.
redis-cli ping
redis-cli ping "Hello Redis"
And you will get the result as below.

If your installation is correct, you will get the Redis Server reply with 'PONG' or reply with the text that you entered after the 'ping' option.
The basic installation and configuration of the Redis Server have been completed successfully.
Step 3 - Securing Redis Installation
In this step, we're going to secure our Redis installation. There are 3 things that you must know about securing the Redis Server.
1. Network Security
The Network security for the Redis server is related to the 'bind' configuration on the Redis configuration 'redis.conf'. It's recommended to use the internal private network for your Redis installation and don't use the public.
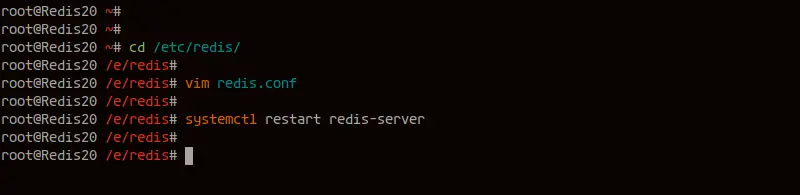
Go to the '/etc/redis' directory and edit the configuration file 'redis.conf'.
cd /etc/redis/
vim redis.conf
On the 'bind' section, change the IP address with your own internal network IP address.
bind INTERNAL-IP-ADDRESS
Save and close.
And now the Redis service will run under the 'INTERNAL-IP-ADDRESS'.
2. Password Authentication
The password authentication for Redis will give you access control to your Redis server. This is a little layer of security that will enhance your Redis server security, and it is not yet enabled by default installation.
To enable the Password Authentication for Rediser server, you will need to uncomment the 'requirepass' section on the 'redis.conf' file and type your strong password after it.
requirepass HakaseLabsRedisPasswd
Change the 'HakaseLabsRedisPasswd' with your strong password. And now the password authentication for Redis has been enabled.
3. Disabling Dangerous Redis Command
Redis provides a feature for disabling some specific Redis commands. This feature can be used to rename or disable some of the dangerous commands such as 'FLUSHALL' for erasing all data, 'CONFIG' command to set up configuration parameter through the Redis CLI, etc.
To change or disable the Redis command, you can use the 'rename-command' option. Edit the Redis configuration file 'redis.conf' and add some configurations below.
# rename-command COMMAND "CUSTOM"
rename-command FLUSHALL "DELITALL"
rename-command CONFIG "MYSERVERCONF"
Save and close.
Once all is complete, restart the Redis service using the systemctl command below.
systemctl restart redis-server
And the basic Redis security for securing Redis installation has been applied to our host.
Other consideration, you may also need the 'Data Encryption' support for Redis, as well as the secure coding needed on the application side.
Step 4 - Testing
In this step, we're going to test our Redis Server deployment using the 'redis-cli' command line.
1. Testing Host and Authentication
Connect to the Redis Server using the redis-cli command by specifying the redis server hostname/ IP address and port.
redis-cli -h 127.0.0.1 -p 6379
Change the '127.0.0.1' with your own IP address.
Once you're connected to the server, try the ping command.
ping
ping "Hello Redis"
Now you will get the result as below.
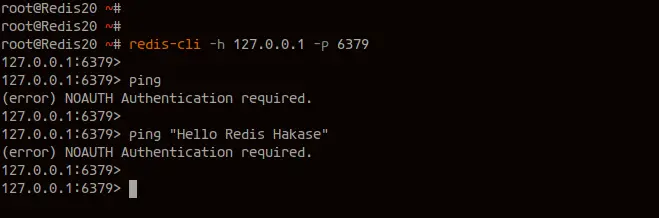
You're getting an error because you need to authenticate before invoking any command on the Redis CLI shell.
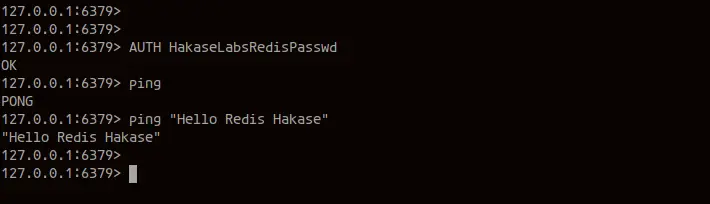
Run the following command to authenticate against the Redis Server.
AUTH HakaseLabsRedisPasswd
Once you're authenticated, you can try the ping command and you will get a reply from the Redis server.
ping
ping "Hello Redis"
Below is the result after you're authenticated to the Redis Server.
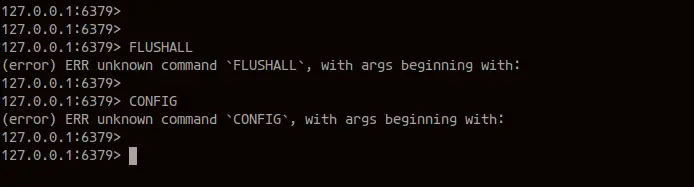
2. Testing Disabled/Renamed Command
Run all commands that we've renamed on the shell and you will get the command error.
FLUSHALL
CONFIG
Below is the error result of those commands.
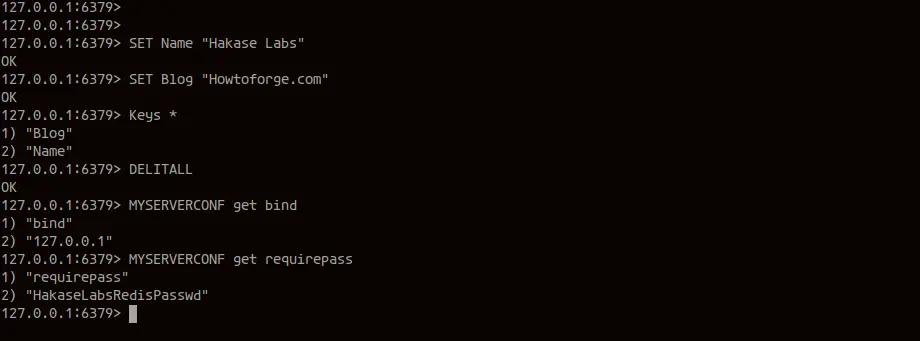
Next, run the 'CUSTOM' commands for each.
Create new Key using through redis-cli command as below.
SET Name "Hakase Labs"
SET Blog "Howtoforge.com"

Keys *
Now delete all keys and data using the renamed 'FLUSHALL' command 'DELITALL'.
DELITALL
For the 'CONFIG' command, you can try to retrieve or set up new value of the Redis Server configuration. The 'CONFIG' command renamed to 'MYSERVERCONF'.
MYSERVERCONF get bind
MYSERVERCONF get requirepass
And below is the result of these new renamed custom command.
The Basic installation of Redis Server on Ubuntu 20.04 has been completed, and the basic security for Redis Server has been applied.

