How to Install ClickHouse OLAP Database System on Debian 11
ClickHouse is a free, open-source, and column-oriented database management system. It is used for online analytical processing and allows you to generate analytical reports using SQL queries in real-time. It stores records in blocks grouped by columns instead of rows. Thus, it spends less time reading data while completing queries. Also, column-oriented databases can compute and return results much faster than traditional row-based systems for certain workloads.
In this post, we will show you how to install ClickHoust database on Debian 11.
Prerequisites
- A server running Debian 11.
- A root password is configured on your server.
Getting Started
Before starting, you will need to update your system packages to the updated version. You can update them by running the following command:
apt-get update -y
Once all the packages are updated, install other required packages using the following command:
apt-get install curl gnupg2 wget git apt-transport-https ca-certificates -y
Once all the required packages are installed, you can proceed to the next step.
Install ClickHouse on Debian 11
By default, the ClickHouse package is not included in the Debian 11 default repository. So you will need to add the ClickHouse repository to your system.
First, download and add the GPG key using the following command:
apt-key adv --keyserver keyserver.ubuntu.com --recv E0C56BD4
You will get the following output:
Executing: /tmp/apt-key-gpghome.WyTt1Mpvh7/gpg.1.sh --keyserver keyserver.ubuntu.com --recv E0C56BD4
gpg: key C8F1E19FE0C56BD4: public key "ClickHouse Repository Key <[email protected]>" imported
gpg: Total number processed: 1
gpg:               imported: 1
Next, add the ClickHouse repository to the APT using the following command:
echo "deb http://repo.yandex.ru/clickhouse/deb/stable/ main/" | tee /etc/apt/sources.list.d/clickhouse.list
Next, update the repository and install the ClickHouse with the following command:
apt-get update -y
apt-get install clickhouse-server clickhouse-client -y
During the installation, you will be asked to provide a password for the ClickHouse admin user as shown below:
Enter password for default user:
Password for default user is saved in file /etc/clickhouse-server/users.d/default-password.xml.
Setting capabilities for clickhouse binary. This is optional.
 chown -R clickhouse:clickhouse '/etc/clickhouse-server'

ClickHouse has been successfully installed.

Start clickhouse-server with:
 sudo clickhouse start

Start clickhouse-client with:
 clickhouse-client --password

Synchronizing state of clickhouse-server.service with SysV service script with /lib/systemd/systemd-sysv-install.
Executing: /lib/systemd/systemd-sysv-install enable clickhouse-server
Created symlink /etc/systemd/system/multi-user.target.wants/clickhouse-server.service → /etc/systemd/system/clickhouse-server.service.
Setting up clickhouse-client (21.12.3.32) ...
Once the installation has been completed, you can proceed to the next step.
Manage ClickHouse Service
You can now start the ClickHouse service and enable it to start at system reboot with the following command:
systemctl start clickhouse-server
systemctl enable clickhouse-server
You can now verify the status of the ClickHouse with the following command:
systemctl status clickhouse-server
You will get the following output:
? clickhouse-server.service - ClickHouse Server (analytic DBMS for big data)
     Loaded: loaded (/etc/systemd/system/clickhouse-server.service; enabled; vendor preset: enabled)
     Active: active (running) since Fri 2021-12-31 11:22:57 UTC; 9s ago
   Main PID: 18152 (clckhouse-watch)
      Tasks: 206 (limit: 2341)
     Memory: 108.2M
        CPU: 931ms
     CGroup: /system.slice/clickhouse-server.service
             ??18152 clickhouse-watchdog        --config=/etc/clickhouse-server/config.xml --pid-file=/run/clickhouse-server/clickhouse-serve>
             ??18153 /usr/bin/clickhouse-server --config=/etc/clickhouse-server/config.xml --pid-file=/run/clickhouse-server/clickhouse-serve>

Dec 31 11:22:57 debian11 systemd[1]: Started ClickHouse Server (analytic DBMS for big data).
Dec 31 11:22:57 debian11 clickhouse-server[18152]: Processing configuration file '/etc/clickhouse-server/config.xml'.
Dec 31 11:22:57 debian11 clickhouse-server[18152]: Logging trace to /var/log/clickhouse-server/clickhouse-server.log
Dec 31 11:22:57 debian11 clickhouse-server[18152]: Logging errors to /var/log/clickhouse-server/clickhouse-server.err.log
Dec 31 11:22:58 debian11 clickhouse-server[18153]: Processing configuration file '/etc/clickhouse-server/config.xml'.
Dec 31 11:22:58 debian11 clickhouse-server[18153]: Saved preprocessed configuration to '/var/lib/clickhouse/preprocessed_configs/config.xml'.
Dec 31 11:22:58 debian11 clickhouse-server[18153]: Processing configuration file '/etc/clickhouse-server/users.xml'.
Dec 31 11:22:58 debian11 clickhouse-server[18153]: Merging configuration file '/etc/clickhouse-server/users.d/default-password.xml'.
Dec 31 11:22:58 debian11 clickhouse-server[18153]: Saved preprocessed configuration to '/var/lib/clickhouse/preprocessed_configs/users.xml'.
How to Use ClickHouse
In this section, we will show you how to connect to the ClickHouse, create a database and table.
First, connect to the ClickHouse using the following command:
clickhouse-client --password
You will be asked to provide the default password as shown below:
ClickHouse client version 21.12.3.32 (official build).
Password for user (default):

Provide the password which you have set during the installation and press the Enter key. You will get the following shell:

Connecting to localhost:9000 as user default.
Connected to ClickHouse server version 21.12.3 revision 54452.

debian11 :)
Now, create a database named testdb using the following command:
debian11 :) CREATE DATABASE testdb;
You will get the following output:
CREATE DATABASE testdb

Query id: a48b3031-a363-4357-b4f9-ffd3edd73b0e

Ok.

0 rows in set. Elapsed: 0.005 sec.
Next, change the database to testdb using the following command:
debian11 :) USE testdb;
You will get the following output:
USE testdb

Query id: 827e0d94-c3eb-46ec-ba04-97386a58e531

Ok.

0 rows in set. Elapsed: 0.001 sec.
Next, create a table named table1 using the following command:
debian11 :) CREATE TABLE table1 (? id UInt64,? name String,? url String,? created DateTime?) ENGINE = MergeTree()?PRIMARY KEY id?ORDER BY id;
You will get the following output:
CREATE TABLE table1
(
    `id` UInt64,
    `name` String,
    `url` String,
    `created` DateTime
)
ENGINE = MergeTree
PRIMARY KEY id
ORDER BY id

Query id: 922f4fe1-283f-4e5d-9966-498344b2aa4d

Ok.

0 rows in set. Elapsed: 0.006 sec.
Next, insert some value in the table using the following command:
debian11 :) INSERT INTO table1 VALUES (1, 'jay', 'https://www.howtoforge.com', '2021-12-31 00:01:01');
You will get the following output:
INSERT INTO table1 FORMAT Values

Query id: be1c57cd-5759-47cd-8649-ce82cd0c1f7d

Ok.

1 rows in set. Elapsed: 0.005 sec.
Next, add a new column using the following command:
debian11 :) ALTER TABLE table1 ADD COLUMN location String;
You will get the following output:
ALTER TABLE table1
    ADD COLUMN `location` String

Query id: 106fa166-afda-4598-a32c-b50da237bfe5

Ok.

0 rows in set. Elapsed: 0.007 sec.
If you want to retrieve the data from the table, run the following command:
debian11 :) SELECT url, name FROM table1 WHERE url = 'https://www.howtoforge.com' LIMIT 1;
You will get the following output:
SELECT
    url,
    name
FROM table1
WHERE url = 'https://www.howtoforge.com'
LIMIT 1

Query id: 8ee433ec-0eb1-4409-b9a8-7e5794b872ce

??url?????????????????????name??
? https://www.howtoforge.com ? jay  ?
????????????????????????????????

1 rows in set. Elapsed: 0.007 sec.
To remove a column, run the following command:
debian11 :) ALTER TABLE table1 DROP COLUMN location;
To remove a table, run the following command:
debian11 :) DROP TABLE table1;
To remove a database, run the following command:
debian11 :) DROP DATABASE testdb;
To exit from the ClickHouse shell, run the following command:
debian11 :) exit;
Enable ClickHouse Web UI
ClickHouse also provides a web-based interface to manage the database. But, it is disabled by default. You can enable it by editing the ClickHouse configuration file:
nano /etc/clickhouse-server/config.xml
Uncomment and change the following lines:
 <listen_host>0.0.0.0</listen_host>
    <http_server_default_response><![CDATA[<html ng-app="SMI2"><head><base href="http://ui.tabix.io/"></head><body><div ui-view="" class="content-ui"></div><script src="http://loader.tabix.io/master.js"></script></body></html>]]></http_server_default_response>
Save and close the file then restart the ClickHouse service to apply the configuration changes:
systemctl restart clickhouse-server
Access ClickHouse Web UI
By default, ClickHouse web UI listens on port 8123. You can check it using the following command:
ss -antpl | grep 8123
You should see the following output:
LISTEN 0 4096 0.0.0.0:8123 0.0.0.0:* users:(("clickhouse-serv",pid=18580,fd=158))
Now, open your web browser and access the ClickHouse Web UI using the URL http://your-server-ip:8123. You should see the following screen:
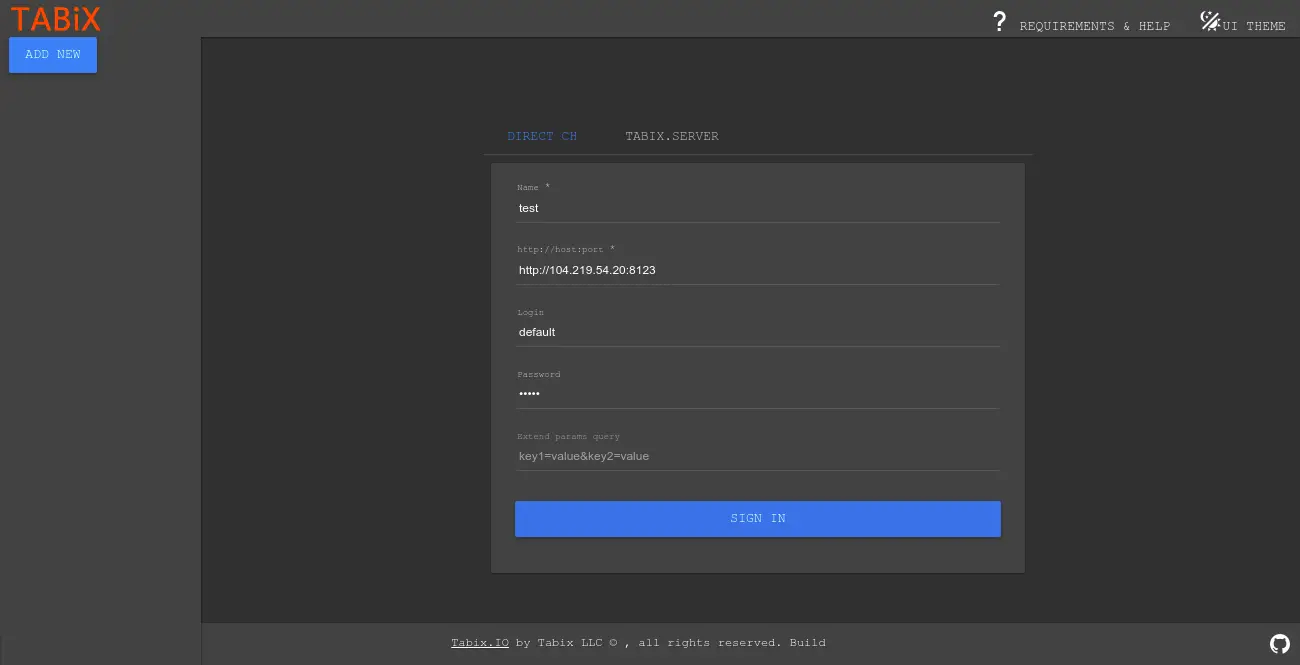
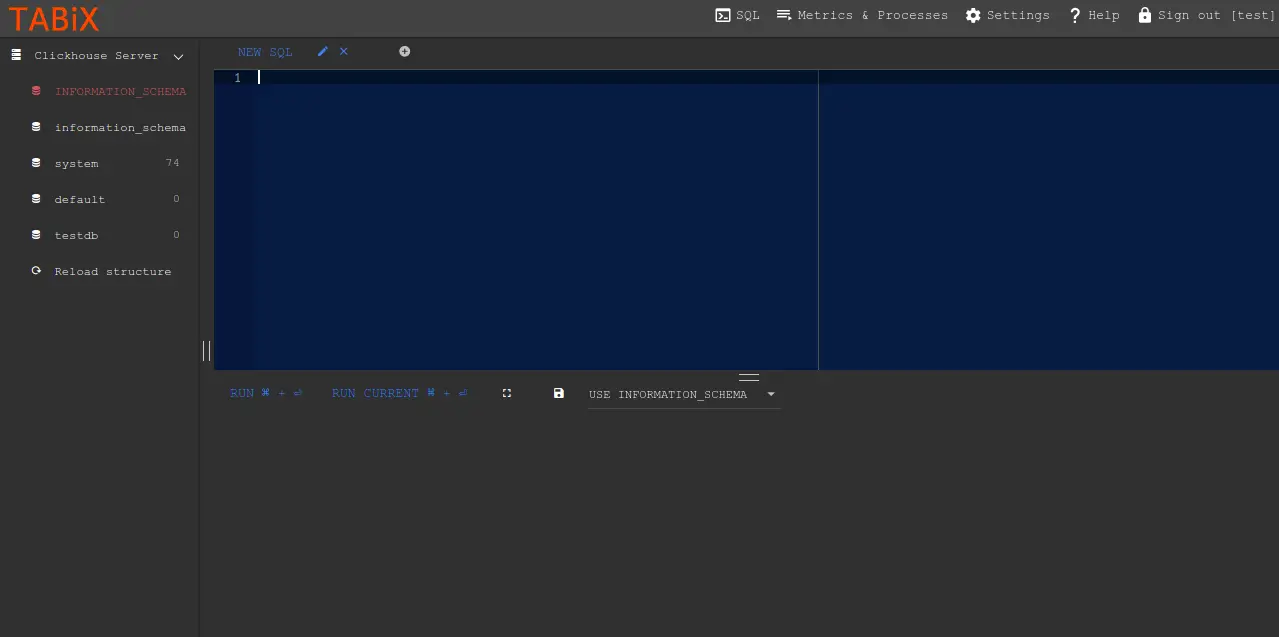
Provide your default username, password and click on the Sign In button. Once you are logged in, you should see the following screen:
Conclusion
In the above guide, we explained how to install ClickHouse database system on Debian 11. We also explained how to create and manage databases and enable the ClickHouse web interface. I hope this will help you to install the ClickHouse in the production environment. Feel free to ask me if you have any questions.

