

Java is a widely used programming language known for its platform independence, making it a versatile option for various development projects. If you’re interested in how to install Java on Fedora Linux, this guide is for you.
Why Choose Java for Fedora Linux?
- Object-Oriented: Java’s object-oriented nature allows for modular and easy-to-manage code, making the development process more efficient.
- Cross-Platform: One of Java’s key strengths is its ability to run on multiple operating systems, including Fedora Linux, without any modifications.
- Memory Management: Java automatically manages memory through Garbage Collection, reducing the chances of memory leaks.
- Rich Libraries: Java comes with a comprehensive standard library, offering pre-written code for common tasks, which speeds up the development process.
- Security: Java has robust features like sandboxing and code signing to protect against malicious attacks.
- Multi-Threading: Java supports multi-threading, allowing for more efficient use of CPU resources, which is especially useful for tasks requiring concurrent or parallel processing.
Given these features, Java is suitable for various applications, from small-scale projects to complex enterprise systems. The following guide will provide step-by-step instructions on installing Java on Fedora Linux, focusing on the Long-Term Support (LTS) versions: Java 17, Java 11, and Java 8. We’ll use the DNF package manager for the installation process.
Step 1: Update Fedora Before Java Installation
Before diving into the Java installation process, ensuring your Fedora system is up-to-date is crucial. This will mitigate potential conflicts that could arise during the installation process. To update your system, execute the following command in your terminal:
sudo dnf upgrade --refreshThe sudo command gives you administrative privileges, while dnf is Fedora’s package manager. The upgrade option updates all packages, and --refresh ensures that all repositories are checked for updates.
Step 2: Searching for Java Versions on Fedora
The next step involves identifying which Java versions are available for installation. To do this, execute the following command:
dnf search openjdkThis command will search for all available OpenJDK packages in Fedora’s repositories. OpenJDK is an open-source implementation of the Java Platform, Standard Edition.
Filtering for Specific Java Versions on Fedora
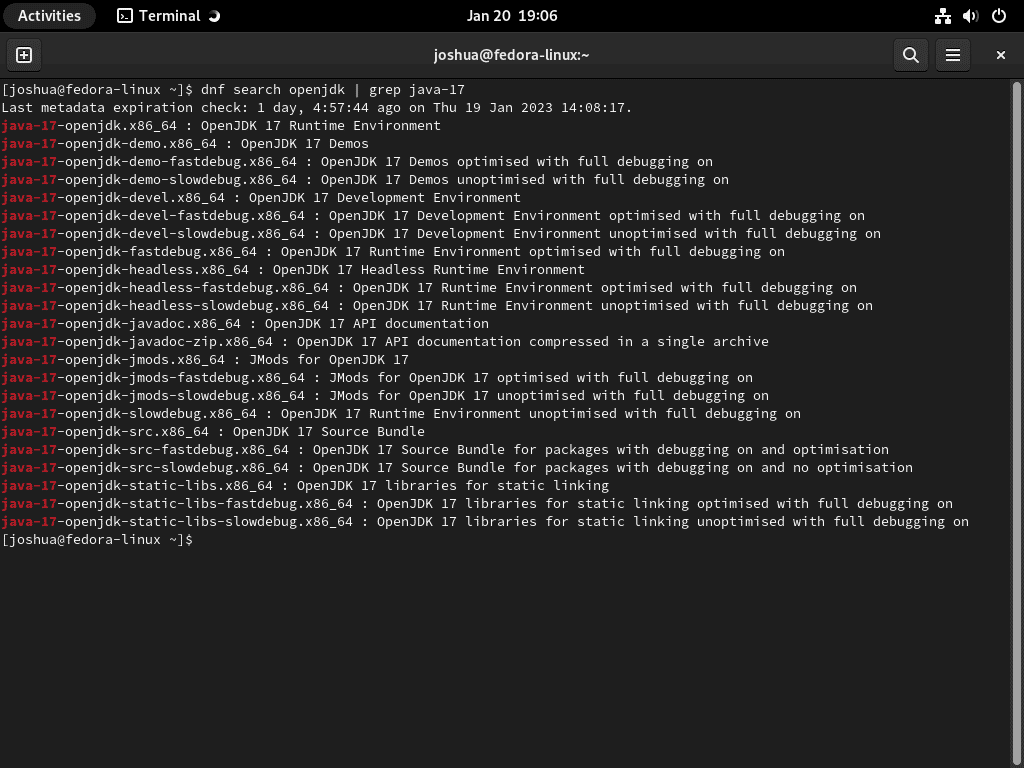
If you want to install a specific version of Java, you can use the grep command to filter the search results. For example, to search for Java 17 (JDK 17), you can run:
dnf search openjdk | grep java-17By piping the output of dnf search openjdk to grep java-17, you can narrow down the list to show only packages related to Java 17.
Step 3: Selecting a Java Version for Installation on Fedora
Understanding Your Java Options on Fedora
Now that you’ve identified the available Java versions in Fedora’s repositories, it’s time to decide which one aligns with your project’s requirements. In the subsequent sections, we’ll focus on installing the most commonly used versions of Java, beginning with Java 17.
Install OpenJDK 17 on Fedora
Why Choose Java 17 on Fedora?
Java 17 is a Long-Term Support (LTS) version as of September 2021. It brings several new features, such as Sealed Classes and Interfaces, which allow for more constrained class hierarchies. This results in cleaner, more maintainable code. Additionally, Java 17 offers enhancements in performance and security.
Installing Standard Java 17 Packages on Fedora
To get the standard Java 17 packages, use the following command:
sudo dnf install java-17-openjdkHere, sudo dnf install initiates the installation process, and java-17-openjdk specifies the OpenJDK 17 package you want to install. This package includes all the standard libraries and files needed to run Java 17 applications on your Fedora system.
Installing Java 17 for Headless Environments on Fedora
If you’re working in a headless environment—meaning no graphical user interface (GUI)—you can install a more minimal set of Java 17 components. Execute the following command:
sudo dnf install java-17-openjdk-headlessThe java-17-openjdk-headless package is more streamlined and omits graphical components you won’t need in a headless setup.
Installing Java 17 Development Packages on Fedora
You’ll want additional tools and libraries for those interested in Java development. Install the development packages by running the following:
sudo dnf install java-17-openjdk-develThis installs the java-17-openjdk-devel package, providing you with the necessary libraries, headers, and tools for Java development in Fedora using OpenJDK 17.
Install OpenJDK 11 on Fedora
The Importance of Java 11 on Fedora
Java 11, another Long-Term Support (LTS) version, was released on September 25, 2018. It brought with it a variety of new features and libraries. For example, it introduced the Local-Variable Syntax for Lambda Parameters, making using the keyword in lambda expressions possible. This enhancement simplifies code and improves readability. Additionally, Java 11 offers a new standard library, the HTTP Client API, designed to streamline sending HTTP requests and receiving responses.
Notably, Java 11 also removed several deprecated features, including the Java EE and CORBA modules. With an end-of-life date for active support in September 2026 and security support until September 2031, Java 11 remains a robust choice for long-term projects.
Standard Package Installation for Java 11 on Fedora
To install the standard set of Java 11 libraries and components, execute the following command:
sudo dnf install java-11-openjdkIn this command, sudo dnf install initiates the package installation, and java-11-openjdk specifies the standard Java 11 package from OpenJDK. This package is tailored for general use and includes everything needed to run Java 11 applications.
Headless Environment Package Installation for Java 11 on Fedora
You may opt for a more minimal installation if your work environment doesn’t require a graphical user interface (GUI). To install Java 11 packages suitable for a headless environment, use the following command:
sudo dnf install java-11-openjdk-headlessThis command installs the java-11-openjdk-headless package, which omits GUI-related libraries and components, making it ideal for server environments or other headless setups.
Development Package Installation for Java 11 on Fedora
You’ll likely need additional tools and libraries not included in the standard package for development work. To install these, run:
sudo dnf install java-11-openjdk-develThis command installs the java-11-openjdk-devel package, equipping your Fedora system with the necessary development libraries and tools for Java 11.
Install OpenJDK 8 on Fedora
Rationale for Using Java 8 on Fedora
Java 8, an earlier Long-Term Support (LTS) version, was initially released on March 18, 2014. This version was a milestone for the Java community, bringing forth features drastically changed Java programming. Among the highlights were Lambda expressions, the Stream API, and a revamped date and time API. It also introduced default and static methods in interfaces, thus allowing for seamless addition of new functionalities to existing classes. However, it’s essential to note that active support for Java 8 ended on December 31, 2020, and security updates will cease after December 31, 2023.
Standard Java 8 Package Installation on Fedora
For a basic Java 8 setup, you can install the standard OpenJDK package using the following command:
sudo dnf install java-1.8.0-openjdkThe sudo dnf install part of the command initializes the package installation, while java-1.8.0-openjdk is the package containing all the essential libraries and components for running Java 8 on Fedora.
Setting Up Java 8 in a Headless Environment on Fedora
If your Fedora system doesn’t have a graphical user interface (GUI), or if you’re setting up a server, you can install a pared-down version of Java 8 tailored for headless environments. Run this command to proceed:
sudo dnf install java-1.8.0-openjdk-headlessThe package java-1.8.0-openjdk-headless omits the GUI-related components, providing only what you need for a headless operation.
Installing Development Packages for Java 8 on Fedora
If you intend to develop with Java 8, you’ll require additional libraries and tools. To install these development-specific packages, execute the following command:
sudo dnf install java-1.8.0-openjdk-develThis will install the java-1.8.0-openjdk-devel package, supplying your Fedora system with the libraries, headers, and tools needed for Java 8 development.
Additional Commands with Java on Fedora
Why Switching Java Versions Matters on Fedora
Having various versions of the Java Development Kit (JDK) or OpenJDK on a single system is not uncommon for developers. Different tasks or projects may necessitate switching between these versions or setting a specific one as the default. Fedora provides a straightforward command-line utility for managing these transitions.
Changing the Default Java Version on Fedora
To change your system’s default Java version, execute the following command:
sudo update-alternatives --config javaThis command triggers the update-alternatives utility with the --config option for Java. The utility then presents a numbered list of all Java versions installed on your system, including the current default.
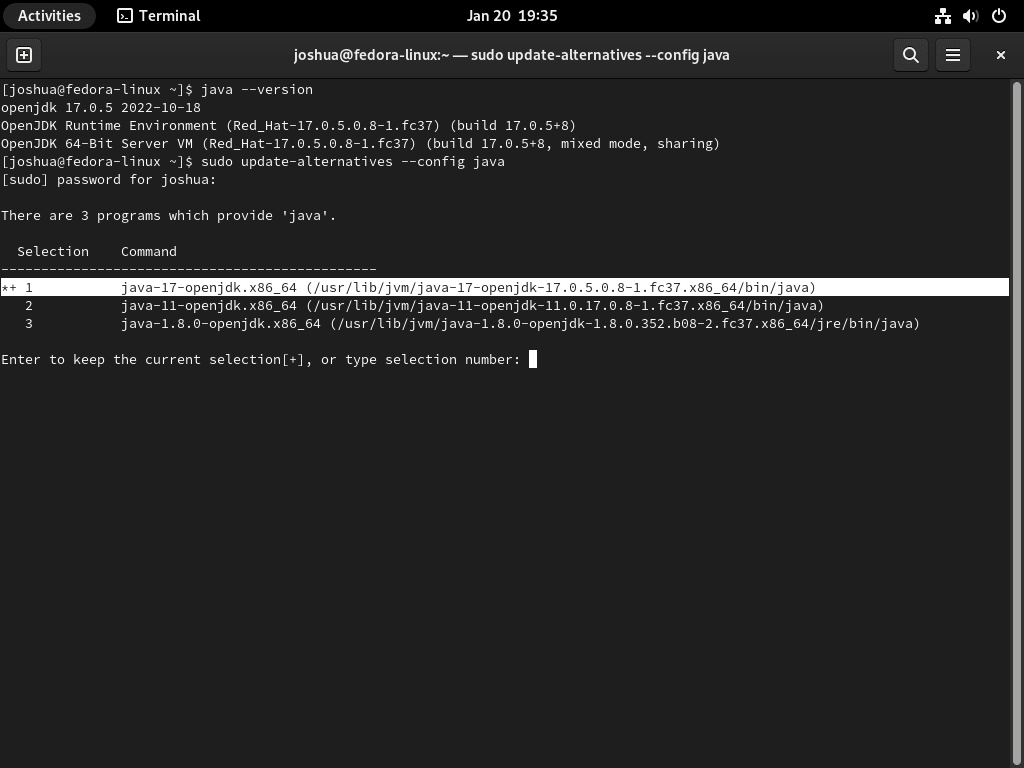
A prompt will ask you to enter the number corresponding to the Java version you’d like to set as the default. For instance, if you transition from Java 17 LTS to Java 11 LTS, you would input the number associated with Java 11 LTS and press the Enter key.
Verifying the Switch of Java version on Fedora
After making the switch, it’s a good practice to confirm that the change has taken effect. To do so, run:
java --version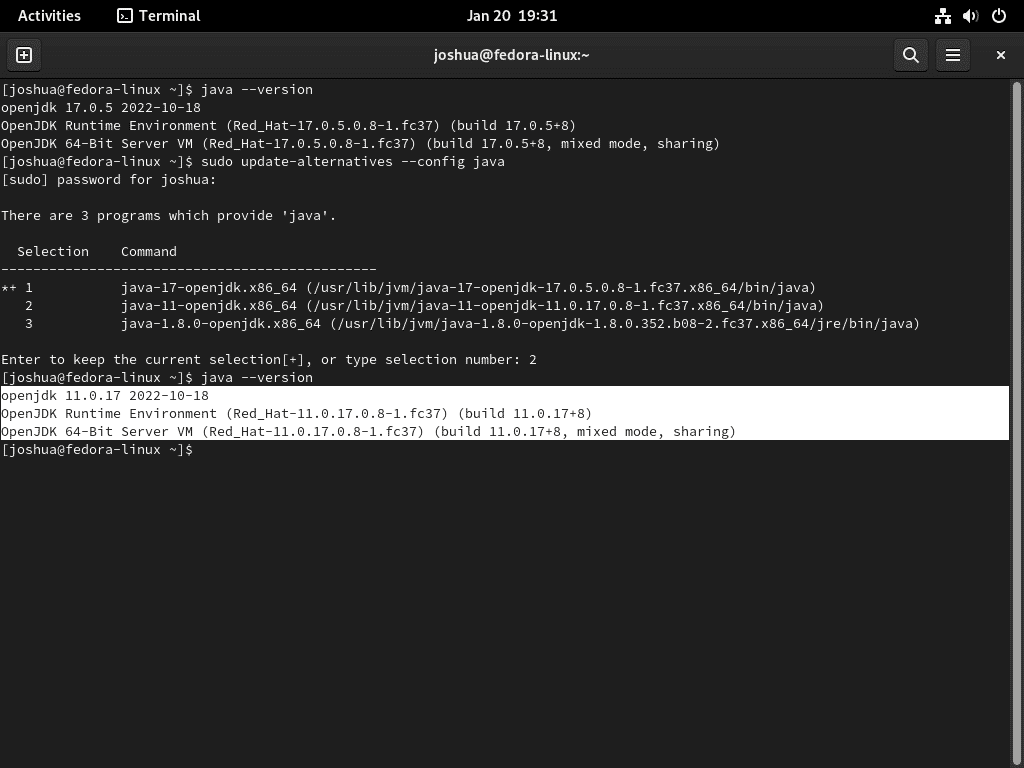
This command returns the version information of the currently active Java environment, verifying that the switch was successful.
Conclusion
In conclusion, installing a Long-Term Support (LTS) version of Java, such as Java 17, Java 11, or Java 8, on Fedora Linux is a straightforward process. Once installed, you can use the command line to set the default version of Java and verify the installation. It’s important to note that LTS versions of Java are intended for use in production environments and are supported longer than standard releases, making them an excellent choice for long-term projects. Additionally, keeping track of the end-of-life date for the version of Java you’re using is essential to promptly plan your migration to a newer version.