

This guide will demonstrate how to install FileZilla on Ubuntu 24.04, 22.04 or 20.04 LTS utilizing the command-line terminal with two different methods: APT with the XtraDeb Applications LaunchPAD PPA or the third-party package manager Flatpak with Flathub.
FileZilla emerges as a powerhouse in the realm of file transfer software, offering users a robust and intuitive platform for managing files across various servers. Renowned for its ease of use and comprehensive suite of features, FileZilla caters to a wide range of needs, from the casual user looking to transfer files between personal devices to the professional managing complex websites. Its dual-pane interface streamlines operations, allowing for quick navigation and operation, making it an indispensable tool in many people’s digital toolkits. The support for multiple protocols such as FTP, FTPS, and SFTP ensures secure and versatile file transfers, accommodating the stringent demands of modern cybersecurity standards.
Key advantages of using FileZilla include:
- Cross-platform support: Works seamlessly on Windows, macOS, and Linux.
- Open-source software: Freely available with full access to its source code.
- User-friendly interface: Simplifies file management with a drag-and-drop functionality.
- Secure file transfer protocols: Supports FTP, FTPS, and SFTP.
- Large file support: Capable of handling files larger than 4GB.
- Remote file editing: Allows editing of files directly on the server.
- Bookmarking: Enables easy access to frequently used sites and directories.
- Transfer queue: Visualizes your file transfer process and allows for queue management.
Moving forward with the installation process ensures you have a reliable and efficient tool for your file management needs.
Install FileZilla on Ubuntu via APT
Update Ubuntu Before FileZilla Installation
Before installing FileZilla on Ubuntu, updating your Ubuntu system is essential. This ensures that all existing packages are up-to-date and helps avoid potential conflicts during installation. To update your system, execute the following command:
sudo apt update && sudo apt upgrade Install FileZilla on Ubuntu via APT
Two primary methods to install FileZilla on Ubuntu are using the default Ubuntu repository or a PPA (Personal Package Archive). We will discuss both methods below.
Method 1: Install FileZilla with Ubuntu’s Repository
The first method involves installing FileZilla directly from the Ubuntu default repository. This approach is the easiest but may not provide the most recent version of FileZilla. The default repository may lag behind the latest releases, which could include new features and bug fixes.
To install FileZilla from the Ubuntu repository, execute the following command:
sudo apt install filezillaMethod 2: Install FileZilla on Ubuntu with XtraDeb PPA
If you prefer the latest version of FileZilla, consider using a PPA. This method installs FileZilla from the “xtradeb packaging” team PPA, which is known for providing up-to-date software versions.
First, install the necessary packages for adding a PPA to your system with the following command:
sudo apt install software-properties-common apt-transport-https -yNext, import the “xtradeb packaging” team PPA by running the following command:
sudo add-apt-repository ppa:xtradeb/apps -yAfter adding the PPA to your system, update the package list to reflect the newly imported PPA:
sudo apt updateFinally, install FileZilla using the following command:
sudo apt install filezilla -yInstall FileZilla on Ubuntu via Flatpak and Flathub
This section explores an alternative approach to installing FileZilla using the Flatpak package manager, a popular choice. Flatpak, unlike conventional installation methods, provides a versatile system for installing applications across various Linux distributions without hassle. When you choose Flatpak to install FileZilla, it creates a self-contained environment for the application, ensuring compatibility and timely updates.
Note: If your system does not have Flatpak installed, please refer to our guide on How to Install Flatpak on Ubuntu for step-by-step instructions on installing the most recent supported version of Flatpak.
Enable Flathub on Ubuntu For FileZilla
Before installing FileZilla through Flatpak, you must enable the Flathub repository, a primary source for Flatpak applications. To enable Flathub, execute the following command in your terminal:
sudo flatpak remote-add --if-not-exists flathub https://flathub.org/repo/flathub.flatpakrepoThis command adds the Flathub repository to your Flatpak configuration, ensuring you have access to various applications, including FileZilla.
Install FileZilla on Ubuntu via Flatpak Command
With Flathub enabled, you can now install FileZilla using the flatpak install command. Run the following command in your terminal:
flatpak install flathub org.filezillaproject.Filezilla -yThis command installs FileZilla from the Flathub repository, providing you with the latest version of the application.
Launching FileZilla with Ubuntu via GUI or CLI Methods
After installing FileZilla, you can launch the FTP client in several ways. This section outlines three methods for launching the FileZilla application.
CLI Methods to Launch FileZilla
One way to launch FileZilla is through the terminal. Launching through the terminal allows you to view additional information, such as error messages, that may be useful in debugging.
To launch FileZilla through the terminal, enter the following command in your terminal window:
filezillaFlatpak users can launch FileZilla through the terminal by entering the following command:
flatpak run org.filezillaproject.FilezillaGUI Method to Launch FileZilla
For desktop users, launching FileZilla through the terminal may not be practical. Instead, you can launch FileZilla through the application launcher on your desktop.
To do this, follow the steps below:
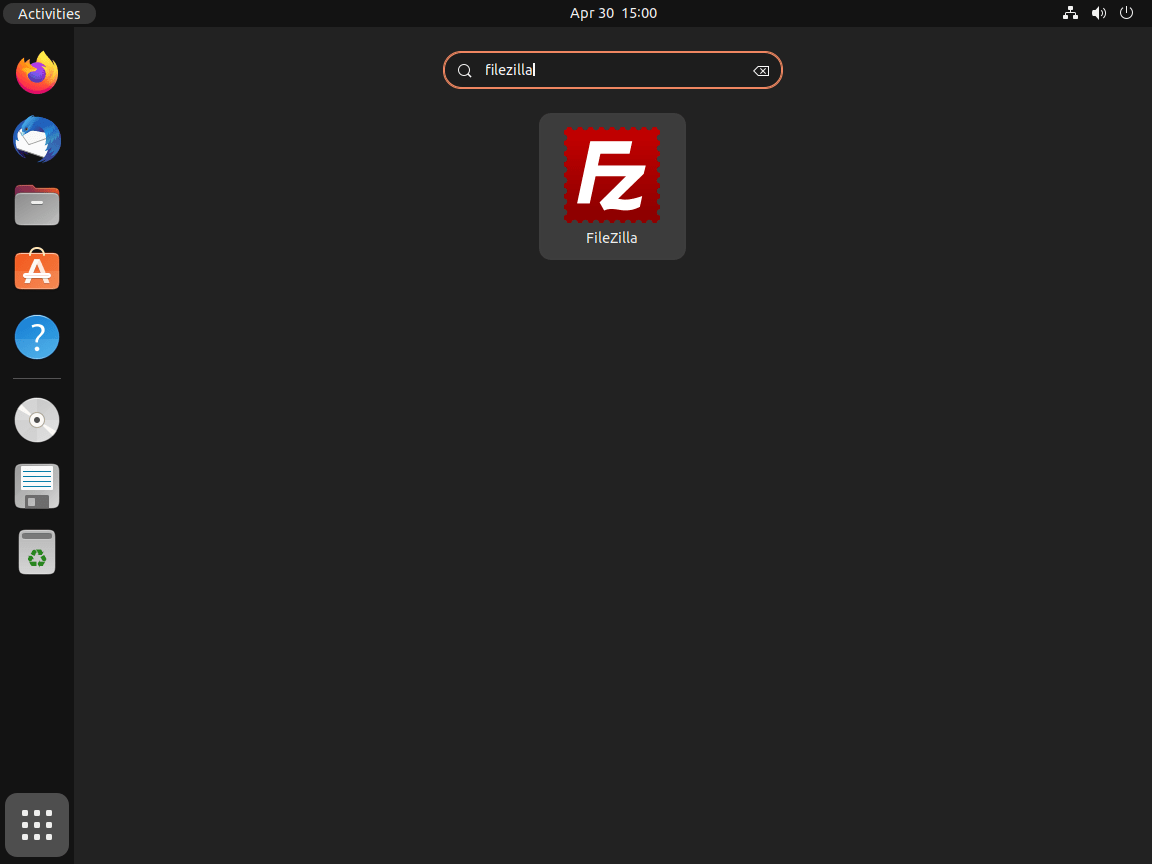
- Click on the “Activities” button in the top-left corner of your desktop.
- Type “FileZilla” in the search bar.
- Click on the “FileZilla” icon to launch the application.
First-Time Tips with FileZilla on Ubuntu
Now that you have successfully installed FileZilla on Ubuntu, here are some first-time tips on getting started with the software:
General Tips for FileZilla
- Secure Your Connections: Always prefer using SFTP (SSH File Transfer Protocol) over FTP to encrypt your file transfers and protect your data from being intercepted.
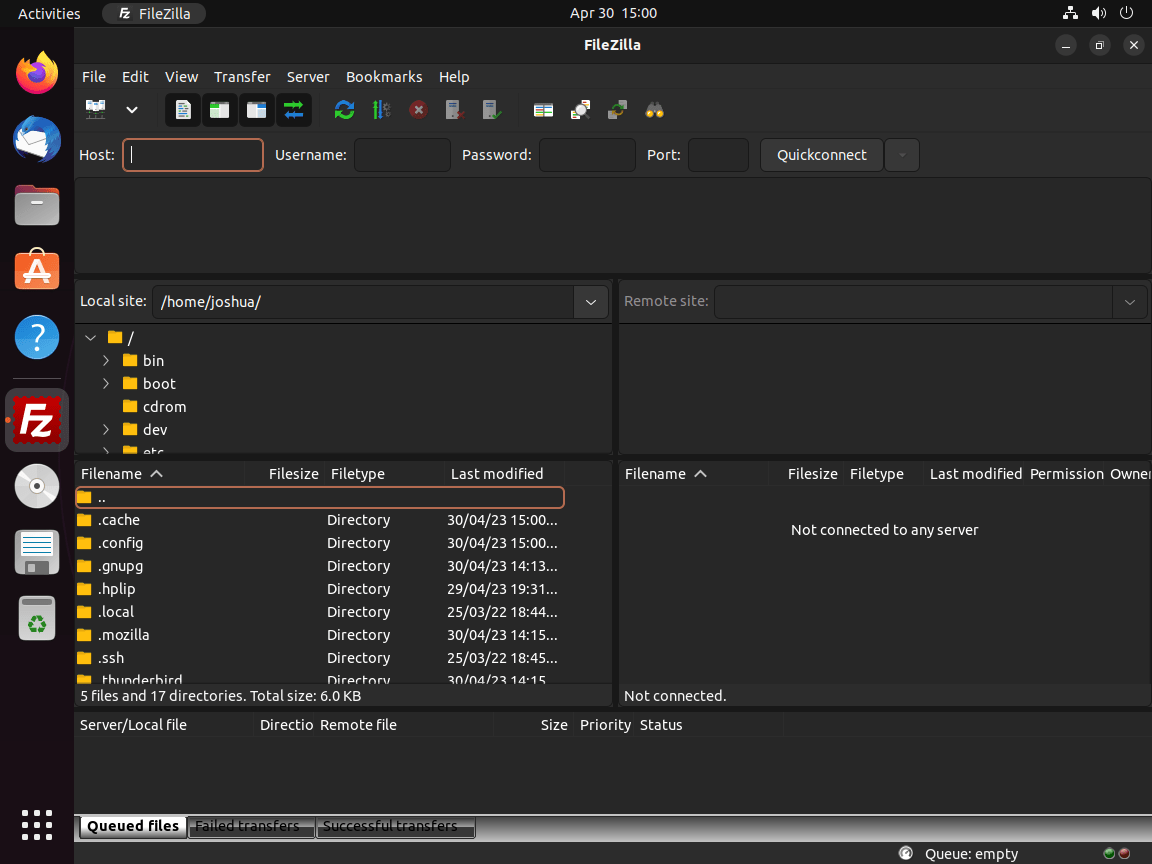
- Understand the Interface: Familiarize yourself with the FileZilla interface. The main window is divided into several sections: the site manager, local and remote file listings, and the transfer queue. This layout helps you efficiently manage your files.
- Configure Network Settings: If you’re behind a firewall or a router, adjust the settings under Edit > Settings > Connection. This helps in preventing connection timeouts and improves file transfer reliability.
Customizations for FileZilla
- Theme and Layout Customization: Change the appearance of FileZilla to suit your preferences. Access Edit > Settings > Interface to select themes and configure interface settings. Tailoring the interface can improve your workflow and make file management more pleasant.
- File Editing: Set up FileZilla to automatically open files with your preferred editor. Go to Edit > Settings > File editing and configure it to use a local editor for quick edits. This feature streamlines the process of modifying files directly from FileZilla.
- Adjust Transfer Speeds: Limit the download and upload speeds in FileZilla to ensure other Internet-dependent tasks are not negatively impacted. Navigate to Edit > Settings > Transfers and specify the speed limits.
- Concurrent Transfers: Increase or decrease the number of concurrent file transfers based on your connection’s reliability and speed. This option is found under Edit > Settings > Transfers.
Security Tips for FileZilla
- Use Master Password: Protect your stored sites and their passwords by enabling FileZilla’s Master Password feature under Edit > Settings > Interface > Passwords. This adds an extra layer of security by encrypting your stored credentials.
- Keep Your Software Updated: Regularly check for updates to ensure you have the latest features and security enhancements. This can be done through your Ubuntu package manager or Flatpak, depending on your installation method.
- Verify Host Keys: When connecting to servers for the first time, carefully verify the host keys. This practice prevents Man-in-the-Middle attacks and ensures the integrity of your connection.
- Backup Your Configuration: Regularly back up your FileZilla settings and stored connections. You can export your settings from File > Export and choose what to include in the backup.
Efficiency Tips for FileZilla
- Keyboard Shortcuts: Learn and use keyboard shortcuts to navigate and manage files more quickly. For example,
Ctrl+Sopens the Site Manager, andCtrl+Topens a new tab. - Use Tabs for Multiple Connections: Open connections to multiple servers in separate tabs to easily switch between different projects or tasks without losing your place.
- Drag and Drop Files: Take advantage of the drag-and-drop functionality between your local system and the server for quick file transfers.
- Queue Management: Utilize the transfer queue to manage, prioritize, and monitor the progress of your file transfers. This feature is especially useful for large transfers or when managing multiple uploads and downloads.
Following these tips, you’ll be well on your way to becoming proficient with FileZilla on Ubuntu, enhancing your productivity and file management capabilities.
Additional FileZilla Commands with Ubuntu
Update FileZilla
While FileZilla updates usually appear in notifications, manually checking for the latest version through the terminal is advisable. The commands you need to check for updates depend on whether you used APT or Flatpak for installation.
APT Method to Update FileZilla
To check for updates and upgrade your FileZilla installation using the APT package manager, execute the following command in your terminal:
sudo apt update && sudo apt upgradeFlatpak Method to Update FileZilla
If you installed FileZilla using Flatpak, use the following command to check for updates:
flatpak updateRemove FileZilla
If you no longer need FileZilla, uninstall it using the appropriate command based on your original installation method (APT or Flatpak).
APT Method to Remove FileZilla
When installed, FileZilla adds quite a few dependencies. To keep your system clean and uncluttered, use the autoremove command when uninstalling:
sudo apt remove filezillaIf you installed FileZilla using the Launchpad PPA and do not plan to reinstall the software, remove the PPA using the following command:
sudo add-apt-repository --remove ppa:xtradeb/apps -yFlatpak Method to Remove FileZilla
To remove FileZilla and its associated data when installed using Flatpak, run the following command:
flatpak remove --delete-data org.filezillaproject.Filezilla -yClosing Thoughts
In wrapping up, this guide walked you through the ropes of installing FileZilla on Ubuntu versions 24.04, 22.04, or 20.04 LTS, showcasing two methods via APT with the XtraDeb Applications LaunchPAD PPA and Flatpak with Flathub. We’ve covered the essentials to kick-start your journey with FileZilla, from general tips to customizing your experience for better security and efficiency. Remember, keeping your FileZilla updated and securing your connections are key. Don’t shy away from exploring the settings to tailor the application to your workflow. It’s all about making file management on Ubuntu as smooth as possible. Happy transferring!