

To optimize database management on Debian systems, installing MySQL 8.0 is a strategic choice. This guide is designed to help you install MySQL 8.0 on Debian 12 Bookworm or the older stable releases of Debian 11 Bullseye or Debian 10 Buster, providing a robust and reliable relational database management system based on SQL (Structured Query Language).
MySQL 8.0 brings new features and enhancements, making it a preferred choice for various applications ranging from data warehousing and e-commerce to logging and web database storage and management; we will cover some of the historical key features and enhancements on release.
Key Features and Enhancements in MySQL 8.0:
- Enhanced Performance: MySQL 8.0 introduces significant performance improvements, ensuring faster and more efficient database operations.
- New Data Dictionary: Introducing a transactional data dictionary enhances data consistency and reliability, replacing the previous file-based system.
- Advanced Security: MySQL 8.0 focuses on providing robust security features, including stronger password encryption and improved privilege management.
- JSON Enhancements: With improved JSON support, users can now work with JSON documents more effectively, leveraging functions for manipulation and search.
- Window Functions: Adding SQL window functions allows for more complex queries and reporting, facilitating advanced data analysis.
- Common Table Expressions: MySQL 8.0 introduces Common Table Expressions (CTEs), making writing recursive queries and organizing complex queries easier for better readability.
- InnoDB Enhancements: The InnoDB storage engine has received numerous enhancements, improving performance, reliability, and efficiency.
With the basics of MySQL 8.0 out of the way, you can proceed to the following guide to install MySQL 8.0 on your Debian system.
Install MySQL 8.0 on Debian 12, 11, or 10 via APT
Debian Releases Have Replaced MySQL with MariaDB by Default
Although Debian releases have replaced MySQL with MariaDB, MySQL, a widely used relational database management system, remains the preferred choice for specific use cases for some users. This guide will fetch the software directly from MySQL’s official APT repository, which consistently provides the most recent community builds.
Step 1: Update Debian Before MySQL 8.0 Installation
To ensure a smooth installation process, it’s crucial to start by updating your Debian system. This guarantees that your system’s existing packages are up-to-date, mitigating potential conflicts during the installation.
Execute the following command to update your system:
sudo apt update && sudo apt upgradeStep 2: Install Required Packages For MySQL 8.0 Installation
Before you proceed with the MySQL 8.0 installation, you must ensure your Debian system has specific required packages. Your system might already have these standard packages installed.
However, to guarantee a smooth installation process, you should execute the following command to check for and install any missing packages:
sudo apt install dirmngr software-properties-common apt-transport-https curl lsb-release ca-certificates -y
Step 3: Import the MySQL Community Repository
Importing the GPG Key
Start this process by importing the GPG key directly from MySQL’s official website. This crucial step enhances security, verifying the authenticity of the packages you are about to install and ensuring their integrity.
Execute the following command to import the GPG key:
curl -fsSL https://repo.mysql.com/RPM-GPG-KEY-mysql-2022 | gpg --dearmor | sudo tee /usr/share/keyrings/mysql.gpg > /dev/nullAdding the MySQL 8.0 APT Repository
With the GPG key successfully imported, you can now proceed to add the MySQL 8.0 APT repository to your system’s software source list with this command:
echo "deb [signed-by=/usr/share/keyrings/mysql.gpg] http://repo.mysql.com/apt/debian $(lsb_release -sc) mysql-8.0" | sudo tee /etc/apt/sources.list.d/mysql.listOptional: Import Development MySQL 8.0 Tools
If you’re utilizing MySQL for development, some additional tools and resources could benefit you. You can import the repositories for these development tools with the following commands:
echo "deb [signed-by=/usr/share/keyrings/mysql.gpg] http://repo.mysql.com/apt/debian $(lsb_release -sc) mysql-tools" | sudo tee -a /etc/apt/sources.list.d/mysql.list
echo "deb-src [signed-by=/usr/share/keyrings/mysql.gpg] http://repo.mysql.com/apt/debian $(lsb_release -sc) mysql-tools" | sudo tee -a /etc/apt/sources.list.d/mysql.list
After adding these repositories, don’t forget to run an APT update to refresh your system’s package list:
sudo apt updateStep 4: Install MySQL 8.0 on Debian via APT Command
Having successfully added the MySQL repository to your system, you’re all set to proceed with the installation. We’ll utilize the APT command to install the community server version:
sudo apt install mysql-community-serverSetting the MySQL 8.0 Database Root Password on Debian
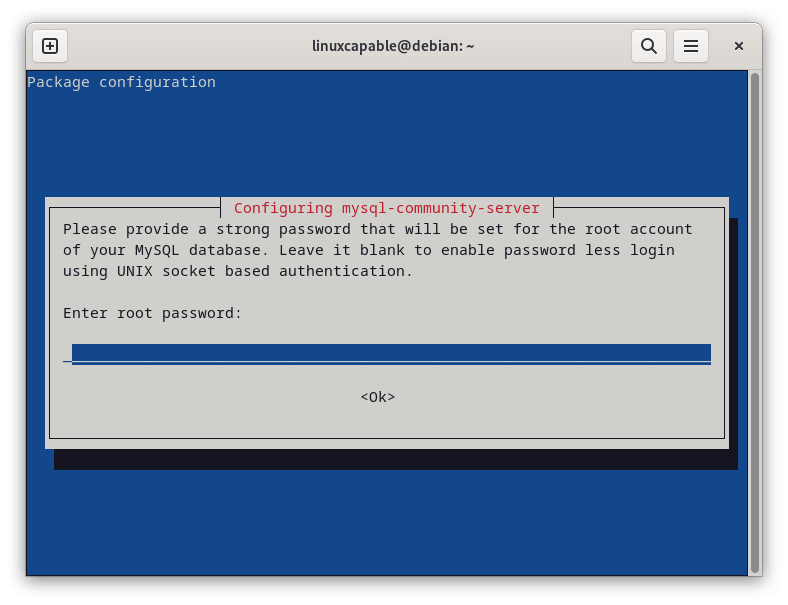
During the installation, a dialog will appear, prompting you to create a password for the root user of your MySQL database. It’s crucial to choose a strong, secure password and make a note of it; you’ll need it for any administrative or supervisory tasks within MySQL in the future.
Once you’ve entered the password, navigate using the tab key to select <Ok> and press enter to proceed.
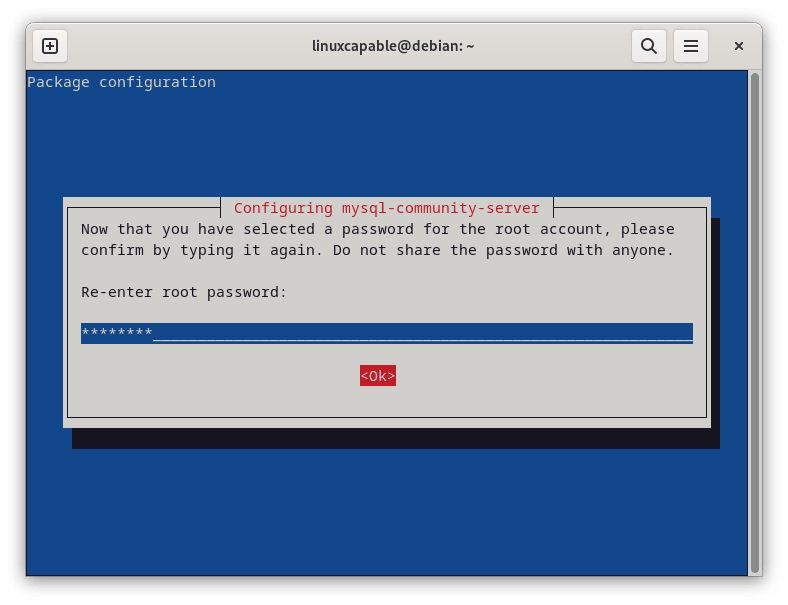
You will be prompted to re-enter the root password for confirmation. Ensure accuracy because this password is vital for future database management and security.
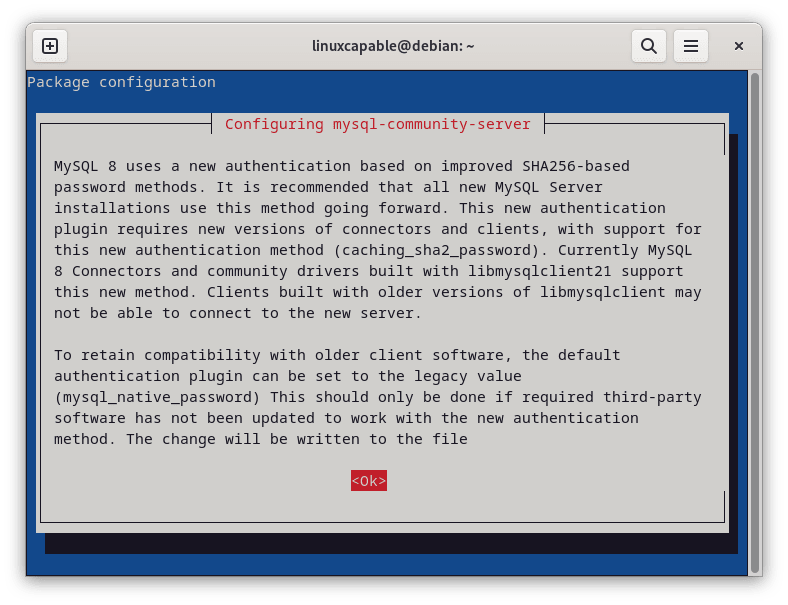
Understanding MySQL 8.0 New Authentication System with Debian
Following the password setup, another dialog will appear, briefing you on the new authentication system employed by MySQL 8.0. This system enhances security and efficiency.
Read the provided information, select <Ok>, and enter to continue.
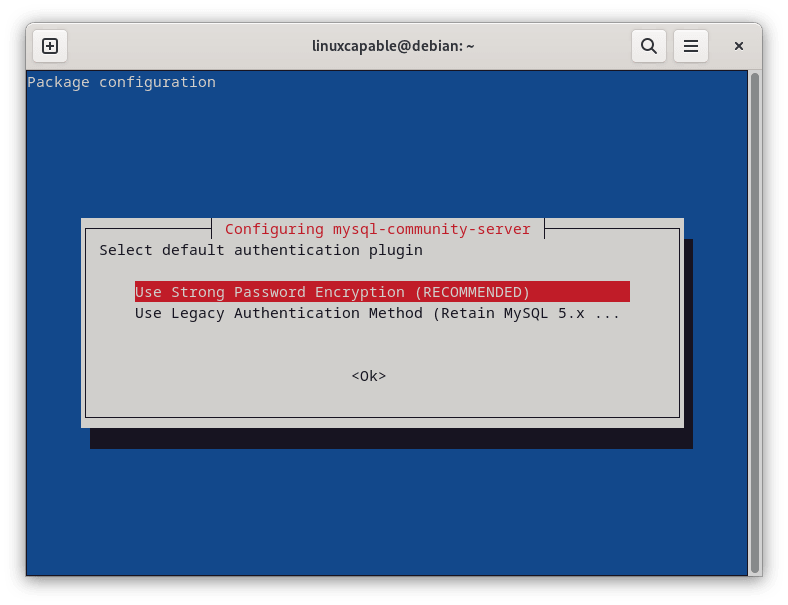
Configuring MySQL 8.0 Authentication Plugin on Debian
Toward the end of the installation process, you will encounter a prompt to choose the default authentication plugin for MySQL 8.0. The system typically recommends the most secure and up-to-date option available. It is prudent to follow this suggestion to ensure optimal security and performance of your MySQL server.
Navigate to select <Ok> and press enter to finalize the configuration.
Step 5: Verify MySQL 8.0 Installation
Now that the installation process is complete, verifying that MySQL 8.0 has been successfully installed on your Debian system is imperative. Performing this verification step ensures everything is in order and functioning as expected.
To check the installed version of MySQL, use the apt policy command as follows:
apt policy mysql-community-server
This command provides detailed information about the installed package, including the version number. Ensure that the version number displayed corresponds to MySQL 8.0, confirming the installation succeeded.
MySQL 8.0 Service Commands on Debian 12, 11 or 10
Managing the MySQL 8.0 service effectively ensures that your database operates smoothly. This section covers verifying and controlling your MySQL service on Debian systems.
Step 1: Verify Systemd MySQL 8.0 Service
The installer should have automatically initiated your MySQL service post-installation, setting it to launch at system startup. However, confirming that the MySQL service is running smoothly is prudent.
To do so, input the following command to check the service’s status:
systemctl status mysql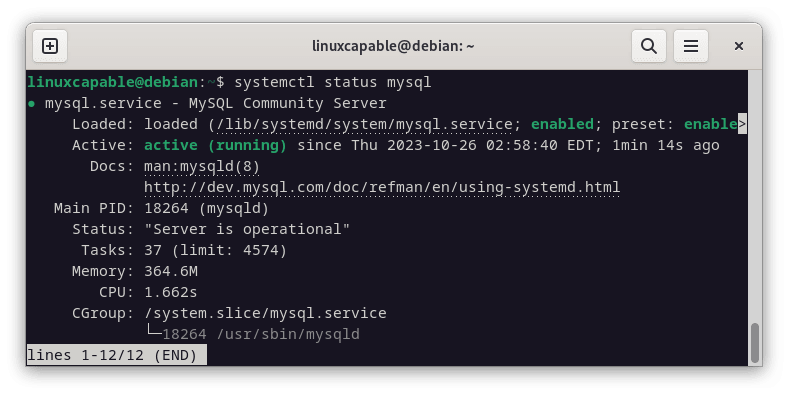
If the service isn’t enabled, use the following command to start it immediately and configure it to launch at system reboot:
sudo systemctl enable mysql-community-server --nowStep 2: Learning Additional MySQL 8.0 Service Commands
To manage your MySQL service effectively, you must familiarize yourself with various system commands. Below is a list of commonly used commands to help you control your MySQL systemd service.
Stop the MySQL service:
sudo systemctl stop mysqlStart the MySQL service:
sudo systemctl start mysqlDisable the MySQL service at system startup:
sudo systemctl disable mysqlActivate the MySQL service at system startup:
sudo systemctl enable mysqlRestart the MySQL service:
sudo systemctl restart mysqlSecure MySQL 8.0 Post Installation on Debian 12, 11 or 10
Ensuring the robustness of your MySQL 8.0 installation against unauthorized access or potential exploits is crucial. Often, the default configurations prove insufficient from a security standpoint. This section will guide you through tightening your MySQL installation’s security on Debian-based systems.
Initiating MySQL 8.0 Security Script on Debian
Running a security script bundled with MySQL is imperative upon installation completion. This script will help fortify your installation by adjusting specific settings and configurations.
Enter the following command to initiate this script:
sudo mysql_secure_installationUpon executing this command, the system will prompt you to enter the root password you previously set during the MySQL installation process.
Configuring Password Validation
Following this, you will encounter a prompt regarding the ‘VALIDATE PASSWORD COMPONENT’. This is a feature that ensures password security by enforcing complexity requirements. While the default settings are generally apt, reviewing and ensuring they align with your security standards is crucial.
Enhancing Security Through Configurations
The subsequent steps involve:
- Securing Root Accounts: You will be prompted to set or alter the passwords for root accounts.
- Purging External Root Access: The script will ask if you wish to remove root accounts accessible from outside the localhost. Affirming this enhances security by ensuring only local access is granted to root accounts.
- Eliminating Anonymous User Accounts: Anonymous users can pose a security risk, and the script will offer an option to remove these accounts.
- Discarding Default Test Database: MySQL has a test database accessible by default to anonymous users. It is recommended to remove this to prevent any unwarranted access.
- Resetting Root Password: Should you desire, you can reset your root password during this process. However, this can be bypassed if you are confident in the security of your current root password, set during the initial installation phase.
Use ‘Y’ to affirm actions that lead to a more secure setup during this process.
Securing the MySQL server deployment.

Enter password for user root:

The existing password for the user account root has expired. Please set a new password.

New password: <---- SET NEW PASSWORD

Re-enter new password: <---- RE-ENTER NEW PASSWORD

Re-enter new password:
The 'validate_password' component is installed on the server.
The subsequent steps will run with the existing configuration
of the component.
Using existing password for root.

Estimated strength of the password: 100
Change the password for root ? ((Press y|Y for Yes, any other key for No) : Y <---- Type Y then press the ENTER KEY (SKIP IF YOU ALREADY JUST SET)

New password:

Re-enter new password:

Estimated strength of the password: 100
Do you wish to continue with the password provided?(Press y|Y for Yes, any other key for No) : Y <---- Type Y then press the ENTER KEY.
By default, a MySQL installation has an anonymous user,
allowing anyone to log into MySQL without having to have
a user account created for them. This is intended only for
testing, and to make the installation go a bit smoother.
You should remove them before moving into a production
environment.

Remove anonymous users? (Press y|Y for Yes, any other key for No) : Y <---- Type Y then press the ENTER KEY.
Success.


Normally, root should only be allowed to connect from
'localhost'. This ensures that someone cannot guess at
the root password from the network.

Disallow root login remotely? (Press y|Y for Yes, any other key for No) : Y <---- Type Y then press the ENTER KEY.
Success.

By default, MySQL comes with a database named 'test' that
anyone can access. This is also intended only for testing,
and should be removed before moving into a production
environment.


Remove test database and access to it? (Press y|Y for Yes, any other key for No) : Y <---- Type Y then press the ENTER KEY.
 - Dropping test database...
Success.

 - Removing privileges on test database...
Success.

Reloading the privilege tables will ensure that all changes
made so far will take effect immediately.

Reload privilege tables now? (Press y|Y for Yes, any other key for No) : Y <---- Type Y then press the ENTER KEY.
Success.

All done!
Additional MySQL 8.0 Commands on Debian 12, 11 or 10
This section will explore various commands and operations available for MySQL 8.0 on Debian-based systems, focusing mainly on updating and uninstalling your MySQL installation when necessary.
Updating MySQL 8.0 on Debian
Maintaining an up-to-date MySQL version is crucial, as it ensures access to the latest features, improvements, and security patches. The MySQL APT repository you have set up simplifies the update process, allowing for a straightforward and hassle-free experience.
To update your MySQL installation, execute the following commands:
sudo apt update && sudo apt upgradeHere, sudo apt update refreshes your package lists, ensuring you have the latest information on available updates. Following that, sudo apt upgrade proceeds to update the packages, including MySQL, to their latest versions.
Remove (Uninstall) MySQL 8.0 From Debian
There might be instances where you need to uninstall MySQL from your system. Before uninstallation, ensure you have stopped the MySQL service to prevent potential issues.
To stop the MySQL service, run:
sudo systemctl stop mysql --nowThe –now option stops the service immediately. After halting the service, proceed to remove the MySQL 8.0 service using the following command:
sudo apt remove mysql-community-serverThis command purges the MySQL server package from your system. If you wish to remove all associated repositories and configuration files, you can do so with:
sudo rm /etc/apt/sources.list.d/mysql.listThis command deletes the MySQL repository list file, ensuring that no remnants of MySQL remain on your system.
Conclusion
The MySQL Community 8.0 edition stands out as a significant advancement over its predecessors, showcasing remarkable improvements in handling read/write operations, I/O-intensive tasks, and scenarios with high levels of contention. Transitioning to MySQL 8.0 is highly recommended for those utilizing older MySQL versions. The enhancements in performance and efficiency are substantial, promising a more streamlined and responsive database management experience. Embracing MySQL 8.0 is not just an upgrade but an investment in the future-proofing and optimizing your database systems.