

There was a time when 5 MB was the reasonable maximum size for an email attachment. Today, it's easily possible for a single photo to be 5 MB. Accordingly, the maximum attachment size has increased to, say, 25 MB. But of course file sizes are getting bigger and bigger too, and so eventually the attachment limit will go up too. It's an endless cycle, common in the digital world: the tools are built for today's data, and today's data increases in complexity and size until the tools are revised and improved. You have to contain data, preferably in the smallest packaging possible, so that sharing it online goes faster for everyone. Here are five ways to optimize images for the Internet.
What image size is good for the web?
First of all, there are two kinds of "sizes" when discussing digital images. The image size represents how many pixels wide and high an image is when you look at it on your screen. The file size represents how many bytes on a hard drive or SD card the image uses. It's the file size that limits how easy something is to send it over the Internet because we all have different bandwidth allotments from our Internet providers and infrastructure. Of course, the larger the image size, the larger the file size, so the two are related.
To avoid confusion, in this article I use the term "image size" to refer to the pixel width and height of an image, and the term "file size" to refer to the bytes on a hard drive occupied by an image file.
It's hard to know exactly what a "reasonable" image size and file size is for a photo on the Internet or being sent over email. There are some reasonable expectations, though. If you're posting a photo to a website, whether it's your own blog or to social media, it's probable that most people are going to be viewing the photo at a resolution consistent with whatever's in stores. Your screen size, at least in 2022, is probably 1920 by 1080 (high definition, or HD) or thereabouts. Your photo, then, probably doesn't need to be any bigger than 1920 by 1080. Even people with a screen twice as big as yours could let your photo take up half their screen, which is probably sufficient.
The other part of the equation is the file format. Many file formats, like JPEG and PNG, imply a certain amount of compression. The more compression, the smaller the file size, but too much compression can render a blurry image. I like the WEBP format, which tends to have quality better than JPEG at a smaller file size. It's well supported by image applications and all major web browsers.
1. Resize an image with Krita
The open source application Krita is technically a digital painting application but it happens to be a really great photo editor as well. I use it to load a photo, shrink it down to a reasonable size, and then save it in a web-optimized format.
Three easy steps:
-
Go to the File menu and select Open to open your image in Krita.
-
Go to the Image menu and select Scale image to new size. Type in the maximum width or height you want to resize your image to.
-
Go to the File menu and select Save As and save the image as a WEBP image. Krita is smart and switches to WEBP as long as you use the
.webpextension while saving your file (for example,myphoto.webp.)

(Seth Kenlon, CC BY-SA 4.0)
Krita is available for Linux, Windows, and macOS.
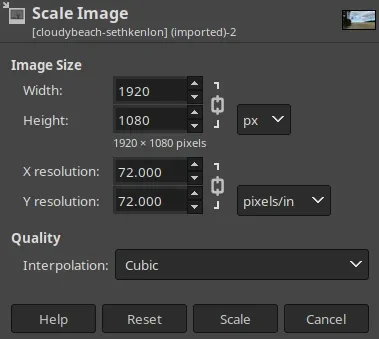
2. Resize an image with GIMP
The open source GNU Image Manipulation Program (GIMP) is a photo editor, and it can resize images.
Three easy steps:
-
Go to the File menu and select Open to open your image.
-
Go to the Image menu and select Scale image. Type in the maximum width or height you want to resize your image to.
-
Go to the File menu and select Export As and save the image as a WEBP image. The application is smart and uses WEBP as long as you give the
.webpextension while saving your file (for example,myphoto.webp.)
(Seth Kenlon, CC BY-SA 4.0)
GNU Image Manipulation Program (GIMP) is available for Linux, Windows, and macOS.
3. Resize an image with ImageMagick
The ImageMagick suite is a set of terminal commands that can manipulate images without even opening the files in a user interface. It's a fast and efficient way to modify lots of images all in one go.
One easy step:
$ convert 2022-09-09-PHOTO.JPG -scale 1920x myphoto.webpIn this command, convert is the component of ImageMagick that performs conversion, and -scale is the option that resizes. The 1080^ argument specifies that the converted image must be 1029 pixels wide, and the height (left blank after the x character) is auto-calculated.
ImageMagick is available for Linux, macOS, and Windows.
4. Archive an image
Sometimes you may not want to resize an image, but you still need to reduce the file size (the bytes the file uses up on your hard drive or SD card.) Images from consumer cameras, like those found in phones, are often already highly compressed, which doesn't leave much for a computer to optimize without resizing it. However, professional cameras often shoot in formats that assume you want no or minimal compression, which means that you can reduce the file size of an image without loss of quality with a good archiving utility.
There are several archive utilities out there, and many may already be installed on your computer. For instance, if your computer can create ZIP archives, then you've already got the ZIP compression algorithm available.
Two easy steps:
-
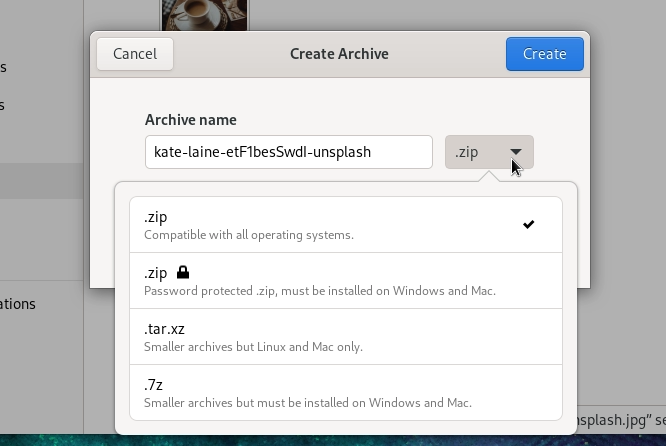
Open a file manager on your computer and locate the photo you want to compress.
-
Right-click on the photo, and select Compress (on some operating systems, this may called Archive instead.)
Provided there's enough uncompressed data in your image to allow for compression, the archive version ought to be smaller in file size than the original. You can send the archive over the Internet, and the recipient can un-archive the image with
(Seth Kenlon, CC BY-SA 4.0)
7-zip is an excellent archive tool for Linux, Windows, and macOS.
5. Split an image
If you're a Linux user, you can use the split command to cut an image into a few different pieces of a specific file size. Then you can send the pieces to someone, and they can reassemble the file using the cat command.
Assume the file 2022-09-09-PHOTO.JPG is 6.7 MB. You could cut it into four pieces by splitting it at every 2 MB. On your computer:
$ split 2022-09-09-PHOTO.JPG --bytes 2M
$ ls -l --human
[...] 6.7M Sep  7 14:50 2022-09-09-PHOTO.JPG
[...] 2.0M Sep  7 14:54 xaa
[...] 2.0M Sep  7 14:54 xab
[...] 2.0M Sep  7 14:54 xac
[...] 667K Sep  7 14:54 xad
On the recipient's computer:
$ cat xaa xab xac xad > myphoto.jpgSave space
In the eternal struggle between file size and carrier capacity, it's likely we'll always have to make concessions. Using open source tools to save space either through lossy compression, lossless compressed archiving, or through clever work-arounds, is a great way to save space and maximize speed of communication. Sure, a picture is worth a thousand words, but it doesn't have to take up a thousand megabytes!


2 Comments