How to Install Matrix Synapse Chat Server on Ubuntu 22.04
This tutorial exists for these OS versions
- Ubuntu 22.04 (Jammy Jellyfish)
- Ubuntu 20.04 (Focal Fossa)
- Ubuntu 18.04 (Bionic Beaver)
On this page
Matrix is a free, open-source, and web-based solution used for messaging and VoIP services. It is an open standard VOIP protocol that allows you to communicate with other users on a different service provider via voice-over-IP and chat. It provides RESTful HTTP JSON APIs for building distributed and federated chat servers with no single point of control and failure and provides all references for the APIs. It is written in Python and allows you to create your home server and store all user personal info and chat history.
In this post, we will show you how to install Matrix Synapse on Ubuntu 22.04.
Prerequisites
- A server running Ubuntu 22.04.
- A valid domain name pointed with your server IP.
- A root password is configured on the server.
Getting Started
First, you will need to update your system packages to the updated version. You can do it with the following command:
apt update -y
Once all the package indexes are updated, install the other required dependencies using the following command:
apt install curl wget gnupg2 apt-transport-https -y
Once all the dependencies are installed, you can proceed to the next step.
Install Matrix Synapse on Ubuntu 22.04
By default, the Matrix Synapse packages is not included in the Ubuntu 22.04 default repository. So you will need to add the Matrix Synapse official repository to APT.
First, download and add the Matrix Synapse GPG key with the following command:
wget -qO /usr/share/keyrings/matrix-org-archive-keyring.gpg https://packages.matrix.org/debian/matrix-org-archive-keyring.gpg
Next, add the Matrix Synapse repository to APT using the following command:
echo "deb [signed-by=/usr/share/keyrings/matrix-org-archive-keyring.gpg] https://packages.matrix.org/debian/ $(lsb_release -cs) main" | tee /etc/apt/sources.list.d/matrix-org.list
Next, update the repository and install the Matrix Synapse package using the following command:
apt-get update -y
apt-get install matrix-synapse-py3 -y
During the installation, you will be asked to define your domain name as shown below:
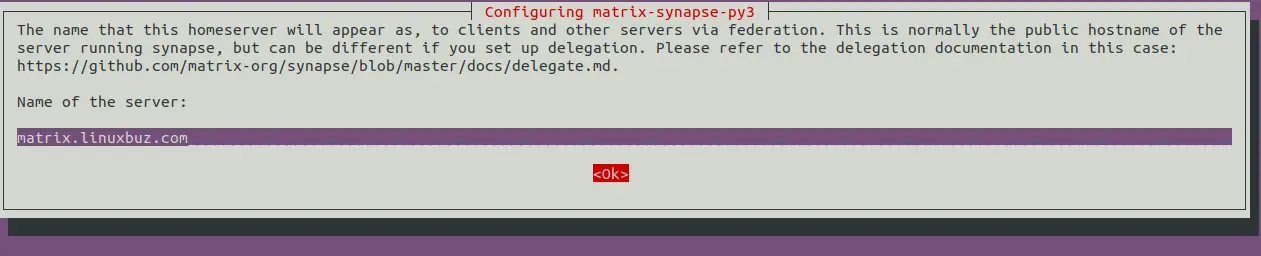
Provide your domain name and press the Enter key. You will be asked to report anonymous statistics:
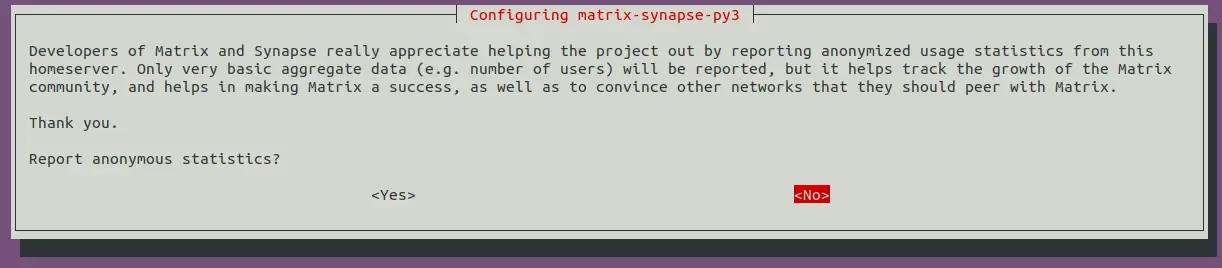
Select Yes and press the Enter key to continue.
Once the installation is completed, start the Matrix service and enable it to start at system reboot using the command given below:
systemctl start matrix-synapse
systemctl enable matrix-synapse
You can also check the status of the Matrix Synapse with the following command:
systemctl status matrix-synapse
You will get the following output:
? matrix-synapse.service - Synapse Matrix homeserver
     Loaded: loaded (/lib/systemd/system/matrix-synapse.service; enabled; vendor preset: enabled)
     Active: active (running) since Sat 2022-06-04 08:01:22 UTC; 3s ago
    Process: 1916 ExecStartPre=/opt/venvs/matrix-synapse/bin/python -m synapse.app.homeserver --config-path=/etc/matrix-synapse/homeserver.ya>
   Main PID: 1923 (python)
      Tasks: 8 (limit: 9460)
     Memory: 78.6M
        CPU: 4.911s
     CGroup: /system.slice/matrix-synapse.service
             ??1923 /opt/venvs/matrix-synapse/bin/python -m synapse.app.homeserver --config-path=/etc/matrix-synapse/homeserver.yaml --config>

Jun 04 08:01:17 ubuntu2204 systemd[1]: Starting Synapse Matrix homeserver...
Jun 04 08:01:22 ubuntu2204 matrix-synapse[1923]: This server is configured to use 'matrix.org' as its trusted key server via the
Jun 04 08:01:22 ubuntu2204 matrix-synapse[1923]: 'trusted_key_servers' config option. 'matrix.org' is a good choice for a key
Jun 04 08:01:22 ubuntu2204 matrix-synapse[1923]: server since it is long-lived, stable and trusted. However, some admins may
Jun 04 08:01:22 ubuntu2204 matrix-synapse[1923]: wish to use another server for this purpose.
Jun 04 08:01:22 ubuntu2204 matrix-synapse[1923]: To suppress this warning and continue using 'matrix.org', admins should set
Jun 04 08:01:22 ubuntu2204 matrix-synapse[1923]: 'suppress_key_server_warning' to 'true' in homeserver.yaml.
Jun 04 08:01:22 ubuntu2204 matrix-synapse[1923]: --------------------------------------------------------------------------------
Jun 04 08:01:22 ubuntu2204 matrix-synapse[1923]: Config is missing macaroon_secret_key
At this point, the Matrix Synapse service is started and listens on port 8008. You can check it with the following command:
ss -antpl | grep python
You will get the following output:
LISTEN 0      50         127.0.0.1:8008      0.0.0.0:*    users:(("python",pid=1950,fd=12))
LISTEN 0      50             [::1]:8008         [::]:*    users:(("python",pid=1950,fd=11))
Configure Matrix Synapse
After installing Matrix Synapse, you will need to configure it. First, create a secretes using the following command:
cat /dev/urandom | tr -dc 'a-zA-Z0-9' | fold -w 32 | head -n 1
You will get the following output:
R3jvgiDYyhh5XgduDPsgtwxPDiar8q2s
Next, edit the Matrix Synapse default configuration file:
nano /etc/matrix-synapse/homeserver.yaml
Define your bind-address, disable registration and define your secretes as shown below:
    bind_addresses: ['127.0.0.1']
    enable_registration: false
    registration_shared_secret: "R3jvgiDYyhh5XgduDPsgtwxPDiar8q2s"
Save and close the file then restart the Matrix Synapse service to apply the changes:
systemctl restart matrix-synapse
Configure Nginx as a Reverse Proxy for Matrix Synapse
It is a good idea to configure Nginx as a reverse proxy for Matix Synapse. First, install the Nginx web server package with the following command:
apt-get install nginx -y
Once the Nginx is installed, create an Nginx virtual host configuration file:
nano /etc/nginx/conf.d/matrix.conf
Add the following configuration:
server {
listen 80;
server_name matrix.linuxbuz.com;
location / {
proxy_pass http://localhost:8008;
proxy_set_header X-Forwarded-For $remote_addr;
}
}
Save and close the file the verify the Nginx configuration using the following command:
nginx -t
You will get the following output:
nginx: the configuration file /etc/nginx/nginx.conf syntax is ok
nginx: configuration file /etc/nginx/nginx.conf test is successful
Next, restart the Nginx service to apply the changes:
systemctl restart nginx
You can also check the status of the Nginx service using the following command:
systemctl status nginx
You should see the following output:
? nginx.service - A high performance web server and a reverse proxy server
     Loaded: loaded (/lib/systemd/system/nginx.service; enabled; vendor preset: enabled)
     Active: active (running) since Sat 2022-06-04 08:06:22 UTC; 26s ago
       Docs: man:nginx(8)
    Process: 2433 ExecStartPre=/usr/sbin/nginx -t -q -g daemon on; master_process on; (code=exited, status=0/SUCCESS)
    Process: 2434 ExecStart=/usr/sbin/nginx -g daemon on; master_process on; (code=exited, status=0/SUCCESS)
   Main PID: 2436 (nginx)
      Tasks: 5 (limit: 9460)
     Memory: 4.8M
        CPU: 58ms
     CGroup: /system.slice/nginx.service
             ??2436 "nginx: master process /usr/sbin/nginx -g daemon on; master_process on;"
             ??2437 "nginx: worker process" "" "" "" "" "" "" "" "" "" "" "" "" "" "" "" "" "" "" "" "" "" "" "" "" "" "" ""
             ??2438 "nginx: worker process" "" "" "" "" "" "" "" "" "" "" "" "" "" "" "" "" "" "" "" "" "" "" "" "" "" "" ""
             ??2439 "nginx: worker process" "" "" "" "" "" "" "" "" "" "" "" "" "" "" "" "" "" "" "" "" "" "" "" "" "" "" ""
             ??2440 "nginx: worker process" "" "" "" "" "" "" "" "" "" "" "" "" "" "" "" "" "" "" "" "" "" "" "" "" "" "" ""

Jun 04 08:06:22 ubuntu2204 systemd[1]: Starting A high performance web server and a reverse proxy server...
Jun 04 08:06:22 ubuntu2204 systemd[1]: Started A high performance web server and a reverse proxy server.
Create a Super User Account
Next, you will need to create an admin user account and set a password to access the Matrix Synapse.
register_new_matrix_user -c /etc/matrix-synapse/homeserver.yaml http://localhost:8008
Provide your admin user account and set a password as shown below:
New user localpart [root]: matrixadmin
Password:
Confirm password:
Make admin [no]: yes
Sending registration request...
Success!
Secure Matrix Synapse with Let's Encrypt
It is also recommended to secure the Matrix Synapse with Let's Encrypt SSL. First, install the Certbot client package with the following command:
apt-get install certbot python3-certbot-nginx -y
Once the Certbot package is installed, run the following command to install the Let's Encrypt SSL:
certbot
You will be asked to provide your email address and agree to the term of service:
Saving debug log to /var/log/letsencrypt/letsencrypt.log
Enter email address (used for urgent renewal and security notices)
 (Enter 'c' to cancel): [email protected]

- - - - - - - - - - - - - - - - - - - - - - - - - - - - - - - - - - - - - - - -
Please read the Terms of Service at
https://letsencrypt.org/documents/LE-SA-v1.2-November-15-2017.pdf. You must
agree in order to register with the ACME server. Do you agree?
- - - - - - - - - - - - - - - - - - - - - - - - - - - - - - - - - - - - - - - -
(Y)es/(N)o: Y

- - - - - - - - - - - - - - - - - - - - - - - - - - - - - - - - - - - - - - - -
Would you be willing, once your first certificate is successfully issued, to
share your email address with the Electronic Frontier Foundation, a founding
partner of the Let's Encrypt project and the non-profit organization that
develops Certbot? We'd like to send you email about our work encrypting the web,
EFF news, campaigns, and ways to support digital freedom.
- - - - - - - - - - - - - - - - - - - - - - - - - - - - - - - - - - - - - - - -
(Y)es/(N)o: Y
Account registered.
You will be asked to select the website on which you want to install the SSL:
Which names would you like to activate HTTPS for?
- - - - - - - - - - - - - - - - - - - - - - - - - - - - - - - - - - - - - - - -
1: matrix.linuxbuz.com
- - - - - - - - - - - - - - - - - - - - - - - - - - - - - - - - - - - - - - - -
Select the appropriate numbers separated by commas and/or spaces, or leave input
blank to select all options shown (Enter 'c' to cancel): 1
Type 1 and press the Enter key to install the Let's Encrypt SSL to your website.
Requesting a certificate for matrix.linuxbuz.com

Successfully received certificate.
Certificate is saved at: /etc/letsencrypt/live/matrix.linuxbuz.com/fullchain.pem
Key is saved at:         /etc/letsencrypt/live/matrix.linuxbuz.com/privkey.pem
This certificate expires on 2022-09-02.
These files will be updated when the certificate renews.
Certbot has set up a scheduled task to automatically renew this certificate in the background.

Deploying certificate
Successfully deployed certificate for matrix.linuxbuz.com to /etc/nginx/conf.d/matrix.conf
Congratulations! You have successfully enabled HTTPS on https://matrix.linuxbuz.com
We were unable to subscribe you the EFF mailing list because your e-mail address appears to be invalid. You can try again later by visiting https://act.eff.org.

- - - - - - - - - - - - - - - - - - - - - - - - - - - - - - - - - - - - - - - -
If you like Certbot, please consider supporting our work by:
 * Donating to ISRG / Let's Encrypt:   https://letsencrypt.org/donate
 * Donating to EFF:                    https://eff.org/donate-le
- - - - - - - - - - - - - - - - - - - - - - - - - - - - - - - - - - - - - - - -
Access Matrix Synapse
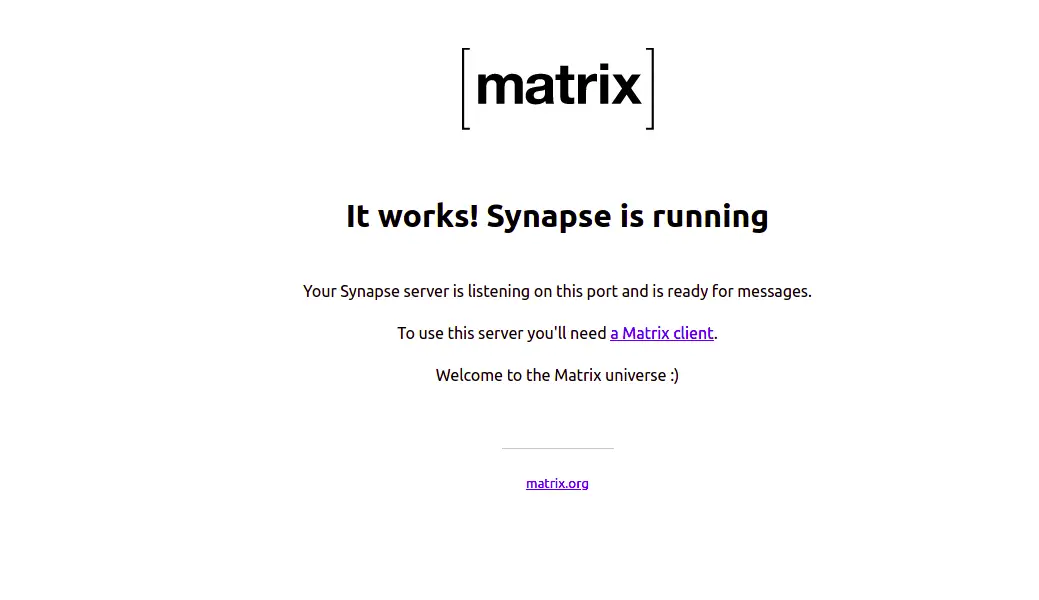
You can now verify the Matrix Synapse installation using the URL https://matrix.linuxbuz.com on your web browser. You should see the following screen:
You can also verify your Matrix Synapse using the Riot web-based client https://riot.im/app/#/login. You should see the following screen:

Click on the Edit button. You should see the following screen:
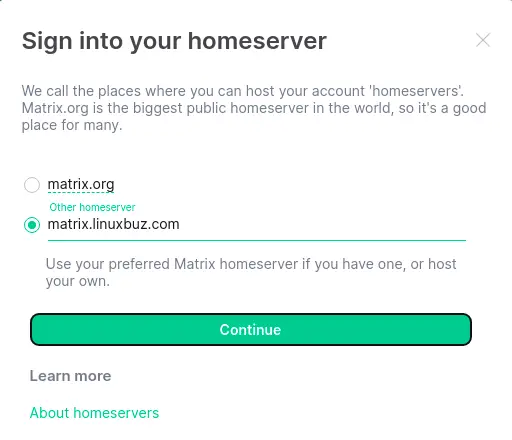
Provide your Matrix server URL and click on the Continue button. You should see the Matrix login page:
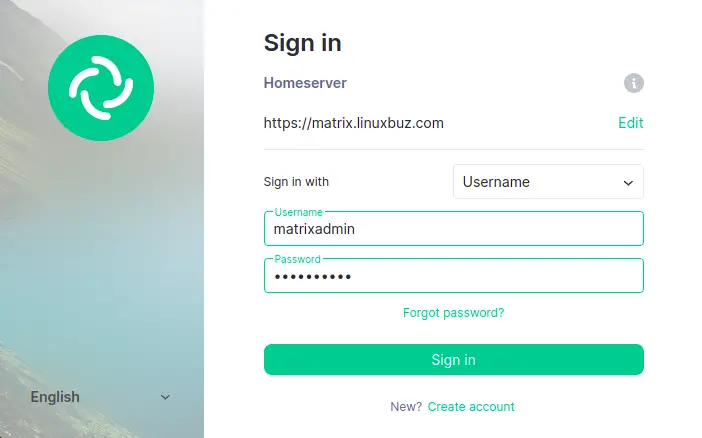
Provide your admin username, password, and click on the Sign in button. Once you are connected to the Matrix Synapse server. You should see the following screen:

Conclusion
In this post, you learned how to install Matrix Synapse with Nginx as a reverse proxy on Ubuntu 22.04 server. You also verify the Matrix Synapse using the Riot web-based client. You can now build your own VOIP server using the Matrix Synapse.

