How to Install Mastodon Social Network with Docker on Rocky Linux 9
On this page
- Prerequisites
- Step 1 - Configure Firewall
- Step 2 - Install Docker and Docker Compose
- Step 3 - Preparing for Installation
- Step 4 - Install Mastodon
- Step 5 - Install Nginx
- Step 6 - Install SSL
- Step 7 - Configure Nginx
- Step 8 - Start Mastodon
- Step 9 - Mastodon Maintenance
- Step 10 - Backup Mastodon
- Step 11 - Upgrade Mastodon
- Conclusion
Mastodon is a free, decentralized, and open-source social network. It was created as an alternative to Twitter. Just like Twitter people can follow each other, and post messages, images, and videos. But unlike Twitter, there is no central store or authority for the content.
Instead, Mastodon operates across thousands of different servers each run by various members of the community. Users signed up on one server can easily connect to users on the other network and follow each other across instances.
Anyone can install their instance of a Mastodon server. This tutorial will teach you how to set up your instance of Mastodon on a server with Rocky Linux 9 using Docker. Docker makes it easy to install Mastodon by containing all the packages and services required in containers.
Prerequisites
-
A server running Rocky Linux 9 with a minimum of 2 CPU cores and 2GB of memory. You will need to upgrade the server as per requirements.
-
A non-root user with sudo privileges.
-
A fully qualified domain name (FQDN) pointing to your server. For our purposes, we will use
mastodon.example.comas the domain name. -
Mastodon sends email notifications to users. We will recommend you use a 3rd party Transactional mail service like Mailgun, Sendgrid, Amazon SES, or Sparkpost. The instructions in the guide will be using Amazon SES.
-
Make sure everything is updated.
$ sudo dnf update
-
Install basic utility packages. Some of them may already be installed.
$ sudo dnf install wget curl nano unzip yum-utils -y
Step 1 - Configure Firewall
The first step is to configure the firewall. Rocky Linux uses Firewalld Firewall. Check the firewall's status.
$ sudo firewall-cmd --state
running
The firewall works with different zones, and the public zone is the default one that we will use. List all the services and ports active on the firewall.
$ sudo firewall-cmd --permanent --list-services
It should show the following output.
cockpit dhcpv6-client ssh
Wiki.js needs HTTP and HTTPS ports to function. Open them.
$ sudo firewall-cmd --permanent --add-service=http
$ sudo firewall-cmd --permanent --add-service=https
Add masquerade, as the application will contact other instances.
$ sudo firewall-cmd --permanent --add-masquerade
Reload the firewall to apply the changes.
$ sudo firewall-cmd --reload
Step 2 - Install Docker and Docker Compose
Rocky Linux ships with an older version of Docker. To install the latest version, first, install the official Docker repository.
$ sudo yum-config-manager \
    --add-repo \
    https://download.docker.com/linux/centos/docker-ce.repo
Install the latest version of Docker.
$ sudo dnf install docker-ce docker-ce-cli containerd.io
You may get the following error while trying to install Docker.
ror:
 Problem: problem with installed package buildah-1:1.26.2-1.el9_0.x86_64
  - package buildah-1:1.26.2-1.el9_0.x86_64 requires runc >= 1.0.0-26, but none of the providers can be installed
  - package containerd.io-1.6.9-3.1.el9.x86_64 conflicts with runc provided by runc-4:1.1.3-2.el9_0.x86_64
  - package containerd.io-1.6.9-3.1.el9.x86_64 obsoletes runc provided by runc-4:1.1.3-2.el9_0.x86_64
  - cannot install the best candidate for the job
Use the following command if you get the error above.
$ sudo dnf install docker-ce docker-ce-cli containerd.io docker-compose-plugin --allowerasing
Enable and run the Docker daemon.
$ sudo systemctl enable docker --now
Verify that it is running.
? docker.service - Docker Application Container Engine
     Loaded: loaded (/usr/lib/systemd/system/docker.service; enabled; vendor preset: disabled)
     Active: active (running) since Sat 2022-11-12 00:19:44 UTC; 6s ago
TriggeredBy: ? docker.socket
       Docs: https://docs.docker.com
   Main PID: 99263 (dockerd)
      Tasks: 8
     Memory: 28.1M
        CPU: 210ms
     CGroup: /system.slice/docker.service
             ??99263 /usr/bin/dockerd -H fd:// --containerd=/run/containerd/containerd.sock
By default, Docker requires root privileges. If you want to avoid using sudo every time you run the docker command, add your username to the docker group.
$ sudo usermod -aG docker $(whoami)
You will need to log out of the server and back in as the same user to enable this change or use the following command.
$ su - ${USER}
Confirm that your user is added to the Docker group.
$ groups
navjot wheel docker
Step 3 - Preparing for Installation
The default limit of the mmap counts is very low for Elasticsearch. Run the following command to check the default value.
$ sysctl vm.max_map_count
You will get the following output.
vm.max_map_count = 65530
Increase the value using the following commands.
$ echo "vm.max_map_count=262144" | sudo tee /etc/sysctl.d/90-max_map_count.conf
$ sudo sysctl --load /etc/sysctl.d/90-max_map_count.conf
Configure SELinux to allow network connections.
$ sudo setsebool -P httpd_can_network_connect 1
Step 4 - Install Mastodon
Create Directories and Set Ownerships
Create directories for Mastodon and related services.
$ sudo mkdir -p /opt/mastodon/database/{postgresql,pgbackups,redis,elasticsearch}
$ sudo mkdir -p /opt/mastodon/web/{public,system}
$ sudo mkdir -p /opt/mastodon/branding
Set proper ownerships to the Elasticsearch, web, and backup directories.
$ sudo chown 991:991 /opt/mastodon/web/{public,system}
$ sudo chown 1000 /opt/mastodon/database/elasticsearch
$ sudo chown 70:70 /opt/mastodon/database/pgbackups
Switch to the Mastodon directory.
$ cd /opt/mastodon
Create environment and docker compose files
Create environment files for the application and the database.
$ sudo touch application.env database.env
Create and open the Docker compose file for editing.
$ sudo nano docker-compose.yml
Paste the following code in it.
version: '3'

services:
  postgresql:
    image: postgres:15-alpine
    env_file: database.env
    restart: always
    shm_size: 512mb
    healthcheck:
      test: ['CMD', 'pg_isready', '-U', 'postgres']
    volumes:
      - postgresql:/var/lib/postgresql/data
      - pgbackups:/backups
    networks:
      - internal_network

  redis:
    image: redis:7-alpine
    restart: always
    healthcheck:
      test: ['CMD', 'redis-cli', 'ping']
    volumes:
      - redis:/data
    networks:
      - internal_network

  redis-volatile:
    image: redis:7-alpine
    restart: always
    healthcheck:
      test: ['CMD', 'redis-cli', 'ping']
    networks:
      - internal_network

  elasticsearch:
    image: docker.elastic.co/elasticsearch/elasticsearch:7.17.7
    restart: always
    env_file: database.env
    environment:
      - cluster.name=elasticsearch-mastodon
      - discovery.type=single-node
      - bootstrap.memory_lock=true
      - xpack.security.enabled=true
      - ingest.geoip.downloader.enabled=false
    ulimits:
      memlock:
        soft: -1
        hard: -1
    healthcheck:
      test: ["CMD-SHELL", "nc -z elasticsearch 9200"]
    volumes:
      - elasticsearch:/usr/share/elasticsearch/data
    networks:
      - internal_network

  website:
    image: tootsuite/mastodon:v4.0.2
    env_file:
      - application.env
      - database.env
    command: bash -c "bundle exec rails s -p 3000"
    restart: always
    depends_on:
      - postgresql
      - redis
      - redis-volatile
      - elasticsearch
    ports:
      - '127.0.0.1:3000:3000'
    networks:
      - internal_network
      - external_network
    healthcheck:
      test: ['CMD-SHELL', 'wget -q --spider --proxy=off localhost:3000/health || exit 1']
    volumes:
      - uploads:/mastodon/public/system

  shell:
    image: tootsuite/mastodon:v4.0.2
    env_file:
      - application.env
      - database.env
    command: /bin/bash
    restart: "no"
    networks:
      - internal_network
      - external_network
    volumes:
      - uploads:/mastodon/public/system
      - static:/static

  streaming:
    image: tootsuite/mastodon:v4.0.2
    env_file:
      - application.env
      - database.env
    command: node ./streaming
    restart: always
    depends_on:
      - postgresql
      - redis
      - redis-volatile
      - elasticsearch
    ports:
      - '127.0.0.1:4000:4000'
    networks:
      - internal_network
      - external_network
    healthcheck:
      test: ['CMD-SHELL', 'wget -q --spider --proxy=off localhost:4000/api/v1/streaming/health || exit 1']

  sidekiq:
    image: tootsuite/mastodon:v4.0.2
    env_file:
      - application.env
      - database.env
    command: bundle exec sidekiq
    restart: always
    depends_on:
      - postgresql
      - redis
      - redis-volatile
      - website
    networks:
      - internal_network
      - external_network
    healthcheck:
      test: ['CMD-SHELL', "ps aux | grep '[s]idekiq\ 6' || false"]
    volumes:
      - uploads:/mastodon/public/system

networks:
  external_network:
  internal_network:
  	 #internal:true

volumes:
  postgresql:
    driver_opts:
      type: none
      device: /opt/mastodon/database/postgresql
      o: bind
  pgbackups:
    driver_opts:
      type: none
      device: /opt/mastodon/database/pgbackups
      o: bind
  redis:
    driver_opts:
      type: none
      device: /opt/mastodon/database/redis
      o: bind
  elasticsearch:
    driver_opts:
      type: none
      device: /opt/mastodon/database/elasticsearch
      o: bind
  uploads:
    driver_opts:
      type: none
      device: /opt/mastodon/web/system
      o: bind
  static:
    driver_opts:
      type: none
      device: /opt/mastodon/web/public
      o: bind
Save the file by pressing Ctrl + X and entering Y when prompted.
At the time of writing the tutorial, the latest available version of Mastodon is v4.0.2. Check the Mastodon GitHub Releases page and adjust the version in the Docker compose file appropriately. We are also using the latest versions of PostgreSQL and Redis. You can adjust them as per your requirements. We are using Elasticsearch 7.x at the moment. There is no major version of Elasticsearch you can follow on the Docker Hub page, so you will have to keep updating it manually for the security updates related to Java.
That internal: true doesn’t work with firewalld, which is why it is commented out in the file above. If this is ever fixed, you may be able to re-add that additional restriction.
Create Application Secrets
The next step is to create application secret values.
Generate SECRET_KEY_BASE and OTP_SECRET values by running the following command twice. The first time will take some time as it will pull the images.
$ docker compose run --rm shell bundle exec rake secret
You can also use the openssl utility for the same.
$ openssl rand -hex 64
Generate VAPID_PRIVATE_KEY and VAPID_PUBLIC_KEY values by using the following command.
$ docker compose run --rm shell bundle exec rake mastodon:webpush:generate_vapid_key
You will get a similar output.
VAPID_PRIVATE_KEY=u2qsCs5JdmdmMLnUuU0sgmFGvZedteJz-lFB_xF4_ac=
VAPID_PUBLIC_KEY=BJXjE2hIXvFpo6dnHqyf1i-2PcP-cBoL95UCmhhxwlAgtFw_vnrYp4GBneR7_cmI9LZUYjHFh-TBAPSb9WTqH9A=
Use the openssl utility to generate PostgreSQL and Elasticsearch passwords.
$ openssl rand -hex 15
Mastodon Environment Files
Open the application.env file for editing.
$ sudo nano application.env
Paste the following lines in it.
# environment
RAILS_ENV=production
NODE_ENV=production

# domain
LOCAL_DOMAIN=mastodon.example.com

# redirect to the first profile
SINGLE_USER_MODE=false

# do not serve static files
RAILS_SERVE_STATIC_FILES=false

# concurrency
WEB_CONCURRENCY=2
MAX_THREADS=5

# pgbouncer
#PREPARED_STATEMENTS=false

# locale
DEFAULT_LOCALE=en

# email, not used
SMTP_SERVER=email-smtp.us-west-2.amazonaws.com
SMTP_PORT=587
SMTP_LOGIN=AKIA3FIG4NVFNSC3AHXE
SMTP_PASSWORD=BHM4MVOjBmnGhSJ9lH3PAXKJ/9AiLWcUghG/kEN2kkFo
[email protected]

# secrets
SECRET_KEY_BASE=c09fa403575e0b431e54a2e228f20cd5a5fdfdbba0da80598959753b829a4e3c0266eedbac7e3cdf9f3345db36c56302c0e1bc5bfc8c5d516be59a2c41de7e37
OTP_SECRET=febb7dbb0d3308094083733fc923a430e52ccec767d48d7d2e0c577bfcb6863dbdfc920b1004b1f8c2967b9866bd7a0b4a15460f9fc7687aa4a42acf54e5a3d4

# Changing VAPID keys will break push notifications
VAPID_PRIVATE_KEY=13RgrfOY2tkwuUycylDPOkoHennkJ0ZAPV_fUwDy7-g=
VAPID_PUBLIC_KEY=BDAQuGwPbh1kbCV904adYXHvz9lLRaJHkiQkihRDPyBn3QmkAYbR21WHYoP8TkyG6dylG6IXpEVfLwdoW7fJVns=
Save the file by pressing Ctrl + X and entering Y when prompted.
Open the database.env file for editing.
$ sudo nano database.env
Paste the following lines in it.
# postgresql configuration
POSTGRES_USER=mastodon
POSTGRES_DB=mastodon
POSTGRES_PASSWORD=15ff12dcb93aa60680d2aadb4032ee
PGPASSWORD=15ff12dcb93aa60680d2aadb4032ee
PGPORT=5432
PGHOST=postgresql
PGUSER=mastodon

# pgbouncer configuration
#POOL_MODE=transaction
#ADMIN_USERS=postgres,mastodon
#DATABASE_URL="postgres://mastodon:15ff12dcb93aa60680d2aadb4032ee@postgresql:5432/mastodon"

# elasticsearch
ES_JAVA_OPTS=-Xms512m -Xmx512m
ELASTIC_PASSWORD=13382e99f6b2d4dc7f3d66e4b9872d

# mastodon database configuration
#DB_HOST=pgbouncer
DB_HOST=postgresql
DB_USER=mastodon
DB_NAME=mastodon
DB_PASS=15ff12dcb93aa60680d2aadb4032ee
DB_PORT=5432

REDIS_HOST=redis
REDIS_PORT=6379

CACHE_REDIS_HOST=redis-volatile
CACHE_REDIS_PORT=6379

ES_ENABLED=true
ES_HOST=elasticsearch
ES_PORT=9200
ES_USER=elastic
ES_PASS=13382e99f6b2d4dc7f3d66e4b9872d
Save the file by pressing Ctrl + X and entering Y when prompted.
Prepare Mastodon
Get the static files ready to be served by Nginx.
$ docker compose run --rm shell bash -c "cp -r /opt/mastodon/public/* /static/"
Bring up the data layer.
$ docker compose up -d postgresql redis redis-volatile
Check the status of the containers.
$ watch docker compose ps
Wait for running (healthy), then press Ctrl + C and initialize the database using the following command.
$ docker compose run --rm shell bundle exec rake db:setup
Step 5 - Install Nginx
Rocky Linux ships with an older version of Nginx. You need to download the official Nginx repository to install the latest version.
Create and open the /etc/yum.repos.d/nginx.repo file for creating the official Nginx repository.
$ sudo nano /etc/yum.repos.d/nginx.repo
Paste the following code in it.
[nginx-stable]
name=nginx stable repo
baseurl=http://nginx.org/packages/centos/$releasever/$basearch/
gpgcheck=1
enabled=1
gpgkey=https://nginx.org/keys/nginx_signing.key
module_hotfixes=true

[nginx-mainline]
name=nginx mainline repo
baseurl=http://nginx.org/packages/mainline/centos/$releasever/$basearch/
gpgcheck=1
enabled=0
gpgkey=https://nginx.org/keys/nginx_signing.key
module_hotfixes=true
Save the file by pressing Ctrl + X and entering Y when prompted.
Install the Nginx server.
$ sudo dnf install nginx
Verify the installation.
$ nginx -v
nginx version: nginx/1.22.1
Enable and start the Nginx server.
$ sudo systemctl enable nginx --now
Check the status of the server.
$ sudo systemctl status nginx
? nginx.service - nginx - high performance web server
     Loaded: loaded (/usr/lib/systemd/system/nginx.service; enabled; vendor preset: disabled)
     Active: active (running) since Sun 2022-11-13 13:49:55 UTC; 1s ago
       Docs: http://nginx.org/en/docs/
    Process: 230797 ExecStart=/usr/sbin/nginx -c /etc/nginx/nginx.conf (code=exited, status=0/SUCCESS)
   Main PID: 230798 (nginx)
      Tasks: 3 (limit: 12355)
     Memory: 2.8M
        CPU: 13ms
     CGroup: /system.slice/nginx.service
             ??230798 "nginx: master process /usr/sbin/nginx -c /etc/nginx/nginx.conf"
             ??230799 "nginx: worker process"
             ??230800 "nginx: worker process"
Step 6 - Install SSL
Certbot tool generates SSL certificates using Let's Encrypt API. It requires the EPEL repository to work.
$ sudo dnf install epel-release
We will use Snapd to install Certbot. Install Snapd.
$ sudo dnf install snapd
Enable and Start the Snap service.
$ sudo systemctl enable snapd --now
Install the Snap core package.
$ sudo snap install core
$ sudo snap refresh core
Create necessary links for Snapd to work.
$ sudo ln -s /var/lib/snapd/snap /snap
$ echo 'export PATH=$PATH:/var/lib/snapd/snap/bin' | sudo tee -a /etc/profile.d/snapd.sh
Issue the following command to install Certbot.
$ sudo snap install --classic certbot
Enable Certbot by creating the symlink to its executable.
$ sudo ln -s /snap/bin/certbot /usr/bin/certbot
Generate the SSL certificate.
$ sudo certbot certonly --nginx --agree-tos --no-eff-email --staple-ocsp --preferred-challenges http -m [email protected] -d mastodon.example.com
The above command will download a certificate to the /etc/letsencrypt/live/mastodon.example.com directory on your server.
Generate a Diffie-Hellman group certificate.
$ sudo openssl dhparam -dsaparam -out /etc/ssl/certs/dhparam.pem 4096
To check whether the SSL renewal is working fine, do a dry run of the process.
$ sudo certbot renew --dry-run
If you see no errors, you are all set. Your certificate will renew automatically.
Step 7 - Configure Nginx
Open the file /etc/nginx/nginx.conf for editing.
$ sudo nano /etc/nginx/nginx.conf
Add the following line before the line include /etc/nginx/conf.d/*.conf;.
server_names_hash_bucket_size 64;
Save the file by pressing Ctrl + X and entering Y when prompted.
Create and open the file /etc/nginx/conf.d/mastodon.conf for editing.
$ sudo nano /etc/nginx/conf.d/mastodon.conf
Paste the following code in it.
map $http_upgrade $connection_upgrade {
  default upgrade;
  ''      close;
}

upstream backend {
    server 127.0.0.1:3000 fail_timeout=0;
}

upstream streaming {
    server 127.0.0.1:4000 fail_timeout=0;
}

proxy_cache_path /var/cache/nginx levels=1:2 keys_zone=CACHE:10m inactive=7d max_size=1g;

server {
  listen 80 default_server;
  server_name mastodon.example.com;
  location / { return 301 https://$host$request_uri; }
}

server {
   listen 443 ssl http2;
   server_name mastodon.example.com;

   access_log  /var/log/nginx/mastodon.access.log;
   error_log   /var/log/nginx/mastodon.error.log;

   http2_push_preload on; # Enable HTTP/2 Server Push

   ssl_certificate /etc/letsencrypt/live/mastodon.example.com/fullchain.pem;
   ssl_certificate_key /etc/letsencrypt/live/mastodon.example.com/privkey.pem;
   ssl_trusted_certificate /etc/letsencrypt/live/mastodon.example.com/chain.pem;
   ssl_session_timeout 1d;

   # Enable TLS versions (TLSv1.3 is required upcoming HTTP/3 QUIC).
   ssl_protocols TLSv1.2 TLSv1.3;

   # Enable TLSv1.3's 0-RTT. Use $ssl_early_data when reverse proxying to
   # prevent replay attacks.
   #
   # @see: https://nginx.org/en/docs/http/ngx_http_ssl_module.html#ssl_early_data
   ssl_early_data on;

   ssl_ciphers 'ECDHE-ECDSA-AES256-GCM-SHA384:ECDHE-RSA-AES256-GCM-SHA384:ECDHE-ECDSA-CHACHA20-POLY1305:ECDHE-RSA-CHACHA20-POLY1305:ECDHE-ECDSA-AES256-SHA384:ECDHE-RSA-AES256-SHA384';
   ssl_prefer_server_ciphers on;
   ssl_session_cache shared:SSL:10m;
   ssl_session_tickets off;

   keepalive_timeout    70;
   sendfile             on;
   client_max_body_size 80m;

   # OCSP Stapling ---
   # fetch OCSP records from URL in ssl_certificate and cache them
   ssl_stapling on;
   ssl_stapling_verify on;
   ssl_dhparam /etc/ssl/certs/dhparam.pem;

   add_header X-Early-Data $tls1_3_early_data;

   root /opt/mastodon/web/public;

   gzip on;
   gzip_disable "msie6";
   gzip_vary on;
   gzip_proxied any;
   gzip_comp_level 6;
   gzip_buffers 16 8k;
   gzip_http_version 1.1;
   gzip_types text/plain text/css application/json application/javascript text/xml application/xml application/xml+rss text/javascript image/svg+xml image/x-icon;

   add_header Strict-Transport-Security "max-age=31536000" always;

  location / {
    try_files $uri @proxy;
  }

  location ~ ^/(system/accounts/avatars|system/media_attachments/files) {
    add_header Cache-Control "public, max-age=31536000, immutable";
    add_header Strict-Transport-Security "max-age=31536000" always;
    root /opt/mastodon/;
    try_files $uri @proxy;
  }

  location ~ ^/(emoji|packs) {
    add_header Cache-Control "public, max-age=31536000, immutable";
    add_header Strict-Transport-Security "max-age=31536000" always;
    try_files $uri @proxy;
  }

  location /sw.js {
    add_header Cache-Control "public, max-age=0";
    add_header Strict-Transport-Security "max-age=31536000" always;
    try_files $uri @proxy;
  }

  location @proxy {
    proxy_set_header Host $host;
    proxy_set_header X-Real-IP $remote_addr;
    proxy_set_header X-Forwarded-For $proxy_add_x_forwarded_for;
    proxy_set_header X-Forwarded-Proto $scheme;
    proxy_set_header Proxy "";
    proxy_pass_header Server;

    proxy_pass http://backend;
    proxy_buffering on;
    proxy_redirect off;
    proxy_http_version 1.1;
    proxy_set_header Upgrade $http_upgrade;
    proxy_set_header Connection $connection_upgrade;

    proxy_cache CACHE;
    proxy_cache_valid 200 7d;
    proxy_cache_valid 410 24h;
    proxy_cache_use_stale error timeout updating http_500 http_502 http_503 http_504;
    add_header X-Cached $upstream_cache_status;
    add_header Strict-Transport-Security "max-age=31536000" always;

    tcp_nodelay on;
  }

  location /api/v1/streaming {
    proxy_set_header Host $host;
    proxy_set_header X-Real-IP $remote_addr;
    proxy_set_header X-Forwarded-For $proxy_add_x_forwarded_for;
    proxy_set_header X-Forwarded-Proto $scheme;
    proxy_set_header Proxy "";

    proxy_pass http://streaming;
    proxy_buffering off;
    proxy_redirect off;
    proxy_http_version 1.1;
    proxy_set_header Upgrade $http_upgrade;
    proxy_set_header Connection $connection_upgrade;

    tcp_nodelay on;
  }

  error_page 500 501 502 503 504 /500.html;
}

# This block is useful for debugging TLS v1.3. Please feel free to remove this
# and use the `$ssl_early_data` variable exposed by NGINX directly should you
# wish to do so.
map $ssl_early_data $tls1_3_early_data {
  "~." $ssl_early_data;
  default "";
}
Once finished, save the file by pressing Ctrl + X and entering Y when prompted.
Verify the Nginx configuration file syntax.
$ sudo nginx -t
nginx: the configuration file /etc/nginx/nginx.conf syntax is ok
nginx: configuration file /etc/nginx/nginx.conf test is successful
Restart the Nginx server.
$ sudo systemctl restart nginx
If you get the following error, then it is most probably due to SELinux Restrictions.
nginx: [emerg] open() "/var/run/nginx.pid" failed (13: Permission denied)
To fix the error, run the following commands.
$ sudo ausearch -c 'nginx' --raw | audit2allow -M my-nginx
$ sudo semodule -X 300 -i my-nginx.pp
Start the Nginx service again.
$ sudo systemctl start nginx
Step 8 - Start Mastodon
Tootctl CLI tool
The Tootctl CLI tool is used to perform administrative tasks on Mastodon. We need to make it accessible on the host shell.
Create the file /usr/local/bin/tootctl and open it for editing.
$ sudo nano /usr/local/bin/tootctl
Paste the following code in it.
#!/bin/bash
docker compose -f /opt/mastodon/docker-compose.yml run --rm shell tootctl "$@"
Save the file by pressing Ctrl + X and entering Y when prompted.
Give the file executable permission.
$ sudo chmod +x /usr/local/bin/tootctl
Mastodon Service File
You can start the Mastodon containers using the Docker compose command but it's easier to do via a systemd unit file.
Create and open the Mastodon service file for editing.
$ sudo nano /etc/systemd/system/mastodon.service
Paste the following code in it.
[Unit]
Description=Mastodon service
After=docker.service

[Service]
Type=oneshot
RemainAfterExit=yes

WorkingDirectory=/opt/mastodon
ExecStart=/usr/bin/docker compose -f /opt/mastodon/docker-compose.yml up -d
ExecStop=/usr/bin/docker compose -f /opt/mastodon/docker-compose.yml down

[Install]
WantedBy=multi-user.target
Save the file by pressing Ctrl + X and entering Y when prompted.
Reload the system daemon to initiate the service file.
$ sudo systemctl daemon-reload
Enable and start the Mastodon service.
$ sudo systemctl enable --now mastodon.service
Check the status of the Docker containers.
$ watch docker compose -f /opt/mastodon/docker-compose.yml ps
Once the status of the containers changes to running (healthy), exit the screen by pressing Ctrl + C.
Create the admin user for Mastodon and note the password provided.
$ tootctl accounts create navjot --email [email protected] --confirmed --role admin
OK
New password: 1338afbe1b4e06e823b6625da80cb537
If you want to close user registrations, use the following command.
$ tootctl settings registrations close
To open the registrations again, issue the following command.
$ tootctl settings registrations open
Initialize Search
You will need to make a toot before you can create and populate Elasticsearch indices. Once you have made a toot, issue the following command.
$ tootctl search deploy
You may get the following error.
/opt/mastodon/vendor/bundle/ruby/3.0.0/gems/ruby-progressbar-1.11.0/lib/ruby-progressbar/progress.rb:76:in `total=': You can't set the item's total value to less than the current progress. (ProgressBar::InvalidProgressError)
        from /opt/mastodon/vendor/bundle/ruby/3.0.0/gems/ruby-progressbar-1.11.0/lib/ruby-progressbar/base.rb:178:in `block in update_progress'
        from /opt/mastodon/vendor/bundle/ruby/3.0.0/gems/ruby-progressbar-1.11.0/lib/ruby-progressbar/output.rb:43:in `with_refresh'
        from /opt/mastodon/vendor/bundle/ruby/3.0.0/gems/ruby-progressbar-1.11.0/lib/ruby-progressbar/base.rb:177:in `update_progress'
        from /opt/mastodon/vendor/bundle/ruby/3.0.0/gems/ruby-progressbar-1.11.0/lib/ruby-progressbar/base.rb:101:in `total='
        from /opt/mastodon/lib/mastodon/search_cli.rb:67:in `deploy'
        from /opt/mastodon/vendor/bundle/ruby/3.0.0/gems/thor-1.2.1/lib/thor/command.rb:27:in `run'
        from /opt/mastodon/vendor/bundle/ruby/3.0.0/gems/thor-1.2.1/lib/thor/invocation.rb:127:in `invoke_command'
        from /opt/mastodon/vendor/bundle/ruby/3.0.0/gems/thor-1.2.1/lib/thor.rb:392:in `dispatch'
        from /opt/mastodon/vendor/bundle/ruby/3.0.0/gems/thor-1.2.1/lib/thor/invocation.rb:116:in `invoke'
        from /opt/mastodon/vendor/bundle/ruby/3.0.0/gems/thor-1.2.1/lib/thor.rb:243:in `block in subcommand'
        from /opt/mastodon/vendor/bundle/ruby/3.0.0/gems/thor-1.2.1/lib/thor/command.rb:27:in `run'
        from /opt/mastodon/vendor/bundle/ruby/3.0.0/gems/thor-1.2.1/lib/thor/invocation.rb:127:in `invoke_command'
        from /opt/mastodon/vendor/bundle/ruby/3.0.0/gems/thor-1.2.1/lib/thor.rb:392:in `dispatch'
        from /opt/mastodon/vendor/bundle/ruby/3.0.0/gems/thor-1.2.1/lib/thor/base.rb:485:in `start'
        from /opt/mastodon/bin/tootctl:8:in `<main>'
In this case, enter the website container shell.
$ docker exec -it mastodon-web-1 /bin/bash
Run the following command.
$ sed -E 's/indices.sum.+/2000/g' -i lib/mastodon/search_cli.rb
Exit the container shell.
$ exit
Run the Elasticsearch deploy command again.
$ tootctl search deploy
Additional Helper Services
Let us create another service for removing downloaded media files.
Create and open the Mastodon media removal service for editing.
$ sudo nano /etc/systemd/system/mastodon-media-remove.service
Paste the following code in it.
[Unit]
Description=Mastodon - media remove service
Wants=mastodon-media-remove.timer

[Service]
Type=oneshot
StandardError=null
StandardOutput=null

WorkingDirectory=/opt/mastodon
ExecStart=/usr/bin/docker compose -f /opt/mastodon/docker-compose.yml run --rm shell tootctl media remove

[Install]
WantedBy=multi-user.target
Save the file by pressing Ctrl + X and entering Y when prompted.
If you want to schedule the media removal, you can set up a timer service for it.
$ sudo nano /etc/systemd/system/mastodon-media-remove.timer
Paste the following code.
[Unit]
Description=Schedule a media remove every week

[Timer]
Persistent=true
OnCalendar=Sat *-*-* 00:00:00
Unit=mastodon-media-remove.service

[Install]
WantedBy=timers.target
Save the file by pressing Ctrl + X and entering Y when prompted.
You can set up another service to remove the Rich preview cards generated using OpenGraph tags.
$ sudo nano /etc/systemd/system/mastodon-preview_cards-remove.service
Paste the following code.
[Unit]
Description=Mastodon - preview cards remove service
Wants=mastodon-preview_cards-remove.timer

[Service]
Type=oneshot
StandardError=null
StandardOutput=null

WorkingDirectory=/opt/mastodon
ExecStart=/usr/bin/docker compose -f /opt/mastodon/docker-compose.yml run --rm shell tootctl preview_cards remove

[Install]
WantedBy=multi-user.target
Save the file by pressing Ctrl + X and entering Y when prompted.
Set the corresponding timer service.
$ sudo nano /etc/systemd/system/mastodon-preview_cards-remove.timer
Paste the following code.
[Unit]
Description=Schedule a preview cards remove every week

[Timer]
Persistent=true
OnCalendar=Sat *-*-* 00:00:00
Unit=mastodon-preview_cards-remove.service

[Install]
WantedBy=timers.target
Save the file by pressing Ctrl + X and entering Y when prompted.
Reload the system daemon.
$ sudo systemctl daemon-reload
Enable and start the timers.
$ sudo systemctl enable --now mastodon-preview_cards-remove.timer
$ sudo systemctl enable --now mastodon-media-remove.timer
List all the timers to check the schedule of the Mastodon services.
$ systemctl list-timers
Access Mastodon
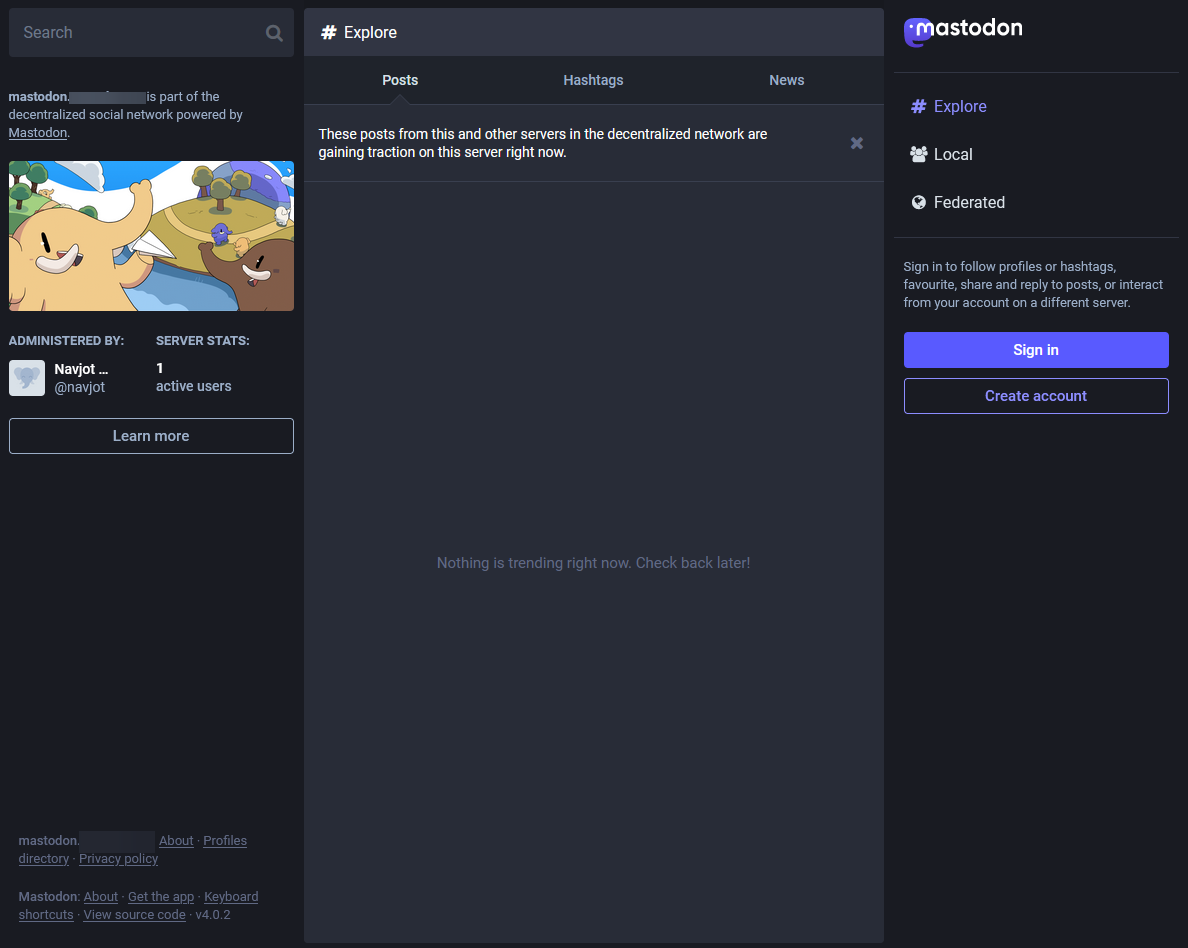
Visit the URL https://mastodon.example.com to access your instance and you will see a similar page.
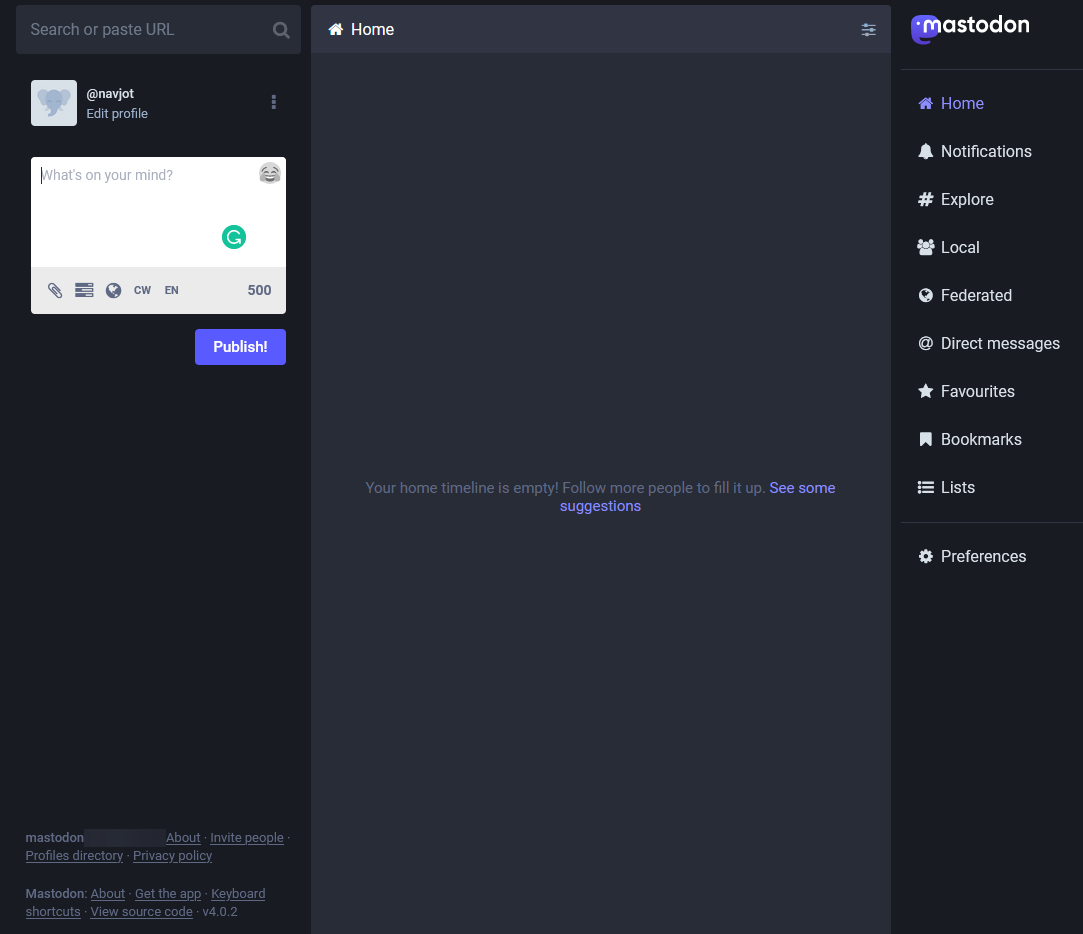
In the above screenshot, you can see there are 2 users and 1 of them (me) is set as an administrator. This is usually not the case. Even if you create an administrator account, it does not show on the main page on the first run. To do that, log in to your instance and you will be taken to the following page.
Click on the Preferences option from the right sidebar to access the settings. From there, click on the Administration option from the left menu to access Mastodon's administration panel.
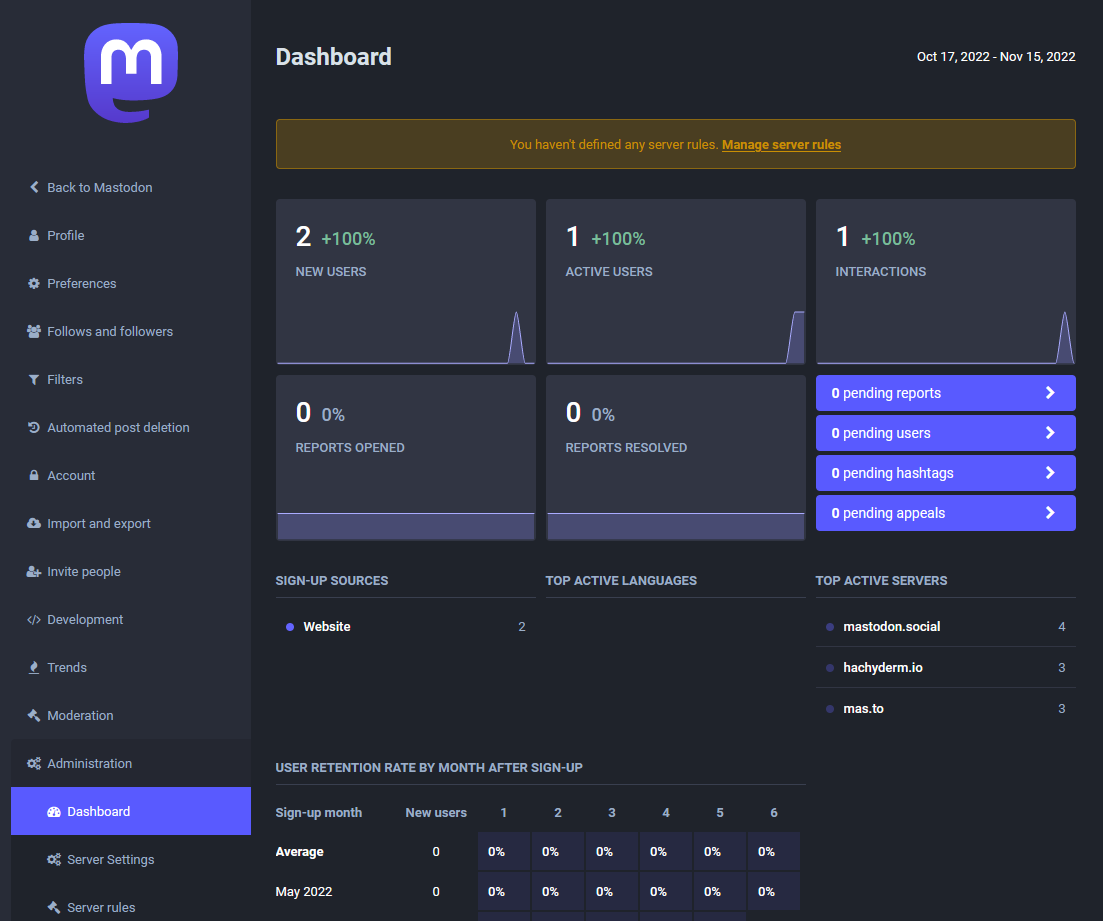
Click on the Site settings option from the left sidebar.

Here, fill in your contact username and business e-mail which will now be reflected on your server's homepage. Also fill in various other information including server description, logo, and server rules to customize your Mastodon instance.
Step 9 - Mastodon Maintenance
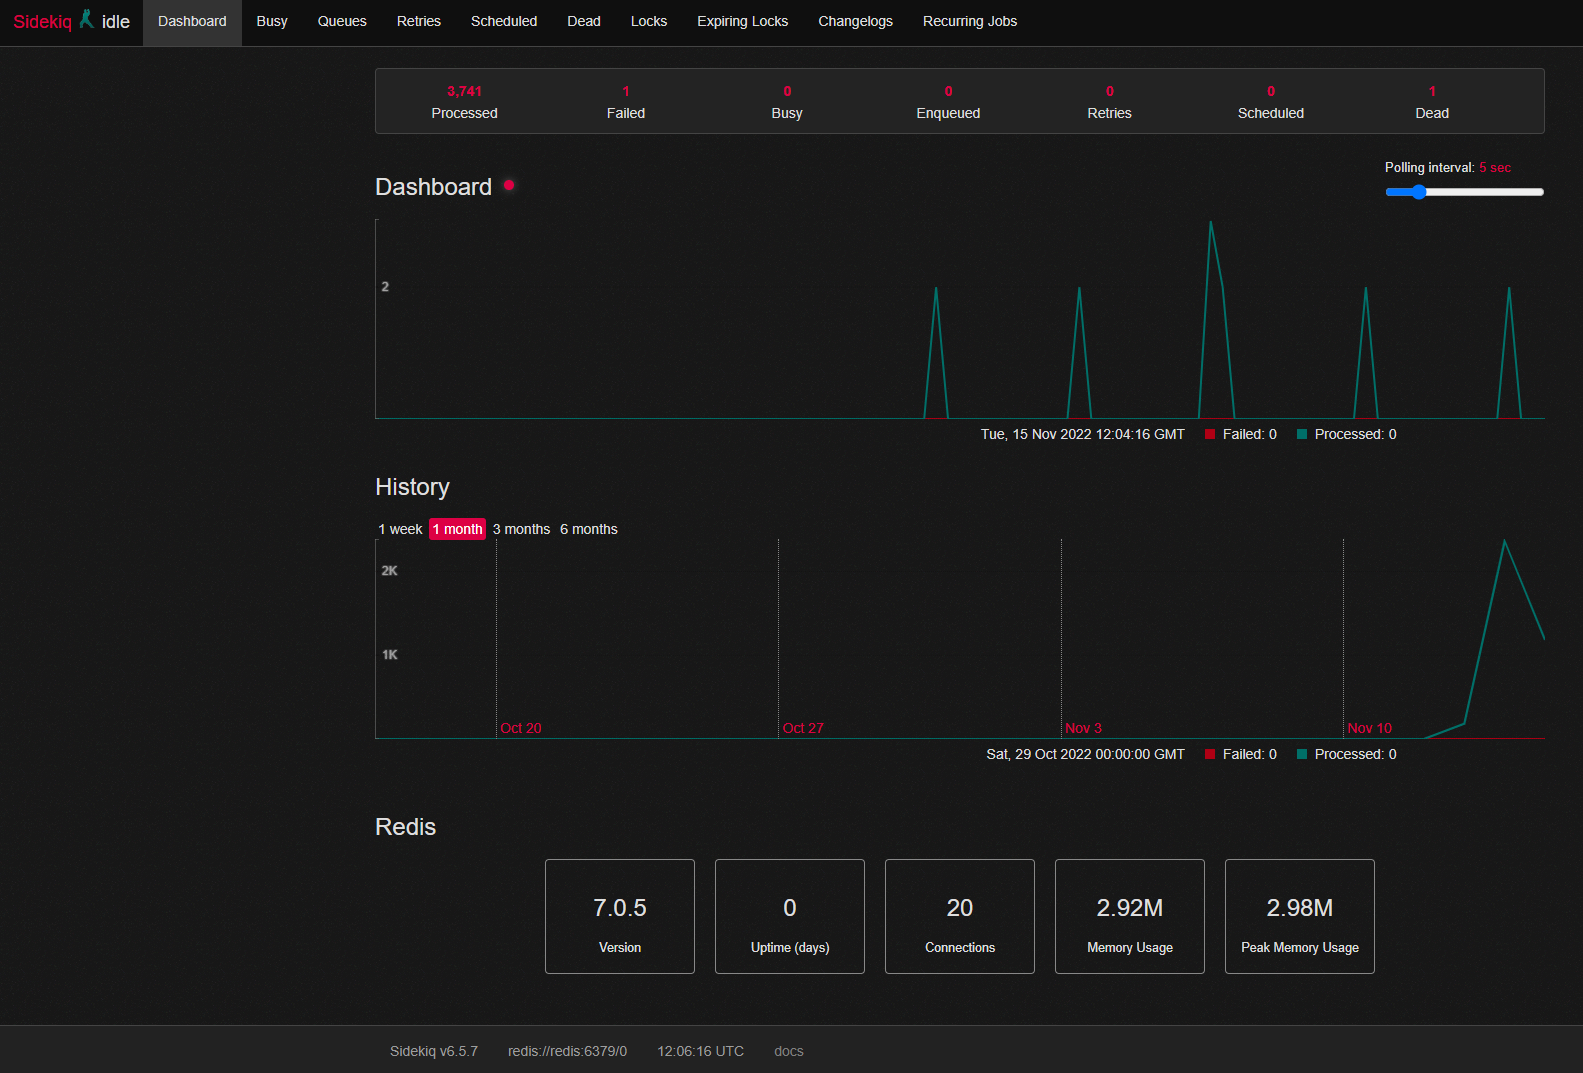
To view the performance and logs of your Mastodon instance, head over to https://mastodon.example.com/sidekiq/.
Here you can view a list of various processes and scheduled tasks related to your Mastodon instance. You can also check for failed tasks under the Dead or Retries section. It will also tell you the memory usage of your instance.
You can check the health of your instance's database from https://mastodon.example.com/pghero/.
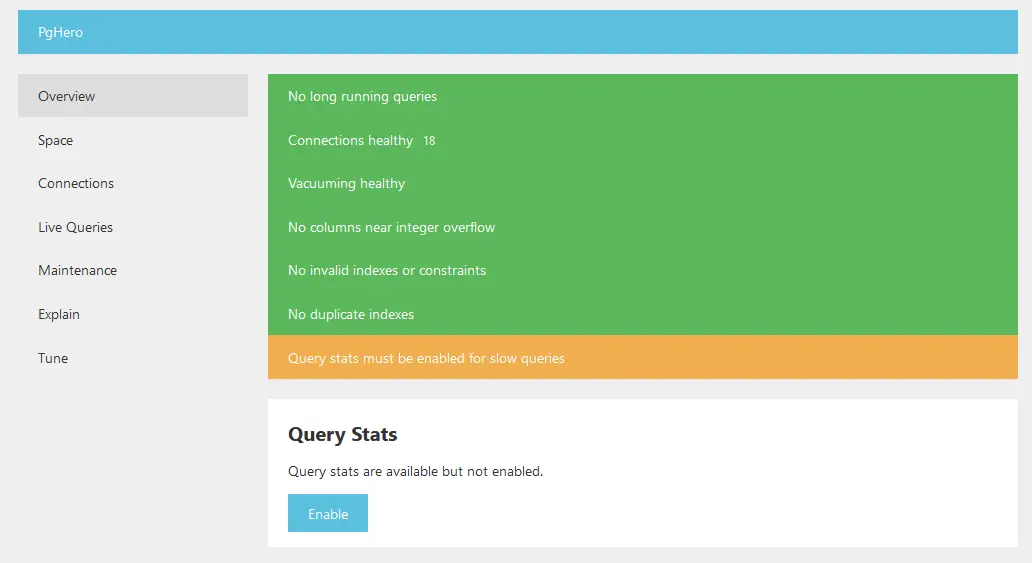
You can perform maintenance of your database, run SQL queries, and remove unused indices. To enable query statistics, click the Enable button on the above page and you will get the following information.
Switch to the root user.
$ sudo -i su
Switch to the /opt/mastodon/database/postgresql directory.
$ cd /opt/mastodon/database/postgresql
Open the postgresql.conf file.
$ nano postgresql.conf
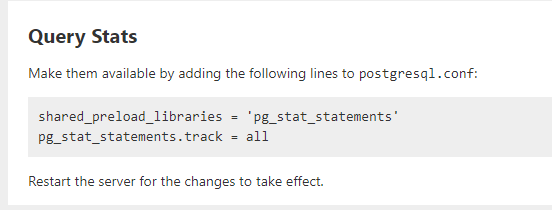
Find the line #shared_preload_libraries = '' # (change requires restart) and replace it with the following.
shared_preload_libraries = 'pg_stat_statements'
Add the following line at the end of the file.
pg_stat_statements.track = all
Save the file by pressing Ctrl + X and entering Y when prompted.
Restart the Mastodon containers.
$ systemctl restart mastodon.service
Exit the root shell.
$ exit
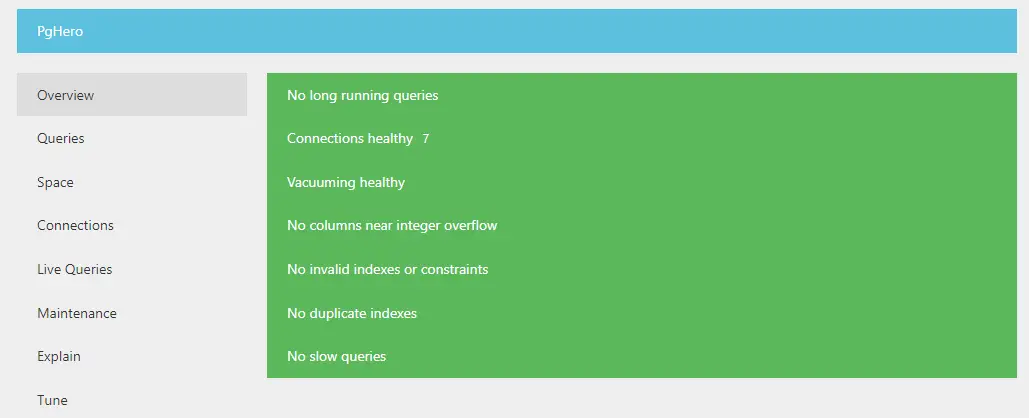
If you check the database health page, you can see if there are any slow queries now.
Note: You can also launch the PgHero and Sidekiq URLs from the Preferences menu.
If your site doesn't load for some reason, you can check logs generated by Docker.
$ docker logs <container-name>
Step 10 - Backup Mastodon
We will use a 3rd party tool called Restic for backing up Mastodon. The first step to back up using Restic is to add all the files and directories to the repository list.
Create and open the repository list file for editing.
$ sudo nano /opt/mastodon/backup-files
Paste the following lines in it.
/etc/nginx
/etc/letsencrypt
/etc/systemd/system
/root
/opt/mastodon/database/pgbackups
/opt/mastodon/*.env
/opt/mastodon/docker-compose.yml
/opt/mastodon/branding
/opt/mastodon/database/redis
/opt/mastodon/web/system
/opt/mastodon/backup-files
/opt/mastodon/mastodon-backup
Save the file by pressing Ctrl + X and entering Y when prompted.
Install Restic.
$ sudo dnf install restic
Create a backup repository and create the initial backup. We are backing up our data to S3 service.
$ restic -r s3:https://$SERVER:$PORT/mybucket init
$ restic -r s3:https://$SERVER:$PORT/mybucket backup $(cat /opt/mastodon/backup-files) --exclude  /opt/mastodon/database/postgresql
Create a Mastodon backup service timer and open it for editing.
$ sudo nano /etc/systemd/system/mastodon-backup.timer
Paste the following code in it.
[Unit]
Description=Schedule a mastodon backup every hour

[Timer]
Persistent=true
OnCalendar=*:00:00
Unit=mastodon-backup.service

[Install]
WantedBy=timers.target
Save the file by pressing Ctrl + X and entering Y when prompted.
Create a Mastodon backup service file and open it for editing.
$ sudo nano /etc/systemd/system/mastodon-backup.service
Paste the following code in it.
[Unit]
Description=Mastodon - backup service
# Without this, they can run at the same time and race to docker compose,
# double-creating networks and failing due to ambiguous network definition
# requiring `docker network prune` and restarting
After=mastodon.service

[Service]
Type=oneshot
StandardError=file:/var/log/mastodon-backup.err
StandardOutput=file:/var/log/mastodon-backup.log

WorkingDirectory=/opt/mastodon
ExecStart=/bin/bash /opt/mastodon/mastodon-backup

[Install]
WantedBy=multi-user.target
Save the file by pressing Ctrl + X and entering Y when prompted.
Next, create and open the /opt/mastodon/mastodon-backup file for editing. This contains the actual backup commands.
$ sudo nano /opt/mastodon/mastodon-backup
Paste the following code in it.
#!/bin/bash

set -e

AWS_ACCESS_KEY_ID=
AWS_SECRET_ACCESS_KEY=
SERVER=
PORT=
RESTIC_PASSWORD_FILE=/root/restic-pasword

docker compose -f /opt/mastodon/docker-compose.yml run --rm postgresql sh -c "pg_dump -Fp  mastodon | gzip > /backups/dump.sql.gz"
restic -r s3:https://$SERVER:$PORT/mybucket --cache-dir=/root backup $(cat /opt/mastodon/backup-files) --exclude  /opt/mastodon/database/postgresql
restic -r s3:https://$SERVER:$PORT/mybucket --cache-dir=/root forget --prune --keep-hourly 24 --keep-daily 7 --keep-monthly 3
Save the file by pressing Ctrl + X and entering Y when prompted.
Give executable permissions to the backup script.
$ sudo chmod +x /opt/mastodon/mastodon-backup
Reload the service daemon and start the backup service and timer.
$ sudo systemctl daemon-reload
$ sudo systemctl enable --now mastodon-backup.service
$ sudo systemctl enable --now mastodon-backup.timer
Confirm that hourly backups are happening and accessible using the following commands.
$ restic -r s3:https://$SERVER:$PORT/mybucket snapshots
$ restic -r s3:https://$SERVER:$PORT/mybucket mount /mnt
Step 11 - Upgrade Mastodon
Upgrading Mastodon requires several steps. First, switch to the directory.
$ cd /opt/mastodon
Pull the latest container images for Mastodon.
$ docker compose pull
Make any changes in the docker-compose.yml if you want.
Perform all the database migrations.
$ docker compose run --rm shell bundle exec rake db:migrate
Update your copies of static files.
$ docker compose run --rm shell bash -c "cp -r /opt/mastodon/public/* /static/"
Restart the Mastodon containers.
$ sudo systemctl restart mastodon.service
The above instructions are generic update instructions. Always check the GitHub releases page of Mastodon to look for any specific update tasks and commands between versions to ensure everything goes smoothly.
Conclusion
This concludes our tutorial on installing Mastodon Social Network using Docker on a Rocky Linux 9 server. If you have any questions, post them in the comments below.

