How to Install and Configure Neo4j Graph Database on Ubuntu 22.04
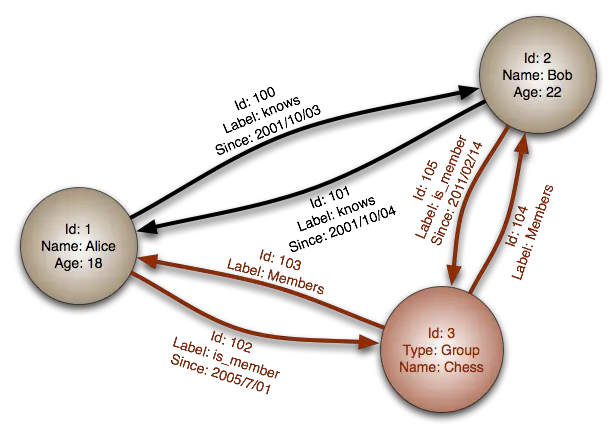
Neo4j is a graph database used to create data relationships. The data inside traditional databases are saved in a table-like structure. A graphical database records relationships between data nodes. Each node stores references to all the other nodes that it is connected to. Traditional databases do not save relationship data directly, but they can figure out connections by searching around data structures with the help of indexing which is expensive and time-consuming. A graphical database like Neo4j avoids all this overhead and can encode and query complex relationships.
Neo4j is developed by Neo Technology. It is written in Java and Scala and is available in both, a free community version, and an enterprise version. Neo4j uses its own query language called Cypher, but queries can be written in other styles.
This tutorial will teach you how to install and configure Neo4j on a Ubuntu 22.04 server.
Prerequisites
-
A server running Ubuntu 22.04 with a minimum of 1 CPU core and 2 GB of memory. You will need to upgrade the server as per requirements.
-
A non-root user with sudo privileges.
-
Make sure everything is updated.
-
$ sudo apt update
-
Install basic utility packages. Some of them may already be installed.
$ sudo apt install wget curl nano software-properties-common dirmngr apt-transport-https gnupg gnupg2 ca-certificates lsb-release ubuntu-keyring unzip -y
Step 1 - Install Neo4j
The first step to installing Neo4j is adding the GPG key.
$ curl -fsSL https://debian.neo4j.com/neotechnology.gpg.key | sudo gpg --dearmor -o /usr/share/keyrings/neo4j.gpg
Add the Neo4j repository to your system APT's sources directory.
$ echo "deb [signed-by=/usr/share/keyrings/neo4j.gpg] https://debian.neo4j.com stable latest" | sudo tee -a /etc/apt/sources.list.d/neo4j.list
To avoid the risk of upgrading to the next major version, you can specify the major and minor versions required in place of latest in the above command.
The following command will add Neo4j 5.x repository, which means you won't end up upgrading to the 6.x version whenever it releases.
$ echo "deb [signed-by=/usr/share/keyrings/neo4j.gpg] https://debian.neo4j.com stable 5" | sudo tee -a /etc/apt/sources.list.d/neo4j.list
Update the system repositories list.
$ sudo apt update
List the Neo4j versions available for installation.
$ apt list -a neo4j
Listing... Done
neo4j/stable 1:5.3.0 all
neo4j/stable 1:5.2.0 all
neo4j/stable 1:5.1.0 all
Install Neo4j Community edition.
$ sudo apt install neo4j
You can install a specific version using the following command.
$ sudo apt install neo4j=1:5.3.0
Note that the version includes an epoch version component (1:), in accordance with the Debian policy on versioning.
Neo4j will automatically install the required JDK version with it.
Enable the Neo4j service.
$ sudo systemctl enable neo4j
Start the Neo4j service.
$ sudo systemctl start neo4j
Check the status of the Neo4j service.
$ sudo systemctl status neo4j
? neo4j.service - Neo4j Graph Database
     Loaded: loaded (/lib/systemd/system/neo4j.service; enabled; vendor preset: enabled)
     Active: active (running) since Sat 2023-01-21 20:50:52 UTC; 33s ago
   Main PID: 5241 (java)
      Tasks: 72 (limit: 1030)
     Memory: 399.3M
        CPU: 20.350s
     CGroup: /system.slice/neo4j.service
Step 2 - Test Connection
Neo4j uses the Cypher Shell for working with data.
Connect to the Cypher Shell.
$ cypher-shell
You will be prompted for a username and a password. The default username and password is neo4j. You will be asked to choose a new password.
username: neo4j
password:
Password change required
new password:
confirm password:
Connected to Neo4j using Bolt protocol version 5.0 at neo4j://localhost:7687 as user neo4j.
Type :help for a list of available commands or :exit to exit the shell.
Note that Cypher queries must end with a semicolon.
neo4j@neo4j>
This confirms the successful connection to Neo4j DBMS.
Type :exit to exit the shell.
neo4j@neo4j> :exit

Bye!
Step 3 - Configure Neo4j for Remote Access
For production environments, you may need to confirm Neo4j to accept connections from remote hosts. By default, Neo4j accepts connections from localhost only.
We can configure Neo4j to accept connections from remote hosts by editing its configuration file. Neo4j stores its settings in the /etc/neo4j/neo4j.conf file. Open it for editing.
$ sudo nano /etc/neo4j/neo4j.conf
Find the commented out line #dbms.default_listen_address=0.0.0.0 and uncomment it by removing the leading hash.
. . .
#*****************************************************************
# Network connector configuration
#*****************************************************************

# With default configuration Neo4j only accepts local connections.
# To accept non-local connections, uncomment this line:
server.default_listen_address=0.0.0.0
. . .
Save the file by pressing Ctrl + X and entering Y when prompted.
By default, the value 0.0.0.0 will bind Neo4j to all available IPv4 interfaces on your system, including localhost. If you would like to limit Neo4j to a particular IP address, for example, a private network IP, specify the IP address that is assigned to your server’s private network interface here.
You can also configure Neo4j to use IPv6 interfaces. As with IPv4, you can set the default_listen_address value to a specific IPv6 address that you will use to communicate with Neo4j. If you want to limit Neo4j to only use the local IPv6 address for your server, specify ::1, which corresponds to localhost using IPv6 notation.
If you configure Neo4j with an IPv6 address, you will not be able to connect with cypher-shell using the IPv6 address directly. Instead, you need to either configure a DNS name that resolves to the IPv6 address, or add an entry in the remote system’s /etc/hosts file that maps the address to a name. Then you will be able to use the DNS or hosts file name to connect to Neo4j using IPv6 from your remote system.
For example, a Neo4j server with an IPv6 address like 2001:db8::1 would require the remote connecting system to have an /etc/hosts entry as shown below.
2001:db8::1 your_hostname
You can then connect to the server from the remote system using the name that you specified as shown below.
$ cypher-shell -a 'neo4j://your_hostname:7687'
If you restrict Neo4j to use the IPv6 localhost address of ::1, then you can connect to it locally on the Neo4j server itself using the preconfigured ip6-localhost name from your /etc/hosts file shown below.
$ cypher-shell -a 'neo4j://ip6-localhost:7687'
Once you invoke cypher-shell with the connection URI, you will be prompted for your username and password as usual.
Step 4 - Configure Firewall Access (UFW)
Once you have enabled remote connections, you can use the firewall to restrict Neo4j to limit connections from only trusted systems to which it can connect.
Neo4j creates two network sockets, one on port 7474 for the built-in HTTP interface, and the main bolt protocol on port 7687.
Ubuntu 22.04 uses Uncomplicated Firewall(UFW) by default.
Configure the firewall to allow a trusted remote host access to the bolt interface using IPv4 using the following command.
$ sudo ufw allow from 203.0.113.1 to any port 7687 proto tcp
Substitute the IP address of the trusted remote system in place of the 203.0.113.1 value. Similarly, you can allow an entire network range using the following command.
$ sudo ufw allow from 192.0.2.0/24 to any port 7687 proto tcp
Substitute the actual network in place of the 192.0.2.0/24 value.
To allow access to a remote host using IPv6, you can use the following command.
$ sudo ufw allow from 2001:DB8::1/128 to any port 7687 proto tcp
Substitute your trusted system's IPv6 address in place of the 2001:DB8::1/128 value.
As with IPv4, you can allow a range of IPv6 addresses using the following command.
$ ufw allow from 192.0.2.0/24 to any port 7687 proto tcp
Again, substitute your trusted network range in place of the highlighted 2001:DB8::/32 network range.
Reload the firewall to apply the changes.
$ sudo ufw reload
Check the status of the firewall.
$ sudo ufw status
Status: active

To                         Action      From
--                         ------      ----
22/tcp                     ALLOW       Anywhere
22/tcp (v6)                ALLOW       Anywhere (v6)
7687/tcp                   ALLOW       203.0.113.1
Step 5 - Use Neo4j
Connect to Neo4j using cypher-shell tool. You will be prompted for your username and password.
$ cypher-shell
If you configured Neo4j for remote access, then use the following command to connect to Neo4j from the remote system.
$ cypher-shell -a 'neo4j://203.0.113.1:7687'
Here 203.0.113.1 is the IP address of the Neo4j server.
If you are using IPv6, ensure that you have an /etc/hosts entry with a name described in step 3. Then connect to the Neo4j server as follows.
$ cypher-shell -a 'neo4j://your_hostname:7687'
Ensure that your_hostname maps to your Neo4j server's IPv6 address in the remote system's /etc/hosts file.
Let us add a node called Slite and the names of authors to Neo4j. The following command will create a node of type Slite, with a name Navjot Singh.
neo4j@neo4j> CREATE (:Slite {name: 'Navjot Singh'});
You will get the following output.
0 rows
ready to start consuming query after 124 ms, results consumed after another 0 ms
Added 1 nodes, Set 1 properties, Added 1 labels
Next, we will add more employees, and relate them using a relationship called COLLEAGUE. You can link nodes with arbitrarily named relationships.
Add three more employees and link them using the COLLEAGUE relationship.
neo4j@neo4j> CREATE
             (:Slite {name: 'Sammy'})-[:COLLEAGUE]->
             (:Slite {name: 'Peter Jack'})-[:COLLEAGUE]->
             (:Slite {name: 'Chris Rock'});
You will get a similar output.
0 rows
ready to start consuming query after 72 ms, results consumed after another 0 ms
Added 3 nodes, Created 2 relationships, Set 3 properties, Added 3 labels
Now, let us create some relationships.
Since Peter and Chris work in the same department and have the same properties as nodes, we will create a relationship with the name column.
neo4j@neo4j> MATCH (a:Slite),(b:Slite)
             WHERE a.name = 'Peter Jack' AND b.name = 'Chris Rock'
             CREATE (a)-[r:DEPARTMENT { name: 'Designers' }]->(b)
             RETURN type(r), r.name;
+----------------------------+
| type(r)      | r.name      |
+----------------------------+
| "DEPARTMENT" | "Designers" |
+----------------------------+

1 row
ready to start consuming query after 60 ms, results consumed after another 17 ms
Created 1 relationships, Set 1 properties
Now, let us create another connection between Sammy and Peter since they are working on the same project.
neo4j@neo4j> MATCH (a:Slite), (b:Slite)
             WHERE a.name = 'Peter Jack' AND b.name = 'Sammy'                                                                        CREATE (a)-[r:PROJECT { name: 'Test Project 1' }]->(b)                                                                  RETURN type(r), r.name;
+------------------------------+
| type(r)   | r.name           |
+------------------------------+
| "PROJECT" | "Test Project 1" |
+------------------------------+

1 row
ready to start consuming query after 132 ms, results consumed after another 12 ms
Created 1 relationships, Set 1 properties
Let us display all this data using the following query.
neo4j@neo4j> MATCH (a)-[r]->(b)
             RETURN a.name,r,b.name
             ORDER BY r;
+-------------------------------------------------------------------+
| a.name       | r                                   | b.name       |
+-------------------------------------------------------------------+
| "Sammy"      | [:COLLEAGUE]                        | "Peter Jack" |
| "Peter Jack" | [:COLLEAGUE]                        | "Chris Rock" |
| "Peter Jack" | [:DEPARTMENT {name: "Designers"}]   | "Chris Rock" |
| "Peter Jack" | [:PROJECT {name: "Test Project 1"}] | "Sammy"      |
+-------------------------------------------------------------------+

4 rows
ready to start consuming query after 99 ms, results consumed after another 5 ms
Conclusion
This concludes our tutorial on installing and configuring Neo4j on a Ubuntu 22.04 server. If you have any questions, post them in the comments below.

