How to Install OpenSearch on Debian 11
This tutorial exists for these OS versions
- Debian 12 (Bookworm)
- Debian 11 (Bullseye)
On this page
- Prerequistes
- Setup System
- Downloading OpenSearch
- Configuring OpenSearch
- Generating TLS Certificates
- Adding TLS Certificates to OpenSearch
- Creating User on OpenSearch
- Running OpenSearch as a Systemd Service
- Installing OpenSearch Dashboards
- Running OpenSearch Dashboards as Systemd Service
- Accessing OpenSearch Dashboards
- Conclusion
OpenSearch is a community-driven project by Amazon and a fork of Elasticsearch and Kibana. it's a fully open-source search engine and analytics suite with rich features and innovative functionality. The OpenSearch project's main component is OpenSearch (a fork of Elasticsearch) and the OpenSearch Dashboards (a fork of Kibana). Both components provide features such as enterprise security, alerting, machine learning, SQL, index state management, and more.
OpenSearch is 100% open-source and licensed under Apache 2.0-licensed. It enables you to easily ingest, secure, search, aggregate, view, and analyze data for a number of use cases such as log analytics, application search, enterprise search, and more.
In this tutorial, you'll deploy OpenSearch - an open-source search, analytics, and visualization suite - to the Debian 11 server. This process includes downloading the OpenSearch package and installing it manually on your Debian system. You'll also set up secure SSL/TLS certificates for OpenSearch and secure the deployment with authentication and authorization.
In addition to that, you'll also deploy and install the OpenSearch Dashboards - an open-source visualization tool - and configure it with OpenSearch. In the end, you'll have data analytics and visualization suite installed on your Debian server and you need to send your data via tools such as fluentd, Logstash, filebeat, and many more.
Prerequistes
To complete this guide, you must have the following requirements:
- A server with Debian 11 installation and at least 8GB of RAM. This example uses a Debian system with hostname 'node1' and local IP address '192.168.5.50'.
- A non-root user with sudo/root administrator privileges.
If these requirements are ready, you can start the OpenSearch installation now.
Setup System
In the first step, you'll set up and optimize your Debian server for OpenSearch deployment. You'll set up the system hostname and fqdn, disable memory paging and swap, then you'll increase the max memory maps number.
Disabling the memory paging and swapping on the OpenSearch host will improve performance. For the max memory maps, you'll need to set up a number of at least '262144' for production.
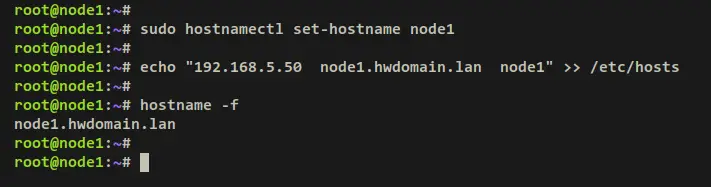
Run the below 'hostnamectl' command to set up the system hostname. Then, add the fqdn configuration to the '/etc/hosts' file. In this example, the hostname should be 'node1' with fqdn 'node1.hwdomain.lan'.
sudo hostnamectl set-hostname node1
echo "192.168.5.50  node1.hwdomain.lan  node1" >> /etc/hosts
Now verify the fqdn of your server via the below hostname command. In the example, the fqdn of the server should be 'node1.hwdomain.lan'.
hostname -f
Output:
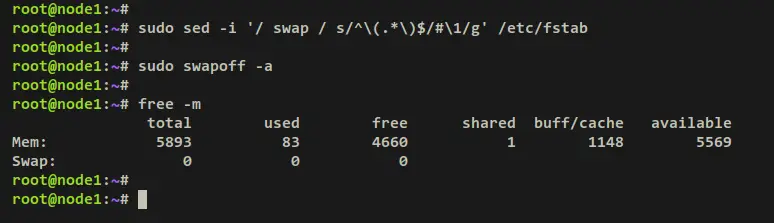
Next, you will need to disable the swap on your system. Whether you're using swap via partition or file, the swap configuration is stored at the '/etc/fstab' file.
Run the below command to disable the swap on your system. The 'sed' command here will disable swap permanently via the '/etc/fstab' file by adding commend '#' to the beginning of line swap settings. The 'swapoff' command will disable swap in the current session.
sudo sed -i '/ swap / s/^\(.*\)$/#\1/g' /etc/fstab
sudo swapoff -a
Verify the swap status via the below command. If disabled, you should get an output '0' in the swap section.
free -m
Output:
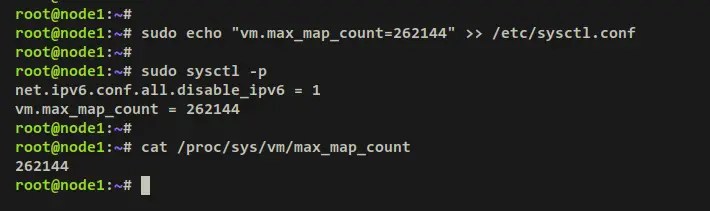
Lastly, you'll add the configuration to the '/etc/sysctl.conf' file to increase the max memory maps on your system.
Run the below command to add the parameter 'vm.max_map_count=262144' to the '/etc/sysctl.conf' file. Then, apply the changes via the 'sysctl -p' command.
sudo echo "vm.max_map_count=262144" >> /etc/sysctl.conf
sudo sysctl -p
Verify the max memory maps by running the below command. If successful, your max memory map should be '262144'.
cat /proc/sys/vm/max_map_count
Output:
With your system configured and optimized, you're ready to install OpenSearch on top of it.
Downloading OpenSearch
OpenSearch can be installed in many ways. In this example, you'll install OpenSearch via Tarball. In this step, you'll create a new dedicated system user 'opensearch', download the OpenSearch tarball package, then set up the OpenSearch installation directory with correct permissions and ownership.
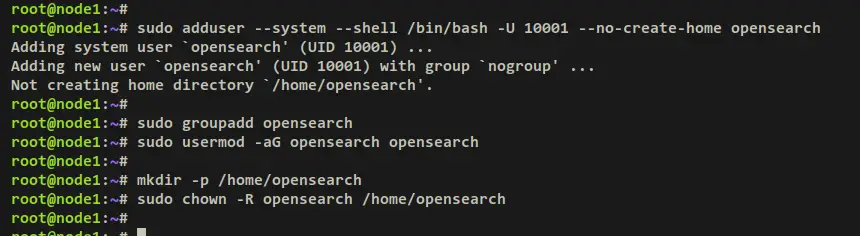
First, add the new system user 'opensearch' using the below command.
sudo adduser --system --shell /bin/bash -U 10001 --no-create-home opensearch
Add a new group 'opensearch' using the groupadd command below. Then, add your system user 'opensearch' to the group 'opensearch' via the usermod command.
sudo groupadd opensearch
sudo usermod -aG opensearch opensearch
Now create a new home directory '/home/opensearch' and change the ownership of the home directory '/home/opensearch' to the 'opensearch' user.
mkdir -p /home/opensearch
sudo chown -R opensearch /home/opensearch
Output:
Next, download the OpenSource package via the wget command. Once the download is finished, extract the file via the tar command below. In this example, you'll install OpenSearch 2.4.1. Check the latest version of OpenSearch on the official download page.
wget https://artifacts.opensearch.org/releases/bundle/opensearch/2.4.1/opensearch-2.4.1-linux-x64.tar.gz
tar xf opensearch-2.4.1-linux-x64.tar.gz
After the OpenSearch package is extracted, move the extracted directory to '/opt/opensearch'. This will be the main installation directory for OpenSearch. Then, run the chown command to change the ownership of the directory '/opt/opesearch' to the user 'opensearch'.
mv opensearch-2.4.1 /opt/opensearch
sudo chown -R opensearch /opt/opensearch
Output:

Now that you've downloaded the OpenSearch package, configured the target installation directory to '/opt/opensearch'. Next, you'll set up and configure your OpenSearch installation.
Configuring OpenSearch
In this step, you'll set up OpenSearch to run on a specific IP address, run on single-node, enable OpenSearch security plugins, and set up max heap memory for the OpenSearch process. All of this can be done by editing the OpenSearch config file '/opt/opensearch/config/opensearch.yml' and the OpenSearch JVM options file 'config/jvm.options'.
Move the working directory to '/opt/opensearch' via the cd command.
cd /opt/opensearch
Open the OpenSearch config file 'config/opensearch.yml' using the below nano editor command.
sudo nano config/opensearch.yml
Add the following lines to the file.
# Bind OpenSearch to interface or IP address
network.host: 192.168.5.50

# OpenSearch deployment type
discovery.type: single-node

# Re-enable security plugins
plugins.security.disabled: false
Save and exit the file 'config/opensearch.yml' when finished.
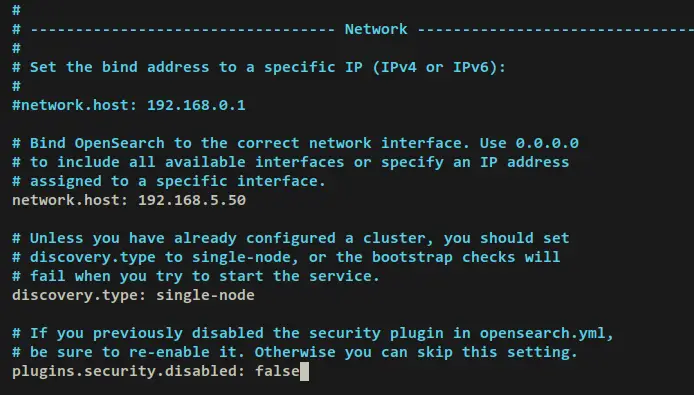
Details parameters:
- The 'network.host' parameter is used to bind OpenSearch to a specific IP address. In this example, the OpenSearch will be running on the internal IP address '192.168.5.50'.
- The parameter 'discovery.type: single-node' is used when you want to deploy OpenSearch in a single node.
- The parameter 'plugins.security.disabled' is set to 'false', which means the security plugin for OpenSearch will be enabled.
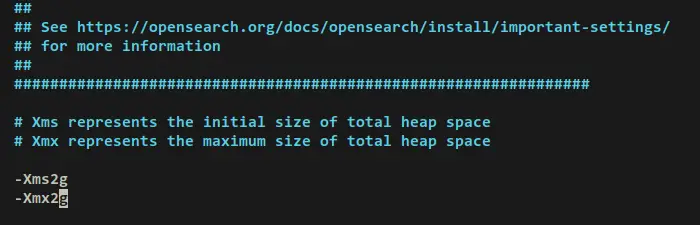
Next, open the file 'config/jvm.options' using the below nano editor command.
sudo nano config/jvm.options
Adjust the max heap memory for the OpenSearch process. This setting is depending on your server's available memory or RAM. This example will allocate 2GB of memory for OpenSearch.
-Xms2g
-Xmx2g
Save and exit the file 'config/jvm.options' when finished.
Lastly, run the below command to set up an environment variable 'OPENSEARCH_JAVA_HOME' on your current session. The OpenSearch package included the required java and JDK packages which are available in the '/opt/opensearch/jdk' directory.
export OPENSEARCH_JAVA_HOME=/opt/opensearch/jdk
echo $OPENSEARCH_JAVA_HOME
With the basic OpenSearch configurations finished. next, you'll generate TLS certificates and secure OpenSearch deployment.
Generating TLS Certificates
In this step, you'll be generating multiple certificates that will be used to secure OpenSearch deployment. You'll secure node-to-node communications with TLS certificates and secure REST-layer traffics between client-server communications via TLS.
Below is the list of certificates that will be generated:
- Root CA certificates: These certificates will be used to sign other certificates.
- Admin certificates: These certificates will be used to get administrative rights to perform all tasks related security plugin.
- Node and Client Certificates: These certificates will be used by nodes and clients within the OpenSearch cluster.
Before you get started, run the below command to create a new directory '/opt/opensearch/config/certs', and move your working directory into it. This directory will be used to store TLS certificates.
mkdir -p /opt/opensearch/config/certs; cd /opt/opensearch/config/certs
Generating Root CA Certificates
Generate a private key for the root CA certificates using the below.
openssl genrsa -out root-ca-key.pem 2048
Now generate a self-signed root CA certificate via the below command. You can also change values within the '-subj' parameter with your information.
openssl req -new -x509 -sha256 -key root-ca-key.pem -subj "/C=CA/ST=ONTARIO/L=TORONTO/O=ORG/OU=UNIT/CN=ROOT" -out root-ca.pem -days 730
With this, you should get the root CA private key 'root-ca-key.pem' and the root CA certificate 'root-ca.pem'.
Output:

Generating Admin Certificates
Generate the new admin certificate private key 'admin-key-temp.pem' using the below command.
openssl genrsa -out admin-key-temp.pem 2048
Convert the default admin private key to PKCS#8 format. For the Java application, you need to convert the default private key to PKCS#12-compatible algorithm (3DES). With this, your admin private key should be 'admin-key.pem'.
openssl pkcs8 -inform PEM -outform PEM -in admin-key-temp.pem -topk8 -nocrypt -v1 PBE-SHA1-3DES -out admin-key.pem
Next, run the below command to generate the admin CSR (Certificate Signing Request) from the 'admin-key.pem' private key. Your generated CSR should now be 'admin.csr' file.
Because this certificate is used for authenticating elevated access and is not tied to any hosts, you can use anything in the 'CN' configuration.
openssl req -new -key admin-key.pem -subj "/C=CA/ST=ONTARIO/L=TORONTO/O=ORG/OU=UNIT/CN=A" -out admin.csr
Lastly, run the below command to sign the admin CSR with the root CA certificate and private key. The output of the admin certificate is the 'admin.pem' file.
openssl x509 -req -in admin.csr -CA root-ca.pem -CAkey root-ca-key.pem -CAcreateserial -sha256 -out admin.pem -days 730
Your admin certificate should now be 'admin.pem' file which is signed with root CA certificates. And the admin private key is 'admin-key.pem', which is converted to PKCS#8 format.
Output:

Generating Node Certificates
The process of generating node certificates is similar to admin certificates. But, you can specify the CN value with the hostname or IP address of your node.
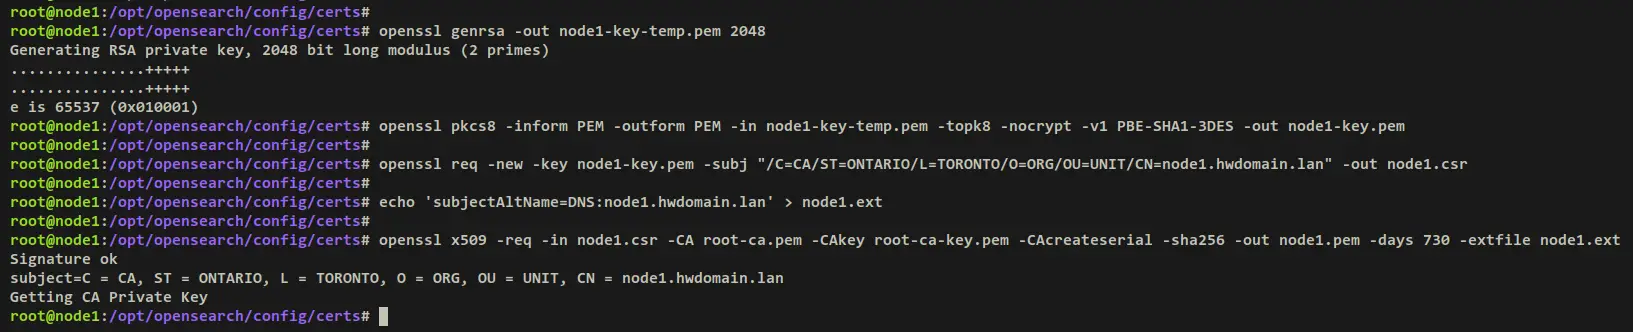
Generate the node private key using the below command.
openssl genrsa -out node1-key-temp.pem 2048
Convert the node private key to PKCS#8 format. Your node private key should now be 'node1-key.pem'.
openssl pkcs8 -inform PEM -outform PEM -in node1-key-temp.pem -topk8 -nocrypt -v1 PBE-SHA1-3DES -out node1-key.pem
Next, create a new CSR for the node certificate. Be sure to change the 'CN' value with the hostname of your node. This certificate is tied to hosts, and you must specify the CN value with the hostname or IP address of your OpenSearch node.
openssl req -new -key node1-key.pem -subj "/C=CA/ST=ONTARIO/L=TORONTO/O=ORG/OU=UNIT/CN=node1.hwdomain.lan" -out node1.csr
Before signing the node certificate, run the below command to create a SAN extension file 'node1.ext'. This will contain the node hostname or FQDN or IP address
echo 'subjectAltName=DNS:node1.hwdomain.lan' > node1.ext
Lastly, sign the node certificate CSR file with root CA certificate and private using the below command.
openssl x509 -req -in node1.csr -CA root-ca.pem -CAkey root-ca-key.pem -CAcreateserial -sha256 -out node1.pem -days 730 -extfile node1.ext
With this, your node certificate is a 'node1.pem' file and the private key is 'node1-key.pem'.
Output:
Setting up Certificates
Run the below command to remove the temporary certificate, CSR, and SAN extension file.
rm *temp.pem *csr *ext
ls

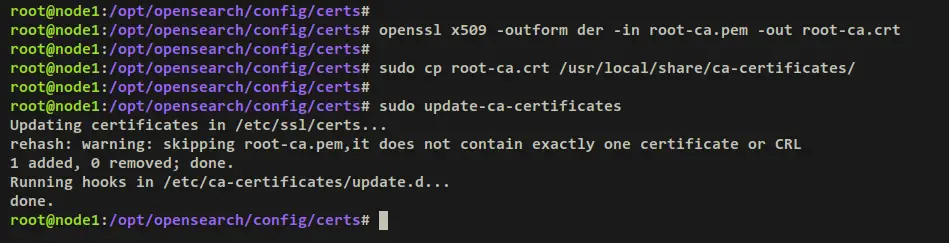
Convert the root CA certificate to .crt format.
openssl x509 -outform der -in root-ca.pem -out root-ca.crt
Add the root CA certificate to your Debian system using the below command. Copy the root-ca.crt file to the '/usr/local/share/ca-certificates/' directory and load the new root CA certificate to your system.
sudo cp root-ca.crt /usr/local/share/ca-certificates/
sudo update-ca-certificates
The output '1 added' confirms that the new root CA certificates are added to your system.
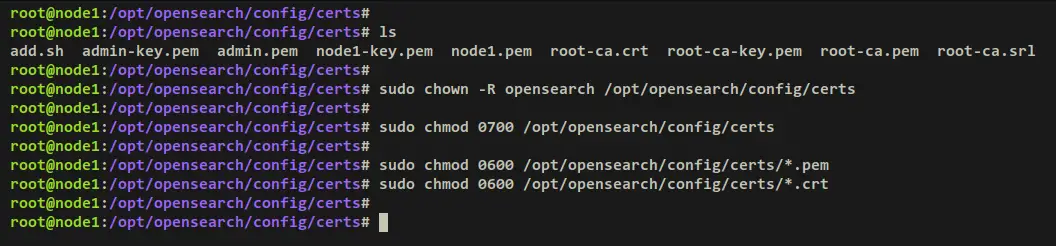
Lastly, run the below command to set up the proper permission and ownership of your certificates. The ownership of the directory '/opt/opensearch/config/certs' should be the user 'opensearch' with permission 0700. And for all certificate files, the permission should be 0600.
sudo chown -R opensearch /opt/opensearch/config/certs
sudo chmod 0700 /opt/opensearch/config/certs
sudo chmod 0600 /opt/opensearch/config/certs/*.pem
sudo chmod 0600 /opt/opensearch/config/certs/*.crt
Adding TLS Certificates to OpenSearch
With TLS certificates generated, the root CA, admin certificates, and node certificates are. You'll next add certificates to the OpenSearch config file '/opt/opensearch/config/opensearch.yml'. In this example, you'll create a new bash script that will add certificates and TLS security plugin settings to OpenSearch.
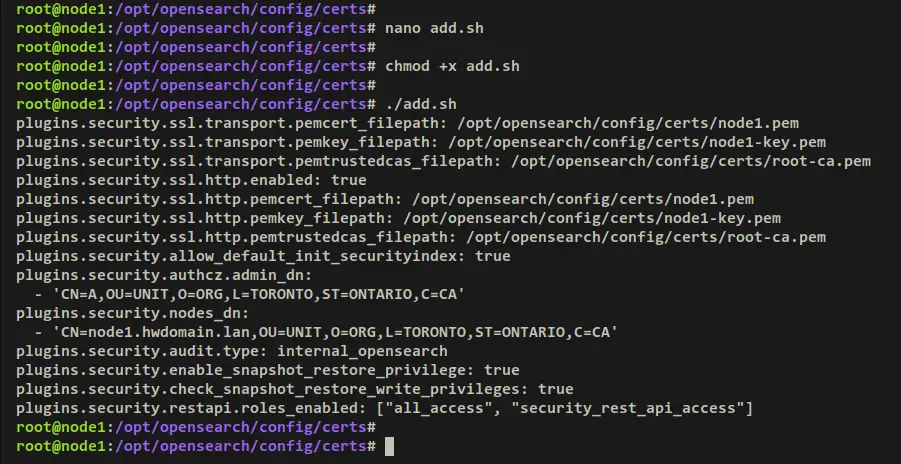
Create a new file 'add.sh' using the below nano editor command.
nano add.sh
Add the following lines to the file. Be sure to change and use the correct path of your certificate files and the target OpenSearch configuration file.
#! /bin/bash

# Before running this script, make sure to replace the /path/to your OpenSearch directory,
# and remember to replace the CN in the node's distinguished name with a real
# DNS A record.

echo "plugins.security.ssl.transport.pemcert_filepath: /opt/opensearch/config/certs/node1.pem" | sudo tee -a /opt/opensearch/config/opensearch.yml
echo "plugins.security.ssl.transport.pemkey_filepath: /opt/opensearch/config/certs/node1-key.pem" | sudo tee -a /opt/opensearch/config/opensearch.yml
echo "plugins.security.ssl.transport.pemtrustedcas_filepath: /opt/opensearch/config/certs/root-ca.pem" | sudo tee -a /opt/opensearch/config/opensearch.yml
echo "plugins.security.ssl.http.enabled: true" | sudo tee -a /opt/opensearch/config/opensearch.yml
echo "plugins.security.ssl.http.pemcert_filepath: /opt/opensearch/config/certs/node1.pem" | sudo tee -a /opt/opensearch/config/opensearch.yml
echo "plugins.security.ssl.http.pemkey_filepath: /opt/opensearch/config/certs/node1-key.pem" | sudo tee -a /opt/opensearch/config/opensearch.yml
echo "plugins.security.ssl.http.pemtrustedcas_filepath: /opt/opensearch/config/certs/root-ca.pem" | sudo tee -a /opt/opensearch/config/opensearch.yml
echo "plugins.security.allow_default_init_securityindex: true" | sudo tee -a /opt/opensearch/config/opensearch.yml
echo "plugins.security.authcz.admin_dn:" | sudo tee -a /opt/opensearch/config/opensearch.yml
echo "  - 'CN=A,OU=UNIT,O=ORG,L=TORONTO,ST=ONTARIO,C=CA'" | sudo tee -a /opt/opensearch/config/opensearch.yml
echo "plugins.security.nodes_dn:" | sudo tee -a /opt/opensearch/config/opensearch.yml
echo "  - 'CN=node1.dns.a-record,OU=UNIT,O=ORG,L=TORONTO,ST=ONTARIO,C=CA'" | sudo tee -a /opt/opensearch/config/opensearch.yml
echo "plugins.security.audit.type: internal_opensearch" | sudo tee -a /opt/opensearch/config/opensearch.yml
echo "plugins.security.enable_snapshot_restore_privilege: true" | sudo tee -a /opt/opensearch/config/opensearch.yml
echo "plugins.security.check_snapshot_restore_write_privileges: true" | sudo tee -a /opt/opensearch/config/opensearch.yml
echo "plugins.security.restapi.roles_enabled: [\"all_access\", \"security_rest_api_access\"]" | sudo tee -a /opt/opensearch/config/opensearch.yml
Save and exit the file when finished.
Next, make the file 'add.sh' executable and execute it. The new TLS security plugin for OpenSearch should be added to the OpenSearch config file '/opt/opensearch/config/opensearch.yml'.
chmod +x add.sh
./add.sh
Output:
If you check the OpenSearch config file '/opt/opensearch/config/opensearch.yml', you should see the new settings like this at the bottom of the configuration file.
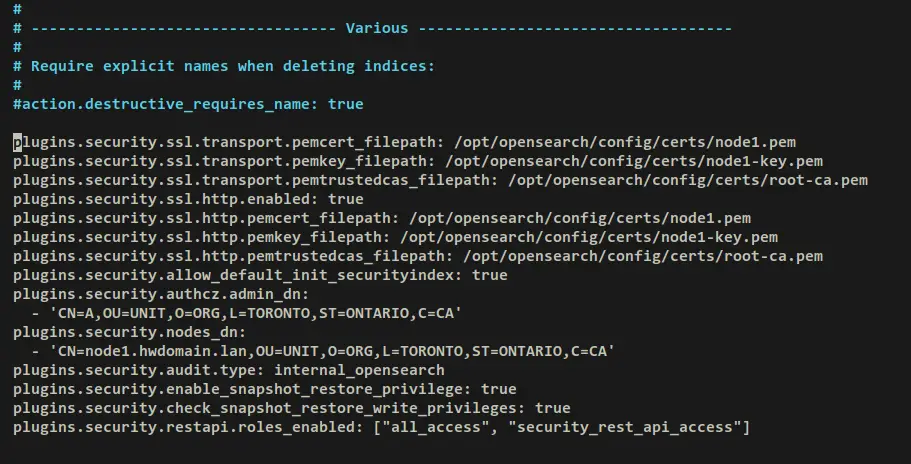
At this point, you have now added TLS certificates to OpenSearch and enabled the security plugins. In the next step, you'll secure OpenSearch with authentication and authorization by creating a new user on OpenSearch.
Creating User on OpenSearch
Before you start, run the below command to set up the environment variable for 'OPENSEARCH_JAVA_HOME' and make OpenSearch security tools executable.
export OPENSEARCH_JAVA_HOME=/opt/opensearch/jdk
chmod 755 /opt/opensearch/plugins/opensearch-security/tools/*.sh
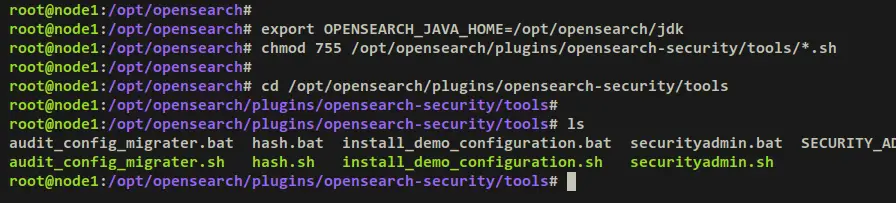
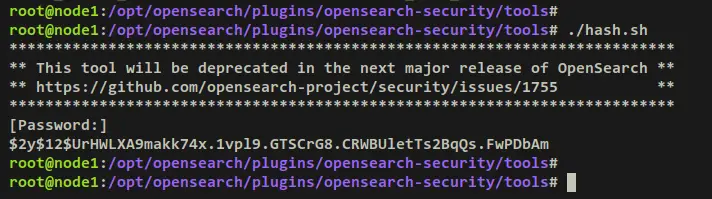
Move your working directory to '/opt/opensearch/plugins/opensearch-security/tools' and execute the script 'hash.sh' to generate a hashed password for OpenSearch.
cd /opt/opensearch/plugins/opensearch-security/tools
./hash.sh
Input your password and copy the generated hash password.
Output:
Now rerun the 'hash.sh' script to generate another hash password that will be used for OpenSearch Dashboards. Input the new password and copy the generated hash password.
./hash.sh
After generating the password hash, you will set up an OpenSearch user via the config file 'internal_users.yml'.
Move your working directory to '/opt/opensearch/config/opensearch-security/' and open the file 'internal_users.yml' using the below nano editor command.
cd /opt/opensearch/config/opensearch-security/
sudo nano internal_users.yml
Remove default user settings and replace them with the following lines. Be sure to change the hash password with your generated password. With this, you'll create two OpenSearch users, the 'admin' user and the 'kibanaserver' user that will be used by OpenSearch Dashboards.
...
...
admin:
   hash: "$2y$12$ChrsBPaDAJsuel.HXFi2Ie2Jn1MpdzXA4Nd1jeyXf65N97RDJc3Ky"
   reserved: true
   backend_roles:
   - "admin"
   description: "Admin user"

kibanaserver:
  hash: "$2y$12$wIeuRDp5txoJ3d6.lyybJOPwoRaizuuBvlKKzAGdAiu.I/qaX8hXu"
  reserved: true
  description: "Demo OpenSearch Dashboards user"
Save and exit the file 'internal_users.yml' when finished.

Next, run the below command to ensure the ownership of the OpenSearch installation directory to user 'opensearch'. Then, log in as the 'opensearch' user.
sudo chown -R opensearch /opt/opensearch
su - opensearch
Move to the directory '/opt/opensearch/bin' and run your OpenSearch installation. The OpenSearch should now be running on the local IP address '192.168.5.50' with the default port '9200'.
cd /opt/opensearch/bin
./opensearch
You should receive an output similar to this:
Now open a new terminal, connect to your OpenSearch server, then log in as the 'opensearch' user.
su - opensearch
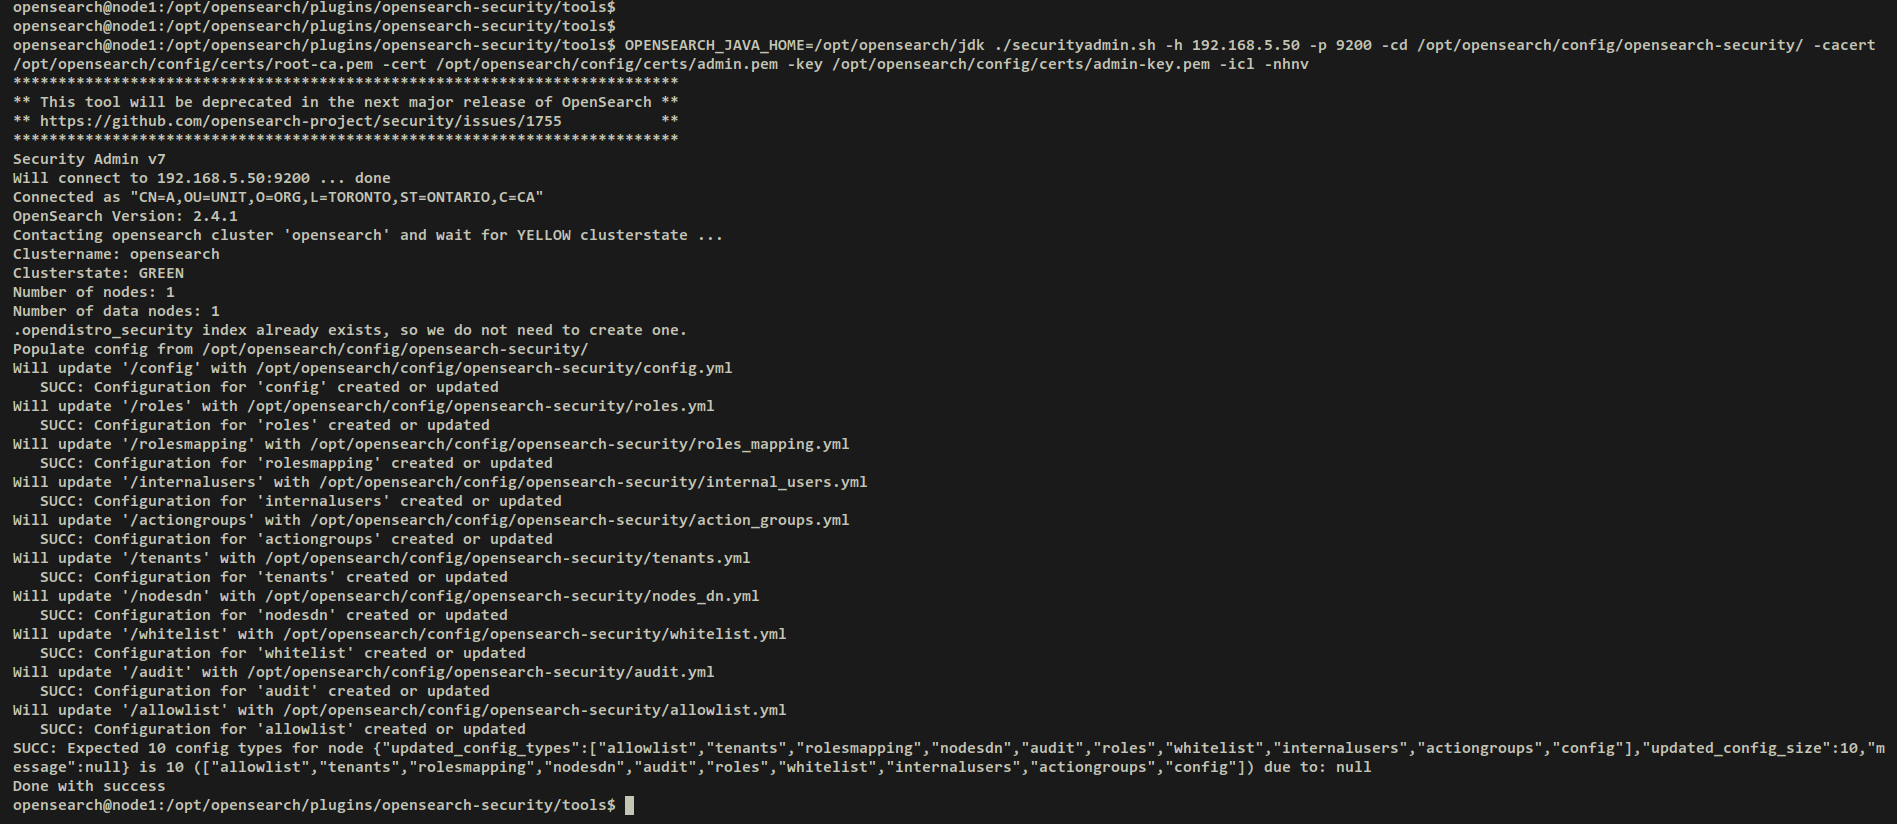
Move the working directory to '/opt/opensearch/plugins/opensearch-security/tools' and run the 'securityadmin.sh' script as below. Be sure to change the OpenSearch host IP address and path of admin certificates.
This will connect to the OpenSearch server and apply new changes on OpenSearch users that you've configured in the 'internal_users.yml' file.
cd /opt/opensearch/plugins/opensearch-security/tools
OPENSEARCH_JAVA_HOME=/opt/opensearch/jdk ./securityadmin.sh -h 192.168.5.50 -p 9200 -cd /opt/opensearch/config/opensearch-security/ -cacert /opt/opensearch/config/certs/root-ca.pem -cert /opt/opensearch/config/certs/admin.pem -key /opt/opensearch/config/certs/admin-key.pem -icl -nhnv
Output:
Now move back to the first terminal and terminate the OpenSearch server by pressing the 'Ctrl+c' button. Then, rerun the OpenSearch server.
./opensearch
At this point, the OpenSearch server is now running with a new user configured.
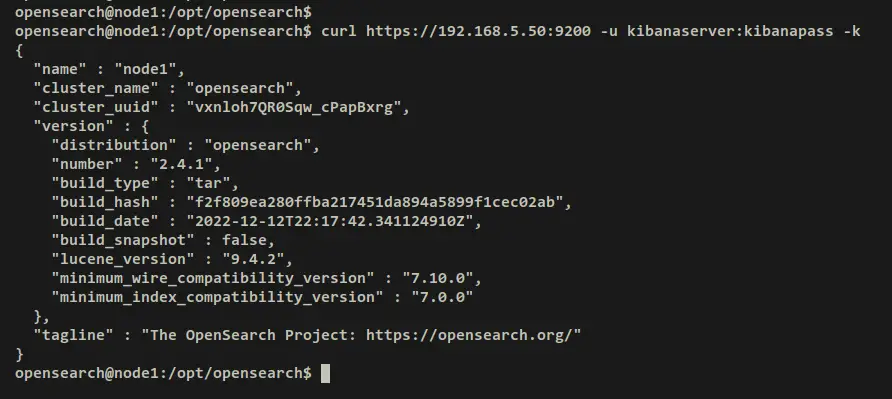
Move back to the second terminal session and run the below command to verify your OpenSearch server. With this, you'll authenticate as the OpenSearch user 'admin' and 'kibanaserver'. Also, be sure to change the password for each user.
curl https://192.168.5.50:9200 -u admin:password -k
curl https://192.168.5.50:9200 -u kibanaserver:kibanapass -k
When authentication was successful, you should see the detail of your OpenSearch server.
Output - authenticated as 'admin' user

Output - authenticated as a 'kibanaserver' user.
With this, you've now successfully configured authentication and authorization on the OpenSearch server. Now move back to the first terminal session and press Ctrl+c to the terminal for the OpenSearch process.
In the next step, you'll set up a systemd service file that will be used to run the OpenSearch server.
Running OpenSearch as a Systemd Service
For this tutorial, you'll run the OpenSearch server in the backgorund as a systemd service. To achive this, you must create a new systemd service file, reload the systemd manager, then you can run and enable OpenSearch via systemctl command utility.
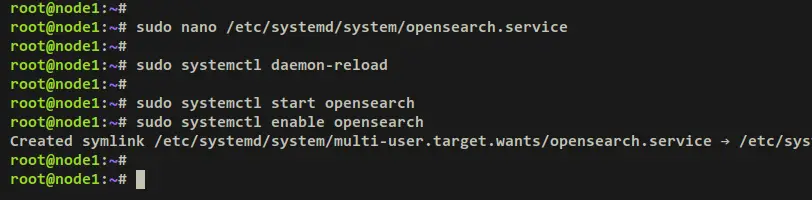
Create a new systemd service file '/etc/systemd/system/opensearch.service' using the below nano editor command.
sudo nano /etc/systemd/system/opensearch.service
Add the following lines to the file.
[Unit]
Description=OpenSearch
Wants=network-online.target
After=network-online.target

[Service]
Type=forking
RuntimeDirectory=data

WorkingDirectory=/opt/opensearch
ExecStart=/opt/opensearch/bin/opensearch -d

User=opensearch
Group=opensearch
StandardOutput=journal
StandardError=inherit
LimitNOFILE=65535
LimitNPROC=4096
LimitAS=infinity
LimitFSIZE=infinity
TimeoutStopSec=0
KillSignal=SIGTERM
KillMode=process
SendSIGKILL=no
SuccessExitStatus=143
TimeoutStartSec=75

[Install]
WantedBy=multi-user.target
Save and close the file when finished.
Next, run the below systemctl command to reload the systemd manager and apply the changes.
sudo systemctl daemon-reload
Then, start and enable the OpenSearch service using the below systemctl command. With this, the OpenSearch service should now be running in the background as a systemd service and it's should be enabled, which means the OpenSearch will start automatically on system startup.
sudo systemctl start opensearch
sudo systemctl enable opensearch
Output:
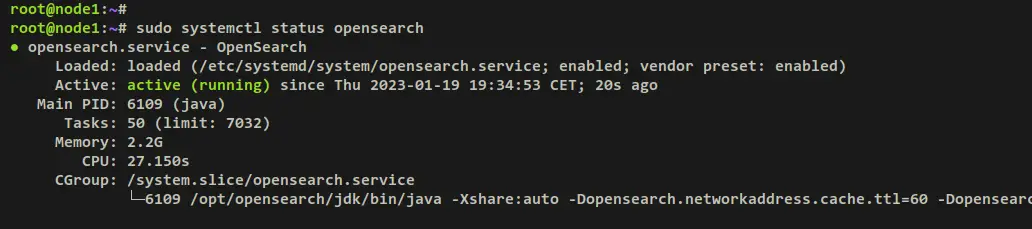
Now verify the OpenSearch service to ensure that the service is running. You should see an output that the OpenSearch service is running and it's now enabled.
sudo systemctl status opensearch
Output:
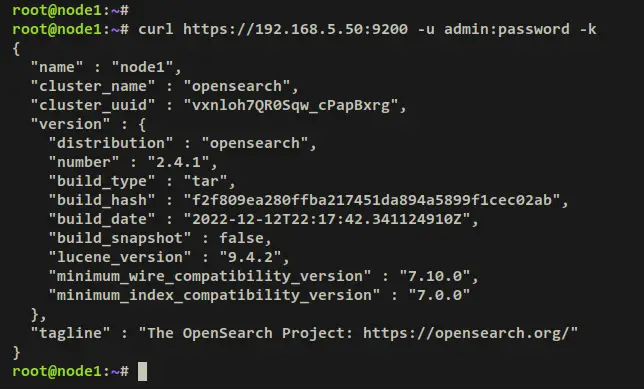
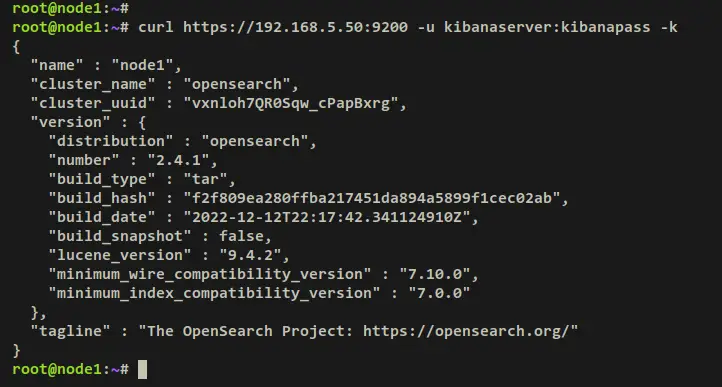
You can also verify the OpenSearch server by curl command to authenticate against the OpenSearch.
curl https://192.168.5.50:9200 -u admin:password -k
curl https://192.168.5.50:9200 -u kibanaserver:kibanapass -k
If OpenSearch is running, you should be authenticated and get details information about your OpenSearch installation.
For OpenSearch admin user.
For kibanaserver user.
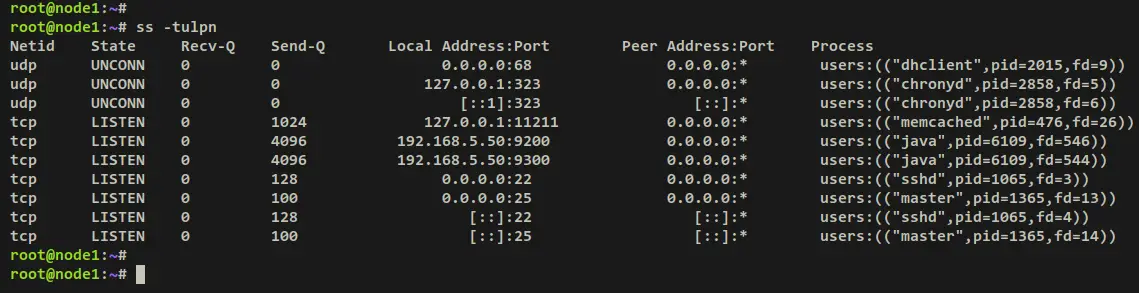
You can also verify the list of open ports on your system via the ss command below. You should see ports 9200 and 9300 are opened by the Java application, which is the OpenSearch server.
ss -tulpn
Output:
With this, you've finished the OpenSearch installation. And now, it's running on the local IP address 192.168.5.50 with the default port 9200. It's running in the background as a systemd service and will start automatically upon system boot.
Installing OpenSearch Dashboards
In this step, you will download the OpenSearch Dashboards package and install it manually via Tarball. You'll also set up how the OpenSearch Dashboard should be running and how to connect to the OpenSearch server via username and password.
Download the OpenSearch Dashboards package via the following wget command.
wget https://artifacts.opensearch.org/releases/bundle/opensearch-dashboards/2.4.1/opensearch-dashboards-2.4.1-linux-x64.tar.gz
Once the download is finished, extract the OpenSearch Dashboards package via the tar command below. You should get a new directory 'opensearch-dashboards-2.4.1'.
tar xf opensearch-dashboards-2.4.1-linux-x64.tar.gz
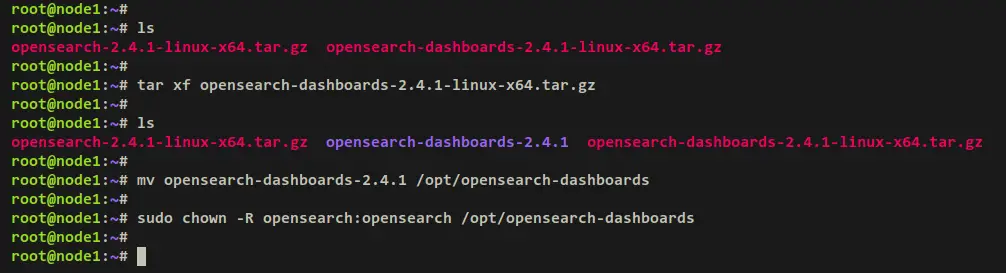
Move the OpenSearch Dashboard directory to '/opt/opensearch-dashboards'. Then, change the ownership of that directory to the user 'opensearch'.
mv opensearch-dashboards-* /opt/opensearch-dashboards
sudo chown -R opensearch /opt/opensearch-dashboards
Next, move your working directory to '/opt/opensearch-dashboards' and open the OpenSearch Dashboards config file 'config/opensearch_dashboards.yml' using the below nano editor command.
cd /opt/opensearch-dashboards
sudo nano config/opensearch_dashboards.yml
Uncomment the following lines and replace the value for each parameter with your settings. In this example, you'll be running the OpenSearch Dashboards on default port '5601' and server IP address '192.168.5.50'.
# OpenSearch Dashboards is served by a back end server. This setting specifies the port to use.
server.port: 5601

# Specifies the address to which the OpenSearch Dashboards server will bind. IP addresses and host names are both valid values.
# The default is 'localhost', which usually means remote machines will not be able to connect.
# To allow connections from remote users, set this parameter to a non-loopback address.
server.host: "192.168.5.50"
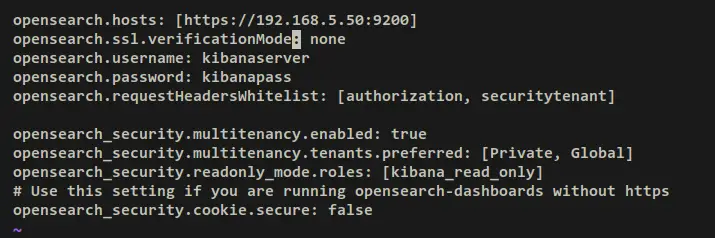
Next, add the following lines to the bottom of the line. Be sure to change the parameter of 'opensearch.hosts', 'opensearch.username', and 'opensearch.password' with your OpenSearch server details.
opensearch.hosts: [https://192.168.5.50:9200]
opensearch.ssl.verificationMode: none
opensearch.username: kibanaserver
opensearch.password: kibanapass
Save and exit the file 'config/opensearch_dashboards.yml' when finished.
Now you've downloaded OpenSearch Dashboard and configured it to connect to the OpenSearch server. Next, you'll set up a systemd service file that will be used to run the OpenSearch Dashboards.
Running OpenSearch Dashboards as Systemd Service
In this step, you'll create a new systemd service that will be used to run the OpenSearch Dashboards.
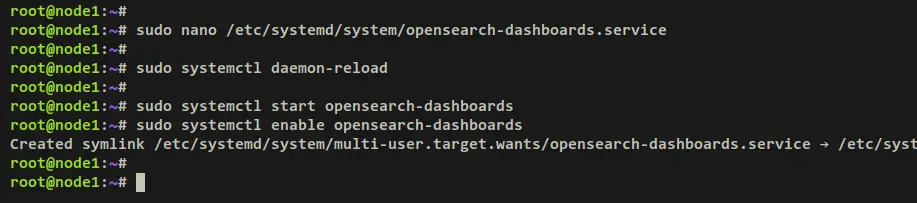
Create a new systemd service file '/etc/systemd/system/opensearch-dashboards.service' using the below nano editor command.
sudo nano /etc/systemd/system/opensearch-dashboards.service
Add the following lines to the file.
[Unit]
Description=OpenSearch-Dashboards
Wants=network-online.target
After=network-online.target opensearch.service

[Service]
Type=simple
User=opensearch
Environment=NODE_ENV=production
Environment=CONFIG_PATH=/opt/opensearch-dashboards/config/opensearch_dashboards.yml
WorkingDirectory=/opt/opensearch-dashboards
ExecStart=/opt/opensearch-dashboards/bin/opensearch-dashboards
StandardOutput=journal
StandardError=inherit
Restart=on-failure

[Install]
WantedBy=multi-user.target
Save and exit the file when finished.
Next, run the below systemctl command to reload the systemd manager and apply the new changes.
sudo systemctl daemon-reload
Then, start and enable the OpenSearch Dashboards service using the below systemctl command. With this, the OpenSearch Dashboards service should be running and enabled, which means the OpenSearch Dashboard service will start automatically at system startup.
sudo systemctl start opensearch-dashboards
sudo systemctl enable opensearch-dashboards
Verify the OpenSearch Dashboards service using the below command.
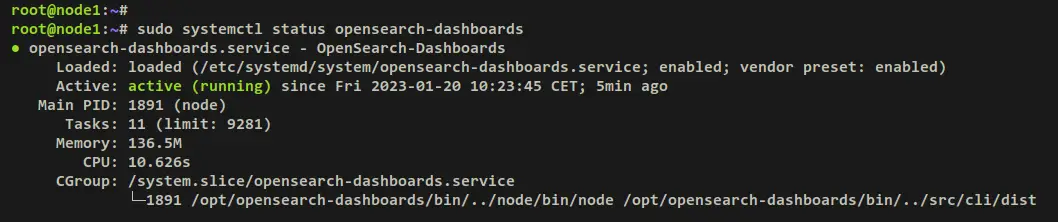
sudo systemctl status opensearch-dashboards
The output 'active (running)' confirms that the OpenSearch Dashboards service is running. And the output '...; enabled;...' confirms that the service is enabled.
With this, the OpenSearch Dashboards is now running on your Debian server with the default config file '/opt/opensearch-dashboards/config/opensearch_dashboards.yml'. It's running on default port 5601 with server IP address 192.168.5.50
Accessing OpenSearch Dashboards
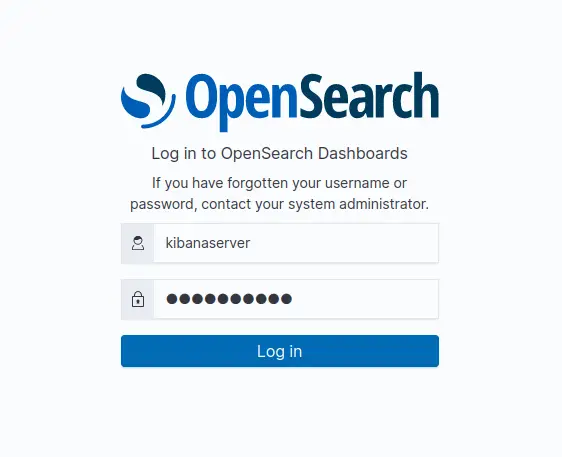
Open up your web browser and visit the OpenSearch Dashboards IP address with port 5601 (i.e: http:192.168.5.50:5601). You'll now see the OpenSearch Dashboards login page.
Input your username and password that you've created. In this example, the user is 'kibanaserver'. Then click the 'Log in' button to confirm and log in to OpenSearch Dashboards.
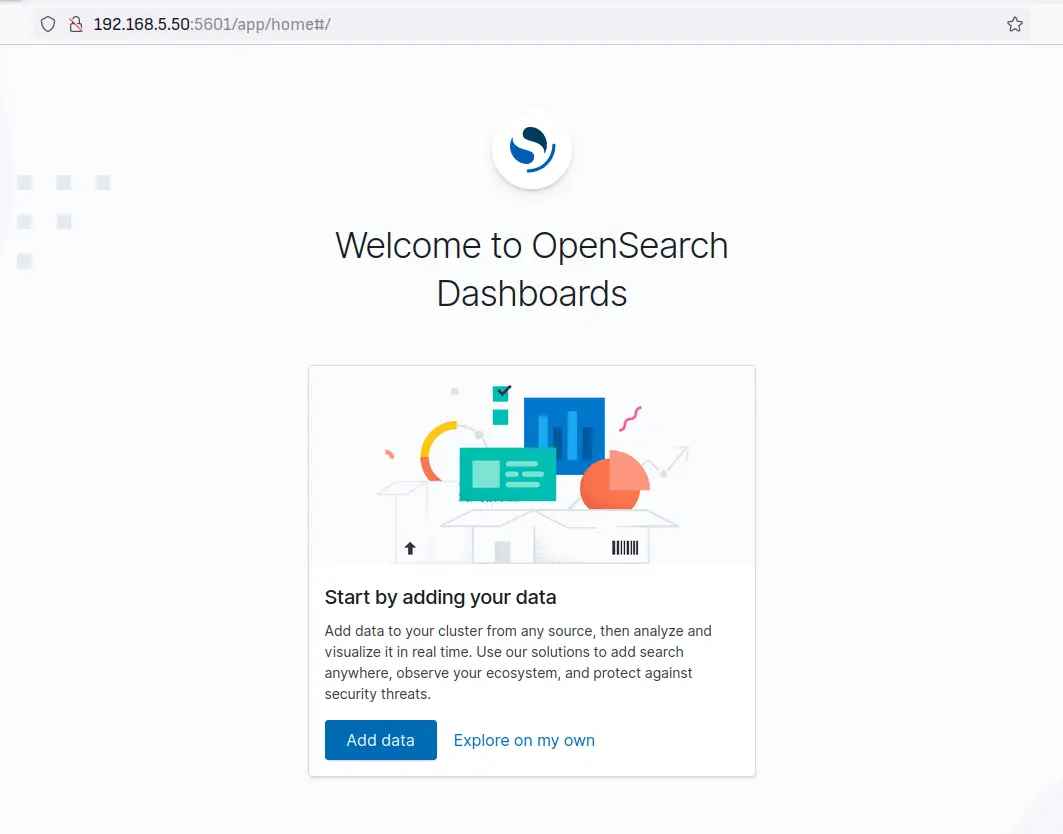
When successful, you should get the following page with the message 'Welcome to OpenSearch Dashboards'. You can now click 'Add data' to add new data to your OpenSearch server or click 'Explore my own' for a later setup.
Next, to ensure that the OpenSearch Dashboards is connected to the OpenSearch server, you'll do the following steps:
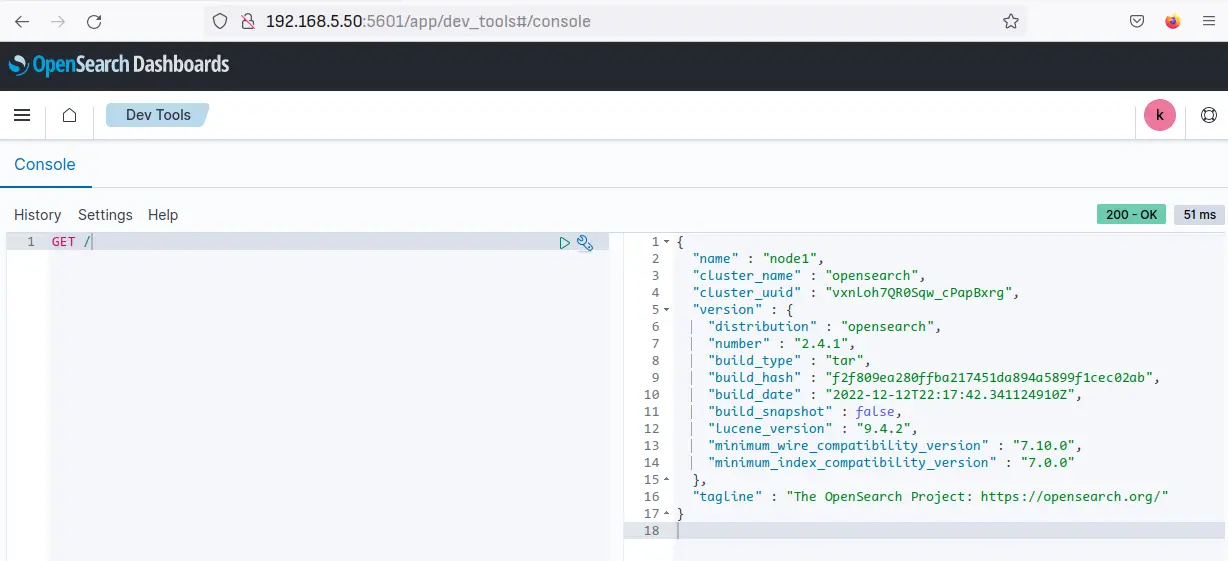
Click on the left menu move to the Management section and click 'Dev Tools'.

Now input the query 'GET /' on the console and click the play button. When successful, you should see the output on the right side with detailed information about your OpenSearch server. Also, you can see on the top right the HTTP code '200 - OK' which confirms that the query is executed without error.
With this in mind, you've now finished the installation of OpenSearch Dashboards on the Debian server via Tarball. And also configured OpenSearch Dashboard to connect to the OpenSearch server.
Conclusion
In this tutorial, you've installed OpenSearch via Tarball on the Debian 11 server. You've also secured OpenSearch with TLS certificates, enabled authentication and authorization, and configured users in OpenSearch. In addition, you've configured OpenSearch to be running as a systemd service and optimized a Debian Linux server for deploying OpenSearch.
You've also installed the OpenSearch Dashboards via Tarball on the Debian server. You've configured OpenSearch Dashboards to be run as a systemd service, connected the OpenSearch Dashboards to OpenSearch Server with authentication enabled, and successfully verified the OpenSearch and OpenSearch Dashboards installation.
With this setup, you can now explore more about OpenSearch by deploying OpenSearch Cluster, setting up additional authentication, and many more. You learn more all of those about OpenSearch from OpenSearch's official documentation.

