How to Install OpenLDAP Server and Client on Rocky Linux 9
On this page
- Prerequisites
- Setup FQDN and /etc/hosts
- Installing OpenLDAP Server
- Setup Firewalld
- Configuring Basic OpenLDAP Server
- Configuring Base Domain
- Configuring Base Group and Organization
- Adding New User to OpenLDAP Server
- Securing OpenLDAP with SSL/TLS
- Adding Client Machine to OpenLDAP Server
- Connect to Client Machine via OpenLDAP Users
- Conclusion
OpenLDAP is a software implementation of the Lightweight Directory Access Protocol (LDAP). OpenLDAP is free and open-source software with its BSD-style license called OpenLDAP Public License. Its command-line drive LDAP software is available on most Linux distributions such as CentOS, Ubuntu, Debian, SUSE, and many more. OpenLDAP is a complete software suite for LDAP servers, which includes SLAPD (standalone LDAP daemon), SLURPD (standalone LDAP update replication daemon), and some utilities and tools for managing LDAP servers. OpenLDAP is a highly customizable LDAP server and supports all major computing platforms.
In this guide, you will install and set up OpenLDAP on a Rocky Linux 9 server. You will install the OpenLDAP server, configure the OpenLDAP server manually, and enable secure SSL/TLS on the OpenLDAP server. You will also add a client machine to the OpenLDAP server via OpenLDAP client and SSSD (System Security Services Daemon). Also, verify your installation by logging in to the client machine via OpenLDAP user.
Prerequisites
To complete this guide, you must have the following requirements:
- A server with at least 4 GB of RAM and 2 CPUs running Rocky Linux 9 system - This example uses a Rocky Linux with the hostname 'ldap' and fqdn 'ldap.hwdomain.lan'.
- A machine that will be used as a client - This example uses a client machine Rocky Linux with the hostname 'client'.
- A non-root user with sudo/root administrator privileges.
- An SELinux running on permissive mode.
Below is the detailed servers that will be used for this guide:
Hostname    IP Address    Used as
-----------------------------------------
ldap        192.168.5.25  OpenLDAP Server
client      192.168.5.80  OpenLDAP Client
When those requirements are ready, you can now start the OpenLDAP installation.
Setup FQDN and /etc/hosts
Before jumping onto the OpenLDAP installation, you must set up the proper fqdn (fully qualified domain name) and the /etc/hosts file on the target server.
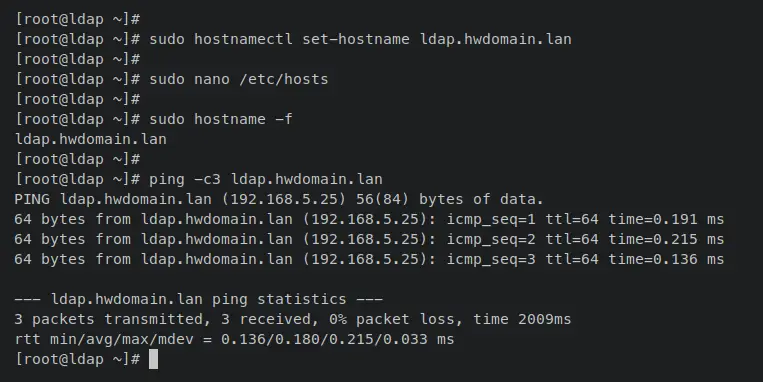
Enter the following 'hostnamectl' command to set up the fqdn of your OpenLDAP server. In this example, the fqdn will of the OpenLDAP server will be 'ldap.hwdomain.lan'.
sudo hostnamectl set-hostname ldap.hwdomain.lan
Now open the '/etc/hosts' file using the following nano editor command.
sudo nano /etc/hosts
Add the following line to the file and be sure to change the detail hostname, fqdn, and IP address.
# ip - fqdn - hostname
192.168.5.25 ldap.hwdomain.lan ldap
Save and close the file when finished.
Now enter the following command to verify the fqdn of your server and ensure that the fqdn is pointed to the correct server IP address.
sudo hostname -f
ping -c3 ldap.hwdomain.lan
When successful, you should receive an output similar to this - The fqdn of the OpenLDAP server is 'ldap.hwdomain.lan', which is pointed to the server IP address '192.168.5.25'.
Now move to the next step to start installing the OpenLDAP server.
Installing OpenLDAP Server
On the latest Rocky Linux 9 server, OpenLDAP packages are available on the 'plus' repository, which is not enabled by default.
In this section, you will install the OpenLDAP server and client to your Rocky Linux server. But before that, you must enable the 'plus' repository on your system.
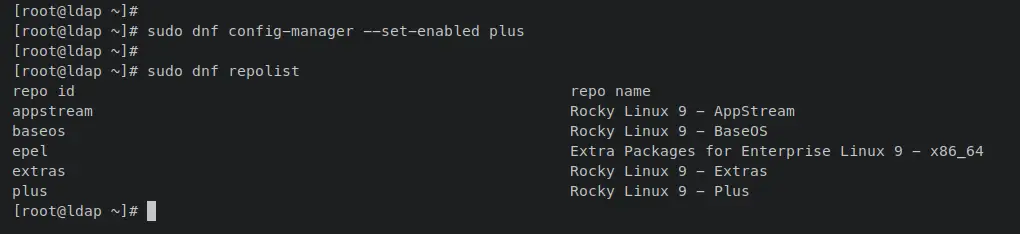
Enter the following 'dnf config-manager' command to enable the 'plus' repository. Then, verify the list of repositories on your system.
sudo dnf config-manager --set-enabled plus
sudo dnf repolist
You should receive an output like this - The Rocky Linux 'plus' repository is enabled.
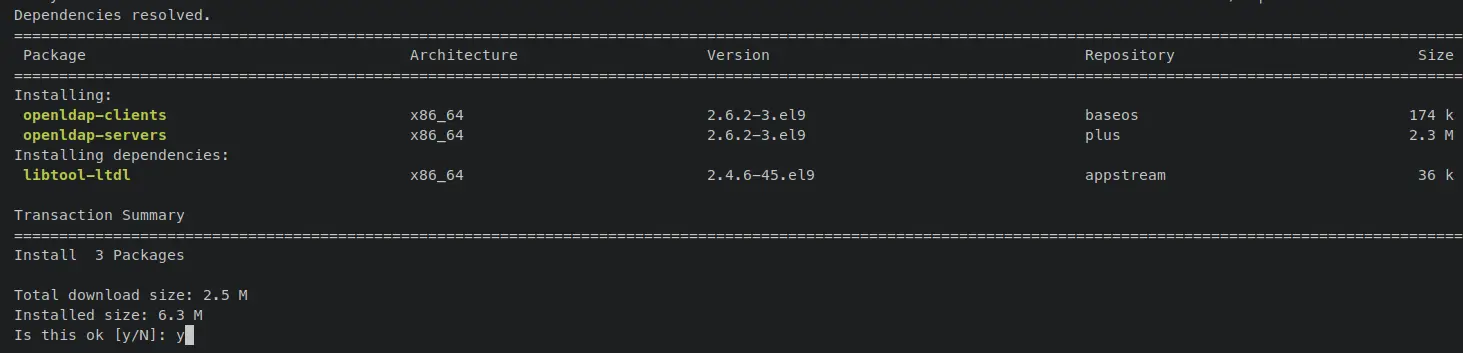
Now enter the following 'dnf install' command to install the OpenLDAP server and client packages. When prompted, input y to confirm and press ENTER to proceed.
sudo dnf install openldap-servers openldap-clients
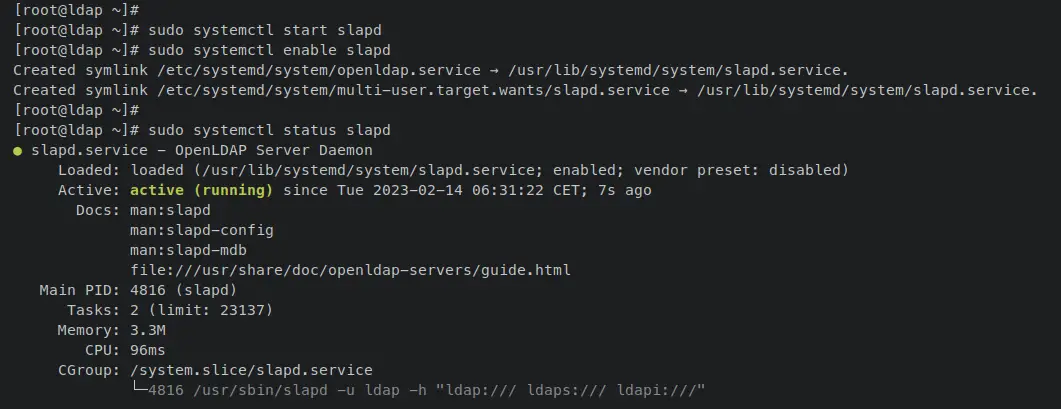
Once OpenLDAP is installed, enter the following systemctl command utility to start and enable the OpenLDAP service 'slapd'. With this, the OpenLDAP should be running with the default configuration and enabled, which means it will start automatically upon the system startup.
sudo systemctl start slapd
sudo systemctl enable slapd
Verify the OpenLDAP service status by entering the following command.
sudo systemctl status slapd
An output 'active (running)' confirms that the OpenLDAP service 'slapd' is running. And the output '...enabled..' confirms that the OpenLDAP will start automatically at system boot.
With the OpenLDAP server installed and running, you will set up the firewalld to add the LDAP and LDAPS service to ensure both service ports are accessible from outside the network.
Setup Firewalld
In this section, you will set up the firewalld to open the LDAP and LDAPS services and ensure both services are accessible from outside networks.
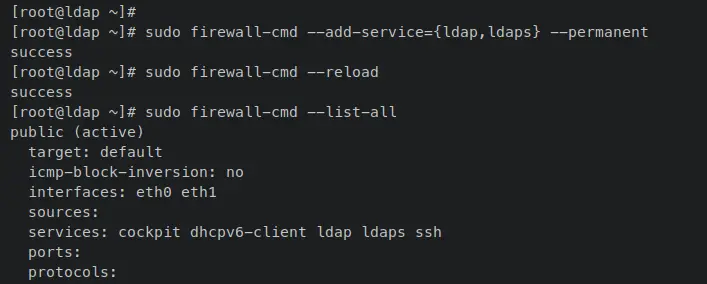
Enter the following 'firewall-cmd' command to add the LDAP and LDAPS services to the firewalld. Then, reload the firewalld to apply the changes. An output 'success' confirms that the new rule was added to the firewalld.
sudo firewall-cmd --add-service={ldap,ldaps} --permanent
sudo firewall-cmd --reload
Now run the following 'firewall-cmd' command to verify the list of enabled services on firewalld.
sudo firewall-cmd --list-all
When you see 'ldap' and 'ldaps' on the 'services' section, that means that both services added to the firewalld will be accessible from outside networks.
Configuring Basic OpenLDAP Server
In this section, you will configure the OpenLDAP server installation. You will set up the password for the OpenLDAP server and import some basic schemas to the OpenLDAP server. These operations can be done via the 'ldapadd' utility provided by the OpenLDAP server package.
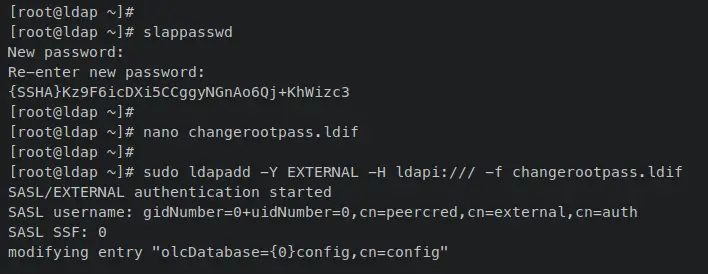
Before you begin, enter the following 'slappasswd' command to generate the password hash for your OpenLDAP server. Input your password and repeat, then copy the generated hash password.
slappasswd
Now create a new LDIF file 'changerootpass.ldif' using the following nano editor command. The LDIF or LDAP Data Interchange Format is a file format that contains a set of records of LDAP entries and can be used to update the LDAP server.
nano changerootpass.ldif
Add the following contents to the file and be sure to change the hashed password with your generated password.
dn: olcDatabase={0}config,cn=config
changetype: modify
add: olcRootPW
olcRootPW: {SSHA}Uf13AbVHOcs/aDWJOvDxxfBSl3omExG2
Save and close the file when you're done.
Now run the following 'ldapadd' command to change the OpenLDAP root password via the 'changerootpass.ldif' file.
sudo ldapadd -Y EXTERNAL -H ldapi:/// -f changerootpass.ldif
When successful, you should receive an output similar to this:
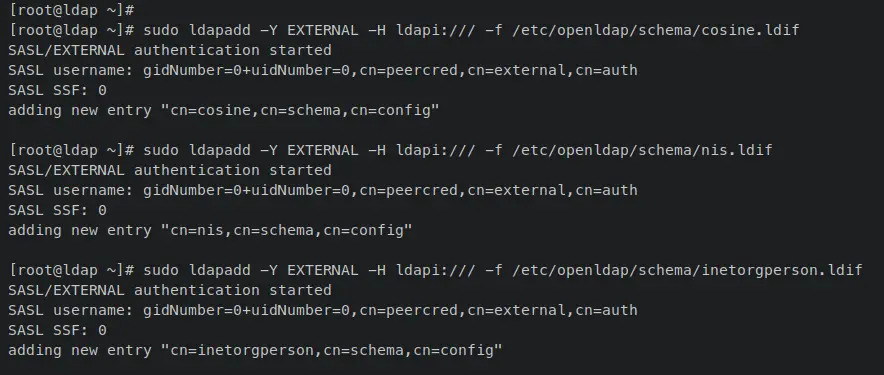
Next, enter the following 'ldapadd' command to import basic schemas for the OpenLDAP server.
sudo ldapadd -Y EXTERNAL -H ldapi:/// -f /etc/openldap/schema/cosine.ldif
sudo ldapadd -Y EXTERNAL -H ldapi:/// -f /etc/openldap/schema/nis.ldif
sudo ldapadd -Y EXTERNAL -H ldapi:/// -f /etc/openldap/schema/inetorgperson.ldif
Output:
Lastly, you can now enter the following systemctl command utility to restart the OpenLDAP service and apply the changes.
sudo systemctl restart slapd
With this, you have now configured the root password and imported basic schemas for the OpenLDAP server. In the next step, you will set up the default DN (Distinguished Name) and the Base Group and Organization entries on the OpenLDAP server.
Configuring Base Domain
In this section, you will set up the base DN (Domain Name) via LDIF file for your OpenLDAP server. In this example, the base dn for OpenLDAP is 'hwdomain.lan'.
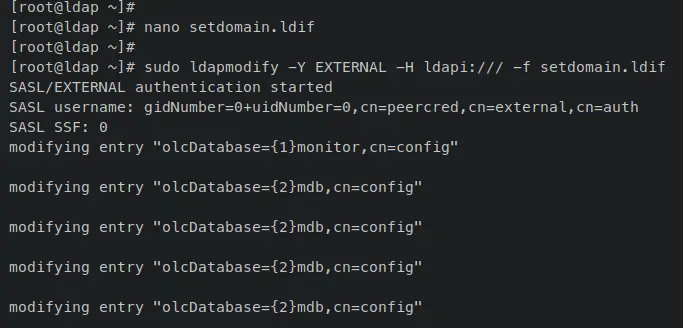
Create a new file 'setdomain.ldif' using the following nano editor command.
nano setdomain.ldif
Add the following contents to the file and be sure to change the base dn 'dc=hwdomain,dc=lan' with your domain. Also, be sure to change the hashed password with your generated root password.
# setdomain.ldif

dn: olcDatabase={1}monitor,cn=config
changetype: modify
replace: olcAccess
olcAccess: {0}to * by dn.base="gidNumber=0+uidNumber=0,cn=peercred,cn=external,cn=auth"
  read by dn.base="cn=Manager,dc=hwdomain,dc=lan" read by * none

dn: olcDatabase={2}mdb,cn=config
changetype: modify
replace: olcSuffix
olcSuffix: dc=hwdomain,dc=lan

dn: olcDatabase={2}mdb,cn=config
changetype: modify
replace: olcRootDN
olcRootDN: cn=Manager,dc=hwdomain,dc=lan

dn: olcDatabase={2}mdb,cn=config
changetype: modify
add: olcRootPW
olcRootPW: {SSHA}Uf13AbVHOcs/aDWJOvDxxfBSl3omExG2

dn: olcDatabase={2}mdb,cn=config
changetype: modify
add: olcAccess
olcAccess: {0}to attrs=userPassword,shadowLastChange by
  dn="cn=Manager,dc=hwdomain,dc=lan" write by anonymous auth by self write by * none
olcAccess: {1}to dn.base="" by * read
olcAccess: {2}to * by dn="cn=Manager,dc=hwdomain,dc=lan" write by * read
Save and close the file when finished.
Now enter the following 'ldapmodify' command to apply the new dn for your OpenLDAP server. In this, you've used the 'ldapmodify' instead of 'ldapadd' because you want to modify the current OpenLDAP server.
sudo ldapmodify -Y EXTERNAL -H ldapi:/// -f setdomain.ldif
When successful, you should receive an output like this.
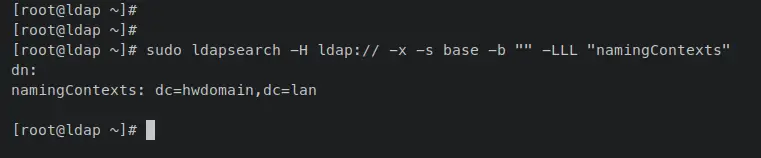
You can now enter the following 'ldapsearch' command to verify the base dn of your OpenLDAP server. The base dn of the OpenLDAP server is stored at 'namingContexts'.
sudo ldapsearch -H ldap:// -x -s base -b "" -LLL "namingContexts"
When successful, you should get the base dn of your OpenLDAP server. The base dn for the OpenLDAP server for this example is 'dn=hwdomain,dn=lan' or 'hwdomain.lan'.
After you have configured the base dn, you will next set up the base group and organization, where you can store OpenLDAP users on top of it. The way to achieve that is similar to the way of setting up the base dn.
Configuring Base Group and Organization
In this example, you will set up two base groups for your OpenLDAP server. You will add two 'ou' or organization unit called 'People' and 'Group' via the LDIF file. You will store all of your OpenLDAP users within these ou, People, and Group.
Enter the following nano editor command to create a new file 'addou.ldif'.
nano addou.ldif
Add the following contents to the file and be sure to change the base domain name with your domain.
# addou.ldif

dn: dc=hwdomain,dc=lan
objectClass: top
objectClass: dcObject
objectclass: organization
o: My hwdomain Organisation
dc: hwdomain

dn: cn=Manager,dc=hwdomain,dc=lan
objectClass: organizationalRole
cn: Manager
description: OpenLDAP Manager

dn: ou=People,dc=hwdomain,dc=lan
objectClass: organizationalUnit
ou: People

dn: ou=Group,dc=hwdomain,dc=lan
objectClass: organizationalUnit
ou: Group
Save and close the file when finished.
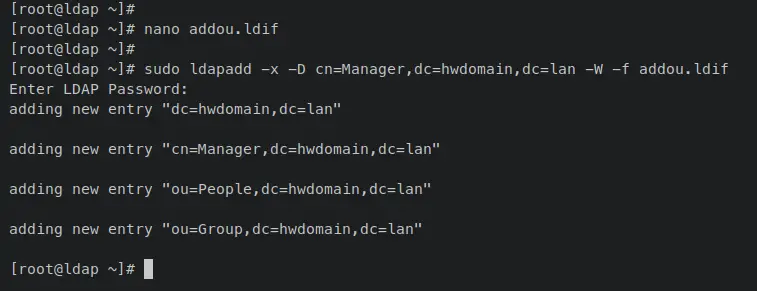
Next, enter the following 'ldapadd' command to add the ou 'People' and 'Group'. When prompted for the password, input the OpenLDAP server password.
sudo ldapadd -x -D cn=Manager,dc=hwdomain,dc=lan -W -f addou.ldif
When the operation success, you should receive an output similar to this.
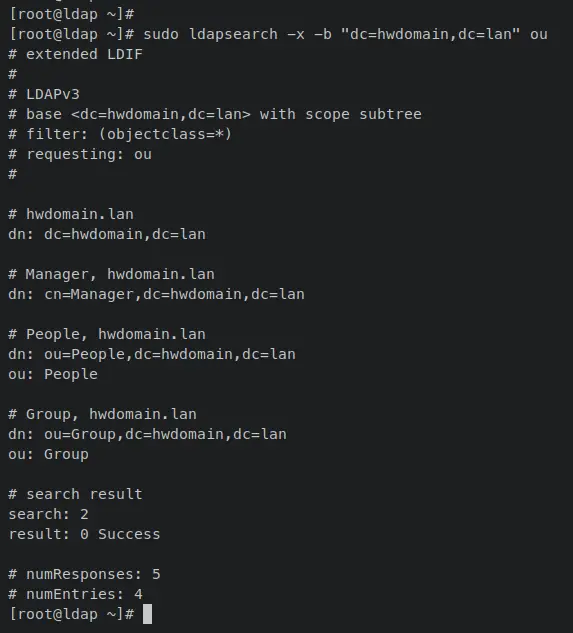
Verify the list of 'ou' on your OpenLDAP server by entering the following 'ldapsearch' command to your terminal.
sudo ldapsearch -x -b "dc=hwdomain,dc=lan" ou
You should see the two ou called 'People' and 'Group' are added and available on the OpenLDAP server.
At this point, you have added and configured the base dn or domain name, two ou or organization unit for the OpenLDAP server. In the next step, you will learn how to add a new user via the LDIF file.
Adding New User to OpenLDAP Server
In this section, you will add and set up a new user in OpenLDAP via the LDIF file. The steps are simple, you just need to generate the hashed password via 'slappasswd', then create a new LDIF file for adding a user, then run the 'ldapadd' command to add the new user to the OpenLDAP server.
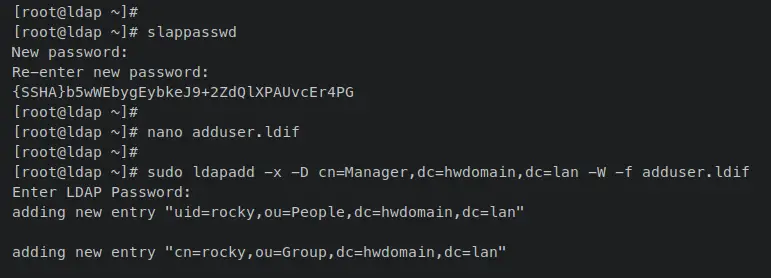
First, enter the following 'slappasswd' command to generate the hash password for the new user. Input your password and repeat, then copy the generated password.
slappasswd
Now enter the following nano editor command to create a new file 'adduser.ldif'.
nano adduser.ldif
Add the following contents to the file and be sure to change the username, password, and the default dn. in this example, you will create a new user called 'rocky' and will be part of the ou 'People'.
# adduser.ldif

dn: uid=rocky,ou=People,dc=hwdomain,dc=lan
objectClass: inetOrgPerson
objectClass: posixAccount
objectClass: shadowAccount
cn: rocky
sn: temp
userPassword: {SSHA}cDG5NuQd+rYn6rWh1r5UnysUOwJlt1uk
loginShell: /bin/bash
uidNumber: 2000
gidNumber: 2000
homeDirectory: /home/rocky
shadowLastChange: 0
shadowMax: 0
shadowWarning: 0

dn: cn=rocky,ou=Group,dc=hwdomain,dc=lan
objectClass: posixGroup
cn: rocky
gidNumber: 2000
memberUid: rocky
Save and close the file when finished.
Now enter the following 'ldapadd' command to add your new user via the 'adduser.ldif' file.
sudo ldapadd -x -D cn=Manager,dc=hwdomain,dc=lan -W -f adduser.ldif
Input the OpenLDAP server when prompted, and when successful, you should receive an output like this.
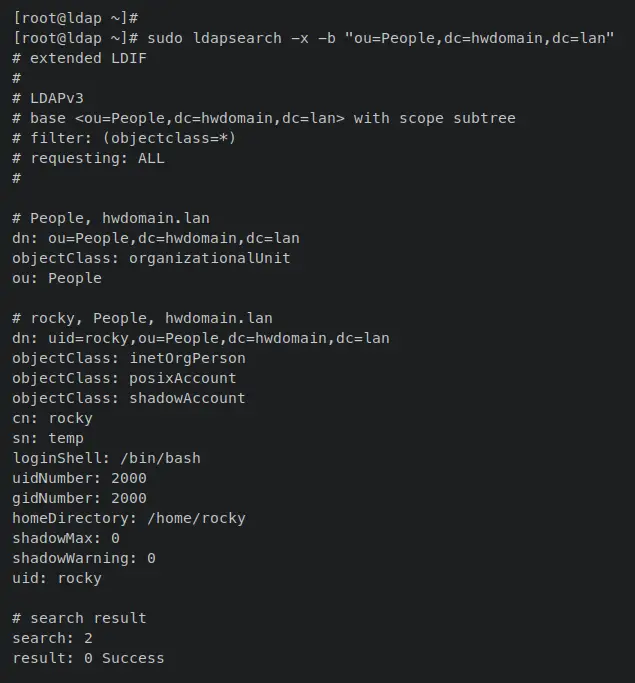
Enter the following 'ldapsearch' command to verify the new user 'rocky' and ensure that it's added and available on your OpenLDAP server. This command will print out all available users on the ou 'People'.
sudo ldapsearch -x -b "ou=People,dc=hwdomain,dc=lan"
Output like this confirms that the OpenLDAP user 'rocky' is created and added to the OpenLDAP server.
Securing OpenLDAP with SSL/TLS
In this section, you will set up and enable secure LDAPS on the OpenLDAP server. You will generate SSL/TLS certificates that will be used by the OpenLDAP server, then set up OpenLDAP to use SSL/TLS certificates and enable the secure LDAPS protocol.
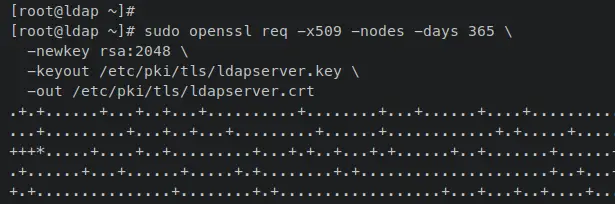
Enter the following 'openssl' command to generate the SSL/TLS Self-Signed certificates. Input detailed information about your certificates, when finished, your certificates will be stored in the '/etc/pki/tls/' directory.
sudo openssl req -x509 -nodes -days 365 \
  -newkey rsa:2048 \
  -keyout /etc/pki/tls/ldapserver.key \
  -out /etc/pki/tls/ldapserver.crt
Once SSL/TLS certificates are generated, change the ownership of SSL/TLS certificates to the user 'ldap' and group 'ldap'. This will allow OpenLDAP to access certificate files.
sudo chown ldap:ldap /etc/pki/tls/{ldapserver.crt,ldapserver.key}
Next, create a new LDIF file 'tls.ldif' using the following nano editor command.
sudo nano tls.ldif
Add the following configurations to the file. Be sure to change the details certificates file and the full path of it if you're using custom certificates.
# tls.ldif

dn: cn=config
changetype: modify
add: olcTLSCACertificateFile
olcTLSCACertificateFile: /etc/pki/tls/ldapserver.crt

add: olcTLSCertificateKeyFile
olcTLSCertificateKeyFile: /etc/pki/tls/ldapserver.key

add: olcTLSCertificateFile
olcTLSCertificateFile: /etc/pki/tls/ldapserver.crt
Save and close the file when finished.
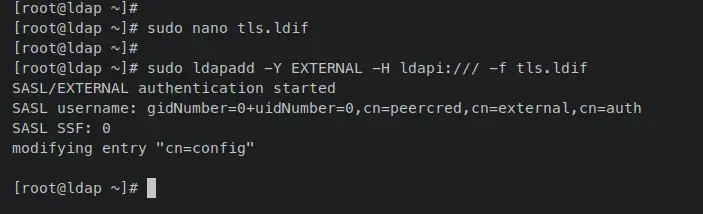
Next, enter the following 'ldapadd' command to apply SSL/TLS on the OpenLDAP server.
sudo ldapadd -Y EXTERNAL -H ldapi:/// -f tls.ldif
Once successful, you should receive an output like this.
Now open the OpenLDAP server configuration '/etc/openldap/ldap.conf' using the following nano editor command.
sudo nano /etc/openldap/ldap.conf
Uncomment the 'TLS_CACERT' parameter and change the value with the path of your generated CA certificate file. Then, add a new parameter 'TLS_REQCERT' and set it to 'never', this is because you're using Self-Signed certificates.
TLS_CACERT     /etc/pki/tls/ldapserver.crt

# because you're using Self-Signed Certificate - you must add this
TLS_REQCERT never
Save and close the file when finished.
Now enter the following systemctl command utility to restart the OpenLDAP service 'slapd' and apply the changes.
sudo systemctl restart slapd
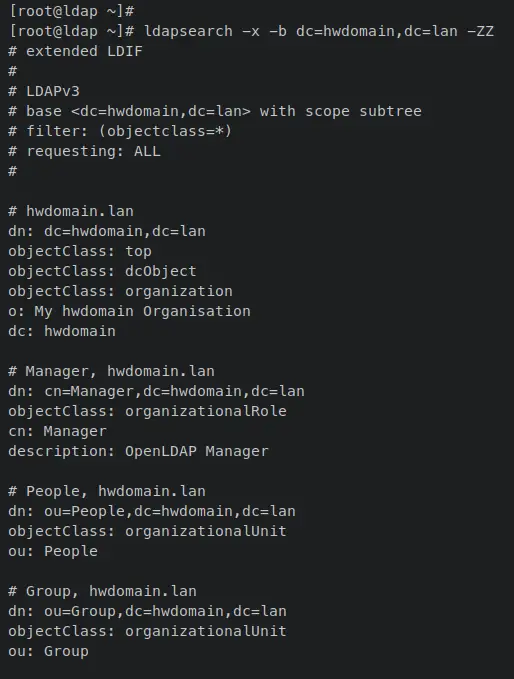
With this, the OpenLDAP server is now running on both LDAP and LDAPS protocols. Enter the following command to verify that the LDAPS is enabled on your OpenLDAP server.
sudo ldapsearch -x -b dc=hwdomain,dc=lan -ZZ
When LDAPS is enabled, you should receive an output of all of your OpenLDAP server settings. The parameter '-ZZ' will force you to connect using secure LDAPS.
Now that you have configured and enabled secure LDAPS on your OpenLDAP server. In the next step, you will learn how to add a Linux host machine to the OpenLDAP server.
Adding Client Machine to OpenLDAP Server
In this section, you will add the client host machine to the OpenLDAP server via the OpenLDAP client and SSSD service. In this example, you will add a Rocky Linux client machine with hostname 'client' and IP address '192.168.5.80'.
Below are some detailed steps for adding a host to the OpenLDAP server:
- Setting up fqdn and /etc/hosts file.
- Installing OpenLDAP Client and SSSD packages.
- Enable SSSD as an Authentication source.
- Configuring OpenLDAP Client and SSSD service.
Now let's start adding the Rocky Linux client machine to the OpenLDAP server.
Set Up FQDN and /etc/hosts
Enter the following 'hostnamectl' command to set up the fqdn of the client machine.
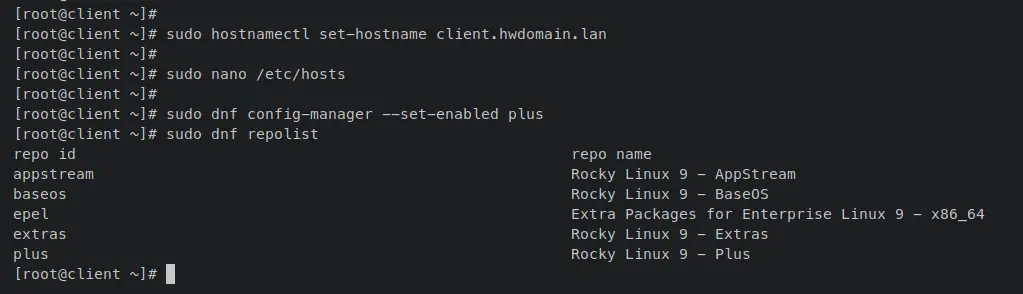
sudo hostnamectl set-hostname client.hwdomain.lan
Now open the '/etc/hosts' file using the following nano editor.
sudo nano /etc/hosts
Add the following lines to the file and be sure to change the details hostname and IP address with the OpenLDAP server details.
# ip - fqdn - hostname
192.168.5.25    ldap.hwdomain.lan   ldap
Save and close the file when finished.
Installing OpenLDAP Client and SSSD Packages
Next, enter the following dnf command to enable the 'plus' repository on the Rocky Linux client machine. Then, verify the list of the enabled repository using the below command.
sudo dnf config-manager --set-enabled plus
sudo dnf repolist
Output like this confirms that the 'plus' repository added and enabled.
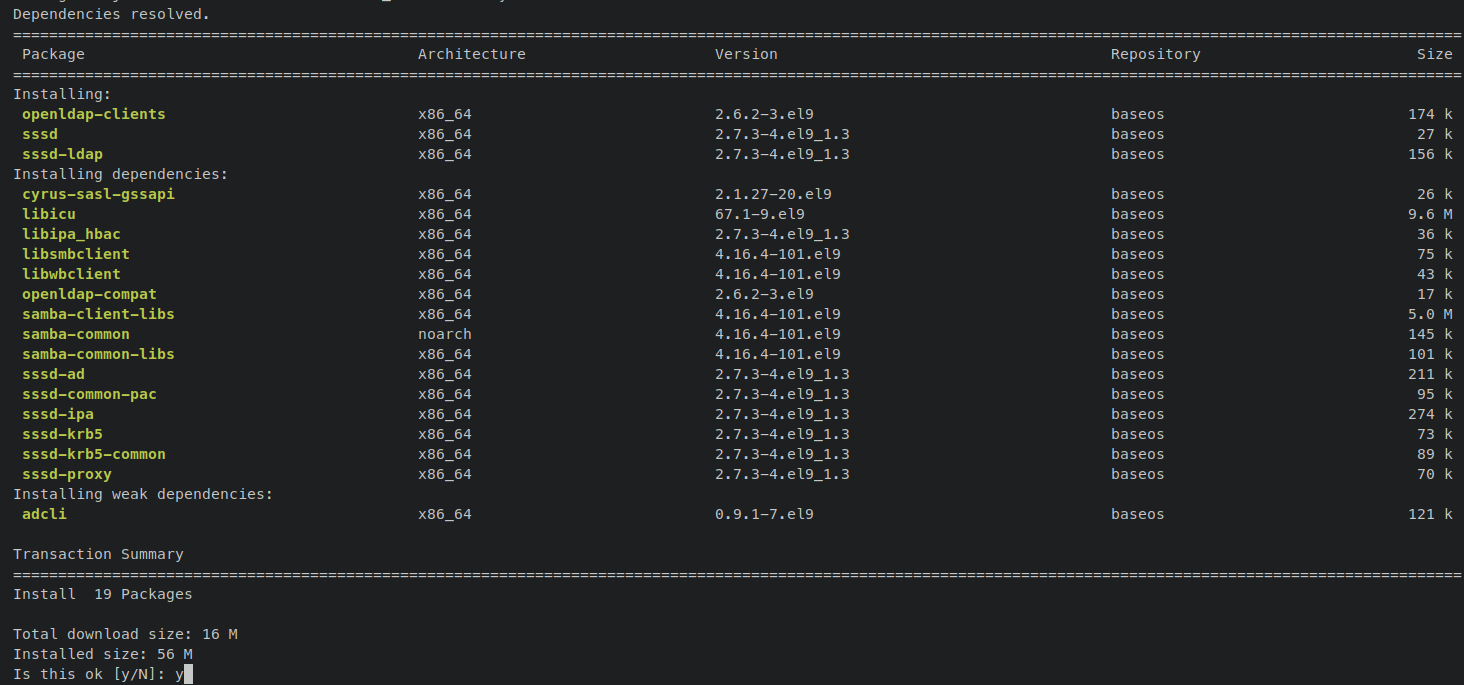
Now install the OpenLDAP client and SSSD (System Security Services Daemon) packages via the 'dnf install' command as below.
sudo dnf install openldap-clients sssd sssd-ldap oddjob-mkhomedir
When prompted, input y to confirm and press ENTER to proceed.
With the OpenLDAP client and SSSD packages installed, you're ready to set up and connect to the OpenLDAP server.
Enable SSSD Authentication Source
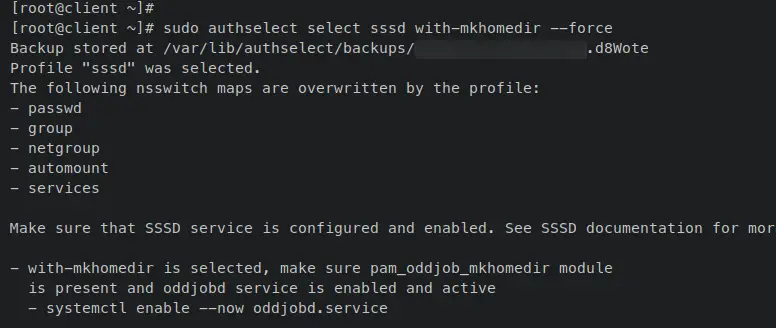
Enter the following 'authselect' command to enable the 'sssd' authentication source on the Rocky Linux client. The parameter 'with-mkhomedir' allows SSSD authenticated users to automatically create a home directory.
sudo authselect select sssd with-mkhomedir --force
You should receive an output similar to this, which also instructs you to start and enable the 'oddjobd' service.
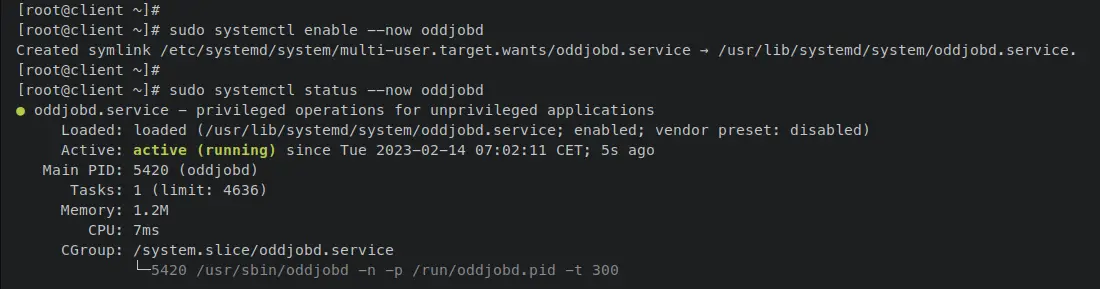
Next, enter the following 'systemctl' command utility to start and enable the 'oddjobd' service. Then, verify the oddjobd service to ensure that the service is running.
sudo systemctl enable --now oddjobd.service
sudo systemctl status oddjobd.service
The output below confirms that the oddjobd service is enabled and will start automatically upon the system startup. And the status of the oddjobd service is running.
With the sssd authentication source enabled and the oddjobd service running, you will now add the OpenLDAP server to your configuration.
Configuring OpenLDAP Client and SSSD Service
Open the config file '/etc/openldap/ldap.conf' using the following nano editor command.
sudo nano /etc/openldap/ldap.conf
Uncomment both the 'URI' and 'BASE' parameters and change the value with your OpenLDAP server domain name and base domain.
URI ldap://ldap.hwdomain.lan/
BASE dc=hwdomain,dc=lan
Save and exit the file when finished.
Next, create a new SSSD config file '/etc/sssd/sssd.conf' using the following nano editor command.
sudo nano /etc/sssd/sssd.conf
Add the following lines to the file and be sure to change the detail of the OpenLDAP server on the 'ldap_uri' and 'ldap_search_base' parameters.
[domain/default]
id_provider = ldap
autofs_provider = ldap
auth_provider = ldap
chpass_provider = ldap
ldap_uri = ldap://ldap.hwdomain.lan/
ldap_search_base = dc=hwdomain,dc=lan
ldap_id_use_start_tls = True
ldap_tls_cacertdir = /etc/openldap/certs
cache_credentials = True
ldap_tls_reqcert = allow

[sssd]
services = nss, pam, autofs
domains = default

[nss]
homedir_substring = /home
Save and close the file when finished.
Now change the permission of the SSSD config file '/etc/sssd/sssd.conf' to 600 via the chmod command below.
sudo chmod 0600 /etc/sssd/sssd.conf
Lastly, enter the following systemctl command utility to start and enable the SSSD service.
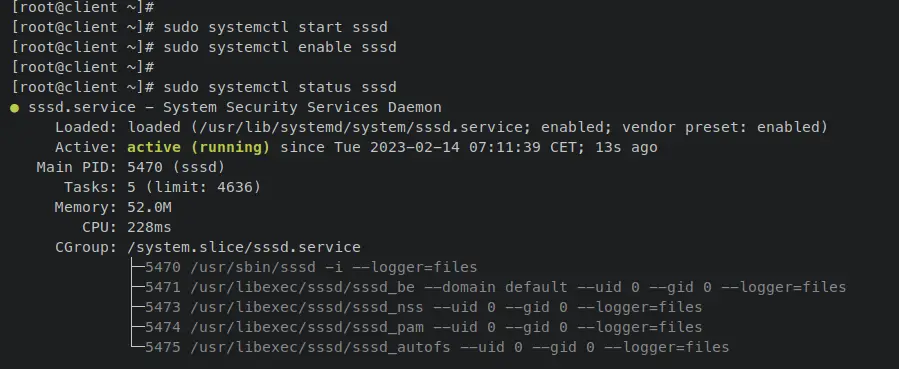
sudo systemctl start sssd
sudo systemctl enable sssd
Now enter the following command to verify the SSSD service to ensure that the service is running.
sudo systemctl status sssd
The output below confirms that the SSSD service is running and enabled, which means the SSSD service will start automatically upon the system's startup.
With this, you have now added the Rocky Linux client machine to the OpenLDAP server via the OpenLDAP client and SSSD. In the next step, you will verify both the OpenLDAP server and OpenLDAP client by logging in to the client machine via the OpenLDAP user 'rocky' that you have created.
Connect to Client Machine via OpenLDAP Users
In this section, you will verify the installation of the OpenLDAP server and OpenLDAP client by logging in to the client machine via the OpenLDAP user. So you will be logging in using the user 'rocky' that you have created on the OpenLDAP server to the client machine with IP address '192.168.5.80'.
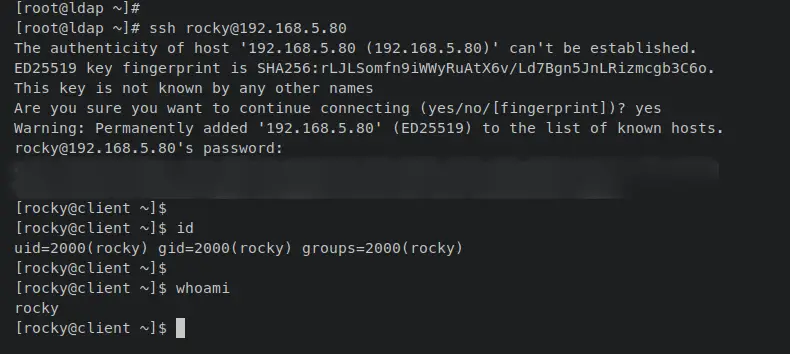
From the OpenLDAP server, enter the following 'ssh' command to log in to the client machine on '192.168.5.80'. Input yes to confirm the SSH fingerprint of the client machine, then input the password for the OpenLDAP user 'rocky'.
ssh [email protected]
When successful, you should be logged in to the client machine shell. Now enter the following command to verify the current user.
id
whoami
An output 'rocky' confirms that you've logged in to the client machine via OpenLDAP user 'rocky'. With this, your installation of the OpenLDAP server on Rocky Linux 9 is finished.
Conclusion
In this guide, you have installed the OpenLDAP server on Rocky Linux 9 server. You have also secured the OpenLDAP installation using the self-signed SSL/TLS certificates. You have also learned the basic usage of some OpenLDAP utilities such as 'ldapadd' to add new entries such as user and new configurations, 'ldapsearch' for searching entries that are available on the OpenLDAP server, and also 'ldapmodify' utility for editing the current configuration of OpenLDAP server.
In addition to that, you have also added and configured the Rocky Linux client machine to the OpenLDAP server via the OpenLDAP client and SSSD (System Security Services Daemon). Then, you have also verified the installation of the OpenLDAP server and client by logging in to the client machine via the OpenLDAP user that you have created.
With this, you can now add more client machines to the OpenLDAP server so you can have centralized user management via OpenLDAP. You may also integrate the OpenLDAP server with your applications. To get more details checks OpenLDAP's official documentation.

