
Are you looking for a powerful and customizable shell that can be especially useful for power users and developers who spend a lot of time on the command line?
Zsh, short for "Z Shell," is a command-line interpreter shell for Unix-based systems such as Linux and macOS. It is an alternative to the default shell, Bash.
In this guide, we learn how to use Zsh to improve your command line productivity.
What is Zsh?
Zsh, short for "Z Shell," is a command-line interpreter shell for Unix-based systems such as Linux and macOS. It is an alternative to the default shell, Bash.
It provides powerful auto-completion and has a wide choice of plugins. It has much more customization and is fully compatible with bash. Even though it has a lot more options than bash, it is still faster. Zsh is actively maintained and updated by open-source contributors and continues to gain popularity over the years.
Areas Zsh shines over Bash
Zsh and Bash are both popular Unix shell environments with many similar features and functionality. But there are some key differences between the two.
- Better command-line completion
- More configurable
- More modern syntax
- Improved error reporting
- zsh can emulate bash.
- Growing user community, updates come frequently.
- Better keybinding
- Supports vi mode with more configuration
Installing Zsh
You can easily install zsh using Linux Distribution specific package manager.
Debian
sudo apt install zshArch Linux
sudo pacman -S zshFedora
sudo dnf install zshSet up zsh as default shell
Once Zsh is installed, you can set zsh as your default shell. Run the following command:
chsh -s /bin/zshEnter your password and your default shell will be changed to zsh. Now start using zsh by modifying the configuration file located at ~/.zshrc.
How to Use Zsh
Let us check how fully make use zsh on your system.
1. Configuration files
Let's take a look at zsh configuration files.
.zshrc OR ~/.config/zsh/.zshrc
Runs for each interactive shell instance. Similar to .bashrc.
.zprofile
Runs for login shell only. Similar to .profile.
.zlogin
This file is the same as .zprofile. You can omit this file. Only difference between .zprofile is .zlogin will get sourced after .zshrc.
.zlogout
This file will be executed when login shell exits. You can use this to save logs or execute some commands whenever you logout, but using a cronjob for this task is better than using .zlogout.
.zshenv
If this file exists, it will always be sourced. Usually used for setting default programs like EDITOR, PAGER etc.
Note that all of these files can have a system-wide configuration as well. The directory can be found in /etc/zsh. Usually, Linux distributions make their own configurations in it.
2. Customizing .zshrc
Let's start by customizing .zshrc first. You can have this file in $HOME or $HOME/.config/zsh.
Let us first setup up a custom prompt. For example:
autoload -U colors && colors
PS1="%B%{$fg[red]%}[%{$fg[yellow]%}%n%{$fg[green]%}@%{$fg[blue]%}%M %{$fg[magenta]%}%~%{$fg[red]%}]%{$reset_color%}$%b "
Making a PS1 is a bit different from bash. Though this PS1 looks hard, it is simpler than making a custom prompt for bash.
After saving .zshrc, here is how the prompt will look like:

Add auto-completion options:
# Basic auto/tab complete
autoload -U compinit
zstyle ':completion:*' menu select
zmodload zsh/complist
setopt extendedglob
_comp_options+=(globdots)
Where,
Line 1: Enable autocompletion for zsh
Line 2: Enable completion options for menu and select (Tab will pop up a menu, enter will select or autocomplete)
Line 3: Load zsh complist (completion scripts)
Line 4: Enable ** globbing (Wildcard to match any file/directory)
Line 5: Enable autocompletion for hidden files
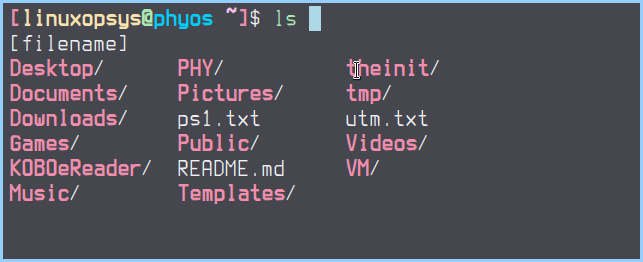
After saving this file, when you write ls and hit tab shows the following output:
3. Install Framework
There are a few lots of framework available for managing zsh configuration. Oh-my-zsh, Prezto, Zinit, and Antigen are some of them. Oh My Zsh is a popular framework, among users. It comes with many default features that can improve your command-line experiences such as autocomplete, plugins, themes, syntax highlighting, alias management, customizable prompts, and history management.
Installation of oh-my-zsh
Here we will use curl to download the script for the installation. To install curl, use any of the following commands based on your system
sudo apt install curl    #Ubuntu / Debian
sudo pacman -S curl   #Arch Linux
sudo dnf install curl   #Fedora
Download and run the oh-my-zsh script:
sh -c "$(curl -fsSL https://raw.githubusercontent.com/ohmyzsh/ohmyzsh/master/tools/install.sh)"This command will install oh-my-zsh, and save your existing .zshrc as .zshrc.pre-oh-my-zsh.
Once oh-my-zsh overrides your custom prompt, the output should be similar to this:
Enable plugins
After installing it, there should be a folder called .oh-my-zsh in your $HOME folder. All the default plugins are available under ~/.oh-my-zsh/plugins directory.
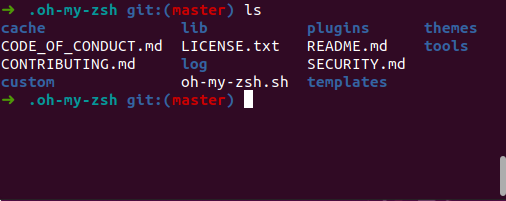
To list all the oh-my-zsh plugins, type:
$ cd ~/.oh-my-zsh/plugins
$ ls
To enable plugins in Oh My Zsh, you need to add the name of the plugin to the list of plugins in your ~/.zshrc file.
For example, to enable plugins golang, git and autocd use this:
plugins=(golang git autocd)Tab completion
After setting up Oh My Zsh, tab completion will be enabled by default. That's awesome !!
Here is a gif to see how it works:
Prompt themes
Oh My Zsh Prompt themes are just eye candy for your terminal. It's a customizable look and feel for the command line prompt. Prompt themes helps you to see the directory you are currently in, show username, hostname, etc. These are all configurable, and with oh-my-zsh it is easier than you think.
Enabling oh-my-zsh prompt theme is really simple. You can find available themes under themes/ directory or on the GitHub themes page.
To set prompt themes edit .zshrc file and set the ZSH_THEME variable to the name of the theme you want to use:
ZSH_THEME="simple"After spawning a new terminal, you should see the new prompt.
You should also consider checking themes Powerlevel10k and oh-my-posh.
Add Syntax Highlighting
There are several syntax highlighting plugins available for zsh. One of the popular and widely used plugin is fast-syntax-highlighting. As it doesn't come with oh my zsh, you need to manually install it.
Install fast-syntax-highlighting
git clone https://github.com/zdharma-continuum/fast-syntax-highlighting.git \
  ${ZSH_CUSTOM:-$HOME/.oh-my-zsh/custom}/plugins/fast-syntax-highlighting
After installing fast-syntax-highlighting, append it to the plugin list in .zshrc file.
plugins=(golang git autocd fast-syntax-highlighting)After sourcing .zshrc or opening another terminal, both commands and outputs should be colorful!

Enabling vim mode
To enable vim mode in zsh, put this in .zshrc:
bindkey -vBy enabling vim (vi) mode, now you can use some of the keybindings in your terminal. Press ESC to change in normal mode, and use usual vim keys to navigate - manipulate text.
Bind Ctrl+e to edit current command with $EDITOR in both vi command mode and vi insert mode:
bindkey -M viins '^e' edit-command-line
bindkey -M vicmd '^e' edit-command-line
Use History
Before learning history related commands, lets change some variables and options in ~/.config/zsh/.zshrc.
HISTSIZE=10000
SAVEHIST=10000
setopt appendhistory
setopt INC_APPEND_HISTORY
setopt SHARE_HISTORY
Where,
Line 1: Set maximum history size.
Line 2: Set maximum history size to store in history file.
Line 3: Append to history file instead of replacing when using multiple zsh sessions.
Line 4: Will append the command without waiting for shell exit.
Line 5: This will enable to see previous commands that has been entered using different terminals. Really useful if you are using multiple terminals at the same time.
The following command will show the output of executed commands until now. Note that it will not save any command if it is not executed.
historyTo see the last 10 commands.
history -10To see commands greater than or equal to 20.
history +20Up arrow can be used for cycling to previous command, and down arrow will cycle through next command.
The exclamation mark is special for zsh history. It can be used for various ways to complete commands from history. Let's take a look at some examples:
!!<Press tab>If you hit tab after 2 exclamations (!!) characters, command will expand to last command. This can be really useful if you forgot to add sudo to a super user privileged command.
Example:
apt update
# Does not work, it needs sudo
sudo !!<Press tab>
Will append the last command double exclamation mark.
It can also be used with numbers as well.
!<number> <Press tab>To expand it to command <number> with respect to history.
Command completion
To have command completion with zsh, that command must have a zsh completion script. If it does not have, it will not have autocompletion. You can try searching google if there is a completion scripts exists for that command. If there is one, place it here for autoloading it:
/usr/share/zsh/site-functionsThere are different places for completion scripts which can be in different locations with different distributions.
Check out completion paths with the command below:
echo $fpathYou can also create your own completions directory and append it to fpath variable.
Using FzF
Fzf is a fuzzy finder, which works perfectly with zsh. It can be used to complete both commands and directories, either with keybindings or using fzf-tab plugin. We are going to install this plugin for both command and directory completion.
This plugin needs to be loaded last, which is why Oh My Zsh is not going to be used to add this plugin. Please clone the repository to ~/.config/zsh:
git clone https://github.com/Aloxaf/fzf-tab ~/.config/zshTo be able to activate a plugin, it needs to be sourced. Use the following command to append fzf-tab plugin to your .zshrc:
echo 'source ~/.config/zsh/fzf-tab/fzf-tab.plugin.zsh' >> ~/.config/zsh/.zshrcTime to see fzf-tab in action.
Using zsh-autocomplete
One of the popular autocomplete plugins is zsh-autocomplete. It provides advanced command completion features.
This plugin is great, but it has some compatibility issues with other plugins. To avoid this issue, after installing this plugin we will replace our old .zshrc with the default one provided by the repository.
Move .zshrc first:
# If it is in home
mv ~/.zshrc ~/zshrc
# If it is in .config/zsh
mv ~/.config/zsh/.zshrc ~/.config/zsh/zshrc
Clone the repository:
# Change your directory to ~/.config/zsh first, create if not exists
mkdir -p ~/.config/zsh
cd ~/.config/zsh
git clone https://github.com/marlonrichert/zsh-autocomplete
mv zsh-autocomplete/.zshrc ~/
In the .zshrc file provided by this repository, path to plugin source is not set. You can set it manually or use the following sed command to change it:
sed -i 's|/path/to|~/.config/zsh/zsh-autocomplete|g' ~/.zshrcClose your terminal and open a new one to source it. It has the ability of real-time type ahead completion, which is why you should notice the differences even if you press one character.
Here is a demonstration of how it works:
Key bindings
Key bindings will help you get smoother and faster in your terminal. You can bind keys to functions, to launch programs, to copy-paste etc. Note that some combinations may not work, since shells have limited capability to catch key presses.
To set up a keybinding in Zsh, you must use ascii notation. Snippet below will bind TAB key to fzf-tab plugin for vi insert mode.
bindkey -M viins '^I' fzf-tab-completeThere are lot of different modes available, to check them and set your own keybindings please refer to zsh documentation.
Terminal emulator window title
Most shells have the capability to set the window title. This can help with locating the correct terminal when using utility keys to switch windows like Alt+Tab, or see the current working directory from looking at the window title. Note that location or features of window title can be different through desktop environments, since each of them have their own implementation.
There is also a way to change window title dynamically by using a function in .zshrc. Function will not be explained, but feel free to try it in your .zshrc:
case "$TERM" in (rxvt|rxvt-*|st|st-*|*xterm*|(dt|k|E)term)
    local term_title () { print -n "\e]0;${(j: :q)@}\a" }
    precmd () {
      local DIR="$(print -P '[%c]')"
      term_title "$DIR" "st"
    }
    preexec () {
      local DIR="$(print -P '[%c]%#')"
      local CMD="${(j:\n:)${(f)1}}"
      #term_title "$DIR" "$CMD" use this if you want directory in command, below only prints program name
	  term_title "$CMD"
    }
  ;;
esac
This function will change your window title with respect to your current working directory.

Zsh commands
Some zsh specific commands to improve your productivity.
Convert hexadecimal number to decimal:
echo $((16#ff)) 255Convert decimal number to hexadecimal number:
echo $(([##16]255)) FFPrint ASCII character integer value:
echo $((#\a)) 97Split string into an array:
echo "${(@f)$(echo hello\nworld)}" hello worldSplit string into an array with custom delimiter:
echo "${(s._.)$(echo hello_world_linux)}" hello world linux The string is delimited with _ .
Note that you can use both '.' or ':' for separator. Example:
i) (s.:.): Split string by :
ii) (s:.:): Split string by .
Conclusion
For Zsh, there are many options, customizing and supporting plugins, which you may feel hard at first sight. If you stick around with Zsh, it will be an irreplaceable tool for your work.


Comments