How to Install and Configure OpenVPN Server on Rocky Linux 9
On this page
- Prerequisites
- Step 1 - Setting up the CA server
- Step 2 - Installing OpenVPN and Easy-RSA on the OpenVPN server
- Step 3 - Creating a PKI for OpenVPN Server
- Step 4 - Create OpenVPN Server Certificate Request and Private Key
- Step 5 - Signing the OpenVPN Server's CSR
- Step 6 - Configure OpenVPN Cryptographic Material
- Step 7 - Generate a Client Certificate and Key Pair
- Step 8 - Configure OpenVPN
- Step 9 - Adjust OpenVPN Server Networking Configuration
- Step 10 - Configure Firewall
- Step 11 - Start OpenVPN
- Step 12 - Create Client Configuration
- Step 13 - Install and Test Client Connection
- Step 14 - Revoking Client Certificates
- Conclusion
A Virtual Private Network (VPN) allows you to access the internet by masking your location which gives you the freedom to access the internet safely on untrusted networks and circumvent geographical restrictions and censorship. OpenVPN is an open-source Transport Layer Security (TLS) VPN solution to achieve this goal.
In our tutorial, we will install OpenVPN on a Rocky Linux 9 server and configure it to be accessible from a client machine, and create a VPN connection between them to redirect all the traffic from the client through the OpenVPN server.
Prerequisites
-
A server running Rocky Linux 9 supporting both IPv4 and IPv6 connections. We will refer to this as the OpenVPN server. The Firewalld Firewall is enabled and running on it.
-
A server running Rocky Linux 9 supporting both IPv4 and IPv6 connections. We will set this up as a private Certificate Authority (CA), which we will refer to as the CA server.
-
A non-root user with sudo privileges on both OpenVPN and the CA server.
-
A client machine to connect to the OpenVPN server. You can use your local device as the client machine. OpenVPN has clients for Windows, Linux, macOS, Android, and iOS. You can use either of them to connect. We will use a Rocky Linux 9 client PC for the tutorial.
-
Everything is updated on the OpenVPN and the CA server.
$ sudo dnf update
Step 1 - Setting up the CA server
A Certificate Authority (CA) is an entity responsible for issuing digital certificates to verify identities on the Internet. In this tutorial, we will use a standalone server as the private CA server which will validate the OpenVPN server and client certificates. Your CA server should not run any other services other than importing, signing, and validating certificates.
Step 1.1 - Install Easy-RSA
The first step is to install the easy-rsa set of scripts. easy-rsa is a Certificate Authority management tool used to generate a private key, and public root certificate.
But first, we need to enable the EPEL repository which contains the easy-rsa package.
$ sudo dnf install epel-release
Install Easy-RSA.
$ sudo dnf install easy-rsa
Step 1.2 - Create a Public Key Infrastructure Directory
The next step is to create a skeleton Public Key Infrastructure (PKI) on the CA server.
$ mkdir ~/easy-rsa
Create symbolic links pointing to the installed easy-rsa package files.
$ ln -s /usr/share/easy-rsa/3/* ~/easy-rsa/
Restrict access to the PKI directory.
$ chmod 700 /home/<username>/easy-rsa
Initialize the PKI.
$ cd ~/easy-rsa
$ ./easyrsa init-pki
You will get the following output.
init-pki complete; you may now create a CA or requests.
Your newly created PKI dir is: /home/<username>/easy-rsa/pki
Step 1.3 - Create a Certificate Authority
Before you can create your CA's private key and certificate, you need to configure the organization information for it. Create vars file to store the information inside the easy-rsa directory and open it for editing.
$ cd ~/easy-rsa
$ nano vars
Paste the following code in it.
set_var EASYRSA_REQ_COUNTRY    "US"
set_var EASYRSA_REQ_PROVINCE   "NewYork"
set_var EASYRSA_REQ_CITY       "New York City"
set_var EASYRSA_REQ_ORG        "Howtoforge"
set_var EASYRSA_REQ_EMAIL      "[email protected]"
set_var EASYRSA_REQ_OU         "Community"
set_var EASYRSA_ALGO           "ec"
set_var EASYRSA_DIGEST         "sha512"
Save the file by pressing Ctrl + X and entering Y when prompted.
Run the following command to create the root public and private key pair for your Certificate Authority.
$ ./easyrsa build-ca
You will be prompted to enter a passphrase for your key pair. You will also be asked for a PEM passphrase. Choose a strong passphrase for both, and note it for later. You will also be asked for the Common Name (CN) for your CA. You can enter any string but for simplicity stake, press ENTER to accept the default name.
Using SSL: openssl OpenSSL 3.0.1 14 Dec 2021 (Library: OpenSSL 3.0.1 14 Dec 2021)

Enter New CA Key Passphrase:
Re-Enter New CA Key Passphrase:
Enter PEM pass phrase:
Verifying - Enter PEM pass phrase:
-----
You are about to be asked to enter information that will be incorporated
into your certificate request.
What you are about to enter is what is called a Distinguished Name or a DN.
There are quite a few fields but you can leave some blank
For some fields there will be a default value,
If you enter '.', the field will be left blank.
-----
Common Name (eg: your user, host, or server name) [Easy-RSA CA]:

CA creation complete and you may now import and sign cert requests.
Your new CA certificate file for publishing is at:
/home/<username>/easy-rsa/pki/ca.crt
If you don't want to be prompted for a password every time you interact with your CA, you can use the following command instead.
$ ./easyrsa build-ca nopass
This will create two files:
~/easy-rsa/pki/ca.crtis the CA's public certificate file. Every user and the OpenVPN server will need a copy of this file.~/easy-rsa/pki/ca.keyis the private key used by the CA to sign certificates for the OpenVPN server and client. If an attacker gains access to your CA and, in turn, yourca.keyfile, you will need to destroy your CA. This is why yourca.keyfile should only be on your CA machine and that, ideally, your CA machine should be kept offline when not signing certificate requests as an extra security measure.
Step 2 - Installing OpenVPN and Easy-RSA on the OpenVPN server
Log in to your OpenVPN server and install OpenVPN and Easy-RSA packages. Also, install the EPEL repository before them.
$ sudo dnf install epel-release
$ sudo dnf install openvpn easy-rsa
Create the directory ~/easy-rsa.
$ mkdir ~/easy-rsa
Create a symbolic link from the easy-rsa script that we installed just like on the CA server.
$ ln -s /usr/share/easy-rsa/3/* ~/easy-rsa/
Restrict access to the directory.
$ chmod 700 ~/easy-rsa
Step 3 - Creating a PKI for OpenVPN Server
Create a vars file inside the ~/easy-rsa directory to store the required information to create the PKI and open it for editing.
$ cd ~/easy-rsa
$ nano vars
Paste the following lines in it.
set_var EASYRSA_ALGO "ec"
set_var EASYRSA_DIGEST "sha512"
Since we are not using this server as the CA, these are the only values we need. This configures your OpenVPN & CA servers to use ECC which means when a client and server attempt to establish a shared symmetric key, they use Elliptic Curve algorithms to do their exchange. It is significantly faster than using plain Diffie-Hellman with the classic RSA algorithm since the numbers are much smaller and the computations are faster.
The next step is to create the PKI directory by using the init-pki option. Although you already ran this command on the CA server as part of the prerequisites, it’s necessary to run it here because your OpenVPN server and CA server have separate PKI directories.
$ ./easyrsa init-pki
The PKI on the OpenVPN server is used as a centralized place to store certificate requests and public certificates.
Step 4 - Create OpenVPN Server Certificate Request and Private Key
Switch to the ~/easy-rsa directory on the OpenVPN server.
$ cd ~/easy-rsa
The next step is to generate a private key and Certificate Signing Request (CSR) on your OpenVPN server. Run the easy-rsa command with the gen-req option followed by a Common Name (CN) for the server. For our tutorial, we will use server as the CN for the OpenVPN server. We will also use the nopass option to avoid any permission issues.
$ ./easyrsa gen-req server nopass
You will get the following output.
Using SSL: openssl OpenSSL 3.0.1 14 Dec 2021 (Library: OpenSSL 3.0.1 14 Dec 2021)
.....+.................+.+.....+....+........+...+.+...+++++++++++++++++++++++++++++++++++++++++++++++++++++++++++++++++*..+++++++++++++++++++++++++++++++++++++++++++++++++++++++++++++++++*........+.+...+..+......+...+....+.....+...+.........+......+.......+...+.....+.......+.....+.....................+.+...+...+...............+........+..........+......+.....+...+.......+........+.+...........+...+.+.....+......+.+...+.........+...+........+.+...........+...+....+..+...+............+.............+.....+...+.......+...+...+...........+.+..+.......+.....+...................+..+...+......+....+..+.......+......+......+......+..+......+....+............+...............+.....+..........+...+..+....+..+.........+....+...............+..............+.......+...+..+...+......+.+....................................+........+....+...+...+.........+.....+.+..+...+.+++++++++++++++++++++++++++++++++++++++++++++++++++++++++++++++++
................+...+....+............+...+...+.....+...+....+...............+......+.....+....+.....+.+.........+...+.................+......+.........+.......+++++++++++++++++++++++++++++++++++++++++++++++++++++++++++++++++*........+...+..+.......+..+...+.+.....+.........+.+..+....+...+.....+......+.......+.........+........+......+.+.....+.+............+..+..........+........+.+..+...+++++++++++++++++++++++++++++++++++++++++++++++++++++++++++++++++*.+.........+...+..+.+........+....+..+......+....+.........+..+............+...+...+.........+.............+..+...+...+.+......+.....+....+.....+.+...+..............................+......+........+..........+..+++++++++++++++++++++++++++++++++++++++++++++++++++++++++++++++++
-----
You are about to be asked to enter information that will be incorporated
into your certificate request.
What you are about to enter is what is called a Distinguished Name or a DN.
There are quite a few fields but you can leave some blank
For some fields there will be a default value,
If you enter '.', the field will be left blank.
-----
Common Name (eg: your user, host, or server name) [server]:

Keypair and certificate request completed. Your files are:
req: /home/<username>/easy-rsa/pki/reqs/server.req
key: /home/<username>/easy-rsa/pki/private/server.key
This creates a private key for the server and a certificate request file called server.req. Copy the server key to the /etc/openvpn/server directory.
$ sudo cp /home/<username>/easy-rsa/pki/private/server.key /etc/openvpn/server/
The Certificate Signing Request (CSR) is now ready for signing by the CA.
Step 5 - Signing the OpenVPN Server's CSR
The next step is to copy the CSR file to the CA server for signing. If your servers have password authentication enabled, you can simply use the following command to copy the file.
$ scp /home/<username>/easy-rsa/pki/reqs/server.req username@your_ca_server_ip:/tmp
If you don't want to use password authentication, you will need to generate an SSH keypair for each server, then add the OpenVPN Server’s public SSH key to the CA machine’s authorized_keys file and vice versa.
If you don't want to go through all this, you can simply copy the files. Open the file on the OpenVPN server, copy its contents, and then create the file on the CA server and paste the contents.
Log back into the CA Server, and switch to the ~/easy-rsa directory and import the CSR file.
$ cd ~/easy-rsa
$ ./easyrsa import-req /tmp/server.req server
You will get the following output.
Using SSL: openssl OpenSSL 3.0.1 14 Dec 2021 (Library: OpenSSL 3.0.1 14 Dec 2021)

The request has been successfully imported with a short name of: server
You may now use this name to perform signing operations on this request.
Sign the request using the following command. Since we are signing the OpenVPN server's CSR, we will use its Common Name (CN).
$ ./easyrsa sign-req server server
You will be prompted to verify if the request comes from a trusted source. Type yes then press ENTER key to confirm.
Using SSL: openssl OpenSSL 3.0.1 14 Dec 2021 (Library: OpenSSL 3.0.1 14 Dec 2021)


You are about to sign the following certificate.
Please check over the details shown below for accuracy. Note that this request
has not been cryptographically verified. Please be sure it came from a trusted
source or that you have verified the request checksum with the sender.

Request subject, to be signed as a server certificate for 825 days:

subject=
    commonName                = server


Type the word 'yes' to continue, or any other input to abort.
  Confirm request details: yes
Next, you will be prompted for the CA private key passphrase which you set up earlier.
Using configuration from /home/<username>/easy-rsa/pki/easy-rsa-5673.9KntVf/tmp.P5JqSD
Enter pass phrase for /home/<username>/easy-rsa/pki/private/ca.key:
802BB2829D7F0000:error:0700006C:configuration file routines:NCONF_get_string:no value:crypto/conf/conf_lib.c:315:group=<NULL> name=unique_subject
Check that the request matches the signature
Signature ok
The Subject's Distinguished Name is as follows
commonName            :ASN.1 12:'server'
Certificate is to be certified until May 12 01:34:35 2025 GMT (825 days)

Write out database with 1 new entries
Data Base Updated

Certificate created at: /home/<username>/easy-rsa/pki/issued/server.crt
The resulting certificate contains the OpenVPN server's public encryption key as well as the signature from the CA server. Copy the certificates back to the OpenVPN server.
$ scp pki/issued/server.crt username@your_vpn_server_ip:/tmp
$ scp pki/ca.crt username@your_vpn_server_ip:/tmp
On your OpenVPN server, copy the files to the /etc/openvpn/server directory.
$ sudo cp /tmp/{server.crt,ca.crt} /etc/openvpn/server
Step 6 - Configure OpenVPN Cryptographic Material
We will add an extra shared secret key that the server and all clients will use with OpenVPN's tls-crypt directive. This ensures that the OpenVPN server is able to cope with unauthenticated traffic, port scans, and Denial of Service attacks. It also makes it harder to identify OpenVPN network traffic.
Switch to the ~/easy-rsa directory.
$ cd ~/easy-rsa
Generate the tls-crypt pre-shared key. This will create a file called ta.key
$ openvpn --genkey secret ta.key
Copy the ta.key to the /etc/openvpn/server directory.
$ sudo cp ta.key /etc/openvpn/server
Step 7 - Generate a Client Certificate and Key Pair
Create a directory to store the client certificate and key files.
$ mkdir -p ~/client-configs/keys
Restrict the permissions on the directory to protect it.
$ chmod -R 700 ~/client-configs
Next, switch to the ~/easy-rsa directory.
$ cd ~/easy-rsa
Generate a client key with client1 as the Common Name for the client. You can use any CN for the client.
$ ./easyrsa gen-req client1 nopass
Press ENTER to confirm the common name. You will get the following output.
Using SSL: openssl OpenSSL 3.0.1 14 Dec 2021 (Library: OpenSSL 3.0.1 14 Dec 2021)
........+.+.........+.........+...+...+..+.........+......+...+.......+..+.+++++++++++++++++++++++++++++++++++++++++++++++++++++++++++++++++*.+..+...+....+........+.......+........+............+...+......+.......+..+.+++++++++++++++++++++++++++++++++++++++++++++++++++++++++++++++++*...+...+...............+..........+......+......+.....+....+...........+.+..+......+.+.....................+.........+.........+..+.........+..+...+.+..+++++++++++++++++++++++++++++++++++++++++++++++++++++++++++++++++
+.....+.+..................+...........+...+.+............+..+++++++++++++++++++++++++++++++++++++++++++++++++++++++++++++++++*.......+.....+.+.........+...+..+.........+....+..+..................+.+......+...+...+.....+...+......+..........+........+...+...+......+...+...+...+++++++++++++++++++++++++++++++++++++++++++++++++++++++++++++++++*...+...+.....+.......+........+.......+........+.+.........+...........+.......+...............+.....+....+.........+.....+.+...+........+...+.+...+..+.+........+............+.........+.+.........+.....+.++.......+.....+.......+.....+....+......+.....+.............+...........+......+++++++++++++++++++++++++++++++++++++++++++++++++++++++++++++++++
-----
You are about to be asked to enter information that will be incorporated
into your certificate request.
What you are about to enter is what is called a Distinguished Name or a DN.
There are quite a few fields but you can leave some blank
For some fields there will be a default value,
If you enter '.', the field will be left blank.
-----
Common Name (eg: your user, host, or server name) [client1]:

Keypair and certificate request completed. Your files are:
req: /home/<username>/easy-rsa/pki/reqs/client1.req
key: /home/<username>/easy-rsa/pki/private/client1.key
Next, copy the client1.key file to the ~/client-configs/keys directory.
$ cp pki/private/client1.key ~/client-configs/keys/
Transfer the client1.req file to the CA server.
$ scp pki/reqs/client1.req username@your_ca_server_ip:/tmp
Log back into the CA server and import the server request.
$ cd ~/easy-rsa
$ ./easyrsa import-req /tmp/client1.req client1
You will get the following output.
Using SSL: openssl OpenSSL 3.0.1 14 Dec 2021 (Library: OpenSSL 3.0.1 14 Dec 2021)

The request has been successfully imported with a short name of: client1
You may now use this name to perform signing operations on this request.
Sign the request using the following command. We are using client as the request type.
$ ./easyrsa sign-req client client1
When prompted, enter yes to confirm to sign the request and that it came from a trusted source.
Using SSL: openssl OpenSSL 3.0.1 14 Dec 2021 (Library: OpenSSL 3.0.1 14 Dec 2021)


You are about to sign the following certificate.
Please check over the details shown below for accuracy. Note that this request
has not been cryptographically verified. Please be sure it came from a trusted
source or that you have verified the request checksum with the sender.

Request subject, to be signed as a client certificate for 825 days:

subject=
    commonName                = client1


Type the word 'yes' to continue, or any other input to abort.
  Confirm request details: yes
You will be prompted for the CA passphrase.
Using configuration from /home/<username>/easy-rsa/pki/easy-rsa-5908.XM2MNt/tmp.SGLqAt
Enter pass phrase for /home/<username>/easy-rsa/pki/private/ca.key:
Check that the request matches the signature
Signature ok
The Subject's Distinguished Name is as follows
commonName            :ASN.1 12:'client1'
Certificate is to be certified until May 12 01:41:45 2025 GMT (825 days)

Write out database with 1 new entries
Data Base Updated

Certificate created at: /home/<username>/easy-rsa/pki/issued/client1.crt
Transfer the created certificate back to the OpenVPN server.
$ scp pki/issued/client1.crt username@your_server_ip:/tmp
On the OpenVPN server, copy the client certificate to the ~/client-configs/keys directory.
$ cp /tmp/client1.crt ~/client-configs/keys/
Copy the ca.crt and ta.key files to the ~/client-configs/keys directory, and set appropriate permissions for your currently logged-in server.
$ cp ~/easy-rsa/ta.key ~/client-configs/keys/
$ sudo cp /etc/openvpn/server/ca.crt ~/client-configs/keys/
$ sudo chown username.username ~/client-configs/keys/*
Step 8 - Configure OpenVPN
Copy the sample server.conf file as a starting point to configure OpenVPN.
$ sudo cp /usr/share/doc/openvpn/sample/sample-config-files/server.conf /etc/openvpn/server/
Open the file for editing.
$ sudo nano /etc/openvpn/server/server.conf
Find the HMAC section of the file by looking for the tls-auth directive. Comment out the line by adding a semi-colon (;) at the beginning of the line. Add a new line below it as shown.
;tls-auth ta.key 0 # This file is secret
tls-crypt ta.key
Next, change the cryptographic cipher value by looking for the cipher lines. The default value is set to AES-256-CBC. Comment out the default value and add another line with the AES-256-GCM encryption which offers a better level of encryption, and performance as shown.
;cipher AES-256-CBC
cipher AES-256-GCM
Right below, add the auth directive to select the HMAC message digest algorithm.
auth SHA256
Since we are using Elliptic Curve Cryptography, we need to turn off the Diffie-Hellman encryption. Comment out the dh dh2048.pem line and add dh none below it.
;dh dh2048.pem
dh none
OpenVPN should run with no privileges once it has started. To enable this, find and uncomment the user nobody and group nobody lines and change them as shown.
user nobody
group nobody
Redirect All Traffic through the VPN
The settings above create the VPN connection between the client and server, but won't force any connections to use the tunnel. To do so, start by finding the push "redirect-gateway def1 bypass-dhcp" line. This line tells the client to redirect all its traffic through the OpenVPN server. Uncomment the line to enable the functionality.
push "redirect-gateway def1 bypass-dhcp"
Find the dhcp-option section below this line. Remove the semi-colon from the beginning of both lines. This tells the client to use the OpenDNS resolvers.
push "dhcp-option DNS 208.67.222.222"
push "dhcp-option DNS 208.67.220.220"
Change Port and Protocol
OpenVPN uses port 1194 and the UDP protocol by default to accept client connections. You can change the port depending on your needs. If you are not hosting web content on your OpenVPN server, you can use port 443.
Find the line ;port 1194, uncomment it by removing the semi-colon, and change its value.
port 443
Find the proto udp line and comment it out by adding a semi-colon in front of it. And, uncomment the proto tcp line by removing the semi-colon as shown.
proto tcp
;proto udp
Since we are using the TCP protocol, we need to change the value of the explicit-exit-notify directive from 1 to 0, as this directive is only used by UDP.
explicit-exit-notify 0
Point to Non-Default Credentials
If you selected a different name during the ./easy-rsa gen-req server command earlier, you need to modify the cert and the key lines so that they point to the appropriate .crt and .key files. Since we are using the default server name, the default value is correct.
cert server.crt
key server.key  # This file should be kept secret
Change Log File location for SELinux
Find the line status openvpn-status.log and change it to the following.
status /var/log/openvpn-status.log
By default, the OpenVPN server generates and stores the log in the /run/openvpn/openvpn-status.log directory which if SELinux is enabled causes issues. The easy fix is to change the location to the system log directory.
Once finished, save the file by pressing Ctrl + X and entering Y when prompted.
Step 9 - Adjust OpenVPN Server Networking Configuration
The next step is to configure the server's networking configuration to enable OpenVPN to route traffic correctly. The first thing we need to configure is Port forwarding.
Open the /etc/sysctl.conf file for editing.
$ sudo nano /etc/sysctl.conf
Add the following line at the bottom of the file.
net.ipv4.ip_forward = 1
Save the file by pressing Ctrl + X and entering Y when prompted.
To read the file and load the new values for the current session, use the following command.
$ sudo sysctl -p
net.ipv4.ip_forward = 1
This configuration will route all web traffic from your client via your server’s IP address, and your client’s public IP address will effectively be hidden.
Step 10 - Configure Firewall
We have installed and configured OpenVPN, but have not set it up to handle incoming client traffic. We need to configure the Firewall for this.
First, check the active zones in your firewalld Firewall.
$ sudo firewall-cmd --get-active-zones
You will receive a similar output.
public
  interfaces: eth0 eth1
If you do not see tun0 interface as a trusted zone, run the following commands to add the server to that zone.
$ sudo firewall-cmd --zone=trusted --add-interface=tun0
$ sudo firewall-cmd --permanent --zone=trusted --add-interface=tun0
Next, add the OpenVPN service to the list of allowed services within the active zone. And then make the settings permanent.
$ sudo firewall-cmd --permanent --add-service openvpn
$ sudo firewall-cmd --permanent --zone=trusted --add-service openvpn
Reload the Firewall to apply the changes.
$ sudo firewall-cmd --reload
Confirm that the OpenVPN service was added.
$ sudo firewall-cmd --list-services --zone=trusted
openvpn
Next, we need to add a masquerade rule to the firewall. This allows the OpenVPN server to translate clients' addresses into the server's public address, and then do the reverse with traffic sent back to clients. This process is also called Network Address Translation (NAT).
Add masquerade rules with the following commands.
$ sudo firewall-cmd --add-masquerade
$ sudo firewall-cmd --add-masquerade --permanent
Confirm that the masquerade was added correctly.
$ sudo firewall-cmd --query-masquerade
yes
Finally, create the specific masquerade rule for the OpenVPN subnet. This is done by creating a shell variable (DEVICE in our tutorial) which represents the primary network interface used by the server, and then using that variable to permanently add the routing rule.
$ DEVICE=$(ip route | awk '/^default via/ {print $5}')
$ sudo firewall-cmd --permanent --direct --passthrough ipv4 -t nat -A POSTROUTING -s 10.8.0.0/24 -o $DEVICE -j MASQUERADE
Finally, open the port set for OpenVPN above.
$ sudo firewall-cmd --permanent --add-port=443/tcp
Reload the firewall to apply the change.
$ sudo firewall-cmd --reload
Step 11 - Start OpenVPN
Enable the OpenVPN service to start at boot.
$ sudo systemctl -f enable [email protected]
Start the OpenVPN service.
$ sudo systemctl start [email protected]
Check the status of the service.
$ sudo systemctl status [email protected]
You will receive a similar output.
? [email protected] - OpenVPN service for server
     Loaded: loaded (/usr/lib/systemd/system/[email protected]; enabled; vendor preset: disabled)
     Active: active (running) since Tue 2023-02-07 02:09:36 UTC; 13s ago
       Docs: man:openvpn(8)
             https://community.openvpn.net/openvpn/wiki/Openvpn24ManPage
             https://community.openvpn.net/openvpn/wiki/HOWTO
   Main PID: 4789 (openvpn)
     Status: "Initialization Sequence Completed"
      Tasks: 1 (limit: 4443)
     Memory: 1.7M
        CPU: 21ms
     CGroup: /system.slice/system-openvpn\x2dserver.slice/[email protected]
             ??4789 /usr/sbin/openvpn --status /run/openvpn-server/status-server.log --status-version 2 --suppress-timestamps --cipher AES-256-GCM --data-ciphers AES-256-GCM:AES-128-GCM:AES-256-CBC:AES-128-CBC:BF-CBC --config server.conf

Feb 07 02:09:36 openvpn-server openvpn[4789]: Listening for incoming TCP connection on [AF_INET][undef]:443
Feb 07 02:09:36 openvpn-server openvpn[4789]: TCPv4_SERVER link local (bound): [AF_INET][undef]:443
Feb 07 02:09:36 openvpn-server openvpn[4789]: TCPv4_SERVER link remote: [AF_UNSPEC]
Feb 07 02:09:36 openvpn-server openvpn[4789]: GID set to nobody
Feb 07 02:09:36 openvpn-server openvpn[4789]: UID set to nobody
Feb 07 02:09:36 openvpn-server openvpn[4789]: MULTI: multi_init called, r=256 v=256
Feb 07 02:09:36 openvpn-server openvpn[4789]: IFCONFIG POOL IPv4: base=10.8.0.4 size=62
Feb 07 02:09:36 openvpn-server openvpn[4789]: IFCONFIG POOL LIST
Feb 07 02:09:36 openvpn-server openvpn[4789]: MULTI: TCP INIT maxclients=1024 maxevents=1028
Feb 07 02:09:36 openvpn-server openvpn[4789]: Initialization Sequence Completed
Step 12 - Create Client Configuration
Before testing a client, we need to create configuration files for the client we will use. Create a directory for storing client configuration files.
$ mkdir -p ~/client-configs/files
Copy the example client configuration file to the directory.
$ cp /usr/share/doc/openvpn/sample/sample-config-files/client.conf ~/client-configs/base.conf
Open the configuration file for editing.
$ nano ~/client-configs/base.conf
Find the remote directive and set it to point to your OpenVPN Server's public IP address. Also, change the port to match the port you chose before.
. . .
# The hostname/IP and port of the server.
# You can have multiple remote entries
# to load balance between the servers.
remote your_server_ip 443
. . .
Set the protocol you chose earlier.
proto tcp
Uncomment the user and group directives by removing the semi-colon in front of them.
# Downgrade privileges after initialization (non-Windows only)
user nobody
group nobody
Find the ca, cert, and key directives and comment them out by putting a semi-colon in front of them. This is because we will add the certs and keys within the client configuration file.
# SSL/TLS parms.
# See the server config file for more
# description. It's best to use
# a separate .crt/.key file pair
# for each client. A single ca
# file can be used for all clients.
;ca ca.crt
;cert client.crt
;key client.key
Comment out the tls-auth directive as we will add the ta.key directly into the client configuration file.
# If a tls-auth key is used on the server
# then every client must also have the key.
;tls-auth ta.key 1
Match the cipher and auth settings that you set in the `/etc/openvpn/server/server.conf file.
cipher AES-256-GCM
auth SHA256
Add the key-direction directive and set it to 1 for the VPN to function correctly.
key-direction 1
Create a script to compile the base configuration with the relevant certificate, key, and encryption files, and then copy the generated configuration file into the ~/client-configs/files directory.
Create and open the file make_config.sh within the ~/client-configs directory.
$ nano ~/client-configs/make_config.sh
Paste the following code in it.
#!/bin/bash

# First argument: Client identifier

KEY_DIR=~/client-configs/keys
OUTPUT_DIR=~/client-configs/files
BASE_CONFIG=~/client-configs/base.conf

cat ${BASE_CONFIG} \
    <(echo -e '<ca>') \
    ${KEY_DIR}/ca.crt \
    <(echo -e '</ca>\n<cert>') \
    ${KEY_DIR}/${1}.crt \
    <(echo -e '</cert>\n<key>') \
    ${KEY_DIR}/${1}.key \
    <(echo -e '</key>\n<tls-crypt>') \
    ${KEY_DIR}/ta.key \
    <(echo -e '</tls-crypt>') \
    > ${OUTPUT_DIR}/${1}.ovpn
Save the file by pressing Ctrl + X and entering Y when prompted.
Make the file executable and restrict permissions to it.
$ chmod 700 ~/client-configs/make_config.sh
This script makes a copy of the base.conf file, collect all the certificate and key files, extract their content, append them to the base configuration file, and export all that to create a new client configuration file. Every time you add a new client, you need to generate new keys and certificates for it and then run this script to create a client configuration file.
We have already created the client certificate and key files in step 7. Let us create the configuration file for the same.
Switch to the ~/client-configs directory.
$ cd ~/client-configs
Run the script to make the client configuration file.
$ ./make_config.sh client1
This will create a file named client1.ovpn. Change the parameter if you want a different filename. Check the directory contents.
$ ls ~/client-configs/files
client1.ovpn
This is the configuration file you need to transfer to the client which will be then used to connect to the OpenVPN server. You can use any SFTP protocol/program to transfer the file to the client.
Step 13 - Install and Test Client Connection
For our tutorial, we are using a Rocky Linux 9 client machine. Install OpenVPN via the following command.
$ sudo dnf install openvpn
Run the following command to connect the client to the VPN server.
$ sudo openvpn --config client1.ovpn
You should get a similar output.
2023-02-07 11:42:05 OpenVPN 2.5.8 x86_64-redhat-linux-gnu [SSL (OpenSSL)] [LZO] [LZ4] [EPOLL] [PKCS11] [MH/PKTINFO] [AEAD] built on Nov  1 2022
2023-02-07 11:42:05 library versions: OpenSSL 3.0.1 14 Dec 2021, LZO 2.10
2023-02-07 11:42:05 Outgoing Control Channel Encryption: Cipher 'AES-256-CTR' initialized with 256 bit key
2023-02-07 11:42:05 Outgoing Control Channel Encryption: Using 256 bit message hash 'SHA256' for HMAC authentication
2023-02-07 11:42:05 Incoming Control Channel Encryption: Cipher 'AES-256-CTR' initialized with 256 bit key
2023-02-07 11:42:05 Incoming Control Channel Encryption: Using 256 bit message hash 'SHA256' for HMAC authentication
2023-02-07 11:42:05 TCP/UDP: Preserving recently used remote address: [AF_INET]142.93.225.189:443
2023-02-07 11:42:05 Socket Buffers: R=[131072->131072] S=[16384->16384]
2023-02-07 11:42:05 Attempting to establish TCP connection with [AF_INET]142.93.225.189:443 [nonblock]
2023-02-07 11:42:05 TCP connection established with [AF_INET]142.93.225.189:443
2023-02-07 11:42:05 TCP_CLIENT link local: (not bound)
2023-02-07 11:42:05 TCP_CLIENT link remote: [AF_INET]142.93.225.189:443
2023-02-07 11:42:05 NOTE: UID/GID downgrade will be delayed because of --client, --pull, or --up-delay
2023-02-07 11:42:05 TLS: Initial packet from [AF_INET]142.93.225.189:443, sid=7c9feddd a75e1d1f
2023-02-07 11:42:06 VERIFY OK: depth=1, CN=Easy-RSA CA
2023-02-07 11:42:06 VERIFY KU OK
2023-02-07 11:42:06 Validating certificate extended key usage
2023-02-07 11:42:06 ++ Certificate has EKU (str) TLS Web Server Authentication, expects TLS Web Server Authentication
2023-02-07 11:42:06 VERIFY EKU OK
2023-02-07 11:42:06 VERIFY OK: depth=0, CN=server
2023-02-07 11:42:06 Control Channel: TLSv1.3, cipher TLSv1.3 TLS_AES_256_GCM_SHA384, peer certificate: 2048 bit RSA, signature: RSA-SHA256
2023-02-07 11:42:06 [server] Peer Connection Initiated with [AF_INET]142.93.225.189:443
2023-02-07 11:42:06 PUSH: Received control message: 'PUSH_REPLY,redirect-gateway def1 bypass-dhcp,dhcp-option DNS 208.67.222.222,dhcp-option DNS 208.67.220.220,route 10.8.0.1,topology net30,ping 10,ping-restart 120,ifconfig 10.8.0.6 10.8.0.5,peer-id 0,cipher AES-256-GCM'
2023-02-07 11:42:06 OPTIONS IMPORT: timers and/or timeouts modified
2023-02-07 11:42:06 OPTIONS IMPORT: --ifconfig/up options modified
2023-02-07 11:42:06 OPTIONS IMPORT: route options modified
2023-02-07 11:42:06 OPTIONS IMPORT: --ip-win32 and/or --dhcp-option options modified
2023-02-07 11:42:06 OPTIONS IMPORT: peer-id set
2023-02-07 11:42:06 OPTIONS IMPORT: adjusting link_mtu to 1626
2023-02-07 11:42:06 OPTIONS IMPORT: data channel crypto options modified
2023-02-07 11:42:06 Outgoing Data Channel: Cipher 'AES-256-GCM' initialized with 256 bit key
2023-02-07 11:42:06 Incoming Data Channel: Cipher 'AES-256-GCM' initialized with 256 bit key
2023-02-07 11:42:06 net_route_v4_best_gw query: dst 0.0.0.0
2023-02-07 11:42:06 net_route_v4_best_gw result: via 10.0.2.2 dev enp0s3
2023-02-07 11:42:06 ROUTE_GATEWAY 10.0.2.2/255.255.255.0 IFACE=enp0s3 HWADDR=08:00:27:fd:d4:94
2023-02-07 11:42:06 TUN/TAP device tun0 opened
2023-02-07 11:42:06 net_iface_mtu_set: mtu 1500 for tun0
2023-02-07 11:42:06 net_iface_up: set tun0 up
2023-02-07 11:42:06 net_addr_ptp_v4_add: 10.8.0.6 peer 10.8.0.5 dev tun0
2023-02-07 11:42:06 net_route_v4_add: 142.93.225.189/32 via 10.0.2.2 dev [NULL] table 0 metric -1
2023-02-07 11:42:06 net_route_v4_add: 0.0.0.0/1 via 10.8.0.5 dev [NULL] table 0 metric -1
2023-02-07 11:42:06 net_route_v4_add: 128.0.0.0/1 via 10.8.0.5 dev [NULL] table 0 metric -1
2023-02-07 11:42:06 net_route_v4_add: 10.8.0.1/32 via 10.8.0.5 dev [NULL] table 0 metric -1
2023-02-07 11:42:06 GID set to nobody
2023-02-07 11:42:06 UID set to nobody
2023-02-07 11:42:06 Initialization Sequence Completed
You can verify the connection by visiting the URL https://whatismyip.com in your browser and you will see your IP address and the location of your OpenVPN server.

You can also verify further by performing a standard test on https://www.dnsleaktest.com/ website.
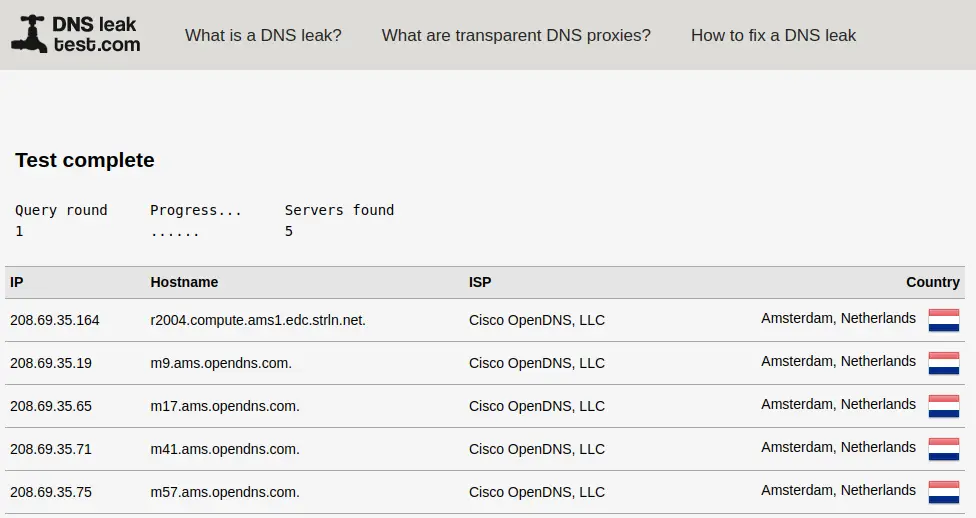
You can see the OpenDNS hostnames which we configured before and the location of the server matches the location of the OpenVPN server.
The above command runs OpenVPN in the foreground which means the terminal will be blocked. To close the connection, you need to press Ctrl + C. However, you can run OpenVPN in the background as well. Use the following command to do that.
sudo openvpn --config client1.ovpn --daemon
To shut down the connection, find the process ID of the process.
$ ps aux | grep openvpn
You will get a similar output.
nobody      4357  0.3  0.0  13468  8432 ?        Ss   15:35   0:00 openvpn --config client1.ovpn --daemon
username    4406  0.0  0.0  17732  2432 pts/0    S+   15:35   0:00 grep --color=auto openvpn
As you can see, the process ID corresponding to the OpenVPN process is 4357. Shut down the VPN connection using the following command to kill the process.
$ sudo kill -9 4357
OpenVPN offers GUI clients for Windows, macOS, Android, and iOS platforms where you can import the client configuration file to connect.
Step 14 - Revoking Client Certificates
If you want to revoke a client's certificate to prevent access, you can do so by logging onto the CA server.
Switch to the ~/easy-rsa directory.
$ cd ~/easy-rsa
Run the script with the revoke option followed by the client name.
$ ./easyrsa revoke client1
You will be prompted if you want to revoke the certificate.
Please confirm you wish to revoke the certificate with the following subject:

subject=
    commonName                = client1


Type the word 'yes' to continue, or any other input to abort.
  Continue with revocation: yes
. . .
Revoking Certificate 8348B3F146A765581946040D5C4D590A
. . .
This revokes the certificate on the CA server. However, the OpenVPN server has no way to check the revocation status. For that, we need to generate a Certificate Revocation List (CRL) and transfer it to the OpenVPN server.
Generate the CRL.
$ ./easyrsa gen-crl
You will be prompted for your CA passphrase. The above command generates a crl.pem file.
Copy this file to the OpenVPN server.
$ scp ~/easy-rsa/pki/crl.pem username@your_server_ip:/tmp
Log back into the OpenVPN server and copy the CRL file to the /etc/openvpn/server directory.
$ sudo cp /tmp/crl.pem /etc/openvpn/server/
Open the OpenVPN server configuration file for editing.
$ sudo nano /etc/openvpn/server/server.conf
Add the following line at the bottom of the file. This instructs the OpenVPN server to check the revocation list for clients that have been restricted.
crl-verify crl.pem
Save the file by pressing Ctrl + X and entering Y when prompted.
Restart the OpenVPN server to apply the changes.
sudo systemctl restart [email protected]
The client cannot connect to the OpenVPN server anymore.
Conclusion
This concludes our tutorial on installing and configuring the OpenVPN server on a Rocky Linux 9 server. We also connected the OpenVPN Linux client to the server. If you have any questions, post them in the comments below.

