In this guide, we'll walk you through the steps to enable automatic login in Ubuntu desktop and server editions. This convenient feature allows you to bypass the login screen on Ubuntu Desktop, allowing direct access to your desktop environment. In Ubuntu Server, it eliminates the need to manually enter your credentials every time.
Warning: Automatic login can pose a security risk as anyone who has physical access to your server can simply turn it on to gain access. Be sure to consider the potential security implications before enabling this feature.
Before configuring Ubuntu automatic login, let's take a brief moment to understand the concept of TTY.Understanding this will provide essential context for the steps ahead.
Table of Contents
What is TTY?
TTY, short for teletypewriter, is a term that originated from the early days of Unix when users connected to computers via physical teletype machines. Today, TTY generally refers to a terminal device, which can be a physical console, a virtual console, or a pseudoterminal (like terminal emulator programs).
To find out which TTY you are currently logged in on in Ubuntu, you can use the tty command. This command prints the file name of the terminal connected to standard input.
$ tty
Sample output:
/dev/tty1
In this example, the user is logged into tty1. Your actual output may be different depending on which TTY or terminal emulator you're currently using.
The tty1 part refers to the first virtual console. On a typical Ubuntu system, there are six virtual consoles that are accessible by pressing the Ctrl + Alt + F1 to F6 keys. tty1 corresponds to Ctrl + Alt + F1, tty2 corresponds to Ctrl + Alt + F2, and so on.
If you are using a terminal emulator within a graphical environment (like the GNOME Terminal or xterm), the tty command will likely print something like /dev/pts/0 or similar, because each terminal window you open gets its own pseudoterminal.
Now that you have a basic understanding of TTY, we can dive into the simple steps required to enable autologin on your Ubuntu system. All the steps provided below are tested in Ubuntu 22.04 LTS desktop and server editions.
Enable Automatic Login in Ubuntu Desktop
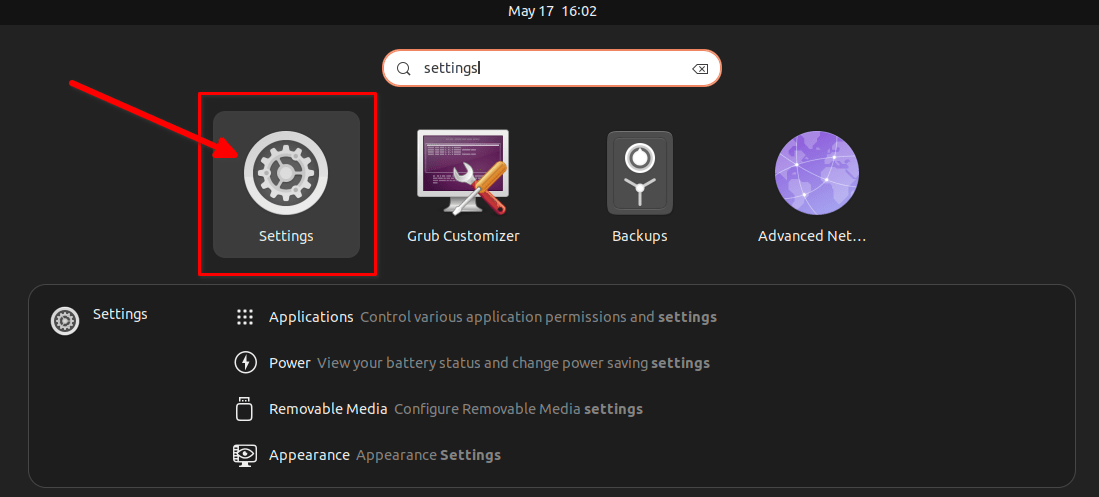
1. Press the Super key (the Windows key). This will open the GNOME Activities window. Type 'Settings' into the search bar and click on the 'Settings' button.
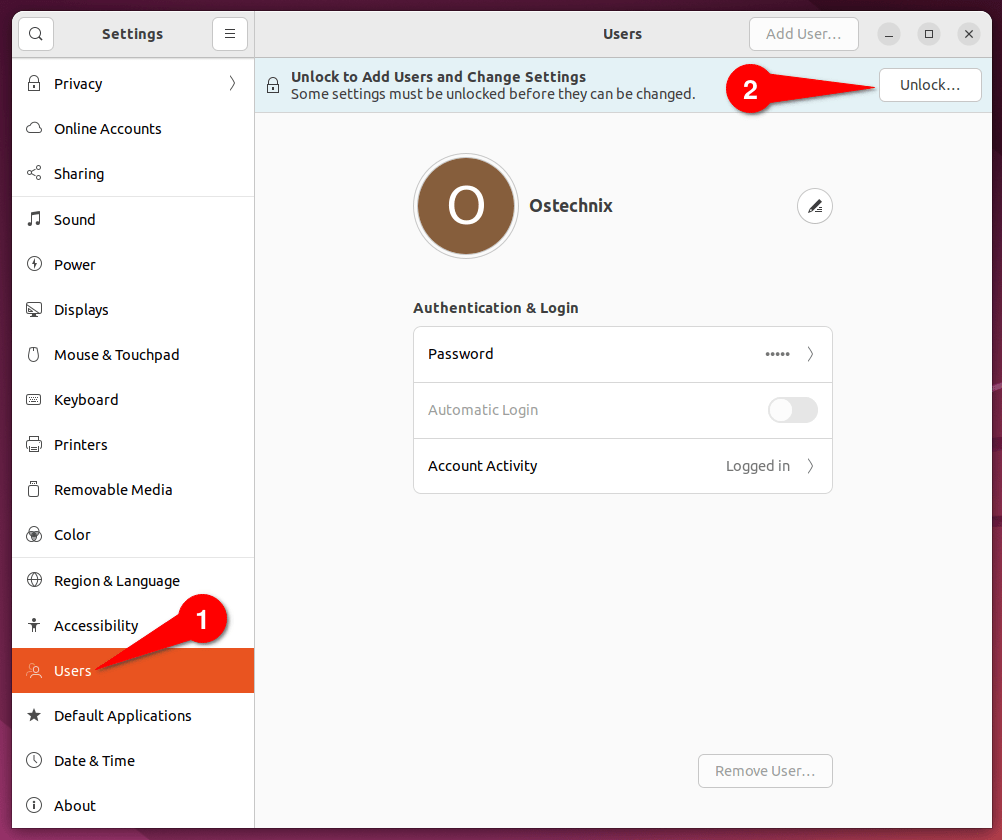
2. Scroll down to the bottom and click the 'Users' button. This will open the Users section. Click 'Unlock' button on the top right corner.
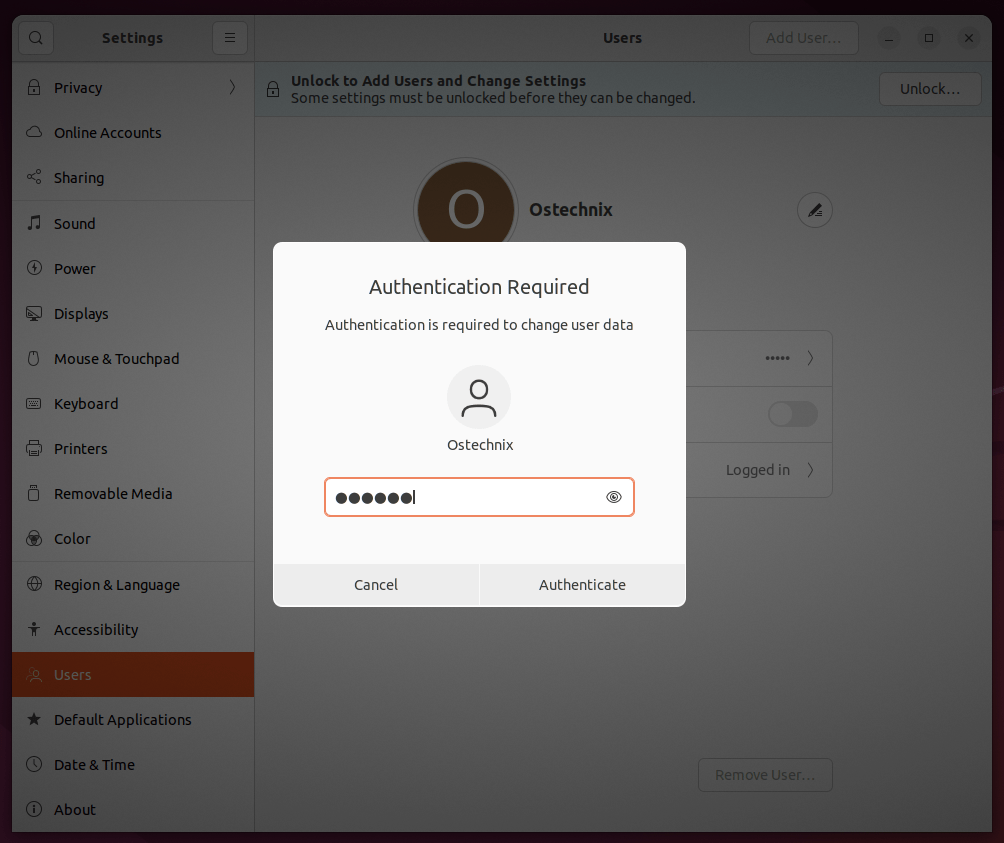
3. Enter the sudo password to unlock it.
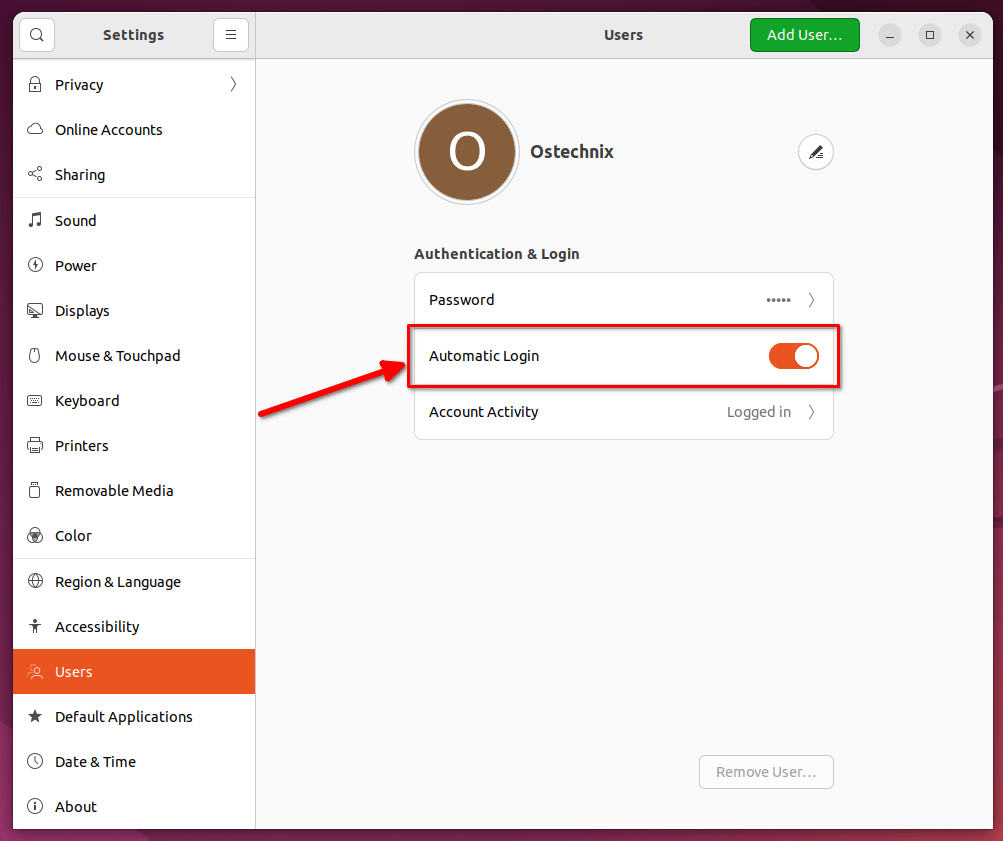
4. Toggle the 'Automatic Login' button ON to enable automatic login in Ubuntu Desktop.
From now on, you should be able to login automatically in your Ubuntu desktop, without entering the user's password.
To disable Automatic login, just follow the same procedure. Go to Settings -> Users. Unlock the Users section and toggle 'Automatic Login' button OFF to disable Ubuntu autologin feature.
Enable Autologin in Ubuntu Server from Commandline
If you're using Ubuntu Server, typically it doesn't come with a graphical user interface (GUI) by default and uses a command-line interface. Therefore, the concept of auto-login for a GUI-based desktop environment doesn't apply here.
However, if you want to set up automatic login to the command-line console (TTY) that you see after booting your server, you can follow these steps:
1. First, open the /etc/systemd/logind.conf file in a text editor as sudo or root user. Here we'll use nano:
$ sudo nano /etc/systemd/logind.conf
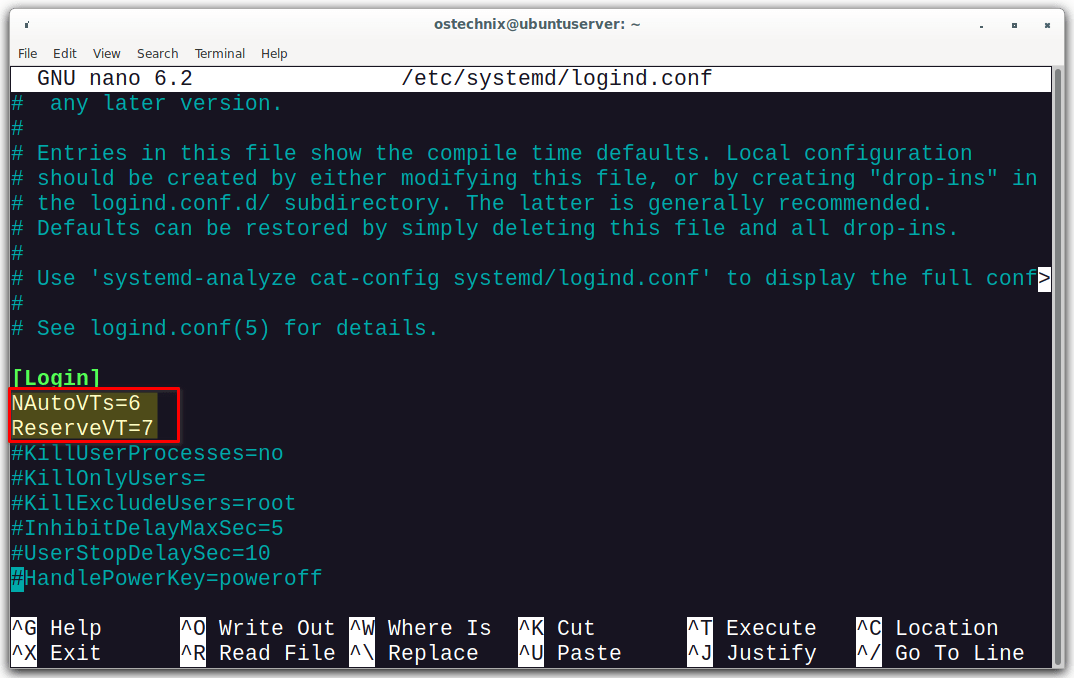
2. In the opened file, look for a line that starts with #NAutoVTs=. Uncomment it by removing the # at the beginning of this line. After the = sign, enter the number of TTYs you want to be logged in automatically. For example, NAutoVTs=6 would auto-login the first 6 TTYs.
3. Next, look for a line that starts with #ReserveVT= and uncomment it by removing the #. After the = sign, put the number of the first TTY that you want to skip auto-login for. So, if you want to auto-login TTYs 1-6, you would put ReserveVT=7 to start reserving from the 7th TTY.
The two directives "NAutoVTs" and "ReserveVT" are configurations related to the systemd-logind service, which handles user logins in a Linux system and are typically found in the logind.conf file.
NAutoVTs: This directive sets the number of virtual terminals (VTs) to allocate by default thatsystemd-logindwill manage. This does not mean that no more than this number of VTs can exist, just thatsystemd-logindwill not automatically allocate more than this. The virtual terminals are allocated on-the-fly as they are needed.ReserveVT: This directive sets the number of the first virtual terminal that shall unconditionally be reserved for a getty. This means that no graphical login (like a desktop manager) can allocate this terminal. If this is set to0, no terminal is unconditionally reserved.
Essentially, these directives control how many virtual terminals are allocated and managed by systemd-logind and which ones are reserved for certain types of usage.
4. Press CTRL+O followed by CTRL+X to save the file and exit the text editor.
5. Now, you need to create a service to auto-login your user. To do so, create a directory named "getty@tty1.service.d" under /etc/systemd/system/ location.
$ sudo mkdir /etc/systemd/system/getty@tty1.service.d/
Replace tty1 with tty2, tty3, etc., in the command above for each TTY that you want to auto-login.
Use the following command to create a service for the first TTY:
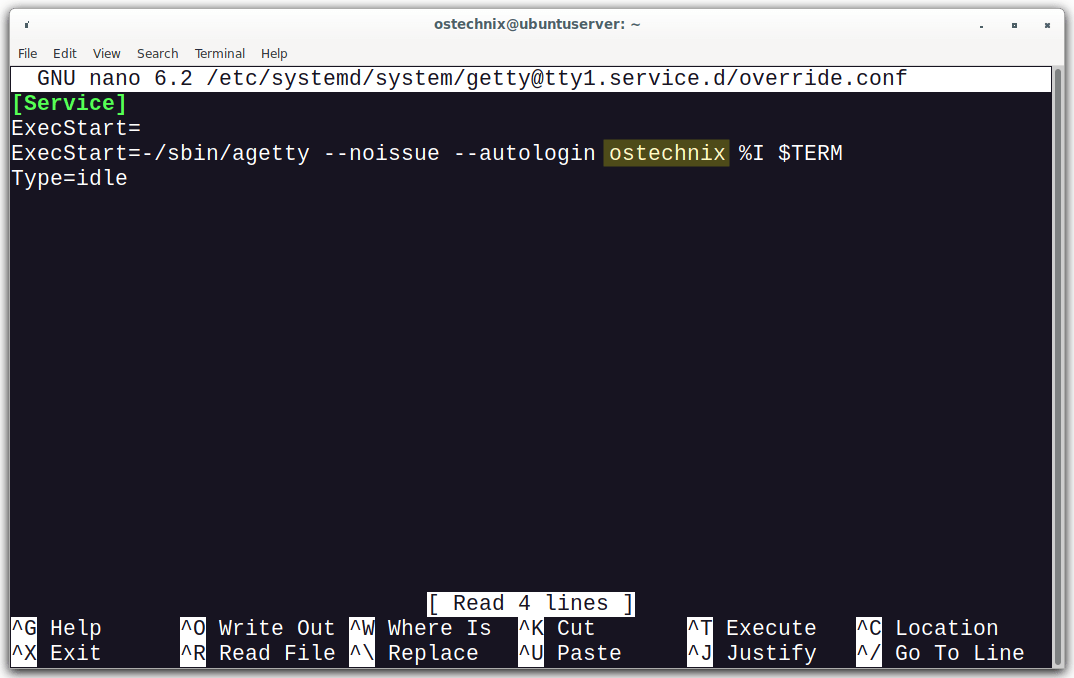
$ sudo nano /etc/systemd/system/getty@tty1.service.d/override.conf
6. In the opened file, paste the following lines:
[Service]
ExecStart=
ExecStart=-/sbin/agetty --noissue --autologin ostechnix %I $TERM
Type=idle
Replace ostechnix with your actual username. Save the file and exit.
Let us break down the above code and see what each option does.
[Service]: This is a section that specifies the behavior of the service itself. The directives inside this section will control how the service starts and stops, its timeout values, and more.ExecStart=: This directive specifies the command to run when the service starts. The equal sign followed immediately by nothing is a way to reset the list of commands to run, in case it was set in another file that this service file is overriding.ExecStart=-/sbin/agetty --noissue --autologin ostechnix %I $TERM: The new command to run when the service starts. Here,/sbin/agettyis being called with several parameters. agetty opens a tty port, prompts for a login name, and invokes the/bin/loginprogram. The--noissueparameter prevents display of the/etc/issuefile before the login prompt.--autologin ostechnixlogs in the user ostechnix automatically.%Iis a specifier thatsystemdreplaces with the instance name (thettyin this case).$TERMis an environment variable defining the type of the terminal.Type=idle: This directive tellssystemdto wait until all jobs are dispatched before it starts the service. This ensures that the service won't start until the system is idle, freeing up resources.
7. Repeat steps 5-7 for each TTY that you want to auto-login.
8. Finally, reboot your server to apply the changes:
$ sudo reboot
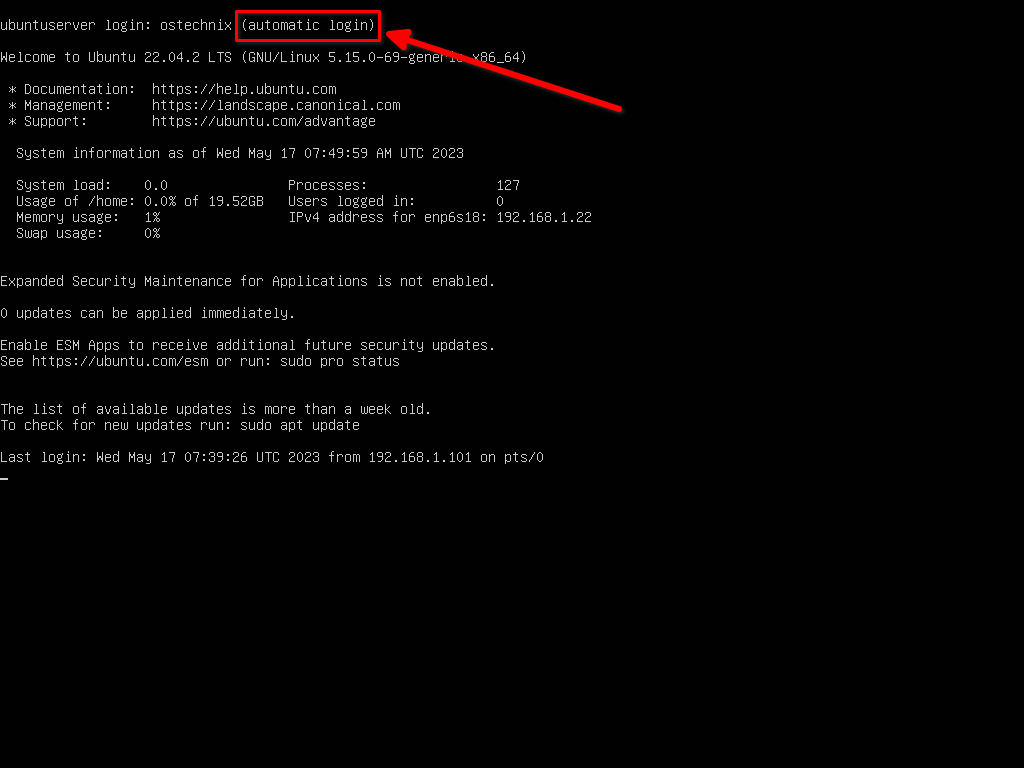
After rebooting, your server should automatically log in to the specified TTYs.
You don't need to manually enter the username and password every time.
To disable the Ubuntu server automatic login feature, simply reverse the procedure. Comment out all the lines that you previously uncommented and remove any lines that you added.
Why We Should Not Enable Automatic Login in Ubuntu or Any Other Linux?
While enabling automatic login in Ubuntu can be convenient, there are several reasons why it may not be a good idea for certain users:
- Reduced Control: Automatic login means that the system will always log in as the default user. This can be a problem on systems with multiple users.
- Privacy Concerns: If you share your computer with others, automatic login means that anyone can access your personal files and potentially see private information.
- Potential for Unauthorized Changes: With automatic login enabled, anyone can potentially change system settings, install or uninstall software, or make other changes that could affect your use of the computer.
- Risk of Data Theft: If your computer is stolen, automatic login will give the thief immediate access to all your files and data.
- Forget Password: You might forget the password if you don't type it yourself for a certain period of time.
Therefore, while automatic login can provide convenience, you should carefully consider these potential risks before deciding to enable Ubuntu automatic login feature.
Similar Read: How To Enable Automatic Login In Fedora Linux
Conclusion
Ubuntu's automatic login feature offers a convenient way to bypass the need for entering user credentials every time the system boots up. This feature can be particularly useful for single-user systems or for scenarios where quick access is paramount.
You should also know the potential security implications before enabling the autologin feature in Ubuntu or in any other Linux distributions. Enabling automatic login can expose your personal data to anyone with physical access to your computer, reduce control over multi-user systems, and potentially lead to unauthorized changes or data theft.

