Rsync is a powerful and versatile file copying tool that allows you to synchronize local and remote directories. It can be used to copy files and directories between two machines, or to keep two directories on the same machine in sync.
Rsync is very efficient, as it only transfers the parts of files that have changed since the last synchronization. This makes it ideal for synchronizing large directories that contain a lot of frequently changing files.x
It also offers a number of features that make it very flexible, such as the ability to:
- Synchronize directories over SSH,
- Compress data during transfer,
- Preserve file permissions and timestamps,
- Delete files in the destination directory that do not exist in the source directory.
Rsync Syntax:
rsync [options] [source] [destination]
Rsync Common Options:
-a(--archive): Archive mode; this option ensures that symbolic links, permissions, timestamps, and other vital information are preserved.-v(--verbose): Increases verbosity.-r(--recursive): Recursively sync directories.--delete: Delete files from the destination that aren't present in the source. You should use this option if you want file synchronization.-z(--compress): Compress data during transfer.-h(--human-readable): Display numbers in a human-readable format.-P: Combines--partial(keep partially transferred files) and--progress(show progress during transfer).
Table of Contents
Why Sync Local and Remote Directories?
There are a number of reasons why you might want to sync local and remote directories. For example, you might want to:
- Keep a backup of your important files on a remote server,
- Share files between two machines,
- Deploy code to a production server,
- Synchronize your development environment with a staging environment.
My Test Setup
For the purpose of this guide, I will be using the following systems:
Local System:
- OS: Debian 11 Desktop
- Local Directory:
~/local/sync/
Remote System:
- OS: Debian 12 Server
- Remote user: ostechnix
- Remote IP Address: 192.168.1.12/24
- Remote Directory:
~/remote/sync/
Copy Files from Local to Remote Directories using Rsync
Make sure rysnc is installed on both system and you have the necessary permissions on both source and destination directories.
Let's say you have a local directory called ~/local/sync/ostechnix@192.168.1.12:~/remote/sync/.
To do this, you can use the following command:
$ rsync -avzP ~/local/sync/ ostechnix@192.168.1.12:~/remote/sync/
Replace the source and destination paths, remote system IP address and user name with your own.

Here's a breakdown of what the command does:
-a: Archive mode, to maintain the same properties as mentioned earlier.-v: Verbose output.-z: Compresses the data to save bandwidth.-P: Shows progress and ensures partially transferred files are kept.
After the synchronization is complete, the contents of ~/local/sync/ostechnix@192.168.1.12:/~/remote/sync

Synchronize Local and Remote Directories using Rsync
As you already know, copying and synchronizing are different. When you use the following rsync command:
$ rsync -avzP ~/local/sync/ ostechnix@192.168.1.12:~/remote/sync/
It ensures that the contents of the source directory (~/local/sync/) are mirrored to the destination directory (ostechnix@192.168.1.12:~/remote/sync/). Any files or directories in the source that are not in the destination will be copied over.
However, with the options provided in the command above, files or directories present in the destination (ostechnix@192.168.1.12:~/remote/sync/) but not in the source (~/local/sync/
If you want to make sure that the source and destination directories are identical (i.e. sync) in terms of content, meaning that any files or directories that are in the destination but not in the source get deleted, you can add the --delete option:
$ rsync -avzP --delete ~/local/sync/ ostechnix@192.168.1.12:~/remote/sync/
With the --delete option, rsync will remove any files or directories in the destination that do not exist in the source, making the two directories identical in content.
To verify if the content in both locations is identical, login to your remote system and create a sample text file (E.g. example.txt) in the ~/remote/sync/ directory.
user@remote $ touch remote/sync/example.txt
Now run the above rsync command with --delete option from your local system. It will automatically delete files from the destination that aren't present in the source directory.
user@local $ rsync -avzP --delete ~/local/sync/ ostechnix@192.168.1.12:~/remote/sync/
ostechnix@192.168.1.12's password:
sending incremental file list
deleting example.txt
./

sent 232 bytes  received 31 bytes  75.14 bytes/sec
total size is 27,538,241  speedup is 104,708.14
Be careful with the --delete option, as it can result in data loss in the destination directory if not used correctly. Always double-check your paths and perhaps run a test first without the --delete option to ensure everything works as expected.
Heads Up:
- The trailing slashes in the directories are important. If you forget the trailing slash after the source directory (
~/local/syncinstead of~/local/sync/),rsyncwill create an additional directory namedsyncin the destination. - Make sure you have the necessary permissions on both the source and destination directories.
- If you're not using SSH key authentication, the command will prompt you for the user password on the remote server.
Key-based SSH Authentication for Rsync
Setting up Rsync with SSH Key-based authentication can help you to avoid typing ssh password. This comes handy when you want to automate file synchronization between two machines.
SSH Key-based authentication is a common and secure method to automate rsync operations without needing to enter an SSH password.
To use key-based authentication with rsync, follow these steps:
1. Generate SSH Key Pair (If you haven't already)
On your local machine, generate an SSH key pair:
$ ssh-keygen
DO NOT type any passphrase. Simply press ENTER key to accept the default values.
By default, this will create a private key (~/.ssh/id_rsa) and a public key (~/.ssh/id_rsa.pub).
2. Copy the Public Key to the Remote Server
Use ssh-copy-id to copy your public key to the remote server's authorized keys:
$ ssh-copy-id ostechnix@192.168.1.12
After this step, you should be able to SSH into the remote server without a password.
By setting up key-based authentication, you've eliminated the need to manually enter the SSH password. Remember to protect your private key and never share or expose it.
What Happens if We add a New File or Directory in the Destination?
The rsync utility will never modify or delete any content in the source directory when used in the typical way described. It only reads the source and makes changes to the destination.
For instance, if you add a new directory called test to the destination directory (~/remote/sync/test in our example) and then run the rsync command with the --delete option, here's what will happen:
$ rsync -avzP --delete ~/local/sync/ ostechnix@192.168.1.12:~/remote/sync/
Since the test directory exists in the destination (~/remote/sync/test~/local/sync), and you're using the --delete option, rsync will remove the test directory from the destination.
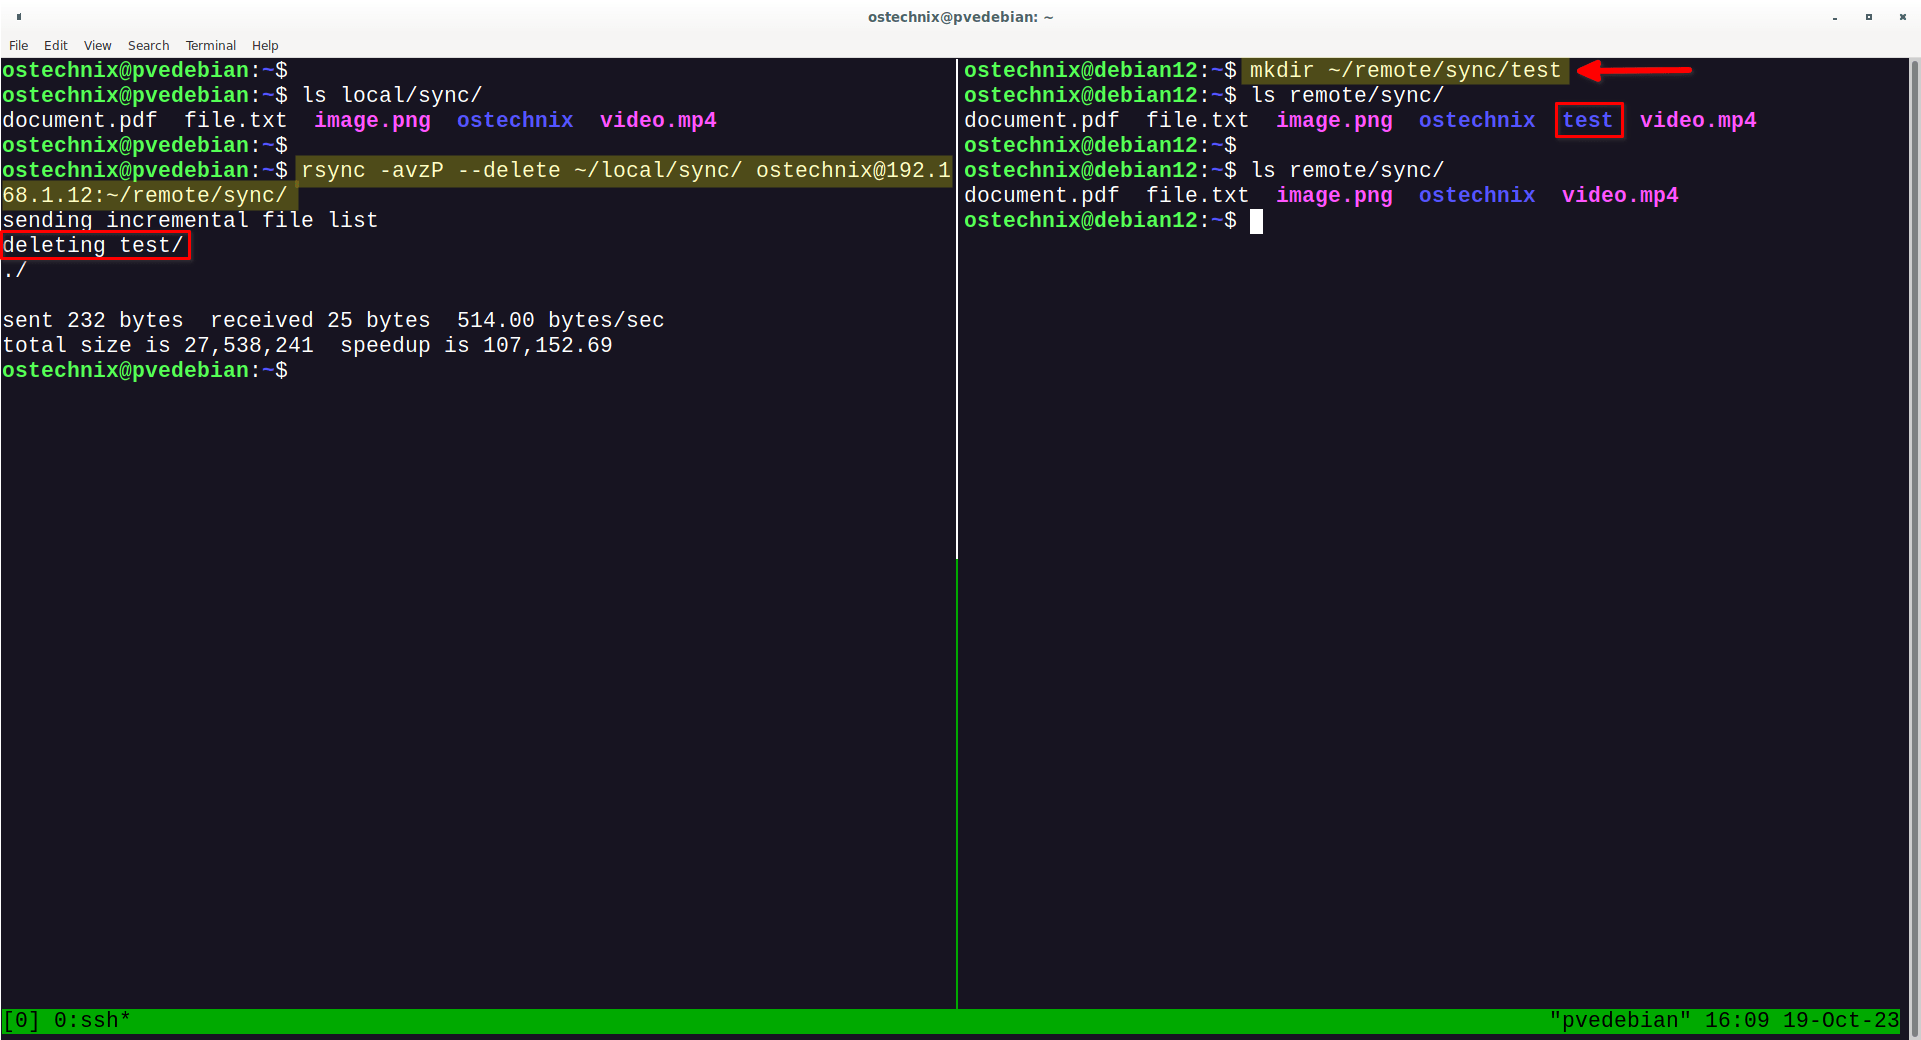
In essence, when using --delete, the destination directory (~/remote/sync/) will be made identical to the source directory (~/local/sync/). Any extra files or directories (like our test directory) in the destination that are not present in the source will be deleted.
If you don't want this behavior and wish to preserve the test directory in the destination, simply omit the --delete option:
$ rsync -avzP ~/local/sync/ ostechnix@192.168.1.12:~/remote/sync/
This will ensure that the test directory in the destination remains untouched.
Please remember, rsync is a powerful tool, and using certain options (like --delete) can result in data loss if not used correctly. Always make sure you understand the options and perhaps even test the command on a Virtual machine before applying it to production.
Real-time File Synchronization with Rsync and Inotify
The rsync itself does not have a built-in mechanism to watch for changes in real-time and immediately copy files upon changes. However, you can achieve this behavior by combining rsync with another tool like inotify on Linux.
The inotify toolset provides a way to watch for file system changes, and you can use it in conjunction with rsync to react to these changes immediately.
Here's a basic example using inotifywait from the inotify-tools package:
1. Install inotify-tools (if not already installed):
On Debian/Ubuntu/Pop!_OS:
$ sudo apt install inotify-tools
On CentOS/Red Hat/Fedora/AlmaLinux/Rocky Linux:
$ sudo dnf install inotify-tools
2. Create a script that watches a directory for changes and triggers rsync
$ nano rsyncnotify.sh
Add the following contents in it:
#!/bin/bash

SOURCE_DIR="/home/ostechnix/local/sync/"
DEST_DIR="ostechnix@192.168.1.12:/home/ostechnix/remote/sync/"

while true; do
    inotifywait -r -e modify,create,delete $SOURCE_DIR
    echo "Change detected, starting rsync..."
    rsync -avzP --delete $SOURCE_DIR $DEST_DIR
    echo "rsync completed."
done
Replace the source and destination directory path, username and IP address of your remote host with your own values.
3. Make the script executable:
$ chmod +x rsyncnotify.sh
4. Run the script:
$ ./rsyncnotify.sh
As long as the script is running, it will watch for changes in the source directory (modify, create, and delete events) and will trigger rsync to synchronize the directories when such changes occur.
Setting up watches.  Beware: since -r was given, this may take a while!
Watches established.
/home/ostechnix/local/sync/ CREATE newfile.doc
Change detected, starting rsync...
sending incremental file list
./
newfile.doc
              0 100%    0.00kB/s    0:00:00 (xfr#1, to-chk=4/9)
newfile.txt
              0 100%    0.00kB/s    0:00:00 (xfr#2, to-chk=3/9)

sent 360 bytes  received 58 bytes  836.00 bytes/sec
total size is 27,538,241  speedup is 65,880.96
rsync completed.
[...]
Heads Up:
- This solution is reactive, meaning there might be a very short delay (usually milliseconds) between a file change and the
rsyncoperation. - The provided script watches the directory continuously, which might not be suitable for all use-cases, especially if there are concerns about resource usage. Adjust as needed for your specific requirements.
- Ensure that the
rsyncandinotifywaitcommands are appropriate for your use case. Always test such scripts in a controlled environment before deploying them in a production setting.
Explicitly Specify SSH Key Path in the Rsync Script (Optional)
Mentioning the path to the private key in the script is not strictly necessary if you've set up key-based authentication correctly and are using the default key paths.
By default, SSH will look for keys in ~/.ssh/id_rsa (for RSA keys) and use them if they exist.
In the following script, I've provided the explicit path to illustrate that you could specify a key, especially useful if you're using a non-default key.
#!/bin/bash

SOURCE_DIR="/home/ostechnix/local/sync/"
DEST_DIR="ostechnix@192.168.1.12:/home/ostechnix/remote/sync/"

# Explicitly using the default private key; adjust the path if you're using a different key
RSYNC_SSH="ssh -i ~/.ssh/id_rsa"

while true; do
    inotifywait -r -e modify,create,delete $SOURCE_DIR
    echo "Change detected, starting rsync..."
    rsync -avzP --delete $SOURCE_DIR $DEST_DIR
    echo "rsync completed."
done
Make the script executable using command:
$ chmod +x your_script_name.sh
Now, when changes (modifications, creations, deletions) are detected in SOURCE_DIR, the rsync command will automatically synchronize the directories using the SSH key-based authentication.
If you're using the default ~/.ssh/id_rsa key for authentication with the remote server, you can simplify the script by omitting the -e "$RSYNC_SSH" part.
If you have multiple keys and/or keys in non-default locations, specifying the key path becomes necessary. But for a straightforward setup with a default key, you can skip it in the rsync command.
Remember to test this script in a VM before deploying in a production setting to ensure that everything is working as expected.
Schedule the Synchronization Process using cron
You can schedule the synchronization process to start at specific times using the cron job scheduler in Unix-like systems. This way, you can avoid resource constraints that might arise from continuous synchronization and have the sync happen at off-peak times, for example, late at night.
1. Open the crontab for editing:
$ crontab -e
2. Add a cron job for your rsync command. For example, to run the sync every day at 2:00 AM, add the following line:
0 2 * * * rsync -avzP --delete ~/local/sync/ ostechnix@192.168.1.12:~/remote/sync/
The format for the cron timing syntax is:
minute (0-59)
hour (0-23)
day of the month (1-31)
month (1-12)
day of the week (0-7 where both 0 and 7 represent Sunday)
3. Save and exit the editor.
Here are a few other examples:
- To run the sync every hour, at the start of the hour:
0 * * * * rsync -avzP --delete ~/local/sync/ ostechnix@192.168.1.12:~/remote/sync/
- To run the sync every Monday at 3:30 AM:
30 3 * * 1 rsync -avzP --delete ~/local/sync/ ostechnix@192.168.1.12:~/remote/sync/
- To run the sync on the 15th of every month at 4:00 AM:
0 4 15 * * rsync -avzP --delete ~/local/sync/ ostechnix@192.168.1.12:~/remote/sync/
Remember to adjust the rsync command and the paths as per your needs. For more cron command examples, refer the following guide.
Using cron in this manner is an efficient way to have periodic synchronization without putting continuous strain on resources. Just ensure that the time you choose doesn't conflict with other resource-intensive tasks, and always monitor the initial runs to make sure everything works as expected.
Related Read:
- How To Synchronize Local And Remote Directories Using Lsyncd In Linux
- How To Synchronize Files With Unison On Linux
- Synchronize Files Between Multiple Systems With Syncthing
- How To Synchronize Files And Directories Using Zaloha.sh
- How To Backup Files And Directories Using Rsync In Linux
- How To Backup Your Entire Linux System Using Rsync
- How To Resume Partially Transferred Files Over SSH Using Rsync
Conclusion
Using the --delete option, you can synchronize the local and remote directory with rsync in Linux. As previously mentioned, please be careful when using this option, as it will delete files in the destination directory that don't exist in the source directory."
When properly configured, Rsync can efficiently synchronize files between two systems. Please edit Rsync script provided in this guide as per your requirement and protect your important data in Linux and Unix-like systems.