
Unoptimized images are one of the most common causes for a slow website. With slow load times comes a negative impact on search engine rankings and user experience. Fortunately, optimizing images for web performance is a crucial step in ensuring fast-loading websites. Read on to find out how you can optimize images for web and improve your website’s page performance.
Table of Contents
The Impact of Images on Web Performance
Images play a significant role in a website’s overall performance, being some of the most data-heavy items loaded on a typical website.
If you’re unsure whether your website needs better image optimization, there are tools to help you with that. Google’s Core Web Vitals is one of them. You can use PageSpeed Insights to measure a website’s performance.
This tool uses factors such as First Contentful Paint (FCP), Largest Contentful Paint (LCP), First Input Delay (FID), and Cumulative Layout Shift (CLS) to determine a website’s overall performance. These metrics measure the speed at which the first element is rendered, the time it takes to render the largest element (usually an image or video), the delay between user interaction and browser response, and the stability of the website’s content during loading.

If you want to check your website’s performance, there are tools online like PageSpeed Insights or GTMetrix that do just that. These tools generate reports on your website’s performance and can provide suggestions for improvement. These reports often highlight images that need optimization in order to achieve faster loading times.
For example, the largest contentful element on your page might be identified as a hero image, which can be resized and compressed to improve the LCP score. Additionally, images without specified dimensions can cause layout shifts, which will negatively affect your CLS (layout shift) score. Setting dimensions for every uploaded image can easily solve this issue.
Best Practices for Image Optimization
Optimizing images for web performance can be done using several techniques. Each of these collectively contributes to faster loading times and an improved user experience. Let’s explore some of the best practices for image optimization:
1. Compress Your Images
Compression is a crucial step in reducing the file size of your images. There are two common compression methods: lossy, and lossless. Lossy compression removes significant amounts of data, resulting in a smaller file size. However, it may impact image quality. On the other hand, lossless compression reduces file size without compromising image quality.
The next step depends on the kind of website you are using. If you’re using WordPress for example, there are plugins that can automatically optimize your images and compress them for you. If your website uses static files and images, then you will need to optimize them yourself, either through programs or online tools.
To optimize your images for web through compression, you can use tools like TinyPNG or plugins like Smush. These tools employ lossy compression techniques to reduce the size of your images while maintaining acceptable image quality. Adjusting the compression level to a slightly more aggressive setting can significantly reduce file size with only minor differences in image quality.
You can also experiment with your image creation tools. If you use Photoshop for example, you can export at a lower quality level. If you are exporting using PNG, you can check the box labelled “Smaller File (8-bit)” if you do not need the additional color depth.
2. Resize Your Images and Use the Right Dimensions
Resizing images is another effective way to optimize them for web performance. Larger image dimensions often result in larger file sizes. By cropping or resizing images to the appropriate dimensions, you can reduce file size while still maintaining image quality.
When uploading images to your website, platforms like WordPress automatically generate different sizes, including large, medium, small, and thumbnails. Utilizing these options allows you to serve the most suitable image size to your readers, optimizing both loading times and responsiveness.
It’s important to select the appropriate image size for different purposes. For example, using larger image dimensions than necessary can negatively impact site speed and consume unnecessary server space. On the other hand, choosing small image sizes everywhere in the pursuit of optimization can ruin the appearance of your website.
Finding a balance is key here. It’s important to judge where your images can be reduced in size and places where the larger size is beneficial.
3. Use the Correct File Types
Understanding different file types and using them appropriately is essential for image optimization. The most common file types for images are JPEG, PNG, GIF, and SVG. An easy way to optimize your images for web use is through the use of modern formats.
JPEG is widely used for photos and images with many colors. It offers a good balance between file size and image quality. On the other hand, PNG is suitable for simple or transparent images, offering higher image quality at the expense of larger file sizes. GIF is primarily used for animated images or images with few colors.
Try out WebP
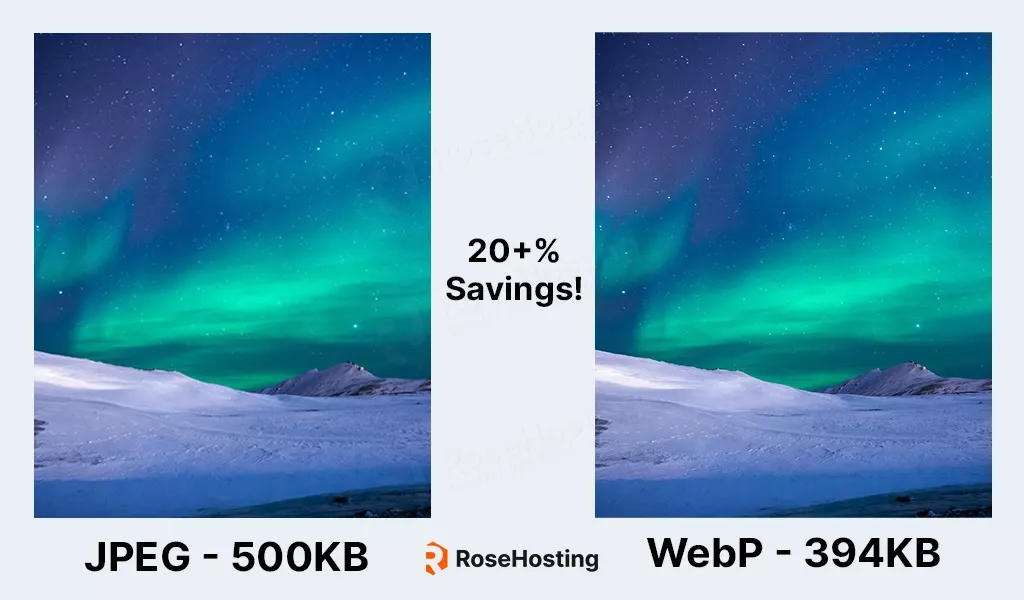
WebP is a newer format developed by Google whose main purpose is lossless image compression. It supports transparency and even animations. This is one of the best formats you can use for image optimization. Its compression even surpasses JPEG while still giving you the benefits of transparency like with a PNG.
It’s important to select the right file type based on the nature of the image. Using SVG (Scalable Vector Graphics) can be beneficial for abstract illustrations or background shapes, as they have smaller file sizes compared to JPEG, PNG, and GIF images. An added benefit of SVG files is their limitless scalability. Since they are “rendered” in the client’s browser, you can make these graphics as large as you want with no loss in quality.
4. Eliminate Unnecessary Metadata
Metadata in images, such as GPS data, camera details, and color profiles can occupy unnecessary space and increase file sizes. Removing this metadata can further optimize your images.
Removing the metadata has an additional privacy benefit. If you are uploading images that you took, you want to avoid revealing where you took the photos or other private information.
To avoid including metadata in your images, disable the option on your camera if possible. Alternatively, you can remove metadata using image editing software like Photoshop by selecting the “Export As” option and choosing “None” in the “Metadata” section.
There are also online tools like Verexif, which can show you the metadata and remove it for you.
5. Leverage Caches and CDNs
Caching mechanisms and content delivery networks (CDNs) are powerful tools for efficiently loading images and improving overall website performance. Caching involves storing assets, including images, in a more accessible location. This could be set up with Varnish or Redis, or in the user’s browser after the initial load. This eliminates the need for repeated downloading and improves loading times.
CDNs distribute images to caching servers strategically located near users, reducing the distance data needs to travel and further enhancing loading speeds. Some CDNs like Cloudflare offer image optimization done transparently by their CDN.
By leveraging both browser caching and CDNs, you can ensure faster and more efficient image delivery to users.
6. Compare Before and After
It’s important to know where you stand before making any optimizations. How much do you stand to gain from image optimization? Once you note a rough idea of how much improvement you can expect, then you can start to optimize.
After optimization, re-run the same test. You should see a notable speed improvement. Depending on the number of images and how unoptimized they were previously, you might see an improvement anywhere between 5%-50% in page loading performance.
Beyond Image Optimization: Other Factors to Consider
While image optimization plays a crucial role in web performance, it’s important to remember that it is not the sole factor that influences technical SEO. Other elements, such as the hosting provider, server performance, website content, and code optimization, also contribute to overall website speed and user experience. Considering these factors alongside image optimization guarantees that you’ve done everything to ensure optimal web performance.
Getting a high-quality Fully-Managed hosting provider that provides the fastest VPS hosting will give your website a speed boost without you doing anything else. Add the image optimizations to that and you’ll already be substantially faster than before.
Knowing how to optimize images for web performance is critial in improving loading times, search engine rankings, user experience, and ultimately conversions. By compressing images, resizing them appropriately, using the correct file types, eliminating unnecessary metadata, and leveraging caching and CDNs, you can match the right tradeoffs for each image on your site. Remember to consider the other factors of your website, as there’s other ways to improve your website speed.