Chrooted SFTP With MySecureShell On Debian Etch
Version 1.0
Author: Falko Timme
This tutorial shows how to install MySecureShell on a Debian Etch system. MySecureShell is an SFTP server that is based on OpenSSH and can be configured in many ways, e.g. it has support for chrooting users into their homedirs or for limiting upload-/download bandwidths. MySecureShell makes SFTP available for users that do not have shell access so that these users do not have to use the insecure FTP protocol anymore.
This document comes without warranty of any kind! I do not issue any guarantee that this will work for you!
1 Preliminary Note
I have tested this on a Debian Etch server with the IP address 192.168.0.100 and the existing user ashley. I will create a second user felix and show how both users can use SFTP with MySecureShell.
2 Installing MySecureShell
MySecureShell has a few requirements, so we install these first:
apt-get install libssl0.9.7 ssh openssh-server
Afterwards, we download and install MySecureShell as follows:
cd /tmp
wget http://ovh.dl.sourceforge.net/sourceforge/mysecureshell/mysecureshell_0.95_i386.deb
dpkg -i mysecureshell_0.95_i386.deb
(Make sure you download the latest version from SourceForge.)
That's it already, MySecureShell is now installed and running.
3 Preparing Users For MySecureShell
Before users can use SFTP with MySecureShell, we must change their shell to /bin/MySecureShell. For existing users (e.g. ashley), we can do it like this:
usermod -s /bin/MySecureShell ashley
In order to create a new user with the /bin/MySecureShell shell (e.g. felix), use a command like this:
useradd -m -s /bin/MySecureShell felix
Specify a password for the new user like this:
passwd felix
There's another way of creating MySecureShell users using the utilities that come with MySecureShell. I will describe these tools later on.
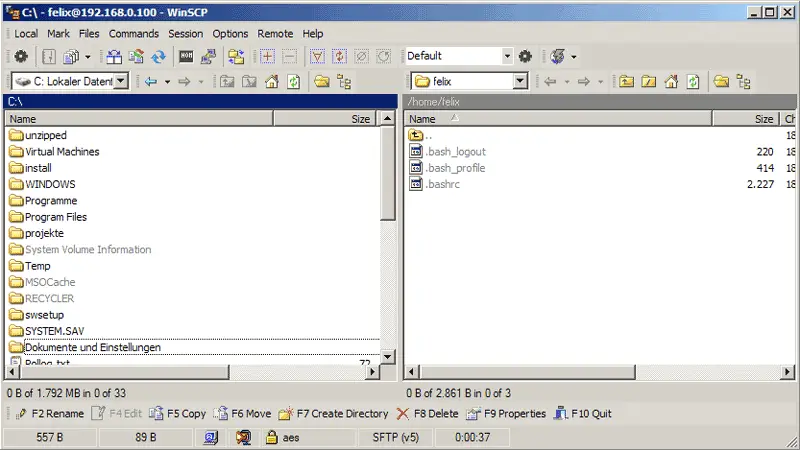
Now you can open an SFTP client (like WinSCP or Filezilla for Windows, gFTP for Linux, Cyberduck for MacOS; a list of clients is available here: http://mysecureshell.sourceforge.net/fr/clients.html) and connect to the server. I'm using WinSCP here.
Fill in the hostname, username, and password; the Port number is 22 (as with SSH); as Protocol you can either select SFTP or SFTP (allow SCP fallback). Then click on the Login button:

Afterwards, you should find yourself in your home directory. Try to go up one directory, and you should be denied permission which means you are chrooted to your home directory:
4 Configuring MySecureShell
MySecureShell is working well in its default configuration, however, you might want to take a look at the configuration to change a few things. The configuration is in the file /etc/ssh/sftp_config which is very well commented so I don't have to explain that here. You can specify upload- and download bandwidths, chroot users, the max. amount of connections, etc., and you can do all this globally or for certain user group or based on the clients' IP addresses, etc. MySecureShell is very flexible. You can find out more about possible configurations here: http://mysecureshell.sourceforge.net/fr/confman.html
Right now, I just want to turn off the download bandwidth limit which is in MySecureShell's configuration by default. Therefore I set GlobalDownload and Download to 0:
vi /etc/ssh/sftp_config
## MySecureShell Configuration File ##
#Default rules for everybody
<Default>
        GlobalDownload          0       #total speed download for all clients
                                        # o -> bytes   k -> kilo bytes   m -> mega bytes
        GlobalUpload            0       #total speed download for all clients (0 for unlimited)
        Download                0       #limit speed download for each connection
        Upload                  0       #unlimit speed upload for each connection
        StayAtHome              true    #limit client to his home
        VirtualChroot           true    #fake a chroot to the home account
        LimitConnection         10      #max connection for the server sftp
        LimitConnectionByUser   1       #max connection for the account
        LimitConnectionByIP     2       #max connection by ip for the account
        Home                    /home/$USER     #overrite home of the user but if you want you can use
                                                #       environment variable (ie: Home /home/$USER)
        IdleTimeOut             300     #(in second) deconnect client is idle too long time
        ResolveIP               true    #resolve ip to dns
#       IgnoreHidden            true    #treat all hidden files as if they don't exist
#       DirFakeUser             true    #Hide real file/directory owner (just change displayed permissions)
#       DirFakeGroup            true    #Hide real file/directory group (just change displayed permissions)
#       DirFakeMode             0400    #Hide real file/directory rights (just change displayed permissions)
                                        #Add execution right for directory if read right is set
#       HideFiles               "^(lost\+found|public_html)$"   #Hide file/directory which match
                                                                #this extented POSIX regex
        HideNoAccess            true    #Hide file/directory which user has no access
#       MaxOpenFilesForUser     20      #limit user to open x files on same time
#       MaxWriteFilesForUser    10      #limit user to x upload on same time
#       MaxReadFilesForUser     10      #limit user to x download on same time
        DefaultRights                   0640 0750       #Set default rights for new file and new directory

#       PathDenyFilter          "^\."   #deny upload of directory/file which match this extented POSIX regex

        ShowLinksAsLinks        false   #show links as their destinations
#       ConnectionMaxLife       1d      #limits connection lifetime to 1 day

        Charset                 "ISO-8859-15"   #set charset of computer
#       GMTTime                 +1      #set GMT Time (change if necessary)
</Default>
[...]
|
After our changes, we must restart MySecureShell:
/etc/init.d/mysecureshell restart
5 MySecureShell Utilities
MySecureShell comes with a few utilities that ease the management and control of SFTP accounts and MySecureShell itself.
sftp-who
shows the SFTP users that are currently connected:
server1:~# sftp-who
--- 1 / 10 clients ---
Global used bandwith : 0 bytes/s / 0 bytes/s
PID: 2256   Name: felix   IP: 192.168.0.24
        Home: /home/felix
        Status: idle    Path: /home/felix
        File:
        Connected: 2007/09/18 17:24:01 [since 04mins 07s]
        Speed: Download: 0 bytes/s [unlimited]  Upload: 0 bytes/s [unlimited]
        Total: Download: 587 bytes   Upload: 89 bytes

server1:~#
With sftp-kill you can disconnect currently connected SFTP users from the server:
sftp-kill felix
server1:~# sftp-kill felix
Kill felix on PID 2160
No lamer to kill ?
server1:~#
The command sftp-state shows the state of the MySecureShell server:
sftp-state
server1:~# sftp-state
Server is up
server1:~#
The command sftp-verif checks the existance and the permissions of the various MySecureShell files. You should run it once to fix permissions:
sftp-verif
server1:~# sftp-verif
#################################################
# MySecureShell Verification Tool #
#################################################
** Verifing file existance **
Verifing file existance of /bin/MySecureShell [ OK ]
Verifing file existance of /usr/bin/sftp-who [ OK ]
Verifing file existance of /usr/bin/sftp-kill [ OK ]
Verifing file existance of /usr/bin/sftp-state [ OK ]
Verifing file existance of /usr/bin/sftp-admin [ OK ]
Verifing file existance of /usr/bin/sftp-verif [ OK ]
Verifing file existance of /etc/ssh/sftp_config [ OK ]
** Verifing rights **
Verifing file rights of /etc/ssh/sftp_config [ OK ]
Verifing file rights of /usr/bin/sftp-who [ OK ]
Verifing file rights of /usr/bin/sftp-verif [ OK ]
Verifing file rights of /usr/bin/sftp-state [ Failed ]
Do you want to repair /usr/bin/sftp-state rights ? (y/n)
<-- y
Verifing file rights of /usr/bin/sftp-kill [ Failed ]
Do you want to repair /usr/bin/sftp-kill rights ? (y/n)
<-- y
Verifing file rights of /usr/bin/sftp-admin [ Failed ]
Do you want to repair /usr/bin/sftp-admin rights ? (y/n)
<-- y
Verifing file rights of /bin/MySecureShell [ Failed ]
Do you want to repair /bin/MySecureShell rights ? (y/n)
<-- y
** Verifing rotation logs **
MySecureShell rotation logs [ OK ]
** Verifing server status **
Verifing server status (ONLINE) [ OK ]
server1:~#
sftp-user list
shows all SFTP-enabled user accounts:
server1:~# sftp-user list
ashley
felix
server1:~#
With sftp-user delete you can delete an SFTP user account:
sftp-user delete felix
And with sftp-user create you can create a new SFTP user account (including password):
sftp-user create felix
server1:~# sftp-user create felix
Enter password:
server1:~#
6 Links
- MySecureShell: http://mysecureshell.sourceforge.net/fr/index.html
- Debian: http://www.debian.org

