
15 Minutes to Install a Mail Server with Antivirus and Antispam
This article illustrates a situation where you need to set up your own mail server (be it your home mail server, or a small office one). It actually shows that, if using an integrated service mail server, anyone can do the job, all in a matter of minutes. tar xzvf axigen-2.0.4.i386.rpm.gcc4.tar.gz 2. Install command Then, in order to install the RPM package, issue (while logged in as root) the following command, from the same directory as the rpm file: rpm -ivh axigen-2.0.4.gcc4-1.i386.rpmThis will create the entire directory structure needed for AXIGEN to run. After the installation, no daemons or related application will be started. 3. Configuration options AXIGEN provides several configuration options (configuration file, Command Line Interface), but the most intuitive and comprehensive one is WebAdmin, the Web configuration interface. The corresponding WebAdmin service is enabled by default, as well as the other default services: IMAP, Logging, POP3, Processing and SMTP. 4. Initial configuration The first configuration steps take place using the configuration wizard. You will set the administrator's password, select which services are started and what interfaces will be used. In this stage of the setup you also create the primary domain that your server will use.  The wizard can be run by issuing the following command in the console right after the installation of the package has finished: /opt/axigen/bin/axigen-cfg-wizardNOTE: You have to make sure you do not start the mail server before the initial configuration. 5. Start AXIGEN You can then start AXIGEN, using its initscript, by issuing this command: /etc/init.d/axigen startNow that your server is running, you can connect the antivirus and anti-spam applications. By default, AXIGEN comes with connectors for the ClamAV Antivirus and SpamAssasin Antispam application. The setup process below describes how to make these two applications work with AXIGEN. However, note that AXIGEN implements a proprietary filter scripting language that allows you to implement connectors for any third party Antivirus and Antispam applications. Connecting to ClamAVA. Install ClamAV (daemon), on the same machine on which AXIGEN Mail Server is installed. Follow these steps in order to configure ClamAv for use with AXIGEN and start the clamd daemon. 1. Install clamav-server, using yum (Yellow Dog Updater, Modified): yum install clamav-server2. Copy the sample config file shipped with clamav-server: cp /usr/share/doc/clamav-server-*/clamd.conf /etc/clamd.d/axigen.conf3. Edit: /etc/clamd.d/axigen.conf # comment out the Example line4. Create a link to the clamd binary: ln -s /usr/sbin/clamd /usr/sbin/clamd.axigen5. Create the run directory, where the PID file and clamd socket will be stored, and change its permissions: mkdir -p /var/run/clamd.axigen chown axigen:axigen /var/run/clamd.axigen6. Create and setup the initscript: cp /usr/share/doc/clamav-server-*/clamd.init /etc/init.d/clamd.axigen7. Edit: /etc/init.d/clamd.axigen and modify the following lines, as specified below: # description: The clamd server running for axigen CLAMD_SERVICE=axigen8. Finally, start the clamd daemon: /etc/init.d/clamd.axigen B. Configure AXIGEN antivirus filter at server level using WebAdmin In order to activate the ClamAV filter, go through the following steps: In the "Server" context, click on the Add new filter button. This will open up and display the Active Filter list. It is empty right now, so we need to add the clamav filter to the list. 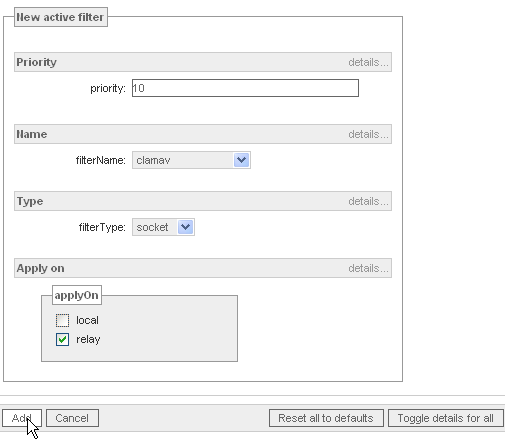 Important - the domain-level filters have the priority limited to range 100-400 and the user-level filters are limited to the 200-300 range. A value of "10" should be fine, leaving you space to apply some other future filters before this one. After setting the filter priority, select the socket value from in the Filter type dropdown list and the clamav value from the Filter Name list. In the Apply on checklist, select the relay option, to apply the filter on outgoing mails. To make sure you scan both incoming and outgoing mails, you have to create the filter and select both values, local and relay. In AXIGEN, it is possible to enable filters either at domain or user level, in the corresponding WebAdmin tabs. The filters activated at server level will be automatically applied for all domains and accounts. However, you have the possibility to add additional filters at domain or account level. Connecting to SpamAssasinThe process for Connecting SpamAssassin is similar and even less time-consuming as no configurations are necessary after the product installation. C. Install SpamAssassin using the yum application: yum install spamassassinNo further configurations are necessary. D. Configure SpamAssassin at server level, using Webadmin The connector for SpamAssassin is a socket filter for AXIGEN, so the configuration procedure is the same as for ClamAV. The difference would be that for SpamAssassin, a TCP socket is more likely to be used. Also, when activating the SpamAssassin filter, you need to keep in mind the following:
Access AXIGEN WebMailAt this step of the way, your mail server is ready to go, and you can also you can access the AXIGEN WebMail to send and receive test messages. Then, use the full email address and password to log on to AXIGEN WebMail, at the default address: http://127.0.0.1:8000, or use the address you specified in the initial configuration phase when you ran the setup wizard. 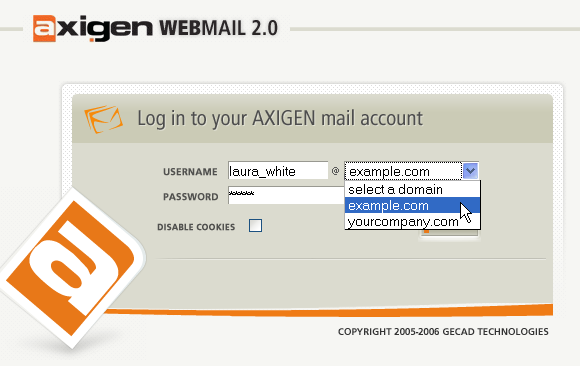 |
|
| Subject | Topic Starter | Replies | Views | Last Post |
|---|---|---|---|---|
| Why bother? | IGnatiusTFoobar | 1 | 1,037 | Feb 5, 2007 4:04 PM |
You cannot post until you login.