Using IPv6 On Debian Etch
Version 1.0
Author: Falko Timme
This document describes how you can configure a Debian Etch system for IPv6 so that a) it can connect to other IPv6 hosts and b) other IPv6 hosts can connect to it. IPv6 should become more important in the future as recent estimates assume that there will be no more IPv4 addresses left by 2010 or 2011. Therefore it's time time to learn IPv6.
This document comes without warranty of any kind! I do not issue any guarantee that this will work for you!
1 Preliminary Note
In this tutorial I'm using a Debian server in a LAN (i.e., it uses a router to connect to the Internet) with the ethernet device eth0 and the IPv4 address 192.168.0.100. The router's public IP address at the time of this writing was 85.176.139.73. With IPv6, other systems can connect directly to the Debian system, regardless of the router and NAT. This tutorial will work for Debian systems that are connected directly to the Internet (i.e., no NAT, no router) as well.
To use IPv6, we will configure a tunnel that connects our IPv6 Debian system to IPv6 hardware on the other end (run by a so-called "tunnel broker") and thus to the IPv6 backbone. This tunnel is necessary because most ISPs don't support direct IPv6 connectivity, and it doesn't make sense to route IPv6 traffic over an IPv4 network because chances are that the next-hop router doesn't know what to do with this traffic.
There are multiple tunnel brokers that give you a tunnel and IPv6 addresses for free (e.g. http://tunnelbroker.net/, http://go6.net/4105/freenet.asp, http://www.sixxs.net/). These tunnel brokers are connected to the IPv6 backbone, and the tunnel connects your Debian Etch system to their IPv6 hardware and therefore to the IPv6 backbone.
2 Creating A Tunnel
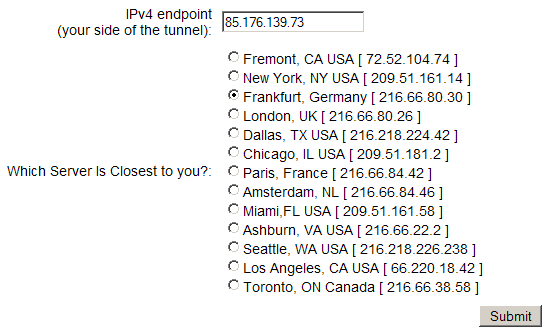
Register with a tunnel broker - I'm using http://tunnelbroker.net/ as they are very fast - you can be up and running in a few minutes. Then log in on their web interface and create a tunnel ("Create Regular Tunnel" on the http://tunnelbroker.net/ web site). Fill in the IPv4 endpoint (this is the public IPv4 address of your Debian system - if it is behind a router, this is your router's public IPv4 address) and select a location close to you (these are the locations where the tunnel broker has POPs, i.e., connections to the IPv6 backbone):
Afterwards you will see a screen with the details of your tunnel.

These are the details for my test tunnel:
Server IPv4 address: 216.66.80.30
Server IPv6 address: 2001:0470:1f0a:cc0::1/64
Client IPv4 address: 85.176.139.73
Client IPv6 address: 2001:0470:1f0a:cc0::2/64
Please write down the Server IPv4 address (216.66.80.30), the Server IPv6 address (2001:0470:1f0a:cc0::1), and the Client IPv6 address (2001:0470:1f0a:cc0::2). We will need them in a moment.
3 Configuring The Debian System
Log in to your Debian system and take a look at the output of
ifconfig
server1:~# ifconfig
eth0      Link encap:Ethernet  HWaddr 00:0C:29:A5:5B:93
          inet addr:192.168.0.100  Bcast:192.168.0.255  Mask:255.255.255.0
          inet6 addr: fe80::20c:29ff:fea5:5b93/64 Scope:Link
          UP BROADCAST RUNNING MULTICAST  MTU:1500  Metric:1
          RX packets:71 errors:0 dropped:0 overruns:0 frame:0
          TX packets:44 errors:0 dropped:0 overruns:0 carrier:0
          collisions:0 txqueuelen:1000
          RX bytes:7789 (7.6 KiB)  TX bytes:5809 (5.6 KiB)
          Interrupt:169 Base address:0x1400

lo        Link encap:Local Loopback
          inet addr:127.0.0.1  Mask:255.0.0.0
          inet6 addr: ::1/128 Scope:Host
          UP LOOPBACK RUNNING  MTU:16436  Metric:1
          RX packets:8 errors:0 dropped:0 overruns:0 frame:0
          TX packets:8 errors:0 dropped:0 overruns:0 carrier:0
          collisions:0 txqueuelen:0
          RX bytes:560 (560.0 b)  TX bytes:560 (560.0 b)

server1:~#
Nothing special here, but the inet6 addr in the output means that the system is IPv6 capable.
Now we configure our new public IPv6 address and the tunnel as follows:
ifconfig sit0 up
ifconfig sit0 inet6 tunnel ::216.66.80.30 #(please replace the IPv4 address with the IPv4 address of the tunnel broker server that you've chosen in the previous step)
ifconfig sit1 up
ifconfig sit1 inet6 add 2001:0470:1f0a:cc0::2/64 #(please replace the IPv6 address with your own IPv6 address)
route -A inet6 add ::/0 dev sit1
That's it already. Take a look at
ifconfig
again, and you should see two new interfaces (sit0 and sit1) that are needed for our tunnel:
server1:~# ifconfig
eth0      Link encap:Ethernet  HWaddr 00:0C:29:A5:5B:93
          inet addr:192.168.0.100  Bcast:192.168.0.255  Mask:255.255.255.0
          inet6 addr: fe80::20c:29ff:fea5:5b93/64 Scope:Link
          UP BROADCAST RUNNING MULTICAST  MTU:1500  Metric:1
          RX packets:145 errors:0 dropped:0 overruns:0 frame:0
          TX packets:163 errors:0 dropped:0 overruns:0 carrier:0
          collisions:0 txqueuelen:1000
          RX bytes:12833 (12.5 KiB)  TX bytes:19303 (18.8 KiB)
          Interrupt:169 Base address:0x1400

lo        Link encap:Local Loopback
          inet addr:127.0.0.1  Mask:255.0.0.0
          inet6 addr: ::1/128 Scope:Host
          UP LOOPBACK RUNNING  MTU:16436  Metric:1
          RX packets:8 errors:0 dropped:0 overruns:0 frame:0
          TX packets:8 errors:0 dropped:0 overruns:0 carrier:0
          collisions:0 txqueuelen:0
          RX bytes:560 (560.0 b)  TX bytes:560 (560.0 b)

sit0      Link encap:IPv6-in-IPv4
          inet6 addr: ::127.0.0.1/96 Scope:Unknown
          inet6 addr: ::192.168.0.100/96 Scope:Compat
          UP RUNNING NOARP  MTU:1480  Metric:1
          RX packets:0 errors:0 dropped:0 overruns:0 frame:0
          TX packets:0 errors:0 dropped:0 overruns:0 carrier:0
          collisions:0 txqueuelen:0
          RX bytes:0 (0.0 b)  TX bytes:0 (0.0 b)

sit1      Link encap:IPv6-in-IPv4
          inet6 addr: 2001:470:1f0a:cc0::2/64 Scope:Global
          inet6 addr: fe80::c0a8:64/64 Scope:Link
          UP POINTOPOINT RUNNING NOARP  MTU:1480  Metric:1
          RX packets:0 errors:0 dropped:0 overruns:0 frame:0
          TX packets:0 errors:0 dropped:0 overruns:0 carrier:0
          collisions:0 txqueuelen:0
          RX bytes:0 (0.0 b)  TX bytes:0 (0.0 b)

server1:~#
Now we can test if we can ping the IPv6 address of the tunnel broker's server:
ping6 -c4 2001:0470:1f0a:cc0::1
server1:~# ping6 -c4 2001:0470:1f0a:cc0::1
PING 2001:0470:1f0a:cc0::1(2001:470:1f0a:cc0::1) 56 data bytes
64 bytes from 2001:470:1f0a:cc0::1: icmp_seq=1 ttl=64 time=16.8 ms
64 bytes from 2001:470:1f0a:cc0::1: icmp_seq=2 ttl=64 time=40.5 ms
64 bytes from 2001:470:1f0a:cc0::1: icmp_seq=3 ttl=64 time=37.5 ms
64 bytes from 2001:470:1f0a:cc0::1: icmp_seq=4 ttl=64 time=37.5 ms
--- 2001:0470:1f0a:cc0::1 ping statistics ---
4 packets transmitted, 4 received, 0% packet loss, time 3002ms
rtt min/avg/max/mdev = 16.880/33.135/40.550/9.466 ms
server1:~#
Looks good.
http://www.ipv6.org/v6-www.html has a list of IPv6 hosts. Let's pick one of them and test if we can ping it as well:
ping6 -c4 www.ipv6.uni-muenster.de
server1:~# ping6 -c4 www.ipv6.uni-muenster.de
PING www.ipv6.uni-muenster.de(tolot.ipv6.uni-muenster.de) 56 data bytes
64 bytes from tolot.ipv6.uni-muenster.de: icmp_seq=1 ttl=57 time=29.3 ms
64 bytes from tolot.ipv6.uni-muenster.de: icmp_seq=2 ttl=57 time=38.7 ms
64 bytes from tolot.ipv6.uni-muenster.de: icmp_seq=3 ttl=57 time=60.4 ms
64 bytes from tolot.ipv6.uni-muenster.de: icmp_seq=4 ttl=57 time=23.1 ms
--- www.ipv6.uni-muenster.de ping statistics ---
4 packets transmitted, 4 received, 0% packet loss, time 3002ms
rtt min/avg/max/mdev = 23.194/37.940/60.454/14.127 ms
server1:~#
Ok, pinging other hosts is working fine. Now let's see if our system can be pinged on our public IPv6 address as well. Go to http://www.berkom.blazing.de/tools/ping.cgi and fill in your public IPv6 address. If all goes well, the output should be similar to this one:
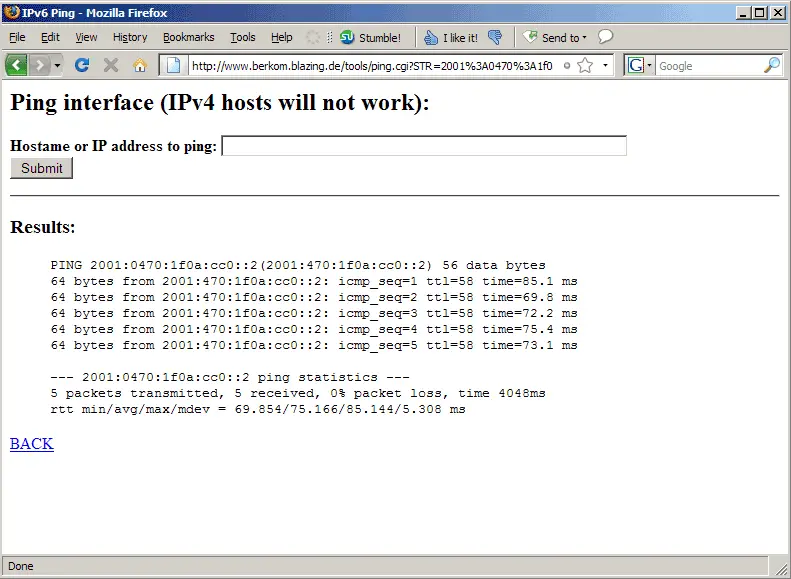
Congratulations, IPv6 is now working on your system!
If you don't want to configure the sit0 and sit1 interfaces manually after each reboot, you can create the file /etc/network/if-up.d/ipv6 as follows:
vi /etc/network/if-up.d/ipv6
#!/bin/sh PATH=/sbin:/bin ifconfig sit0 up ifconfig sit0 inet6 tunnel ::216.66.80.30 ifconfig sit1 up ifconfig sit1 inet6 add 2001:0470:1f0a:cc0::2/64 route -A inet6 add ::/0 dev sit1 |
(Replace the IPv4 and IPv6 addresses with your own values!)
Then make the file executable:
chmod 755 /etc/network/if-up.d/ipv6
Now whenever the system boots, it starts the sit0 and sit1 interfaces automatically.
4 Links
- Debian: http://www.debian.org/

