Using Firewall Object In Firewall Builder
Firewall Builder supports variety of object types, both simple such as address, network, host, or IP, TCP, UDP and ICMP services, as well as more sophisticated such as Firewall, Host, Address table, DNS name, User service. Firewall object is central to the program and is in the focus of this article.
General Description
A firewall object is designed to represent a real firewall device in your network. This firewall object will have interface and IP address objects that mirror the real interfaces and IP addresses of the actual device. In addition, the firewall object is where you create the access policy rule sets, NAT rule sets, and routing rule sets that you assign to your firewall device.
By default, a firewall has one Policy rule set, one NAT rule set, and one routing rule set. However, you can create more than one rule set using branching rules (for firewalls that support them). On the other hand, you don’t have to populate all the rule sets. You can, for example, create a Policy ruleset and leave the NAT and Routing rule sets empty. We explains more about policies and rule sets below.
To speed up the creation of a firewall object, Firewall Builder has a wizard that walks you through creating the object. The wizard has three options for creating a firewall object:
- From a template: Firewall Builder comes with several pre-defined templates. You can use these to create a firewall that is close to your configuration, the modify it to fit your needs. This method was demonstrated in the "Getting Started with Firewall Builder" here or here.
- Manually: You can provide interface IP address, subnet mask, gateway, and other parameters manually. You can add this information when you create the firewall, or you can add it later.
- Via SNMP: Firewall Builder uses SNMP queries to learn about the network.
Creating Firewall Object Manually
To start the firewall object creation wizard, right-click the Firewalls folder in the User tree and select New Firewall.
The first page of this wizard is displayed.
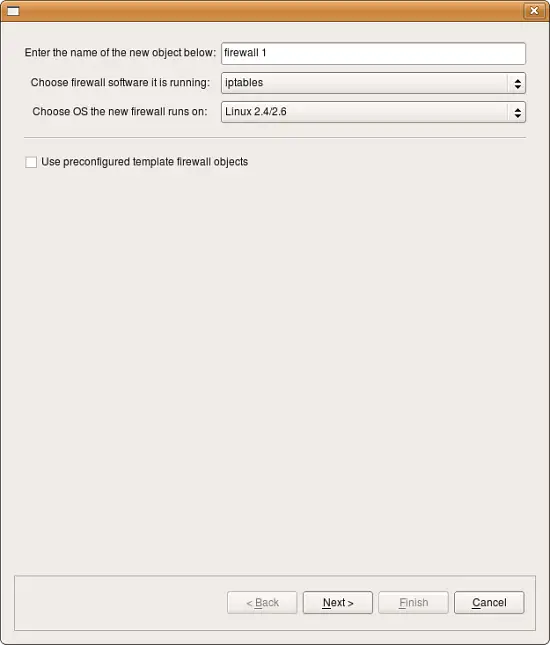
Give the firewall object a name. Usually, this name will be the same name as the device, but it doesn’t have to be if you’re assigning interfaces manually. (If you will use SNMP or DNS to populate the interfaces, then the name must be the same as the device name.) Then specify the firewall software and OS. Leave the Use pre-configured template firewall objects checkbox unchecked. Click Next.

Select Configure interfaces manually and click Next.
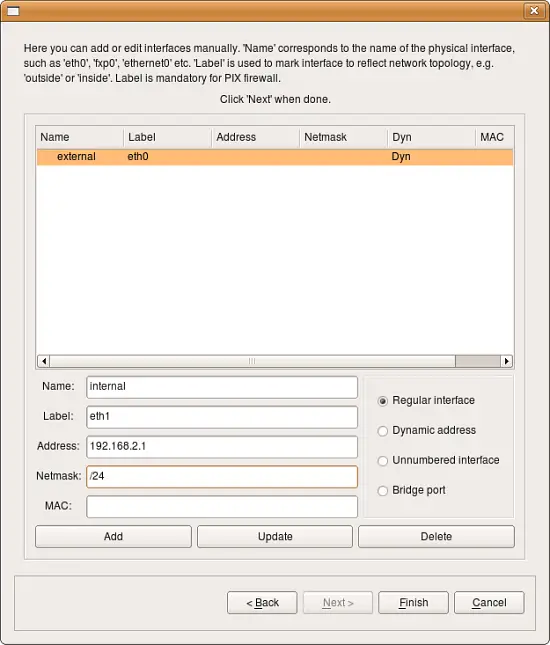
Use this screen to add firewall interfaces. Populate the following fields for an interface, then click Add to add the interface. Then, populate the fields again for the next interface. If you make a mistake, click on the interface in the list, make your changes, then click Update.
- Interface type: Indicate the type of interface. We explain interface types in more detail below. Briefly, though, a Regular interface has a static IP addresses, a Dynamic address interface has a dynamic address provided by something like DHCP, an Unnumbered interface never has an IP address (PPPoE connection, for example), and a Bridge por t is an interface that is bridged in the firewall.
- Name: The name of the interface object in Firewall Builder must match exactly the name of the interface of the firewall machine it represents. This will be something like "eth0", "eth1", "en0", "br0", and so on.
- Label: On most OS’s this field is not used and serves the purpose of a descriptive label. The label is mandatory for Cisco PIX though, where it must reflect the network topology. Firewall Builder GUI uses the label, if it is not blank, to label interfaces in the tree. One of the suggested uses for this field is to mark interfaces to reflect the network topology (’outside’, ’inside’) or interface purpose (’web frontend’ or ’backup subnet’).
- Address: If the interface has a static IP address, specify it here. (In Firewall Builder version 3, this must be an IPv4 address. If you need it to be an IPv6 address, create the interface without an IP address, then add the IPv6 address after you have created the firewall object.)
- Netmask: Use either a traditional netmask (255.255.255.0) or slash notation (24, without the actual slash) to specify the interface netmask.
- MAC: If you like, you can also specify the interface physical address. The MAC address is not necessary, but it can be used to combat spoofing. If the feature is turned on and available, and interface object with MAC address is used in a policy rule, then the firewall will only accept packets from the given IP address if the MAC address also matches the one specified.
Once all the interfaces are configured, click Finish to create the new firewall object.
Note: You can always add, modify and delete interfaces later using controls provided in the main window.

