Setting Up An OpenVPN Server With Authentication Against OpenLDAP On Ubuntu 10.04 LTS
OpenVPN, or Open Virtual Private Network, is a tool for creating networking "tunnels" between and among groups of computers that are not on the same local network. This is useful if you have services on a local network and need to access them remotely but don't want these services to be publicly accessible. By integrating with OpenSSL, OpenVPN can encrypt all VPN traffic to provide a secure connection between machines.
The OpenLDAP backend of iRedmail allows you to integrate all kinds of applications and to realize centralized account management. This tutorial shows you how to integrate OpenVPN into the iredmail ldap backend on Ubuntu 10.04; passwords will be stored in ldap and you can change passwords through webmail.
This tutorial is based on Ubuntu 10.04, so I suggest you set up a minimal Ubuntu 10.04 system with SSH; make sure you install all updates. Install iredmail 0.6.1 and choose openldap as backend, as shown in this tutorial:
1 Install OpenVPN
Install OpenVPN and ldap support:
apt-get install openvpn openvpn-auth-ldap
Install dnsmasq:
To forward DNS traffic through the VPN you will need to install the dnsmasq package:
apt-get install dnsmasq
2 easy-rsa
The OpenVPN package provides a set of encryption-related tools called "easy-rsa". These scripts are located by default in the /usr/share/doc/openvpn/examples/easy-rsa/ directory. However, in order to function properly, these scripts should be located in the /etc/openvpn directory.
cp -R /usr/share/doc/openvpn/examples/easy-rsa/ /etc/openvpn
Configure Public Key Infrastructure Variables
Before we can generate the public key infrastructure for OpenVPN we must configure a few variables that the easy-rsa scripts will use to generate the scripts. These variables are set near the end of the /etc/openvpn/easy-rsa/2.0/vars file. Here is an example of the relevant values:
Edit /etc/openvpn/easy-rsa/2.0/vars according to your environment.
export KEY_COUNTRY="CN" export KEY_PROVINCE="BJ" export KEY_CITY="BeiJing" export KEY_ORG="iRedMail" export KEY_EMAIL="[email protected]" |
Initialize The Public Key Infrastructure (PKI)
Issue the following commands in sequence to internalize the certificate authority and the public key infrastructure:
cd /etc/openvpn/easy-rsa/2.0/
chmod +rwx *
source ./vars
./clean-all
./pkitool --initca
Generate Certificates
With the certificate authority generated you can generate the private key for the server. This script will also prompt you for additional information. By default, the Common Name for this key will be "server". You can change these values in cases where it makes sense to use alternate values. To accomplish this, issue the following command:
./pkitool --server server
Generate Diffie Hellman Parameters Link
The "Diffie Hellman Parameters" govern the method of key exchange and authentication used by the OpenVPN server. Issue the following command to generate these parameters:
./build-dh
Relocate Secure Keys
The keys and certificates for the server need to be relocated to the /etc/openvpn directory so the OpenVPN server process can access them. These files are:
- ca.crt
- ca.key
- dh1024.pem
- server.crt
- server.key
cp keys/{ca.crt,ca.key,server.crt,server.key,dh1024.pem} /etc/openvpn/
These files don't need to leave your server. Maintaining integrity and control over these files is of the utmost importance to the integrity of your server. If you ever need to move or back up these keys, ensure that they're encrypted and secured.
3 Configure OpenVPN Support For LDAP Auth
Find cn=vmail password
The vmail password was randomly created during the iredmail installation. You can find the password in /etc/postfix/ldap_virtual_mailbox_domains.cf:
cat /etc/postfix/ldap_virtual_mailbox_domains.cf
bind_dn         = cn=vmail,dc=example,dc=com
bind_pw         = GDp9BH32x3zWf8xOtr86IKLcV0ffVW #cn=vmail password
|
Configure OpenVPN auth OpenLDAP
Issue the following two commands in sequence to create the /etc/openvpn/auth folder and copy the example files of OpenVPN auth LDAP to the /etc/openvpn/auth directory.
mkdir /etc/openvpn/auth
cp /usr/share/doc/openvpn-auth-ldap/examples/auth-ldap.conf /etc/openvpn/auth
Now edit /etc/openvpn/auth/auth-ldap.conf:
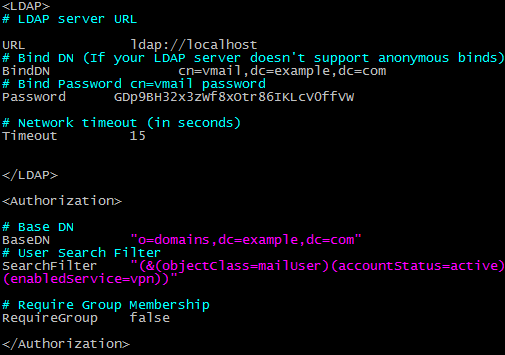
<LDAP>
# LDAP server URL
URL             ldap://localhost
# Bind DN (If your LDAP server doesn't support anonymous binds)
BindDN                cn=vmail,dc=example,dc=com
# Bind Password cn=vmail password
Password      GDp9BH32x3zWf8xOtr86IKLcV0ffVW

# Network timeout (in seconds)
Timeout         15

</LDAP>

<Authorization>
# Base DN
BaseDN          "o=domains,dc=example,dc=com"
# User Search Filter
SearchFilter    "(&(objectClass=mailUser)(accountStatus=active)(enabledService=vpn))"
# Require Group Membership
RequireGroup    false
</Authorization>
4 Configuring OpenVPN
We'll now need to configure our server file. There is an example file in the /usr/share/doc/openvpn/examples/sample-config-files directory. Issue the following sequence of commands to retrieve the example configuration files and move them to the required directories:
cd /usr/share/doc/openvpn/examples/sample-config-files
gunzip -d server.conf.gz
cp server.conf /etc/openvpn/
Now edit /etc/openvpn/server.conf:
push "redirect-gateway def1" push "dhcp-option DNS 10.8.0.1" ##Add it at the bottom line plugin /usr/lib/openvpn/openvpn-auth-ldap.so /etc/openvpn/auth/auth-ldap.conf client-cert-not-required |
5 Enable VPN Service For Mail User
Use phpLDAPadmin or other tools to add LDAP values for existing mail users.
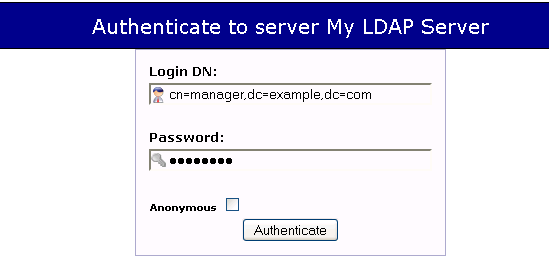
Log into phpLDAPadmin:
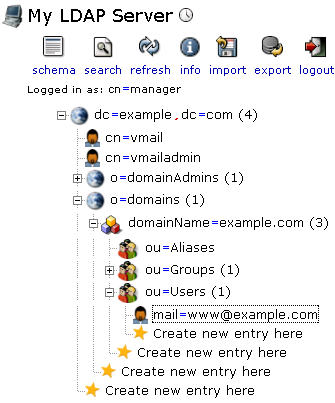
Find the existing mail user [email protected]:
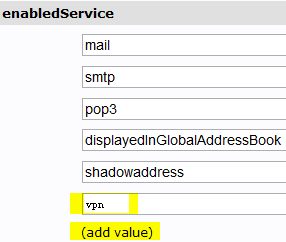
Enable the VPN service for the user [email protected]: