On this page
- Changing From SquirrelMail To Atmail Open With ISPConfig 3
- Step 1 - Create A Database
- Step 2 - Backup Squirrelmail
- Step 3 -Download, Unpack And Remove Unnecessary Files
- Step 4 - Make Atmail Open Writeable For Apache
- Step 5 - Install Atmail Open To Your Server
- Step 6 - Connect To The Database
- Step 7 - Define The SMTP Host
- Step 8 - Import Data From SquirrelMail (Or Another Webmail System)
- Step 9 - All done! Log In To Atmail Open
- Step 10 - Customise The Login Screen
Changing From SquirrelMail To Atmail Open With ISPConfig 3
Author: Sellotape
Version: 1.00
Last edited: Saturday, 04th December 2010
Atmail Open is an open source webmail client which is available free of charge and is a great alternative to Squirrelmail. This tutorial shows how to use it with ISPConfig 3 (instead of SquirrelMail). More information available here... http://atmail.org
Step 1 - Create A Database
First we need to create a database for Atmail.
- Open up ISPConfig and go to Sites.
- Select Database from the sub-navigation menu on the left.
- Click on Add new Database
- Create a Database name, Database user and a Database password
Step 2 - Backup Squirrelmail
Just in case it all goes wrong - we need to backup Squirrelmail.
cd /usr/share
mv squirrelmail squirrelmail.bak
mkdir squirrelmail
Step 3 -Download, Unpack And Remove Unnecessary Files
I was unable to get the latest version of Atmail open to work with my setup. For the purpose of this tutorial; we will be using v1.01 - Please feel free to let me know if you find a way to get the latest version working.
cd squirrelmail
wget http://downloads.sourceforge.net/atmailopen/atmailopen-1.01.tgz
tar xvfz atmailopen-1.01.tgz
cd atmailopen
mv * ../
cd ../
rm –r atmailopen
rm atmailopen-1.01.tgz
Step 4 - Make Atmail Open Writeable For Apache
chown –R [Apache-user] /usr/share/squirrelmail
Please note: On Debian systems, replace [Apache-user] with www-data. The Apache user on other Linux distributions might be different.
Step 5 - Install Atmail Open To Your Server
In your preferred browser, go to http://yourdomain.tld/webmail. You'll be required to read the on-screen instructions and read the licence agreement. Providing you accept you can continue!
Step 6 - Connect To The Database
In Step 1 we created a database in ISPConfig and we're now need to enter the details into the AtMail Open...
Step 7 - Define The SMTP Host
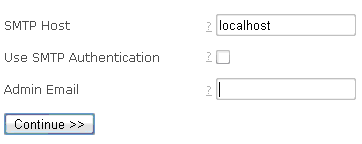
Enter the SMTP Host (in this example we assume it is localhost). Whether or not you require Authentication (e.g. if you need to use a mail relayer to send e-mail) and an Administrator E-mail Address.
Step 8 - Import Data From SquirrelMail (Or Another Webmail System)
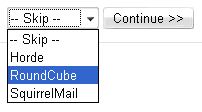
At this step, you have the possibility to import data from other popular webmail systems. Should you decide to do this, please select Squirremail and enter the database connetion settings and click 'Continue'
Step 9 - All done! Log In To Atmail Open
You can now log in to your new Atmail Open Webmail system! It's all good to go from here but if you like, follow Step 10 to customise your login screen.
Step 10 - Customise The Login Screen
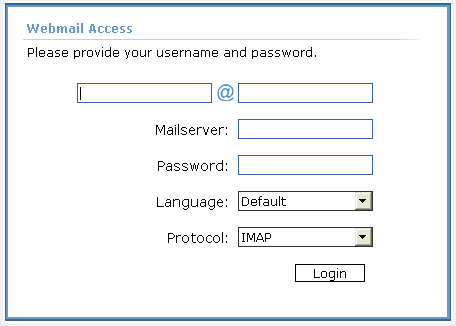
In this step we will cover how to remove the Mailserver, Language and Protocol fields from the login screen and define default settings so we don't need to input them manually everytime we login.
vi /usr/share/squirrelmail/html/login-light.html
Find the lines below and edit accordingly...
Login Header / Title text
< td >Webmail Access< /td >
Instructions to login / Custom Message
< td >< div id="AuthStatus" class="logintext" style="padding-left: 4px;" >Please provide your username and password.< /div >< /td >
Hide 'Mailserver; field from login page and set default to 'localhost'
Find...
< tr id="mailserver" >
And change to...
< tr id="mailserver" style="display:none;" >
Find...
< td align="left" >< input name="MailServer" type="text" class="logininput" id="MailServer">< /td >
And change to...
< td align="left" >< input name="MailServer" type="text" class="logininput" id="MailServer" value="localhost" >< /td >
Hide protocol from login page
Find...
< tr id="protocol" >
And change to...
< tr id="protocol" style="display:none;" >
Hide Language from login page
Find...
< tr >
     < td > < /td >
     < td colspan="2" align="right" >Language:< /td >
And change the < tr > tag to...
< tr style="display:none;" >
Please let me know if you have any suggestions to improve this tutorial... Enjoy!


