Continuous Deployment With Jenkins And Rex
In this tutorial I will show you how to do continuous deployment with jenkins as a ci tool and Rex as a deployment tool. Together, we will set up Jenkins, the build and test process, a Subversion repository and our example Perl App.
This tutorial can be used with Java-, PHP-, Rails-, ... projects as well. But for simplicity I've chosen Perl.
This howto focuses on Ubuntu LTS 11.04 but it can also be done with other Linux Distributions. For Jenkins you just need a Java Environment and for Rex you just need Perl 5.8 (i recommend >=5.10) and some Perl Modules (see http://rexify.org/).
Read http://rexify.org/howtos/start.html to get a short overview of what Rex is and how it works.
Preparation
You need the following systems. It is, for sure, possible to build everything on one system, but in this tutorial I will use for every service a seperate system.
- Continuous Integration Server (short: CI Server). This is the System where Jenkins and the Tests will run on. (Ubuntu 11.04 LTS)
- Subversion Server (Ubuntu 11.04 LTS)
- 2 Test Webservers. This will be the systems where we will deploy our test project to. (Ubuntu 11.04 LTS)
- Your Workstation (doesn't matter what Operating System. I prefer Ubuntu, Debian or Mac OS X)
Installing Rex
Install it on: Your Workstation, CI Server
There are multiple prebuilt packages available for Rex. Just have a look at http://rexify.org/get/.
You can install Rex via CPAN as well:
sudo sh -c "curl -L cpanmin.us | perl - Rex"
sudo sh -c "cpanp -i --skiptest Rex::Apache::Deploy"
To build Rex you need the following dependencies:
- build-essential
- libexpat1-dev
- libssh2-1-dev
- zlib1g-dev
- libssl-dev
Don't forget to install Rex and Rex::Apache::Deploy on your Jenkins server as well. You need at least Rex 0.19.0 and Rex::Apache::Deploy 0.7.0.
Installing Tomcat
Install it on: CI Server
At first we will install Jenkins. Fire up a shell and use apt-get to install tomcat6 and tomcat6-admin. If you want, you can use this howto that shows you how to install Tomcat with Rex and jump to Step 2 "Deploying Jenkins".
sudo apt-get install tomcat6 tomcat6-admin
Now open the file /etc/tomcat6/tomcat-users.xml and replace the content with the following.
 <?xml version='1.0' encoding='utf-8'?>
 <tomcat-users>
    <role rolename="manager"/>
    <user username="manager" password="passw0rd" roles="manager"/>
 </tomcat-users>
Now restart Tomcat.
sudo /etc/init.d/tomcat6 restart
Deploying Jenkins
Install it on: CI Server
Download Jenkins from http://mirrors.jenkins-ci.org/war/latest/jenkins.war.
wget http://mirrors.jenkins-ci.org/war/latest/jenkins.war
First your need to create the directory /usr/share/tomcat6/.jenkins and change its owner to tomcat6.
sudo mkdir /usr/share/tomcat6/.jenkins
sudo chown tomcat6: /usr/share/tomcat6/.jenkins
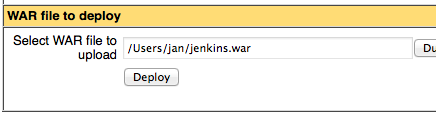
Now open up a webbrowser and go to http://your-ci-server:8080/manager/html and select jenkins.war to deploy.
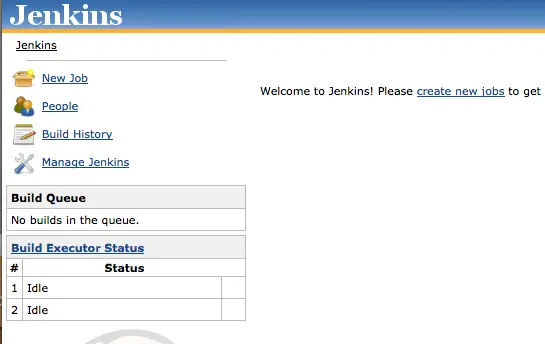
After deploying Jenkins go to http://ci-server/jenkins/.
Okay, if you see the following screenshot everything is working.
Next you will create a Subversion repository where the example project gets managed.
Example Repository
Install it on: Subversion Server
sudo apt-get install subversion libapache2-svn apache2
After you've installed the packages edit the file /etc/apache2/mods-enabled/dav_svn.conf
 <Location /svn>
    # enable svn
    DAV svn
    # set parent path to allow multiple repositories
    SVNParentPath /var/lib/svn
 </Location>
Save the file and create the repository.
sudo mkdir /var/lib/svn
sudo cd /var/lib/svn
sudo svnadmin create webapp
sudo chown -R www-data: .
sudo /etc/init.d/apache2 restart
Example Project
Okay, after you've created your repository, switch back to your workstation, check it out and create a small Project. I've chosen a Mojolicious Project (http://mojolicio.us), because it is easy to setup and to handle.
If you know how to set up Jenkins to work with other projects, for example PHP, RubyOnRails, Java, ... feel free to use a own project.
First install Mojolicious:
sudo sh -c "curl -L cpanmin.us | perl - Mojolicious"
Install Mojolicious on your CI Server and Webserver, too.
After installing create a mojo app.
svn co http://your-svn-server/svn/webapp
cd webapp
mojo generate app MySite
cd my_site
mojo generate makefile
sed -ie 's/MyApp/MySite/g' Makefile.PL
sed -ie 's/my_app/my_site/g' Makefile.PL
rm Makefile.PLe
Now create a configuration file for the build-in webserver Hypnotoad. Create a new file hypnotoad.conf and put the following lines in it.
 {
    listen   => ['http://*:80'],
    workers  => 5,
    pid_file => '/var/run/hypnotoad.pid',
    user     => 'www-data'
 };
Okay that is enough for the first try. You can view your application by starting the development server.
./script/my_site daemon
This will start a development server on port 3000 on your workstation.
Add everything to subversion and commit it.
cd ../..
svn add my_site
svn ci -m "inital commit"
Installing TAP::Harness::JUnit
Install it on: CI Server
To get Jenkins compatible test outputs we need to install another perl module. This module is called TAP::Harness::JUnit.
Don't forget the dependencies
sudo apt-get install curl build-essential
sudo sh -c "curl -L cpanmin.us | perl - TAP::Harness::JUnit"

