Creating Your Own Distributable Ubuntu DVD
Version 1.0
Author: Christian Schmalfeld <c [dot] schmalfeld [at]
projektfarm [dot] de>
This article is about how to create a DVD image of the Ubuntu distribution on your machine with the exact same software included on the disk. This can be done using a software called Remastersys. Remastersys allows you to either create iso-backups of your whole system, including the home folder, or just backups of the installed software, leaving the home folder aside.
1 Preliminary Note
Please be aware of what you want to do with the created iso-image. If you want to burn it on a DVD, remember that the image may not surpass the maximum size of 4 GB. In most cases, this makes it impossible to include the home folder to the image since it may be the largest folder on your system.
I have tested Remastersys on Linux Mint 11 and it works properly on my machine.
I do not issue any guarantee that this will work for you!
2 Install Remastersys
Remastersys is not available in the standard Ubuntu repositories, therefore you first have to add another repository to be able to download it. To do so, open the sources.list file by entering the following into a terminal:
sudo gedit /etc/apt/sources.list
Type in the following at the bottom of the file and save it afterwards:
[...]
# Remastersys
deb http://www.geekconnection.org/remastersys/repository karmic/
Back in the terminal, enter following to update your package list:
sudo apt-get update
Now you can download Remastersys via Synaptic Package Manager. Open it, type in your password and enter remastersys into the searchbar.
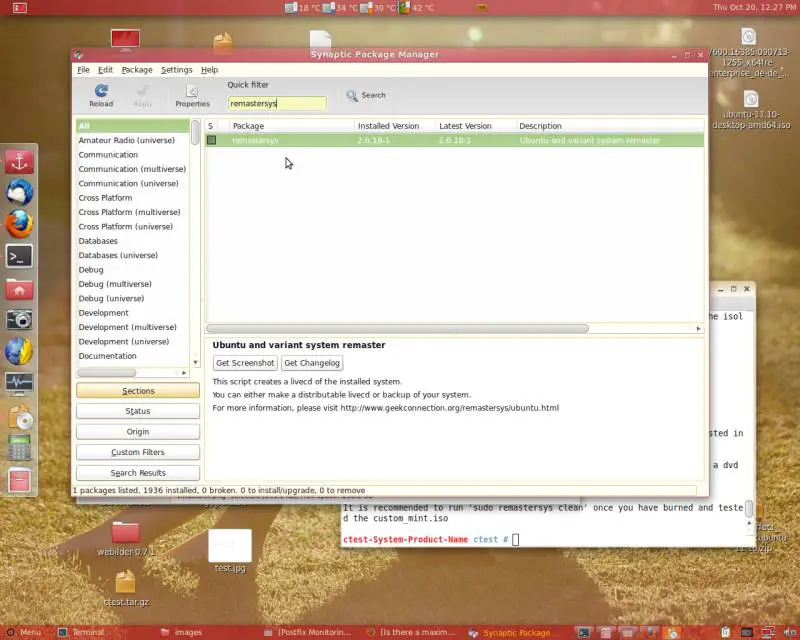
Then follow the usual procedure. Right-click it, select Mark for installation, accept the installation of its dependencies by clicking on Mark and hit Apply afterwards.
You can also easiliy install it by using the command line. Simply enter following:
sudo apt-get install remastersys
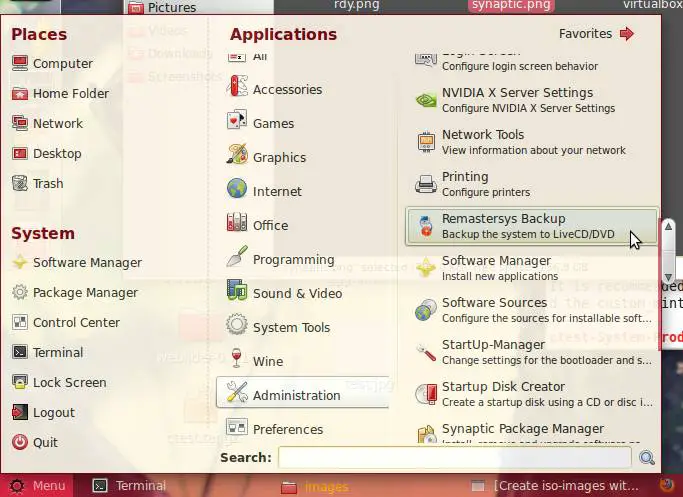
After the installation, find Remastersys in Menu > Administration > Remastersys Backup.
3 Install Software
To create yourself a unique distributable Ubuntu DVD you need to install the software you want on it on your current system. Do this by opening Synaptic Package Manager (Menu > Administration > Synaptic Package Manager) and use the search bar to find the packages you want to install. Install them exactly as you installed remastersys. All software you have installed on your current system will later automatically be transferred to the iso-image of you DVD.
4 Start and Use Remastersys
Start Remastersys from the menu or let a terminal show you the possible commands by entering
remastersys
The main menu comes with a bunch of options you should carefully read (they trigger once you click OK):
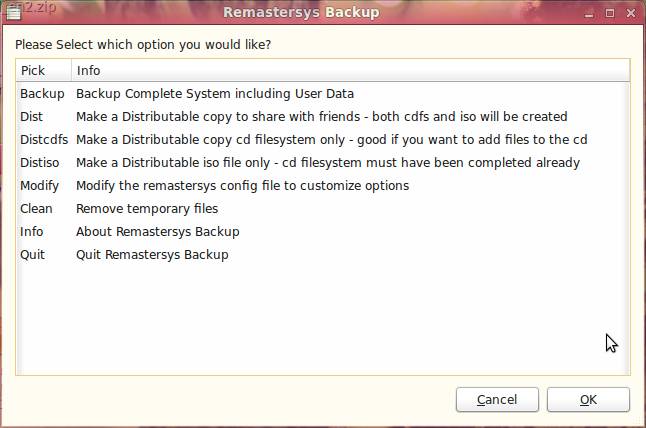
Here is what exactly they do:
- Backup - Creates a file system and an iso-image of your whole system including the home-folder (may become really large)
- Dist - Combines the two options below: creates a file system to build the iso-image out of and does so after the first step (same as backup, but excluding the home folder)
- Distcdfs - Creates the squashed file system to build the iso-image out of. This is the necessary step to take before actually creating an iso-image. This can also be used to retroactively add files to the file system before creating the images
- Distiso - Creates the actual iso-image which can be used in a virtual machine or burned on a CD to boot your custom system from (before choosing this option a file system must have been created using Distcdfs)
- Modify - This option lets you determine settings such as the image's name or the files to exclude from the creation process
- Clean - Removes files in the directory where the file system and the image are stored - be sure to move the created image somewhere else before you pick this option
- Info
- Quit
Since you most likely want to use the image you create for burning it on a DVD you should pay attention to the summed size of software and files you add to it.
Every file created with Remastersys will be placed in its temporary directory /home/remastersys/remastersys. That counts for filesystems as well as for images (e.g. custom.iso by default). Be sure you move your image to some other place since this temporary folder will be emptied on the use of Clean.
5 Add Files to a Non-Backup Filesystem Without home-folder
If you have a home folder that is to large to put it on a DVD but still have files that need to be on the image, there are two ways you can put them on it; one has to be dealt with before you create the file system and one that can also be done after it has been created.
5.1 /etc/Skel Folder
To add files to your non-backup image before you create the file system, just put them into the /etc/Skel folder to let the files appear in your home folder on the image afterwards. The /etc/Skel folder is responsible for populating the home folder on every installation and every adding of a new user.
5.2 Squashfs-tools
Squashfs-tools is package that allows you to build and uncompress but also to add files to squashed filesystems, which are also used to build the filesystem on Remastersys. They can be used to append files to already created filesystems. Install them by entering the following into a terminal:
sudo apt-get install squashfs-tools
The squashfs-tools offer two commands to use, one to create filesystems or add files to existing and one to uncompress them. The first one is
mksquashfs
and its basic structure is the command followed by one or more source files or folders and the path to the squashed file (e.g. mksquashfs /home/ctest/Desktop/bla /home/ctest/Desktop/ultimate.squashfs). The last folder in the path of the source file will be the root of the squash filesystem unless you specify otherwise with an option, meaning it will not be directly displayed itself. The same command is also used to append files to existing squash filesystems, which is what we basically want. To do so, just pick the existing filesystem as the filesystem to create and the files to append in the input files' path. Unfortunately, it is not possible to merge the two filesystems, which is why we circumvent this problem by creating a folder called extrafiles (could be any name) in any folder and choose this upper folder as the one to add to the system (it will become the root folder and the folder inside, the one we want, will be displayed along the files in the filesystem's root folder). Add the files you want on your DVD to the extrafiles folder. Following would be a possible way to add files to the filesystem:
mksquashfs /home/ctest/Desktop/bla /home/remastersys/remastersys/ISOTMP/casper/filesystem.squashfs
In this example the folder bla is the one containing the extrafiles folder. See the man page for further switches and options.
To uncompress a squash filesystem, use following command:
unsquashfs
The most common way to use this command should be combined with the destination switch. Make sure to choose an unexisting directory as destination since it will give you an error otherwise.
unsquashfs -d /home/ctest/Desktop/unexistingdirectory /home/remastersys/remastersys/ISOTMP/casper/filesystem.squashfs

