Apache Module For OpenID Authentication

OpenID is a widely adopted technology for user authentication in web applications. It relies on the concepts of distributed user authentication in blog applications. This small cookbook explains step-by-step how to install and configure the Open Source Apache module mod_auth_oid.
The intended purpose of this module is to provide a simple relying party implementation which can be used to protect access to Apache based web applications and resources. The module doesn't implement all, in the official Specification described functions. However, it's features are already mature enough, to provide a comfortable login usability for your applications and users.
There are also two additional modules included which enhance the authentication module with the capability to map userid's to local users not only via the Apache configuration, but with either a local mapping file (which can be already existing from other applications) or via Ldap.
Security Warning: The module doesn't support Protocol Extensions like PAPE. Therefore usage in environments with higher requirements of data protection, like health care or monetary transactions is not recommended.
Installation
Prerequisites
In order to install this Apache module the following requirements have to be met:
- Apache 2.2 including mod_ssl, mod_proxy, mod_include, Headerfiles and apxs/apxs2 (often referred as apache2 and apache2-devel packages).
- Apache module mod_parp for parameter parsing. Get it from here. Installation is straight forward: Use sudo or login as root:
$ tar xvBzf mod_parp-0.10-src.tar.gz
 $ cd mod_parp-0.10 $ sudo apxs2 -i -c apache2/mod_parp.c
 $ sudo chmod 755 /usr/lib64/apache2/mod_parp.so
Main Module
Download and unpack the Sourcecode from here.
$ tar xvBzf mod_auth_oid-2.0-src.tar.gz
 $ cd mod_auth_oid-2.0
 $ sudo apxs2 -i -c -I . -D AOID_MOD_EXT_HOOKS apache2/mod_auth_oid.c -lcrypto -lparp
Optional: There are additional modules which come with the Sourcecode. If you want to use also the highly recommended additional module mod_auth_oid_file.c or the mod_auth_oid_ldap.c please compile and install them also with either of the following commands.
$ sudo apxs2 -i -c -I . apache2/mod_auth_oid_file.c
 $ sudo apxs2 -i -c -I . apache2/mod_auth_oid_ldap.c
Configuration
Server Section
The following Apache Standard modules are required:
- mod_ssl (provides Encryption routines used by mod_auth_oid)
- mod_proxy (provides functions for the mod_auth_oid in order to send requests to the OpenID Providers)
- mod_include (provides rendering of shtml pages)
Enable the modules in your Apache's global configuration section. Adjust the file location according to your file system layout. It is also important, that the modules are loaded after mod_ssl. Thus place this lines at the end of your Apache's LoadModule block. Uncomment the last two lines with the mapping modules if you intend to use them also. If your distribution has an individual style for loading modules please do it according to their instructions (e.g. place the following lines in a file which is included automatically if it lies in a specific directory like modules-enabled or similar.
  LoadModule parp_module                    /usr/lib64/apache2/mod_parp.so
  LoadModule auth_oid_module                /usr/lib64/apache2/mod_auth_oid.so
  # LoadModule auth_oid_file_module           /usr/lib64/apache2/mod_auth_oid_file.so
  # LoadModule auth_oid_ldap_module           /usr/lib64/apache2/mod_auth_oid_ldap.so
Try to restart your server. If the module is loaded correctly, it should be reported in the Servers error.log:
[Sun Nov 06 12:10:59 2011] [notice] Apache/2.2.17 (Linux/SUSE) mod_ssl/2.2.17 OpenSSL/1.0.0c mod_auth_oid/2.0 configured -- resuming normal operations
VirtualHost Section
Now it is time to prepare the specific configuration for protection your application. Edit your VirtualHost configuration. Of course it should be your https VirtualHost as we deal with security here. And replace my OpenID YOURNAME with your own OpenID, otherwise YOURNAME could steal your crown jewels one day. ;) If you want to use Google as your OpenID provider you have to go a slightly different way and add a AOID_UserPattern, because Google uses the Directed Identity approach with opaque OpenID's per site. In the last chapter of this howto, called Narrowing the namespace of your prefered OpenID providers the configuration directive is explained with a Google example.
We assume that the resource we want to protect is the location /private and the Authentication handler is located on /aoid. The sections below are commented to indicate what you have to do.
       # A complete reference of all available configuration options
       # is available under: http://auth-openid.sourceforge.net/
       # Caution: Enable on trusted CA's by putting them into cacerts
       # Link them to hashnames like described in the Apache documentation
       # http://httpd.apache.org/docs/2.2/mod/mod_ssl.html#sslproxycacertificatepath
       SSLProxyEngine            on
       SSLProxyCACertificatePath /etc/ssl/cacerts

       # use httponly flag preventing XSS attacks to the session cookie
       BrowserMatch              "Mozilla.*Firefox/(3|4)" HttpOnlyCookie
       BrowserMatch              "MSIE [6789]"            HttpOnlyCookie
       BrowserMatch              "Opera/(10|9\.[56789])"  HttpOnlyCookie
       BrowserMatch              Secure SecureCookie

       # mod_auth_oid base settings
       AOID_Realm                /
       AOID_StartPage            /private/index.html
       AOID_LogLevel             info
       AOID_LoginPath            /aoid/login
       AOID_LoginSuffix          .shtml
       AOID_Timeout              300
       AOID_CookieName           AJESSIONID

       # OpenID User Mapping. Additional possibilitys are described
       # in the Chapter "Local file mapping" of the Howtoforge Page
       # allowed/known users REPLACE WITH YOUR OPENID
       AOID_User http://YOURNAME.myopenid.com/ YOURNAME

       # Enforce mod_auth_oid user authentication of the following location
       <Location /private>
         AuthType OpenID
         Require valid-user
       </Location>

       # mod_auth_oid login page
       # enable SSI for the login page (requires mod_include)
       <Location /aoid>
          Options            Includes
          AddType            text/html .shtml
          AddOutputFilter    INCLUDES .shtml
       </Location>
Files
Now create a directory named private in the DocumentRoot of your VirtualHost, which includes the content you like to protect. As an example add an index.html file which says: "Yeahh!! mod_auth_oid rocks and I hacked 127.0.0.1!.
Additionally you need a loginpage in the Directory aoid which is also in the DocumentRoot. As a start you can use the sample SHTML page from the directory htdocs in the tarball. Just copy it also into your htdocs. Check the permissions of the newly created files, if they match your webservers preferences.
Now you can restart your Apache once again. Please check the error.log to see everything is fine.
Test Your Installation
Now open your browser. If you have done everything right and your Apache also does, then you should see a loginpage when you point your browser to the following URL: https://YOURHOST/private/index.html
Select your provider and submit. The module will redirect you to your provider where you log in, and if it was successful you will be sent back to your private application. If you choose Google, just submit the proposed OP Identifier, in the two other cases enter your OpenID into the highlighted part. Later in the howto is a much convenient solution for a fancy looking loginpage described.
Debugging In Case Something Went Wrong
In the unlikely case where something is not worked as expected you have several indications what might be wrong in the error.log from your Apache server. The log messages should indicate what fails. A detailed list of the possible error codes and how to enable a higher Loglevel can be found on the mod_auth_oid Page.
Additional Options
Fancy Loginpage
I assume that you are like me, and one of the first thing you'd like to see, is a nicely looking loginpage in the browser. Does something like this look cool enough for your taste.
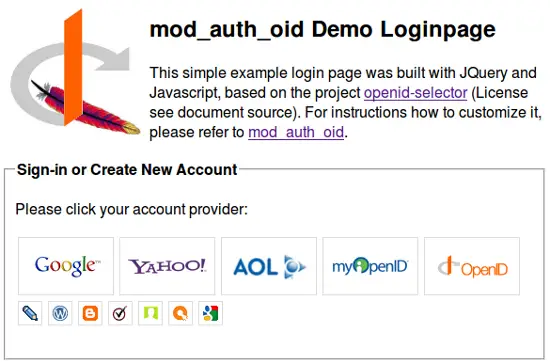
This professional looking login page was created with the Open Source Project openid-selector which is a user-friendly way to select an OpenID.
After generating the Loginpage it has to be enhanced with the shtml include stuff from mod_auth_oid. I have added the error-rendering part from the original loginpage into the generated html page from openid-selector. My example of the customized page can be downloaded here.
Local Userid Mapping
If you also compiled the mod_auth_oid_file module then you can also map your userid records in a local file instead of adding them all to your Apache configuration file. The detailed instructions can be found here.
Read the following chapter to add user self registration with local file mapping in one shot.
User Self Administration An OpenID To Local Userid Mapping
Assuming that you already have a user administration in place which is based on Apache's .htpasswd files, you can use the following configuration snipplet to enhance it, so that users can register OpenID account to their local accounts. Copy the file_mapper.html file from the tarball into your htdocs.
  # Virtual Host section
  AOID_File_DB              /etc/apache2/mapdb
  AOID_File_AdminPage       /usr/local/apache2/htdocs/file_mapper.html

  # Profile administration location
  # Adjust filepath according to your existing .htpasswd file
  <Location /profile>
    AuthUserFile            /srv/data/.htpasswd
    AuthName                'Enter your LoginName: Cancel to register if you do not have one.'
    AuthType                Basic
    Require                 valid-user
    SetEnvIf                Request_Method POST parp
    SetEnvIf                Request_Method GET parp
    SetHandler              auth-oid-file
    AOID_File_UserOnly      on
  </Location>
Now, mod_auth_oid_file creates a mapdb file where it stores the relation between OpenID accounts and local .htpasswd accounts.
Security Considerations
Relying Party Discovery Document
OpenID recomments to host a Relying Party Discovery Document which indicates a proper return_to address for the OpenID Provider. Yahoo will indicate your site as not trusted, if you don't supply such a document. Further information can be found here.
Save a document called openid.xrd in the DocumentRoot of your site. The content should look similar to the following example. Adjust it according to your setup.
<?xml version="1.0" encoding="UTF-8"?>
<xrds:XRDS
    xmlns:xrds="xri://$xrds"
    xmlns:openid="http://openid.net/xmlns/1.0"
    xmlns="xri://$xrd*($v*2.0)">
    <XRD>
        <Service priority="1">
            <Type>http://specs.openid.net/auth/2.0/return_to</Type>
            <URI>https://YOUR_HOST_HERE/aoid/login</URI>
        </Service>
    </XRD>
</xrds:XRDS>
The document must then be references by either sending a special crafted header with every HTTP response or it can be included in the sites top-level document.
Variant 1 announce it via header (recommended)
    LoadModule headers_module /usr/lib/apache2/modules/mod_headers.so
    # .......
Header set X-XRDS-Location https://YOUR_HOST_HERE/openid.xrd
Variant 2 announce it in the top level html document's head section
  ....
  <head>
  <meta http-equiv="X-XRDS-Location" content="https://YOUR_HOST_HERE/openid.xrd"/>
  ....
Protecting From DoS And Other Kind Of Attacks
DoS attacks and cross site request forgery is a big issue today. You can protect your site efficiently from DoS attacks with another Open Source Module, called mod_qos. This module is a swiss army knife when it comes to protect your server from various kinds of attacks. The module can be as easily installed as any other Apache module. The following configuration example shows a basic configuration which protects your site from DoS attacks and cross site request forgery on the self administration page.
    # server section
    LoadModule qos_module /usr/lib/apache2/modules/mod_qos.so

    # handles connections from up to 100000 different IPs
    QS_ClientEntries 100000

    # will allow only 50 connections per IP
    QS_SrvMaxConnPerIP 50

    # maximum number of active TCP connections is limited to 256
    MaxClients              256

    # disables keep-alive when 70% of the TCP connections are occupied:
    QS_SrvMaxConnClose      180

    # minimum request/response speed (deny slow clients blocking the server, ie. slowloris keeping connections open without requesting anything):
    QS_SrvMinDataRate       120 1500 400

    # and limit request header and body (carefull, that limits uploads and post requests too):
    QS_SrvMaxConnClose      70%
    LimitRequestFields      30
    QS_LimitRequestBody     102400

    QS_ClientEventBlockCount 20 300
    QS_SetEnvIfStatus        400               QS_Block
    QS_SetEnvIfStatus        401               QS_Block
    QS_SetEnvIfStatus        403               QS_Block
    QS_SetEnvIfStatus        404               QS_Block
    QS_SetEnvIfStatus        405               QS_Block
    QS_SetEnvIfStatus        406               QS_Block
    QS_SetEnvIfStatus        408               QS_Block
    QS_SetEnvIfStatus        411               QS_Block
    QS_SetEnvIfStatus        413               QS_Block
    QS_SetEnvIfStatus        414               QS_Block
    QS_SetEnvIfStatus        417               QS_Block
    QS_SetEnvIfStatus        500               QS_Block
    QS_SetEnvIfStatus        503               QS_Block
    QS_SetEnvIfStatus        505               QS_Block
    QS_SetEnvIfStatus        QS_SrvMinDataRate QS_Block
    QS_SetEnvIfStatus        NullConnection    QS_Block

    QS_SrvMaxConnExcludeIP 127.0.0.1

    # CSRF protection of the Self Registration Form by setting
    # four milestones for profile administration
    QS_MileStone          deny       "^GET /OpenIdLogin"
    QS_MileStone          deny       "^GET /OpenIDRegistration"
    QS_MileStone          deny       "^GET /profile"
    QS_MileStone          deny       "^POST /profile"
Narrowing The Namespace Of Your Prefered OpenID Providers
You can limit which OpenID provider you accept for authentication of your website with the configuration directive AOID_UserPattern. The following two examples give you a rought idea how to construct regular expressions for that purpose.
  # VirtualHost section

  # Allow only Google OpenID's
  AOID_UserPattern          "^(https://www\.google\.com/accounts/o8/id\?id=.*)$" "$1"

  # Allow only my.company.com OpenID's and use only a part of it for mapping it to a local user.
  AOID_UserPattern          "^https://my\.company\.com/([a-z]{1})[a-z]+\.([a-z]{2})[a-z]+$" "$1$2"
Final Words
Thank you for reading this tutorial. I hope your installation went straight-forward. I wish you, that many users will profit from this module and I hope it was fun for you to install it. If you wish to keep informed about what's going on with the module, you can subscribe on our mod_auth_oid facebook page.
Credits: I wish to thank Pascal Buchbinder who mentored me, to improve this Apache module and enhance it with the identifier_select method. He is a the author of several Apache modules like mod_qos, mod_sslcrl, mod_parp and others.

