How to setup Raspberry Pi as Backup Server for Linux and Windows Desktops
On this page
- Setting up the Raspberry Pi as backup server
- 1. Download Raspian Image
- 2. Flash the image onto the microSD card
- 3. First Boot / Configuration
- 4. Expand Filesystem
- 5. Change User Password
- 6. Console Login
- 7. Localisation
- 8. Advanced Options
- 9. Set the Hostname
- 10. Memory Split
- 11. Enable OpenSSH Server
- 11. Finish and Reboot
- 12. Update and install required packages
- 13. Continue with Remote SSH connection or on the Raspberry Pi
- 14. Locate and Format the external USB drive
- 15. Mount the external USB drive
- 16. Mount external USB drive at boot up
- 17. Configure Samba
- 18. Backup Control File on the Raspberry Pi
- Making backups to the Rasperry Pi from Linux
- Making backups to the Rasperry Pi from Windows
- Checking your backups
The Raspberry Pi is a series of small single-board computers. They are rather cheap and are well suited for running a backup server or voip server. In february 2015 the Raspberry Pi 2 was released. It has more ram, newer cpu and features 4 onboard USB ports.
Current price for the Raspberry Pi 2 is $ 35.-. However in addition you need a few other things:
- microSD card: The Raspberry Pi 2 requires a microSD card to boot from. Any should do with 4GB or more. For the backup server 4GB should be plenty. You might want to get one that reads fast.
- Micro USB Power Charger: Also you'll need a power supply for it. It is powered by a micro usb port so very likely you'll have a charger at home from an old mobile phone that you don't need anymore.
- External USB Storage: Since this howto is about setting up a backup server, you also need to get external USB storage. Maybe an external 512GB harddisk is enough, maybe you need a 4TB drive. That's all up to your storage needs.
- Casing: The last thing is the casing. You don't strictly need casing but if you don't use one then you'll have just have the whole mainboard laying around somewhere and it's more suspectible to damage.
So the total costs will be like $ 35.- for the Raspberry Pi, about $10.- for the microSD card, about $10.- for the case, nothing for the micro usb charger since you probably have one, and then whatever the external usb drive costs.
Also, for retrieving backups I setup samba and the share is in read-only mode without any required credentials. If properly configured according to this guide, it will only be available in the lan and refused any connection attempt from outside the lan. Setting up also samba users and different credentials would go beyond the scope of thise howto. There are plenty of other howtos that explain it and it could be incorporated easily if there's a need for it.
Setting up the Raspberry Pi as backup server
Setting up the Raspberry Pi as backup server is the "most" difficult part of it since you first have to flash an image and then make everything ready. However the step-by-step guide should take you through it.
1. Download Raspian Image
First download the current Raspian Image from here https://www.raspberrypi.org/downloads/
2. Flash the image onto the microSD card
After downloading the image you'll need to flash it to the microSD card. Since there are already excellent guides out there for doing this, there's no point in repeating this over here. Best follow the guid here
3. First Boot / Configuration
After you have flashed the Raspberry Pi with the Raspian Image, attach a HDMI screen to it and boot it up. On first boot, you'll be presented a configuration screen. That configuration screen is pretty simple and there's a few things that you should set.
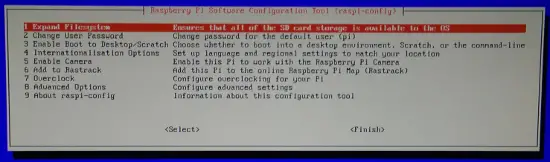
Disclaimer: The pics were taken with a cell phone so they aren't that great.
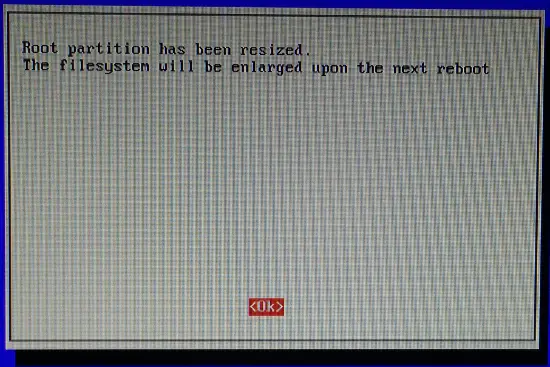
4. Expand Filesystem
First we want to have available the full space on the sdcard. For the backups it doesn't really matter as they will be stored on an external drive anyway. However I do like to have the space available. So select 1 Expand Filesystem and then you'll be prompted with a notification that upon next reboot, the filesystem will be expanded.
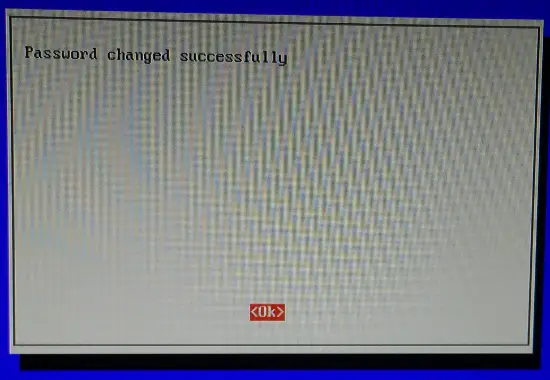
5. Change User Password
Then we want to alter the default password for the user "pi". So select 2 Change User Password and then type your desired password twice, each time followed by Enter. Again you'll be prompted with a notification that the password was changed.
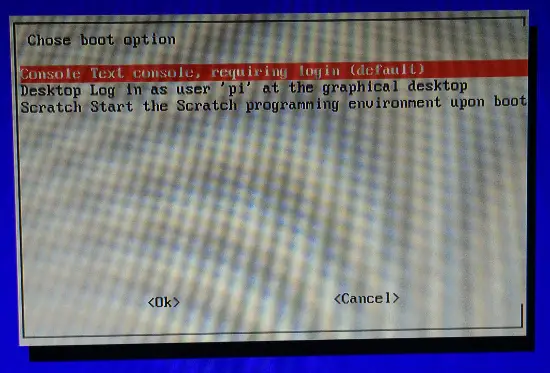
6. Console Login
Afterwards we want to make sure that we don't start and gui. So select 3 Enable Boot to Desktop/Scratch. On the following screen select Console Text console, requiring login (default).
7. Localisation
Then we want to set the system language and other available languages, keyboard layout etc. For that we go into 4 Internationalisation Options. When you enter that, you'll be presented to change the languages, timezone and keyboard language. The dialogs are all easy, so I won't go into further details.
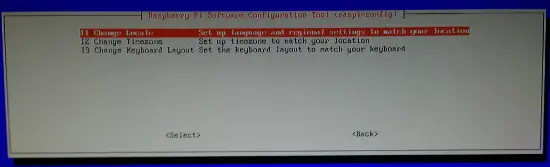
Notice: If you have selected on of those options, you'll end up at the main config screen again.
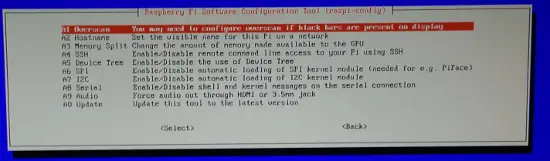
8. Advanced Options
Now go into the 8. Advanced Options. There we have another bunch of stuff we can set. The three important ones are A2 Hostname, A3 Memory Split and A4 SSH.
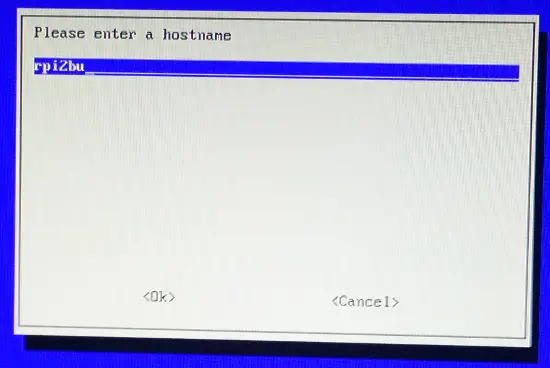
9. Set the Hostname
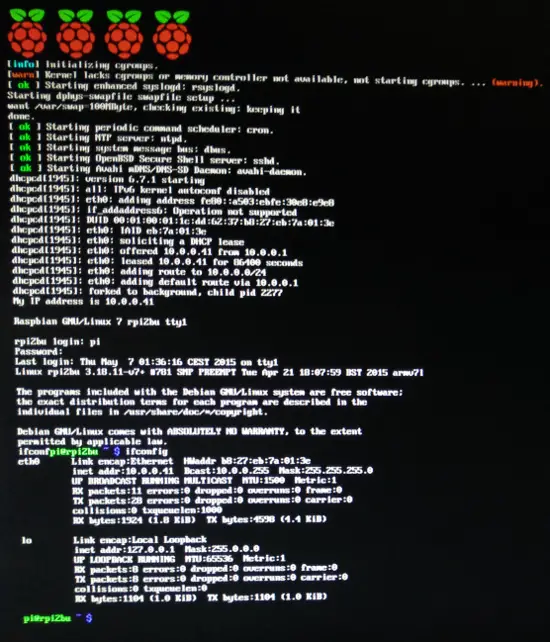
The hostname will allow you to access the Raspberry Pi by its hostname on the lan. Beware: You can only use letters and numbers. In this example I use as hostname rpi2bu - short for Raspberry Pi 2 Backup but it's all up to you.
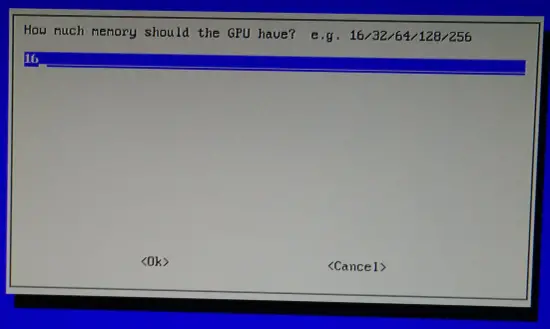
10. Memory Split
Since we want to run this Raspberry Pi as backup server, we don't wanna waste precious ram on the gpu. Remember: This is a headless server. So set the ram split to 16MB.
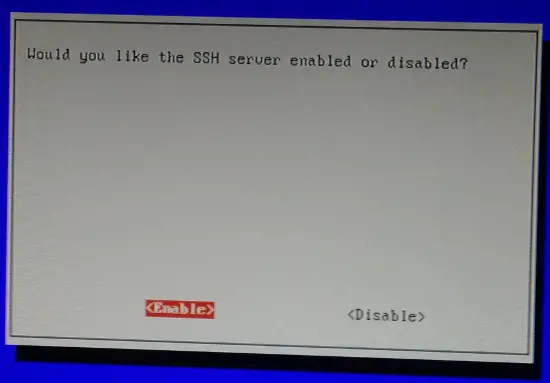
11. Enable OpenSSH Server
Since we'll do our backups with rsync through ssh and since ssh access is good for remonte administration of the Raspberry Pi, enable also the OpenSSH Server in the advanced options menu.
11. Finish and Reboot
So, those are all the things to be set from the configuration screen and you can now select
12. Update and install required packages
To have the Raspberry Pi as backup server we will need to install two additional packages: rsync and samba. Rsync is the tool that syncs the files from your Windows / Linux computer and samba will then make the backups available on the network (in read-only mode).
Since there are always lots of changes and updates coming, we first run:
sudo apt-get update && sudo apt-get upgrade
and then we install the required packages by:
sudo apt-get install rsync samba
Notice:The default user pi can run system commands as root with the sudo command. When you use the sudo command you are again prompted for your login password. This password will also be cached for some time, so running two sudo commands after one another should only trigger once the password input.
13. Continue with Remote SSH connection or on the Raspberry Pi
The next steps can be done in the Raspberry Pi itself or through a ssh connection. I prefer ssh connections and on linux I just use Konsole in my KDE. On Windows, you could use Putty or Kitty
14. Locate and Format the external USB drive
Before we configure the samba server, we need to mount the external usb drive and create a backup user. Before we can mount the external usb drive, we'll need to format it and know it's UUID. So before you attach your external USB drive, run:
ls -al /dev/disk/by-uuid
and it will return something like this:
total 0
drwxr-xr-x 2 root root 100 Mai 19 18:22 .
drwxr-xr-x 6 root root 120 Jan  1  1970 ..
lrwxrwxrwx 1 root root  15 Mai 19 18:22 13d368bf-6dbf-4751-8ba1-88bed06bef77 -> ../../mmcblk0p2
lrwxrwxrwx 1 root root  15 Mai 19 18:22 15CD-3B79 -> ../../mmcblk0p1
Now attach the external USB drive and run the command again. You'll see, the result is different and there's a new device there.
total 0
drwxr-xr-x 2 root root 100 Mai 19 18:22 .
drwxr-xr-x 6 root root 120 Jan  1  1970 ..
lrwxrwxrwx 1 root root  15 Mai 19 18:22 13d368bf-6dbf-4751-8ba1-88bed06bef77 -> ../../mmcblk0p2
lrwxrwxrwx 1 root root  15 Mai 19 18:22 15CD-3B79 -> ../../mmcblk0p1
lrwxrwxrwx 1 root root  10 Mai 19 18:22 eac53de3-9f06-4e46-999c-684da279298b -> ../../sda1
This tells us two things. The new devices is /dev/sda1 and it's uuid is eac53de3-9f06-4e46-999c-684da279298b. When you attach multiple dirves then the sda1 can change. So for mounting purposes later on, we'll just use it's UUID which won't change as long as the partitions aren't altered or the partition is being formatted - however, we're about to format the partition to a suitable filesystem.
Before we can use it, we'll have to format this drive. I prefer ext4 but some people might prefer btrfs for it's snapshot and integrity checks. In order to format it as ext4 just run this command:
sudo mkfs.ext4 /dev/sda1
Warning: Be sure to use the proper device label otherwise you might destroy data on a different device.
As said, formatting causes to change the UUID as well, so you need to issue again the aforementioned command and take note of the new UUID.
15. Mount the external USB drive
Next thing is that we have to mount it. Here you must decide where you want to mount it. I opted to mount the drive in the backup user's home directory. I could have mounted it as /home also if I wanted. However if I have multiple backups to do I like to make them onto individual drives. So one user = 1 drive and the drive is mounted in the user's home directory. On the Rasperry Pi you can directly attach 4 USB devices, so it's easy to expand to another user if needed. Before I mount it, I add according backup user - in this howto I call that user bu. In order to create that user, run the following command:
sudo adduser bu
You will be prompted again twice to provide a password for that user.
Once the user is added, you can mount the external drive easily there with the following command:
sudo mount /dev/sda1 /home/bu
However before we can use it, one last step needs to be taken. You need to change the ownership of the mounted folder now also to the bu user:
sudo chown bu:bu /home/bu
So, we have now mounted the external USB drive and set according permissions. If you run now the following command you'll see, that /dev/sda1 is mounted to /home/bu
df -h
Filesystem      Size  Used Avail Use% Mounted on
rootfs           15G  2.4G   12G  18% /
/dev/root        15G  2.4G   12G  18% /
devtmpfs        484M     0  484M   0% /dev
tmpfs            98M  236K   98M   1% /run
tmpfs           5.0M     0  5.0M   0% /run/lock
tmpfs           195M     0  195M   0% /run/shm
/dev/mmcblk0p1   56M   19M   37M  34% /boot
/dev/sda1       2.7T  260M  2.6T   1% /home/bu
Since I already have some test data on the external USB drive it shows that I have already used 260MB. On a fresh drive it should be zero.
16. Mount external USB drive at boot up
All seems find but after a reboot, the external USB drive isn't mounted anymore. Usually you would just add an entry to /etc/fstab but there's an issue with booting to quickly and USB detection being too slow. The solution is rather easy.
Edit: /boot/cmdline.txt
and you'll see that there is a line containing:
dwc_otg.lpm_enable=0 console=ttyAMA0,115200 console=tty1 root=/dev/mmcblk0p2 rootfstype=ext4 elevator=deadline rootwait
Just add rootdelay=10 to it so that it looks now:
dwc_otg.lpm_enable=0 console=ttyAMA0,115200 console=tty1 root=/dev/mmcblk0p2 rootfstype=ext4 elevator=deadline rootwait rootdelay=10
Next edit /etc/fstab
and add this to the end of that file
UUID=eac53de3-9f06-4e46-999c-684da279298b /home/bu ext4 defaults 0 2
Of course use your own UUID instead of the one given in the example above.
So now we have ensured that the external USB drives mounts in /home/bu even after a reboot. If you attach more than one usb device, which I have never tested, and you notice that I doesn't properly add all of them, then maybe extend rootdealy to more than 10.
17. Configure Samba
Next we'll configure samba so that it will make all backups available on the network. Samba is a daemon that acts provides network shares that can also be accessed through Windows using the smb protocoll.
Simply edit /etc/samba/smb.conf and replace the context of the config file with this:
[global]

   workgroup = WORKGROUP
   server string = %h server
;   wins support = no
;   wins server = w.x.y.z
   dns proxy = no
;   name resolve order = lmhosts host wins bcast
   name resolve order = bcast lmhosts host wins

    socket options = TCP_NODELAY IPTOS_LOWDELAY SO_KEEPALIVE

;   interfaces = 127.0.0.0/8 eth0
;   bind interfaces only = yes

   hosts allow = 127.0.0.1, 10.0.0.0/24
   hosts deny = 0.0.0.0/0

   log file = /var/log/samba/log.%m
   max log size = 1000
#   syslog only = no
   syslog = 0
   panic action = /usr/share/samba/panic-action %d

   security = user
   encrypt passwords = true
   map to guest = bad user
   guest account = bu

#   valid users = root

#======================= Share Definitions =======================

[Backup]
        comment = Backup Share
        path = /home/bu
        read only = yes
        guest only = yes
        guest ok = yes
        hosts allow = 127.0.0.1, 10.0.0.0/24
        force user = bu
        force group = bu
        hosts deny = 0.0.0.0/0
To ensure that nothing is leaked outside the lan I set in the global section to deny every ip address and only allow localhost as well as the lan. I use 10.0.0.x for my lan. Likely you use 192.168.0.0, so change this accordingly.
Also in the global section you see that the guest account is the bu user and in the actual share you can see that guests have access and that it's read only access.
Save and exit the file and restart samba:
sudo /etc/init.d/samba restart
With this, we're no done configuring the services.
18. Backup Control File on the Raspberry Pi
Create and edit the /home/bu/backups.sh and fill it with the following content:
#!/usr/bin/env bash

basePath="/home/bu"

action="${1}"

function checkMonth ()
{
        now=$(date +"%Y-%m")
        last=$(<checkMonth.txt)
        if [[ ${now} != ${last} ]]
        then
                # New Month
                mkdir -p "${basePath}/current/"
                rm -Rf "${basePath}/current/"*
                echo "${now}" > "checkMonth.txt"
        fi
}


function makeHardlink ()
{
        # Make hardlink copy
        now=$(date +"%Y-%m-%d_%H-%M")
        mkdir -p "${basePath}/old/${now}"
        cp -al "${basePath}/current"* "${basePath}/old/${now}"
}


function checkFree ()
{
        # Check if old files need to be deleted
        freeSpace=$( df -P | grep "${basePath}" | awk '{print $4}' )
        curUse=$( cd "${basePath}/current" | du -s | awk '{print $1}' )
        estUse=$(( curUse * 2 ))

        echo "${freeSpace} - ${curUse} - ${estUse}"

        while [[ ${freeSpace} -le ${estUse} ]]
        do
                echo "Not enough space... removing old backups..."
                IFS= read -r -d $'\0' line < <(find "${basePath}/old" -type d -maxdepth 1 -printf '%T@ %p\0' 2>/dev/null | sort -z -n)
                oldDir="${line#* }"
                rm -Rf "${oldDir}"
                freeSpace=$( df -P | grep "${basePath}" | awk '{print $4}' )
                echo "${freeSpace} - ${curUse} - ${estUse}"
        done
}


case ${action} in

        newMonth)
                        checkMonth
                        ;;
        hardLink)
                        makeHardlink
                        checkFree
                        ;;
esac
This script has two purposes. It should be run before and after each backup.
The checkMonth function will see if there is a new month since the last backup. As you know, harddisk can become corrupt or rather some parts of it may fail. If that happens, you can't access the data files in the corrupted sectors anymore. However, creating a full backup everytim requires a lot of diskspace. To save disk space, I hardlink backups, meaning I only write the file system "index" files a new that point to the same data. So if the data sector gets corrupted, the file can't be retrieved anymore for all the hardlinked file as they all point to the same data. In order to minimize that risk, I ensure that every month a complete new backup set is written. This will eat in your storage space. E.g. if you have 400 GB data, that means in month 1 it will use 400 GB + altered files. In month 2 it will use another 400 GB + altered files etc.
This also means that the first sync and the first sync in a new month will take a long time. All others are quick.
The makeHardlink function will actually create the hardlink copy of the last backup. A hardlink copy requires almost no space and on a backup, only new files are written afresh. Also in combination with the hardlink copy I run the checkFree function.
The checkFree function checks the free space of /home/bu. It also checks the used size by the last backup. If the free space is less than twice as much as the last backup, then it will start removing old backups until it has twice that free space again. I tend to think if you you already have 400 GB of data that you want to back up, it's unlikely that on the next day/next backup time you'll have more than 800 GB.
Together this means, that you can use this backup mechanism "forever". It will auto-remove old backups if free space gets too small.
After saving that script make it executable and change ownership to the bu user:
sudo 0755 /home/bu/backups.sh
 sudo chown bu:bu /home/bu/backups.sh
That's it on the Raspberry Pi side.
Making backups to the Rasperry Pi from Linux
To make backups to the Raspberry Pi you only need to add your current user (or root if desired) to the Raspberry Pi backup user account.
I assume that you have a ssh client already installed and that you have a public key that you can use. Eventually you need to install rsync first.
19. Create a public ssh key
If you have no public key this far, create one:
ssh-keygen -t rsa -b 4096 -C "[email protected]"
Of course replace it with your email or fill in just anything if you want.
20. Copy the public ssh key to the Rasperry Pi backup user
Then you need to copy your public key to the Raspberry Pi backup user account:
ssh-copy-id ~/.ssh/id_rsa.pub bu@rpi2bu
Replace bu and rpi2bu with your actual backup user and hostname. If for some reason the Raspberry Pi can't be detected by its hostname, use its IP address.
21. Create Backup Script on the Desktop
Now that we can login to the Raspberry Pi without need to provide a password, we need a small bash script that does the backup. Create a backup.sh on the desktop.
Edit ~/Desktop/backup.sh" and add this
#!/usr/bin/env bash

# Check for new month
ssh bu@rpi2bu '/home/bu/backups.sh newMonth'
# Run rsync backup
rsync -avzpH  --partial --delete ~/ bu@rpi2bu:/home/bu/current/
# Make backup and check regarding free space
ssh bu@rpi2bu '/home/bu/backups.sh hardLink'
Then make it executable:
chmod 0755 ~/Desktop/backup.sh
And that's it - of course don't forget the set according hostname for the Raspberry Pi and alter the user if you use something different.
Making backups to the Rasperry Pi from Windows
On Windows it's a bit harder since all those nice *nix tools are missing. Especially ssh and rsync. However the simple solution here is to install cygwin with according packages.
22. Download Cygwin
First we need download and install cygwin. Download it from here. Most likely you want to use the 64-bit version.
23. Install Cygwin with Required Packages
When the Cygwin installer download is finished, run it. You'll then be prompted for a couple of inputs. Give input according to the list below:
Choose A Download Source -> Install from Internet
Select Root Install Directory -> C:\cygwin
Local Package Directory -> C:\Users\
Select Your Internet Connection -> Direct Connection
Chose A Download Site -> Select a download site that's close to you
Afterwards you'll be presented with the Select Packages dialog. Here it's important to select rsync and openssh. Best you can filter the list with the Search box. Just type in rsync and you will then find it in the Net folder. Click on it and then Bin? column should be checked now. Repeat this for openssh.
Afterwards it'll start downloading all the packages and install them. Since it'll download a lot of *nix tools it will take a little while.
24. Create a publich ssh key
After installation of cygwin including rsync and openssh you'll have a new "Cygwin" entry in your start menu. Inside that entry you find the link for the Cygwin Terminal. Run this and a terminal will open. In the terminal, we create the public ssh key by issuing this command:
ssh-keygen -t rsa -b 4096 -C "[email protected]"
Of course replace it with your email or fill in just anything if you want.
25. Copy the public ssh key to the Rasperry Pi backup user
Then you need to copy your public key to the Raspberry Pi backup user account:
ssh-copy-id ~/.ssh/id_rsa.pub bu@rpi2bu
Replace bu and rpi2bu with your actual backup user and hostname. If for some reason the Raspberry Pi can't be detected by its hostname, use its IP address.
26. Create backup script on Desktop
Now open your text editor and enter the follwing:
REM Just a little script for making backups

REM Check if it's a new month
c:\cygwin\bin\ssh.exe bu@rpi2bu '/home/bu/backups.sh newMonth'
REM Make backup with rsync
c:\cygwin\bin\rsync -avzpH  --partial --delete -e "c:\cygwin\bin\ssh.exe" /cygdrive/c/Users bu@rpi2bu:/home/bu/current/
REM Make hardlink copy and clean up space if necessary
c:\cygwin\bin\ssh.exe bu@rpi2bu '/home/bu/backups.sh hardLink'
Save this file as backup.bat
on your desktop (or any other location).
It's important that the file extension is .bat so that Windows will run it.
If you installed Cygwin to any other folder, provide the according path (by default it will use c:\cygwin64 for the 64-bit installation). Also alter the Raspberry Pi hostname and backup user if you used something different.
When you click now the backup.bat file on your desktop it will open a terminal and make the backup. You could also run it from the Windows Command (cmd.exe) so that it won't auto-close when it's done.
Checking your backups
Just making backups is only half the deal. You'll need to verify that (a) backups were made and (b) you can use them to restore the stuff if needed.
To make this simple, we setup samba earilier. If correctly configured if you check the network environment then you should have a computer/server named rpi2bu in your neighbourhood. In Windows just open Explorer, go onto Network and wait 2-3 seconds for it to show up. On Linux, e.g. in Dolphin, you just click on the Network icon in the places sidebar. You can then enter that computer/server without any credentials and it will then show you a share named Backup. When you enter that share, you'll see two folder current and old and two files backups.sh and checkMonth.txt. You can copy the files back to your computer but since samba is setup as read-only, you can't delete the files.
So copy a few files back to your computer and verify that they run ok. If they do, you have successfully made a backup.

