Two Factor Authentication for ownCloud

enlighten your own Cloud using two factors to authenticate
by arnobabotte @pixabay
In this tutorial, I will show you how to protect your ownCloud installation with privacyIDEA, which you can be used to manage the second authentication factors of your users.
ownCloud is a system to store your own or your companies data not on someone else's computer (a.k.a "the Cloud") but on your very own computer under your control. privacyIDEA is a system to manage authentication devices for two factor authentication in your own network - not at any Identity Provider - thus keeping your identity and the identities of your users also under your control.
If you want to know, how this will look like, you can take a peek at this video on youtube.
Prerequisites
I assume that you already have a ownCloud 8 system up and running. There are some fairly good examples out there. You may also take a look at the howto install ownCloud 8 with nginx here on this site.
In addition I assume that you are running a privacyIDEA system. This howto does not cover the installation of privacyIDEA. You also find a howto here at Howtoforge to install privacyIDEA on CentOS or you can use the installation instructions at the documentation.
Please Note: You do not need to run privacyIDEA and ownCloud on the same server. You will unleash the full power of such a setup, when installing privacyIDEA as authentication system on one server and configure the other applications like ownCloud against this privacyIDEA. This also comprises the advantage that you do not need to manage authentication devices for ownCloud, authentication devices for your second application and authentication devices for your third application and so forth. You see, that this solution proves its strenghts if you have several applications and more than two users. But it will of course also work in smaller scenarios.
Please Note: The ownCloud privacyIDEA App is in an early development stage. So any feedback you provide is highly appreciated and will help to improve this tool. You can give feedback here at howtoforge, via the github issues or via the Google group.
Connect privacyIDEA to the ownCloud database
Preparing the database
There is one condition for privacyIDEA. The ownCloud users must be known to privacyIDEA or the other way round, the users to whom you assign tokens in privacyIDEA must also be available in ownCloud.
You might run a setup where your users are located in an LDAP directory, but in this example we simply use the existing ownCloud SQL user table.
Please note: If you are running privacyIDEA and ownCloud on different servers, you need to grant access to the SQL database. In case of MySQL/MariaDB you need to modify the bind-address in /etc/mysql/my.cnf accordingly like:
bind-address = 0.0.0.0
Moreover, you need to add the access right based on MySQL:
grant all privileges on owncloud.* to "ocuser"@"privacyIDEA-Server" identified by "password";
Now the MySQL-user "ocuser" can access the database on the ownCloud server from the privacyIDEA server.
WARNING: The network traffic to the MySQL server is not encrypted. We very much recommend to setup TLS if you are running this scenario. You may also find some howtos on this site for setting up MySQL with SSL.
Connecting privacyIDEA to ownCloud
Create User Resolver
Now we connect privacyIDEA to ownCloud, so that privacyIDEA knows the users. We create a new user resolver at Config → Users.
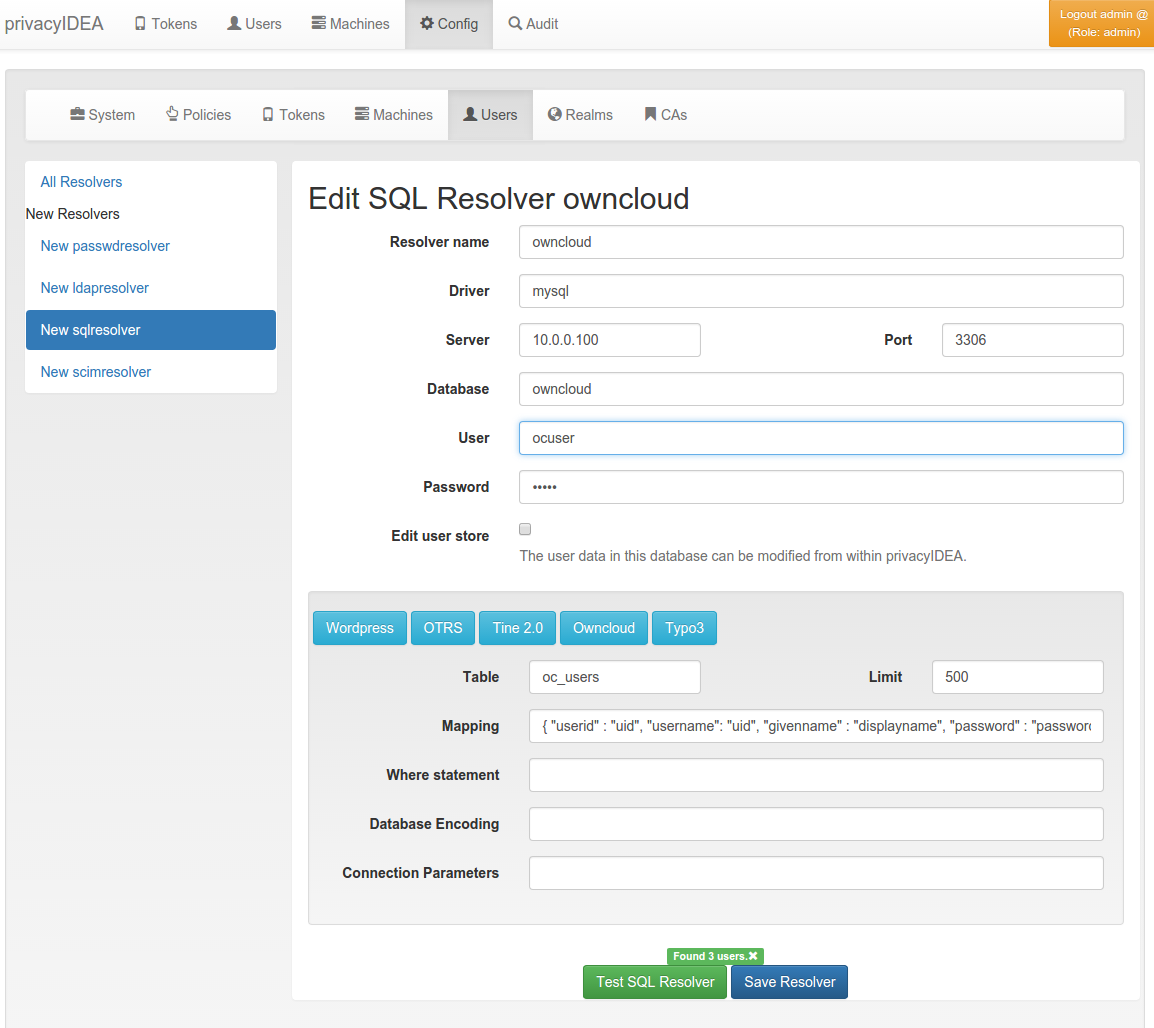
You can click the button ownCloud which should preset all necessary fields in the database attribute mapping.
Then you can click Test SQL Resolver to see, if everything went fine.
Create Realm
Now you can got to Config → Realms to create a default realm from the resolver.
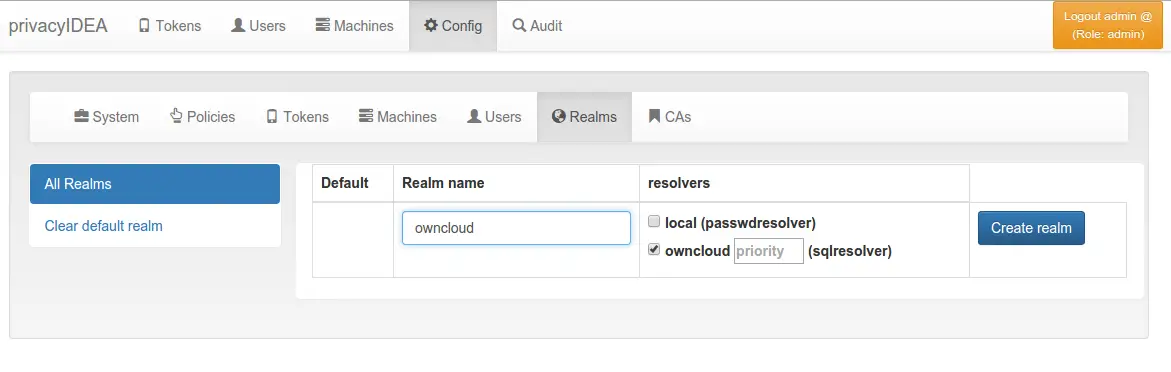
You should now see the ownCloud users in the tab Users and be able to enroll tokens for these users.
Enroll a Google Authenticator
privacyIDEA supports a wide variety of tokens, which you can find here.
We will quickly enroll a Google Authenticator as a simple example.
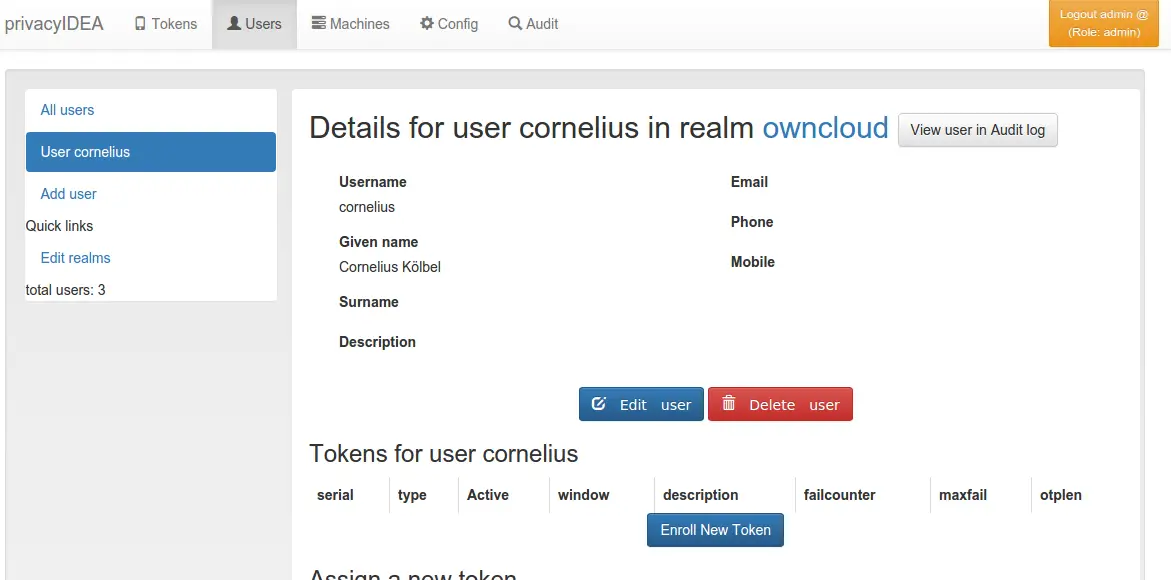
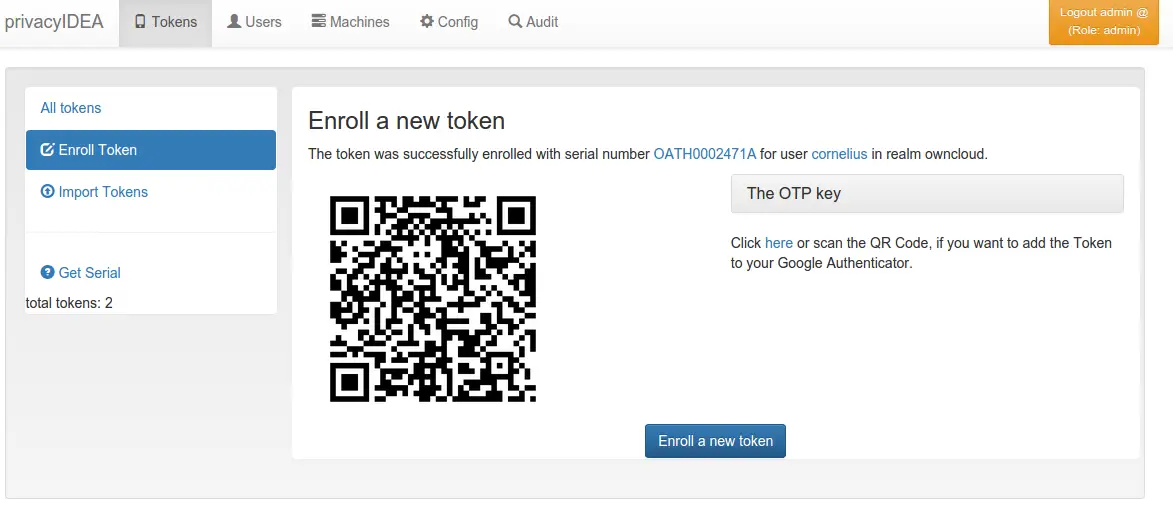
Go to the users view and choose a user to see the users details. Here you can click the button Enroll New Token.
In the enrollment dialog you can choose the token type and depending on the token type you will need to enter different details. But in this example, we are using the default token type HOTP. At the buttom of the page you may enter an OTP PIN.
Click Enroll Token.
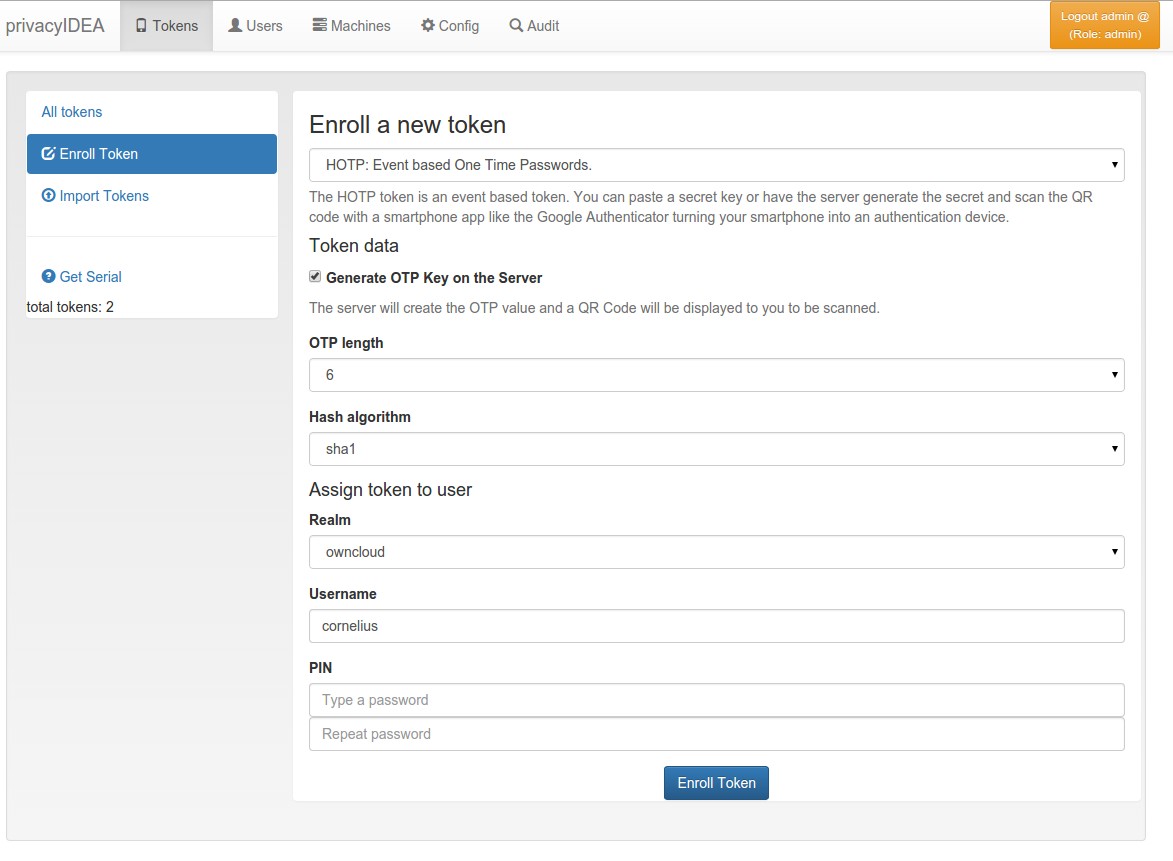
The token is enrolled and you are presented a QR code, which you can scan with your Google Authenticator App.
Other token types are enrolled in other ways, which is out of scope of this tutorial. For more information see the privacyIDEA documentation.
Now we are done, as the ownCloud user has a token assigned. You may repeat this process for further ownCloud users.
Getting the ownCloud App
First, you need to download the ownCloud privacyIDEA App.
You can download the App here. You need to copy the directory user_privacyidea to your ownCloud directory apps/. Let's assume you installed ownCloud to /var/www/owncloud so that you will end up with a structure like
root@owncloud:~# ls /var/www/owncloud/apps/user_privacyidea/ -l
 -rw-rw-r-- 1 root root 1671 Jun 25 15:05 adminSettings.php
 drwxrwxr-x 2 root root 4096 Jun 25 15:17 appinfo
 drwxrwxr-x 2 root root 4096 Jun 25 15:17 img
 drwxrwxr-x 2 root root 4096 Jun 25 15:17 js
 drwxrwxr-x 2 root root 4096 Jun 25 15:17 lib
 drwxrwxr-x 2 root root 4096 Jun 25 15:17 templates
The privacyIDEA App is implemented as an ownCloud user backend and will act as an overlay to your existing user backends to be able to jump into the authentication request, to add the second factor to the login.
Configuring the ownCloud App
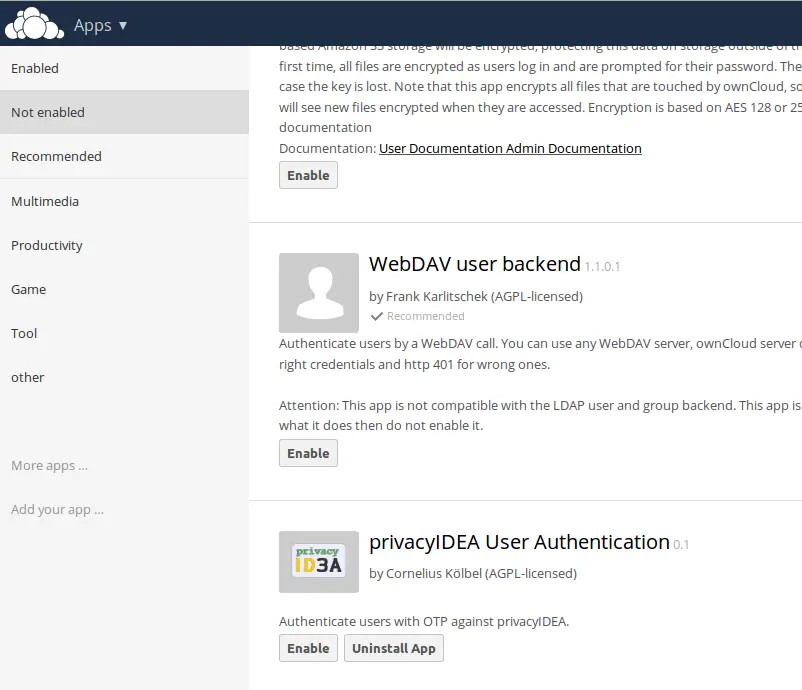
Go to Apps → not Enabled and enabled the App.
Then you can go to the Your User → Admin to configure the privacyIDEA App.
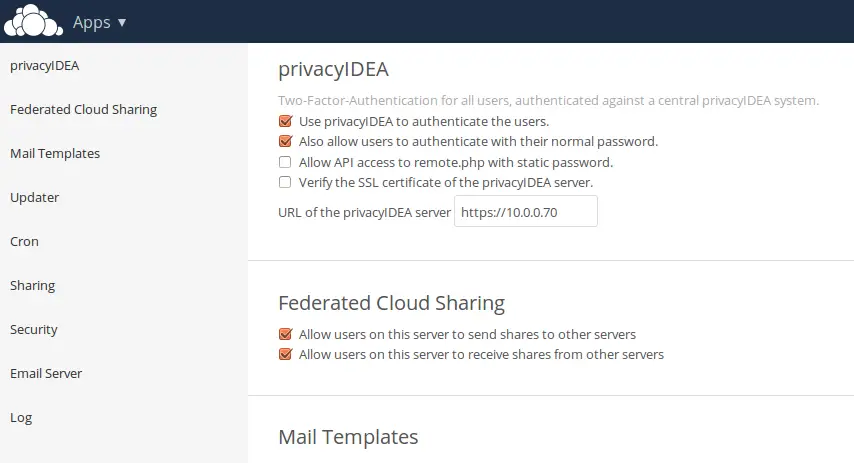
You need to provide the URL of the privacyIDEA server. You should run the privacyIDEA server with a trusted certificate. If during your setup process, you do not have a trusted certificate, you can untick the checkbox Verify the SSL certificate of the privacyIDEA server.
To avoid locking you out you can tick the checkbox Also allow users to authenticate with their normal password. In this case, if the authentication to privacyIDEA fails, the user is authenticated against the underlying ownCloud user backend. In productive use, you should untick this checkbox.
Desktop clients will of course have problems with the one time passwords. If you are using such clients you should tick the checkbox Allow API access to remote.php with static password. In this case the authentication request coming from a desktop client (identified by remote.php) will not be authenticated against privacyIDEA but against the underlying user backend.
Finally, if everything is fine, you can activate two factor authentication by ticking the checkbox Use privacyIDEA to authenticate the users.
Log in to ownCloud
After activating the privacyIDEA App the login screen of ownCloud does not change.
To login you need to enter your username and in the password field you need to enter the OTP PIN and the OTP value generated by your Google Authenticator.

