How to Install ownCloud 9 with Nginx on OpenSUSE Leap 42.1
ownCloud is an OpenSource file sharing application based on the PHP programming language. OwnCloud provides Self-hosted file syncing and sharing with a nice web interface and syncing apps for all major mobile and desktop platforms with a functionally like dropbox, mega, etc. ownCloud makes it easy to access and sync files, calendars, and contacts across your devices.
In this tutorial, I will guide you to create your own sync and share server platform with ownCloud. We will install ownCloud with Nginx as the web server, MariaDB (a MySQL fork) as the database and php-fpm to handle the request for php on Linux OpenSUSE Leap 42.1.
Prerequisite
- OpenSUSE Leap 42.1
- Root privileges
- Understanding zypper command
Step 1 - Install SuSEfirewall2
SuSEfirewall is a firewall script which stores its configuration in the file "/etc/sysconfig/SuSEfirewall2". With SuSEfirewall2, you can open ports by editing the "SuSEfirewall2" file.
Install SuSEfirewall2 with the zypper command:
zypper in SuSEfirewall2
When the firewall is installed, go to the sysconfig directory and edit the "SuSEfirewall2" configuration with vim:
cd /etc/sysconfig/
vim SuSEfirewall2
Go to line 253 and add the ports of all services that you want to use. In this step, I will add the: ssh, http, and https ports.
FW_SERVICES_EXT_TCP="22 80 443"
Save the file and exit the editor.
Next, start SuSEfirewall2 and enable it to run at boot time:
systemctl start SuSEfirewall2
systemctl enable SuSEfirewall2
Now restart the sshd service:
systemctl restart sshd
If you want to test the SSH server port, you can use telnet command to connect to port 22:
telnet 192.168.1.101 22
Step 2 - Install Nginx
Nginx is a lightweight web server with low memory and CPU consumption. We will use nginx as the web server for our ownCloud installation.
Install nginx with the zypper command:
zypper in nginx
Start nginx and enable it to run at boot with the systemctl command:
systemctl start nginx
systemctl enable nginx
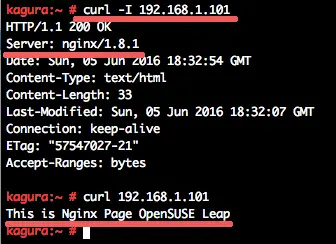
Next, add an index.html file to test if nginx is working.
echo "This is Nginx Page OpenSUSE Leap" > /srv/www/htdocs/index.html
Now you can access nginx web server from your web browser, or you can check it with curl:
curl -I 192.168.1.101
curl 192.168.1.101
Step 3 - Install and Configure MariaDB
MariaDB is an OpenSource RDBMS based fork of the MySQL database. In this step, we will install and configure MariaDB. Then we will create a new user and database for the ownCloud installation.
Install MariaDB with the zypper command below:
zypper in mariadb mariadb-client
Now start MariaDB and add it to the system startup:
systemctl start mysql
systemctl enable mysql
MariaDB has been started, now you can configure the root password for MariaDB with the command below:
mysql_secure_installation
Set the MariaDB/MySQL password:
Enter current password for root (enter for none): PRESS ENTER
Set root password? [Y/n] Y
New password: TYPE YOUR PASSWORD
Re-enter new password: REPEAT PASSWORD
Remove anonymous users? [Y/n] Y
Disallow root login remotely? [Y/n] Y
Reload privilege tables now? [Y/n] Y
The MariaDB root password has been configured. Now we can login to the MariaDB/MySQL shell and create a new database and new user for ownCloud.
Login to the MariaDB/MySQL shell:
mysql -u root -p
TYPE your password
Create a new database "owncloud_db" and new user "ownclouduser" with password "ownclouduser@":
create database owncloud_db;
create user ownclouduser@localhost identified by 'ownclouduser@';
grant all privileges on owncloud_db.* to ownclouduser@localhost identified by 'ownclouduser@';
flush privileges;
exit
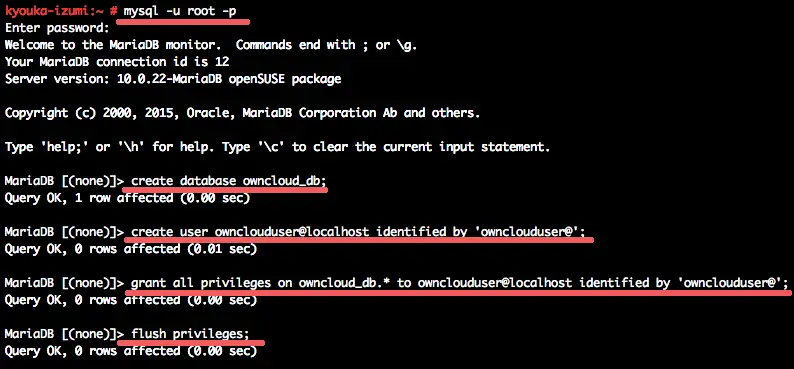
The database for ownCloud installation has been created.
Step 4 - Install and Configure PHP-FPM
PHP-FPM (FastCGI Process Manager) is a modern FastCGI alternative to handle sites with a lot of visitors. PHP-FPM has an advanced process management and is easy to manage and configure.
In this step, we will install php-fpm and some PHP extensions, then we will configure the nginx web server to handle php file requests trough php-fpm.
Install php-fpm with this "zypper in" command:
zypper in php5-fpm php5-gd php5-mcrypt php5-mysql php5-pear php5-zip php5-curl php5-ldap php5-json
When the installation is completed, go to the php-fpm directory and copy the default configuration file:
cd /etc/php5/fpm/
cp php-fpm.conf.default php-fpm.conf
Edit the php-fpm.conf file with the vim or nano editor:
vim php-fpm.conf
Uncomment line 32 to enable the php-fpm log. If there is error later in your PHP scripts, then you can find the log file in the "/var/log/" directory.
error_log = log/php-fpm.log
Change line 148 - 149 to "nginx" for the unix user/group of the processes.
user = nginx
group = nginx
Change the value in line 159 to run php-fpm with a socket file.
listen = /var/run/php-fpm.sock
Uncomment and change the value on lines 170 - 172 to set the permissions of the unix socket.
listen.owner = nginx
listen.group = nginx
listen.mode = 0660
Save the file and exit the editor.
Next, edit the php.ini file in the cli directory:
cd /etc/php5/cli/
vim php.ini
Uncomment and change the value on line 758:
cgi.fix_pathinfo=0
Save and exit.
Copy the php.ini file to conf.d directory:
cp php.ini /etc/php5/conf.d/
Now configure the php session handleer path. In this tutorial, we run php-fpm as nginx user, so make sure the nginx user can write to the sessions directory. You can see session path configuration in the php.ini file on line 1390.
session.save_path = "/var/lib/php5"
Change the owner of the session directory "/var/lib/php5/", make the nginx user the owner of the directory:
chown -R nginx:nginx /var/lib/php5/
Next, configure php-fpm to work with the nginx web server. Go to the nginx configuration directory and backup the nginx.conf file before you edit the configuration.
cd /etc/nginx/
cp nginx.conf nginx.conf.backup
vim nginx.conf
Add the following new configuration on line 65 - this configuration will handle all PHP file requests.
       location ~ \.php$ {
                root /srv/www/htdocs;
                try_files $uri =404;
                include /etc/nginx/fastcgi_params;
                fastcgi_pass unix:/var/run/php-fpm.sock;
                fastcgi_param SCRIPT_FILENAME $document_root$fastcgi_script_name;
       }
Save and exit, and then test the nginx configuration to make sure there is no error in the configuration:
nginx -t
If there is no error, you can see the results below:
nginx: the configuration file /etc/nginx/nginx.conf syntax is ok
nginx: configuration file /etc/nginx/nginx.conf test is successful
Now start php-fpm and add it to stat at boot time, then restart the nginx service:
systemctl start php-fpm
systemctl enable php-fpm
systemctl restart nginx
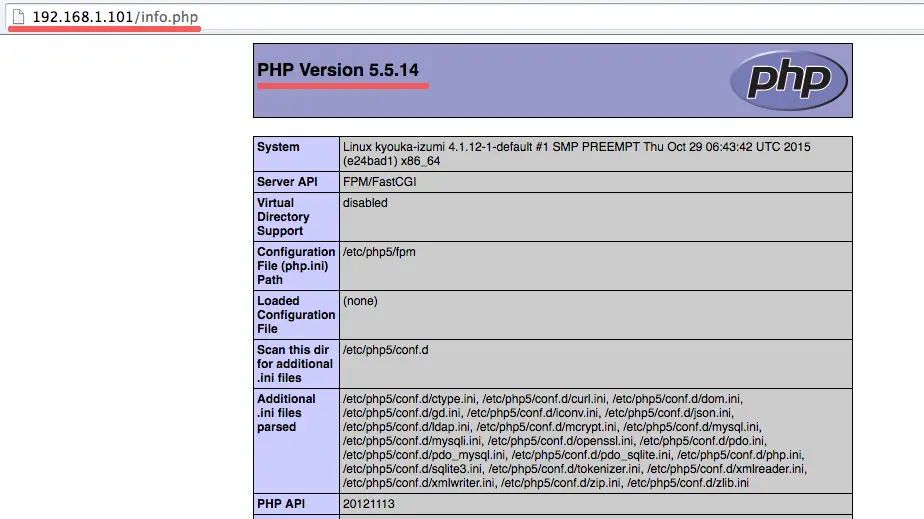
Nginx and php-fpm are configured, you can test the php file by creating a new phpinfo() file in the web root directory:
cd /srv/www/htdocs/
echo "<?php phpinfo(); ?>" > info.php
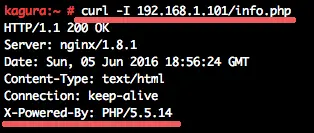
Open your browser and visit the server IP:
or you can use curl:
curl -I 192.168.1.101/info.php
Step 5 - Generate SSL Certificate
Running ownCloud over a secure https connection is very important to keep your files secure and private. If you are running ownCloud on your own company, you can buy the SSL certificate, or if you want a free SSL certificate you can use Let's-encrypt. Here I will create a so called "self-signed" SSL certificate, the encryption of a self-signed certificate is not lower than an official certificate but you will have to accept a security warning in your browser when you access the service the first time.
Create a new "ssl" directory and generate the certificate with the openssl command:
cd /etc/nginx/
mkdir ssl; cd ssl/
openssl req -new -x509 -days 365 -nodes -out /etc/nginx/ssl/example-owncloud.crt -keyout /etc/nginx/ssl/example-owncloud.key
Next, change the permissions of the key:
chmod 600 example-owncloud.key
Step 6 - Install and Configure ownCloud
In this step, we will install ownCloud and configure a new nginx virtual host for the ownCloud domain. We will install owncloud with the domain name "example-owncloud.co", and the web root file in the "/srv/www/owncloud/" directory.
Download ownCloud
Go to the "/srv/www/" directory and download the ownCloud source and extract it:
cd /srv/www/
wget https://download.owncloud.org/community/owncloud-9.0.2.zip
unzip owncloud-9.0.2.zip
Now create a new data directory under the owncloud directory to store all user data. Change the owner of the ownCloud directory to the nginx user:
mkdir -p owncloud/data/
chown -R nginx:nginx owncloud/
Configure a Nginx Virtual Host for ownCloud
Go to the nginx directory and create a new directory for the virtual host file configuration:
cd /etc/nginx/
mkdir vhosts.d/
Go to the vhosts.d directory and create a new virtual host file for owncloud "example-owncloud.conf".
cd vhosts.d/
vim example-owncloud.conf
paste the configuration below:
upstream php-handler {
  #server 127.0.0.1:9000;
  server unix:/var/run/php-fpm.sock;
}

server {
  listen 80;
  server_name example-owncloud.co;
  # enforce https
  return 301 https://$server_name$request_uri;
}

server {
  listen 443 ssl;
  server_name example-owncloud.co;

  ssl_certificate /etc/nginx/ssl/example-owncloud.crt;
  ssl_certificate_key /etc/nginx/ssl/example-owncloud.key;

  # Path to the root of your installation
  root /srv/www/owncloud/;
  # set max upload size
  client_max_body_size 10G;
  fastcgi_buffers 64 4K;

  # Disable gzip to avoid the removal of the ETag header
  gzip off;

  # Uncomment if your server is build with the ngx_pagespeed module
  # This module is currently not supported.
  #pagespeed off;

  rewrite ^/caldav(.*)$ /remote.php/caldav$1 redirect;
  rewrite ^/carddav(.*)$ /remote.php/carddav$1 redirect;
  rewrite ^/webdav(.*)$ /remote.php/webdav$1 redirect;

  index index.php;
  error_page 403 /core/templates/403.php;
  error_page 404 /core/templates/404.php;

  location = /robots.txt {
    allow all;
    log_not_found off;
    access_log off;
  }

  location ~ ^/(?:\.htaccess|data|config|db_structure\.xml|README){
    deny all;
  }

  location / {
    # The following 2 rules are only needed with webfinger
    rewrite ^/.well-known/host-meta /public.php?service=host-meta last;
    rewrite ^/.well-known/host-meta.json /public.php?service=host-meta-json last;

    rewrite ^/.well-known/carddav /remote.php/carddav/ redirect;
    rewrite ^/.well-known/caldav /remote.php/caldav/ redirect;

    rewrite ^(/core/doc/[^\/]+/)$ $1/index.html;

    try_files $uri $uri/ =404;
  }

  location ~ \.php(?:$|/) {
    fastcgi_split_path_info ^(.+\.php)(/.+)$;
    include fastcgi_params;
    fastcgi_param SCRIPT_FILENAME $document_root$fastcgi_script_name;
    fastcgi_param PATH_INFO $fastcgi_path_info;
    fastcgi_param HTTPS on;
    fastcgi_pass php-handler;
    fastcgi_intercept_errors on;
  }

  # Adding the cache control header for js and css files
  # Make sure it is BELOW the location ~ \.php(?:$|/) { block
  location ~* \.(?:css|js)$ {
    add_header Cache-Control "public, max-age=7200";
    # Add headers to serve security related headers
    add_header Strict-Transport-Security "max-age=15768000; includeSubDomains; preload;";
    add_header X-Content-Type-Options nosniff;
    add_header X-Frame-Options "SAMEORIGIN";
    add_header X-XSS-Protection "1; mode=block";
    add_header X-Robots-Tag none;
    # Optional: Don't log access to assets
    access_log off;
  }

  # Optional: Don't log access to other assets
  location ~* \.(?:jpg|jpeg|gif|bmp|ico|png|swf)$ {
    access_log off;
  }
}
Save the file and exit the editor.
Test the nginx configuration and don't forget to restart all services:
nginx -t
systemctl restart nginx
systemctl restart php-fpm
systemctl restart mysql
Testing
Visit the owncloud domain:
example-owncloud.co
You will be redirected to the https connection.
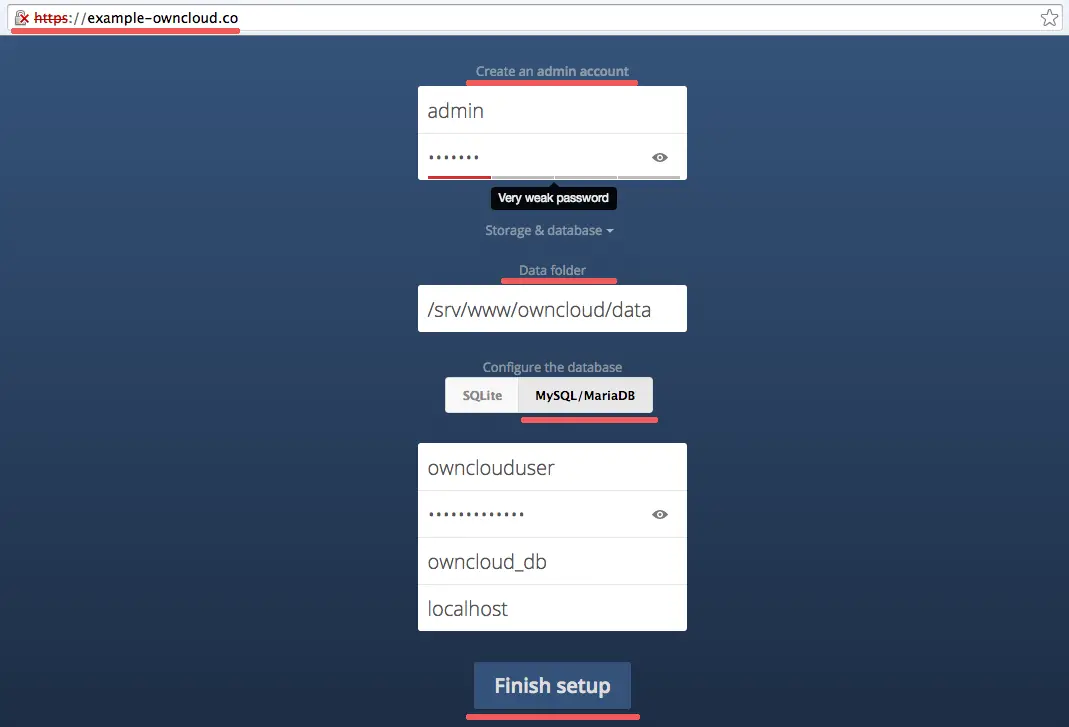
Next, type in your admin user and password, the database name, user, and password and click "Finish Setup".
Wait a sec and you will see the owncloud file manager:
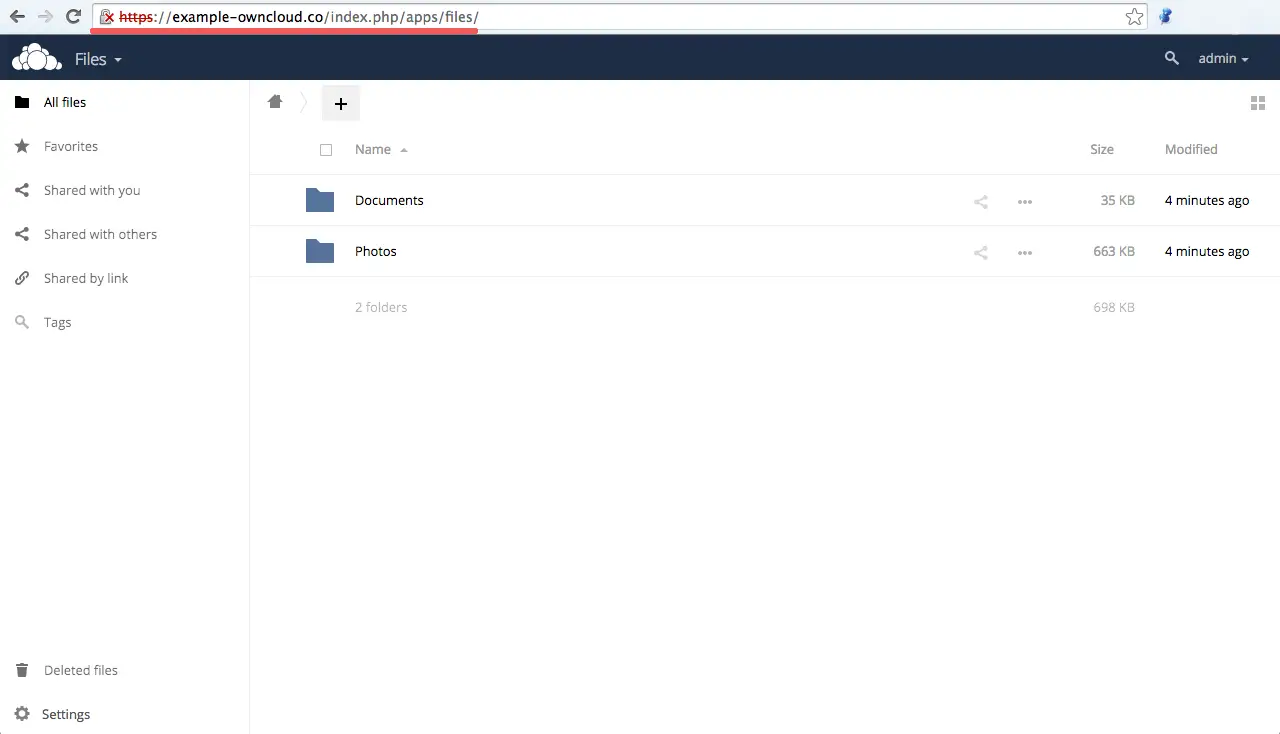
The installation of ownCloud with nginx and MariaDB on OpenSUSE Leap 42.1 is finished.

