Useful Vim editor plugins for software developers - part 3: a.vim
Up until now, in this series of articles covering programming-related plugins for Vim, we discussed basics of Vim plugin installation using Pathogen plugin manager, and covered a total of three plugins - namely Tagbar, delimitMate, and Syntastic. Now, in this third and the final part, we will discuss another very useful plugin dubbed a.vim.
Please note that all the examples, commands, and instructions mentioned in this tutorial have been tested on Ubuntu 16.04, and the Vim version we've used is 7.4.
A.vim
If you are into software development and work with programming languages like C and C++, you'd agree that it's practically impossible to tell how many times you have to switch between source and header files. What I mean to say is that it's a very basic task that's done very frequently.
While it's easy to switch between files when using a GUI-based IDE (as you just have to do a couple of mouse clicks), things get a bit difficult if you are using a command line IDE like Vim. However, as you'd have guessed by now, there exists a plugin - called a.vim - that makes life easier for you especially when it comes to switching between source and header files.
Before we jump over to the usage, it's worth mentioning that installation process for this plugin is different from the way we've be installing the other plugins discussed in this article series. Following are the steps involved in this case:
- Firstly, you need to download a couple of files (a.vim and alternate.txt), which you can do by heading here.
- Next, create the following directories: ~/.
vim/bundle/avim, ~/.vim/bundle/avim/doc, ~/.vim/bundle/avim/plugin, and ~/.vim/bundle/autoload. - Once the directory creation is done, put a.vim into ~/.vim/bundle/avim/plugin as well as ~/.vim/bundle/autoload, and alternate.txt into ~/.vim/bundle/avim/doc.
That's it. If all the aforementioned steps are completed successfully, the plugin will be installed on your system.
Using the plugin is very simple: All you have to do is to run the :A command - if the current file is a source file (say test.c), the plugin will open the corresponding header file (test.h) for you (vice-versa is true as well).
Obviously, not every time a corresponding file with the same name exists. In these cases, running :A will create a new file with that name. For example, if test.h doesn't exist, a file with that name will be created and opened for you.
In case you want to disable this behavior, you can set the g:alternateNoDefaultAlternate variable (give it a non-zero value) in the .vimrc file present in your home directory.
Moving on, it's pretty normal to refer to a non-corresponding header file from a source file as well. For example, if you are in test.c, and want to switch to some other header file (say mem.h) and not test.h, then you can do that by running the :IH <filename> command in Vim. Needless to say, you'll have to replace <filename> with the actual name of the file you need to open.
Up until now, whatever functionality we discussed is assuming that the file that you intend to open is present in the same directory as the current file. However, as you'd agree, it's not always the case. What I mean to say is that in many projects the location of the source files and the corresponding header files is not always the same directory.
To handle such situations, you need to use the g:alternateSearchPath variable. This is what the official documentation says about this variable:
"This plugin allows the search path it uses to locate source and header files to be configured. The search path is specified by setting the g:alternateSearchPath variable. The default setting is as follows:"
g:alternateSearchPath = 'sfr:../source,sfr:../src,sfr:../include,sfr:../inc'
"This indicates that the corresponding file will be searched for in ../source, ../src. ../include and ../inc all relative to the current file being switched from. The value of the g:alternateSearchPath variable is simply a comma separated list of prefixes and directories. The "sfr:" prefix indicates that the path is relative to the file. Other prefixes are "wdr:" which indicates that the directory is relative to the current working directory and "abs:" which indicates the path is absolute. If no prefix is specified "sfr:" is assumed."
If all the aforementioned features of this plugin have already made you go "wow," let me tell you that's not all. Another extremely useful functionality the plugin offers is the ability to split your Vim screen so that both source and its corresponding header file can be viewed simultaneously.
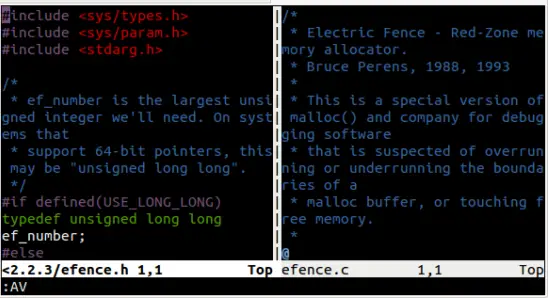
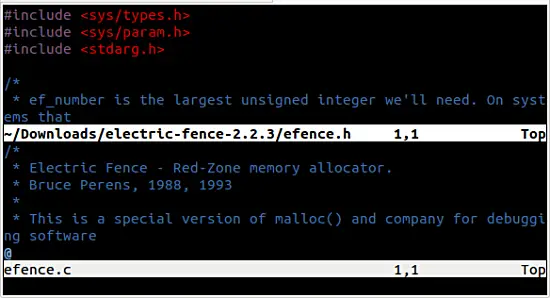
What more, you can split the screen both horizontally and vertically, depending upon what fits best for you. Use :AS command to split the screen horizontally and :AV command for vertical split.
Use :A command to switch between opened files.
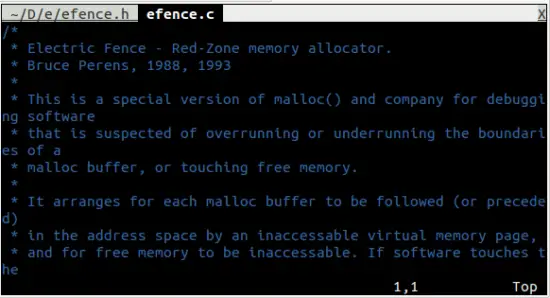
The plugin also lets you open a corresponding file in a separate tab within the same Vim window. You can do this by running the :AT command.
Of course, like :AV, :AS, and :AT, you can use :IHV, :IHS, and :IHT commands as well.
Conclusion
While there are many programming-related Vim plugins available to use, the ones that we discussed in this three-part series should be enough to give you an idea about how powerful the editor becomes if you have the correct plugins enabled for your software development work.
Of course, we've only focused on the programming part here. For those of you who use Vim as you daily text editor, you should know that there are a plethora of plugins available that add to Vim's text editing functionality and make it even better. But we'll leave this discussion for some other day.

