How to Connect to WiFi on Arch Linux: A Step-by-Step Guide
Table of Contents
If you’re using a Linux distro other than Arch CLI, setting up WiFi on Arch Linux via the terminal is one of the most difficult chores. Despite the fact that the procedure is quite simple. In this tutorial, I’ll walk you through the step-by-step setup process to connect your Arch Linux to your WiFi network.
There are a lot of programs to setup a wireless connection in Linux, we could use ip and iw to configure an Internet connection, but it would be a little complicated for newbies. So we’ll use netctl, it’s a cli-based tool used to configure and manage network connections via profiles. Note: You must be root for all the configurations, also you can use sudo.
Before we continue, we’d like to tell you about Contabo. We host LinuxAndUbuntu on Contabo VPS. Check them out if you need web hosting. Prices start at $6.99 per month for an 8GB RAM and 4 Core CPU VPS.

Also Read – Arch Linux Take Your Linux Knowledge To Next Level
Scanning Network
Run the command to know the name of your network interface –
iwconfigRun the command –
ip link set interface upRun the command to search the available WiFi networks. Now move down to look for your WiFi network.
iwlist interface scan | lessNote: Where an interface is the network interface that you found using the above iwconfig command. Run the command –
ip link set interface downSetup A Wi-Fi Using netctl:
Before configuring a connection with netctl you must check the compatibility of your network card with Linux.
- Run the command:
lspci -kThis command is to check if kernel loaded the driver for wireless card. The output must look like this:

If the kernel didn’t load the driver, you must install it using an Ethernet connection. Here is the Official Linux Wireless Wiki: https://wireless.wiki.kernel.org/If your wireless card is compatible with Linux, you can start with netctl configuration.
netctl works with profiles, the profile is a file that contains information about the connection. A profile can be created by the hard way or the easy way.
Also Read – 5 Best Arch Based Linux Distributions
The Easy Way – Wifi-menu
If you want to use wifi-menu, the dialog must be installed.
1. Run the command: wifi-menu
2. Select your Network

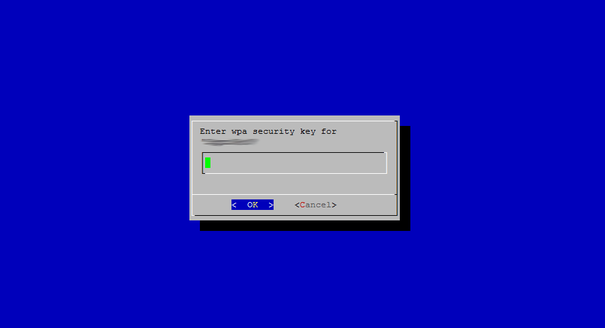
3. Type the correct password and wait.
If you don’t have a failed connection message, then you can prove it typing the command:
ping -c 3 www.google.comHurrah! If you’re watching it pinging, then the network is setup successfully. You’re now connected to WiFi network in Arch Linux. If you’ve any error then follow the above steps again. Perhaps you’ve missed something to do.
The Hard Way
In comparison to the above wifi-menu method, this method is a little hard. That’s I call it the hard way. In the above command, the network profile was setup automatically. In this method, we’ll setup the profile manually. But don’t worry this is not going to be much more complicated. So let’s get started!
- The first thing that you must do is know the name of your interface, generally, the name is wlan0/wlp2s0, but there are many exceptions. To know the name of your interface, you must type the command iwconfig and note it down.

2. Run the command:
cd /etc/netctl/examplesIn this subdirectory, you can see different profile examples. 3. Copy your profile example to /etc/netctl/your_profile
cp /etc/netctl/examples/wireless-wpa /etc/netctl/your_profile 4. You can see the profile content typing:
cat /etc/netctl/your_profile
5. Edit the following fields of your profile using vi or nano:
nano /etc/netctl/your_profile- Interface: it would be wlan0
- ESSID: The name of your Internet connection
- key: The password of your Internet connection

Running netctl
1. Run the command:
cd /etc/netctl
ls
You must see the profile created by wifi-menu, for example, wlan0-SSID; or if you used the hard way then you must see the profile created by yourself.2
2. Start your connection profile typing the command:
netctl start your_profile3. Test your connection typing:
ping -c 3 www.google.comThe output must look like this:

6. Finally, you must run the following command: netctl enable your_profile.
netctl enable your_profileThis will create and enable a systemd service that will start when the computer boots. So it’s time shout Hurrah! You’ve setup wifi network in your Arch Linux.
Other Utilities
Also, you can use other programs to setup a wireless connection: For example iw -iw
- iw dev wlan0 link – status
- iw dev wlan0 scan – Scanning networks
- iw dev wlan0 connect your_essid – Connecting to open network
- iw dev wlan0 connect your_essid key your_key – Connecting to WEP encrypted network using hexadecimal key.
wpa_supplicanthttps://wiki.archlinux.org/index.php/WPA_supplicant
Wicd
https://wiki.archlinux.org/index.php/wicd
NetworkManager
https://wiki.archlinux.org/index.php/NetworkManager
Conclusion
So there you go! I have mentioned 3 ways to connect to a WiFi network in your Arch Linux. One thing that I want to focus here is that when you execute the first command, please note down the interface. In the next command where we scan networks, do not only use interface but the name of your interface such as wlan0 or wlp2s0 (you got from the previous command).

LinuxAndUbuntu Newsletter
Join the newsletter to receive the latest updates in your inbox.


