How to monitor progress of Linux commands using PV and Progress utilities
On this page
Consider a scenario where-in you have just started copying a very large file from your pen drive to your Linux system through the command line. Given that the file in question is heavy, you know the process will take time, and so you start doing some other work.
After a while, you come back, only to see that the command is still running. You decide to give the ongoing copy operation some more time. After sometime, when you take a look again, you observe that nothing has changed, meaning the copy process has neither ended, and nor the command has thrown any error.
Have you ever encountered such a situation? If yes, what did you do? Frankly, there is nothing much you can do in such cases, especially if you are working on a headless Linux system - most times, either we wait, or just cancel the ongoing operation using Ctrl+C and then start it again.
Wouldn't it be better if we could see a progress bar (or something similar) in situations like these, just like we do when we try copying a file through GUI? Definitely, a progress bar for command line operations will be very useful. If you have been looking for such a solution, look no further as in this article, we will discuss two command line utilities, PV and Progress, that will make life easy for you on the command line.
Please note that all the commands and instructions that we've mentioned in this tutorial have been tested on Ubuntu 14.04.
Linux PV command
As per the official documentation, the pv command monitors the flow of data through a pipe. The command displays the following information about an ongoing operation: time elapsed, percentage completed (with
progress bar), current throughput rate, total data transferred, and ETA.
"To use it, insert it in a pipeline between two processes, with the appropriate options," the man page explains. "Its standard input will be passed through to its standard output and progress will be shown on standard error."
Now, lets understand the pv command usage through an example. But before that, make sure the utility is present on your system. If not, you can easily download and install it on Debian-based systems (like Ubuntu) using the following command:
sudo apt-get install pv
Now, coming to the example. The following screenshot shows the pv command in action when I was copying images kept inside a directory in my pen drive to my system's desktop:

So as you can see, the pv command displayed a progress bar as well as other useful information. This is the default behavior of the command. However, if you want to limit the output, you can do so using display switches. For example, the following command will only display the progress bar, and nothing else.
pv -p /media/himanshu/1AC2-A8E3/Maldives-2016/* | gzip > ./Desktop/trip-pictures.gz
That's because we've used the -p display switch, which tells pv to only turn on the progress bar. For the complete list of display switches, head to the command's man page.
Then there are some output modifiers. For example, using -W or --wait option with the command will tell it to wait until the first byte has been transferred before showing any progress information or calculating any ETAs. This is especially useful in cases when the program you are piping to or from requires extra information before it starts.
And finally, the pv command also offers some data transfer modifiers. For example, if you want, you can limit the transfer to a particular number of bytes per second. If take a look at the screenshot included earlier in the tutorial, the data transfer rate is over 18MBps. Now suppose you want to limit it to say 5MBps, so for that you'll run the following command:
pv -L 5m /media/himanshu/1AC2-A8E3/Maldives-2016/* | gzip > ./Desktop/trip-pictures.gz
The -L option followed by the value '5m' does the trick here. See, the above command in action in the following screenshot:

"A suffix of 'k', 'm', 'g', or 't' can be added to denote kilobytes (*1024), megabytes, and so on," the man page explains. Detailed information on output as well as data transfer modifiers is also available on the command's man page.
Linux Progress command
Progress (formerly known as cv) is a command line utility that provides progress for ongoing operations involving coreutils basic commands, such as cp, mv, dd, tar, gzip/gunzip, cat, and more. "It can also show estimated time and throughput, and provides a 'top-like' mode (monitoring)," the official documentation says.
Before you install Progress, you have to first make sure that the library 'ncurses' is there on your system as the command depends on this library. If not, Debian/Ubuntu users can download and install the ncurses package using the following command:
sudo apt-get install libncurses5-dev
Then download the Progress command package from its GitHub repo using the following command:
git clone https://github.com/Xfennec/progress.git
Thereafter enter the 'progress' directory and run the following commands:
make
sudo make install
That's it. The Progress command will now be installed on your Linux box. The following screenshot (taken from the project's GitHub page) shows the command in action:
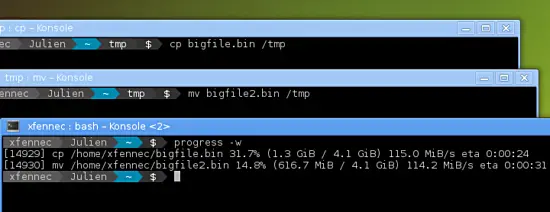
As you can see, the Progress command gives you information about all the ongoing operations that involve coreutil commands. Like any other Linux command line tool, Progress also offers several command line options. Following is the list of options that may be useful to you:
- -m (--monitor) : loop while monitored processes are still running
- -M (--monitor-continuously) : like monitor but never stop (similar to watch progress )
- -c (--command cmd) : monitor only this command name (ex: firefox). This option can be used multiple times on the command line.
- -p (--pid id) : monitor only this numeric process ID (ex: `pidof firefox`). This option can be used multiple times on the command line.
- -i (--ignore-file file) : do not report a process for 'file'. If the file does not exist yet, you must give a full and clean absolute path. This option can be used multiple times on the command line.
Conclusion
While the Progress tool is limited to coreutils commands, PV can be used in general to monitor any command line activity. Plus, PV is easy to download and install as well. But before you go ahead and conclude that PV is better than Progress, keep in mind that unlike PV, with Progress you don't have to modify the command you want to monitor. So, which of the two is better broadly depends on your requirement.

