Linux Uniq Command Tutorial for Beginners (10 examples)
On this page
- Linux Uniq command
- 1. How to delete repeated lines using uniq command
- 2. How to display number of repetitions for each line
- 3. How to only print duplicate lines using uniq
- 4. How to make uniq avoid comparing first few fields
- 5. How to make uniq display all lines, while separating repetitive groups with empty line
- 6. How to make uniq only print non-repetitive lines
- 7. How to make uniq avoid comparing set number of initial characters
- 8. How to limit comparison to set number of chars
- 9. How to make uniq comparison case insensitive
- 10. How to make uniq output NUL-terminated
- Conclusion
If you are a Linux command line user, and your work involves playing with text files, you should know (if not already) that there are many command line utilities that may be of great help to you in different situations. For example, there exists a tool dubbed 'uniq' that reports or even deletes repeated lines in a file.
In this article, we will discuss 'uniq' through easy to understand examples. But before we do that, it's worth mentioning that all examples and instructions mentioned in this tutorial have been tested on Ubuntu 16.04LTS.
Linux Uniq command
As already mentioned in the beginning, the uniq command reports or omits repeated lines. Here's the general syntax of this command:
uniq [OPTION]... [INPUT [OUTPUT]]
According to the utility's man page: "Filter adjacent matching lines from INPUT (or standard input), writing to OUTPUT (or standard output). With no options, matching lines are merged to the first occurrence."
Following are some examples that'll help you understand the tool better.
1. How to delete repeated lines using uniq command
Suppose the file contains following lines:
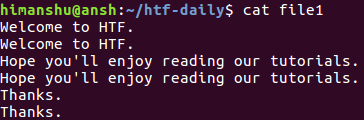
Clearly, each line is repeated. Now let's run Uniq on this file, and see what happens.
uniq file1

So as you can see, the output the command produced contains no repeated lines. Please note that the original file - 'file1' in our case - remains unaffected. You can redirect the tool's output to another file in case you want to save and work on it.
2. How to display number of repetitions for each line
If you want, you can also make uniq display in output the number of times a line is repeated. This can be done by using the -c command line option. For example, the following command:
uniq -c file1
produces the following output:

So as you can see, the number of repetitions for each line is prefixed before it in the output.
3. How to only print duplicate lines using uniq
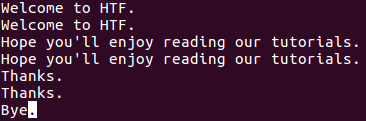
To make uniq print only duplicate lines, use the -D command line option. For example, suppose file1 now contains an extra line at the bottom (note that this line is not repeated).
Now, when I run the following command:
uniq -D file1
The following output is produced:
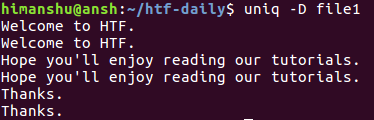
As you can see, the -D option makes uniq display all repeated lines in output, including all their repetitions. To better segregate, you can have an empty line after each group of repeated lines, something which can be done using the --all-repeated option.
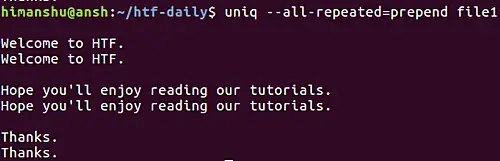
uniq --all-repeated[=METHOD] file1
This option requires a method name to be entered by the user. The values could be prepend (to prepend empty line) or separate (to append an empty line). For example, here's this option in action with prepend method.
Moving on, if you want the tool to only display one duplicate line per group, then you can go for the -d option. Here's an example of that:

Clearly, only one repeated line from each group was displayed in the output.
4. How to make uniq avoid comparing first few fields
Sometimes, depending on the situation, the similarity of two lines is defined by a small part of those lines. For example, consider the contents of the following file:
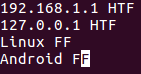
Now, suppose the lines are considered similar or different based on their second field (HTF or FF), and you want to convey this to uniq, then this can be done using the -f command line option.
uniq -f [number-of-fields-to-skip] [file-name]
The -f option requires you to pass a number that represents the number of fields you want the command to skip. For example, in our case, we can pass '1' as argument to -f as it's only the first field that we want uniq to skip.
uniq -f 1 file1

The output clearly shows that uniq considered both first and third lines as repeated based on their respective second fields.
5. How to make uniq display all lines, while separating repetitive groups with empty line
In case the requirement is to display all lines, while separating repetitive groups of lines with an empty line, then you can use the --group option. Like the --all-repeated option we discussed earlier, --group also requires you to tell the position of empty line (prepend, append, or both).
Here's an example:
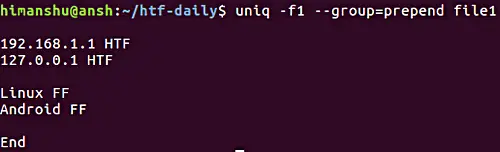
Note that the -f option we've already discussed in the previous section.
6. How to make uniq only print non-repetitive lines
As you'd have understood by now, by default the uniq command only displays repeated lines in the output. But if you want, you can instead make it to display only non-repeated or unique lines. This can be done using the -u command line option.
uniq -u [file-name]
So, in our case:
uniq -u file1
Here's an example:
![]()
Note that the -f option we've already discussed in section/point number 4.
7. How to make uniq avoid comparing set number of initial characters
In one of our earlier examples, we discussed how you can make uniq skip fields. However, if you want, you can force the tool to skip a set number of initial characters as well. This feature can be accessed using the -s command line option.
uniq -s [number-of-char] filename
For example, suppose the file contains following lines:
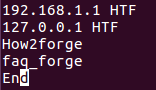
Now, if you want uniq to skip the first 4 characters in each line before comparing, then this can be done in the following way:
uniq -s 4 file1
Here's the above command in action:

So you can see that the fourth line (faq_forge) that was originally there has been skipped in the output. This is because after skipping the first four characters, the third and the fourth line were same, and hence considered repeated by uniq.
8. How to limit comparison to set number of chars
Similar to the way you skip characters, you can also ask uniq to limit the comparison to a set number of characters. For this, you'll have to use the -w command line option.
uniq -w [num-of-chars] [file-name]
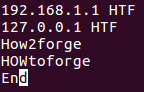
For example, suppose the file contains the following lines:
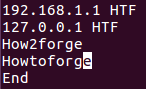
Now, if the requirement is to limit the comparison to first 3 characters, then this can be done in the following way:
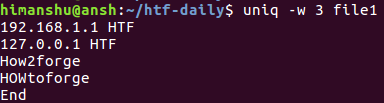
uniq -w 3 file1
Here is the above command in action:

Since first 3 characters of the third and fourth lines are same, so these lines were considered as repeated. Hence, only third one is displayed in the output.
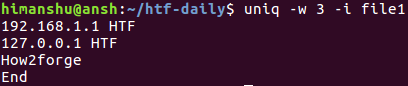
9. How to make uniq comparison case insensitive
By default, the comparison uniq carries out is case-sensitive in nature. However, you can make the process case-insensitive using the -i command line option.
For example, consider the same case that we discussed in the previous section, just that the fourth line starts with capital H, O, and W.
Now, if you try running the same command that we used in the previous section, you'll see that the output is different:
That's because the first three characters of the third and the fourth lines are different for uniq because of their case. In situations line these, you can make the comparison case-insensitive using the -i command line option.
10. How to make uniq output NUL-terminated
By default, the output uniq produces is newline terminated. However, if you want, you can have a NUL terminated output instead (useful while dealing with uniq in scripts). This can be made possible using the -z command line option.
uniq -z [file-name]
Conclusion
We've covered pretty much all of the command line options the uniq command offers, so just practice whatever we've discussed here, and you should get a solid idea of how uniq works, and what features it provides. As always, in case of any query or doubt, do go through the command's man page first.

