How To Reset Root Password In CentOS 7
Table of Contents
One of the most important things for Linux users is to know what to do if the root password is lost. Many times we create a strong password for our computer, but sometimes we forget it. This trouble is mostly for servers, and CentOS is a Linux distro focused on servers, so in this article, we’re going to learn how to reset password in CentOS Linux.
Also Read – How To Reset root Password In Ubuntu?
This process is simple, but we must be careful because if we do a wrong action, our system could be in danger. So, let’s get started!
There is a tool that’s useful for situations that require superuser access without the password, cause this program changes the apparent root directory for the current running process and its children. If you want to know more about it, please visit the Wikipedia article for chroot.
Before explaining the process, I’ve to tell you something important: This process is for CentOS 7 and it’s different from previous releases because it is the most recent version and its SELinux integration is better. So if you have a previous release installed on your computer please visit the documentation at CentOS wiki.
The first step to reset the root password is to boot the CentOS machine in emergency mode, and for this process, we’ll use rd.break.
Start the system and, on the GRUB 2 boot screen, press the ‘e’ key for edit:
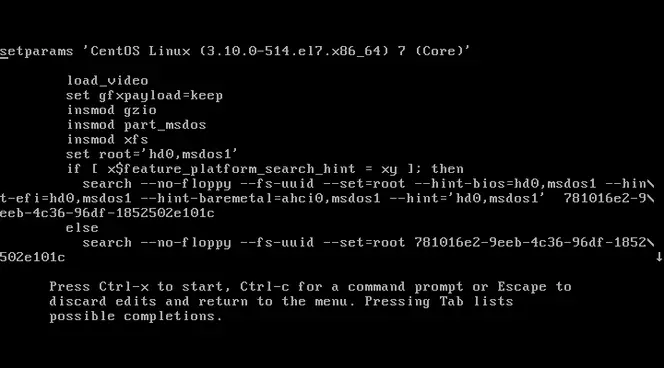
Remove the rhgb and quiet parameters from the end, or near the end, of the linux16 line, or linuxefi on UEFI systems.

Add the following parameters at the end of the linux16 line on x86-64 BIOS-based systems, or the linuxefi line on UEFI systems:
rd.break enforcing=0

When you finish, press ctrl + x to load the system. Finally, you’ll boot in emergency mode.

After emergency mode booting, you must remount the filesystem as writable because it’s mounted read-only, so you just have to type the following command:
mount -o remount, rw /sysroot
Now change the file system’s root as follows: chroot /sysrootFinally, you’ll get a chroot environment ready to reset the password. Probably you know the command to set a user password, but if don’t, let me explain it.
The way to set a password is easy just type passwd user_name.
user_name isn’t necessary if you’re logged in the session, so for this tutorial, you must type only “passwd”.

If the system is not writable, the passwd tool fails with the following error: Authentication token manipulation error Updating the password file results in a file with the incorrect SELinux security context, because SELinux is a Linux kernel security module that provides a mechanism for supporting access control security policies, to relabel all files on next system boot, enter the following command:
touch /.autorelabel
But I have to tell you something, relabel a large disk takes a long time, so you can omit this step provided you included the enforcing=0 option.
Now you must remount the filesystem as read-only using the following command:
mount -o remount,ro /
Now exit from chroot environment and exit to finish the system boot (just type exit two times).

If you omitted to relabel files enter the following command to restore the /etc/shadow file’s SELinux security context:
restorecon /etc/shadow
Enter the following commands to turn SELinux policy enforcement back on and verify that it is on:
setenforce 1
getenforce

That’s all friends. The process to reset the root password isn’t hard and this isn’t the only way to do it. Also, you can use an installation disk or maybe a live Linux cd of another distro. If you want to get more information about the topic or you have a previous release of CentOS you can check the document here.

LinuxAndUbuntu Newsletter
Join the newsletter to receive the latest updates in your inbox.


