How to Install MySQL Server with phpMyAdmin on FreeBSD 11
MySQL is a free and open source relational management system. It stores data in tabular format. It is the most popular way of storing the data into the database. phpMyAdmin is also a free and open source application used to administrate a MySQL server instance through a rich graphical user interface. phpMyAdmin is written in PHP. To install phpMyAdmin, we will also need to install a web server with PHP on FreeBSD.
In this tutorial, we will install MySQL with phpMyAdmin along with Apache web server with PHP 5.6.
Prerequisite
- Minimal FreeBSD 11 server.
- Root privileges. This guide is written as the root user, if you are logged in as sudo user, run sudo -i.
Update Base System
Before installing any package it is recommended that you update the packages and repository using the following command.
pkg update
pkg upgrade
Once your system is updated, proceed further.
Install MySQL Database Server
You can install MySQL server on FreeBSD using its default package manager. Run the following command to install MySQL 5.7.
pkg install mysql57-server mysql57-client
The above command will install MySQL version 5.7 on your server. Enable MySQL in rc.conf by running the following command.
sysrc mysql_enable="yes"
Now you can start the MySQL server by running the following command.
service mysql-server start
To obtain the initial root password which was set during installation, run the following command.
cat $HOME/.mysql_secret
You should see following output, which includes the current MySQL root password.
# cat $HOME/.mysql_secret
# Password set for user 'root@localhost' at 2017-07-23 17:42:39
y4j?>sHsuh9r
It is recommended to secure the MySQL instance before using it for production use. Run the following command to secure the MySQL instance.
mysql_secure_installation
The above command will automatically read the password in $HOME/.mysql_secret and will continue to set validate password plugin.
# mysql_secure_installation

Securing the MySQL server deployment.

Connecting to MySQL server using password in '/root/.mysql_secret'

VALIDATE PASSWORD PLUGIN can be used to test passwords
and improve security. It checks the strength of the password
and allows the users to set only those passwords which are
secure enough. Would you like to setup VALIDATE PASSWORD plugin?

Press y|Y for Yes, any other key for No: y

There are three levels of password validation policy:

LOW    Length >= 8
MEDIUM Length >= 8, numeric, mixed case, and special characters
STRONG Length >= 8, numeric, mixed case, special characters and dictionary                  file

Please enter 0 = LOW, 1 = MEDIUM and 2 = STRONG: 1
It is recommended to use validate password plugin as it bounds the user to set a very strong password for MySQL users. Choose y to set the validate password plug in and enter the level of validation policy according to your choice.
Also, change the root password. Also, choose y for all other options. The questions are self-explanatory.
Change the password for root ? : y
Do you wish to continue with the password provided? : y
Remove anonymous users? : y
Disallow root login remotely? : y
Remove test database and access to it? : y
Reload privilege tables now? : y
All done!
MySQL server is now installed on your server. You can login to MySQL shell by running the following command.
mysql -u root -p
You should be successfully logged in after providing the password. Your shell will change, and you will get following output.
# mysql -u root -p
Enter password:
Welcome to the MySQL monitor.  Commands end with ; or \g.
Your MySQL connection id is 8
Server version: 5.7.18-log Source distribution

Copyright (c) 2000, 2017, Oracle and/or its affiliates. All rights reserved.

Oracle is a registered trademark of Oracle Corporation and/or its
affiliates. Other names may be trademarks of their respective
owners.

Type 'help;' or '\h' for help. Type '\c' to clear the current input statement.

root@localhost [(none)]>
You can exit from MySQL prompt by running EXIT; command.
Install Apache Web Server
You can easily install Apache web server through the default package manager pkg. Run the following command to install Apache web server on your system.
pkg install apache24
The above command will install Apache version 2.4 on your server. Enable Apache in rc.conf by running the following command.
sysrc apache24_enable="YES"
Now you can start the Apache web server by running the following command.
service apache24 start
You see your web server working by browsing the following URL through your favourite web browser.
http://Your_Server_IP
You should see the following screen if your web server is running successfully.

Install and Configure PHP
As phpMyAdmin is written in PHP, thus you will need to install PHP on your web server. Install PHP 5.6 along with the required modules by running the following command.
pkg install mod_php56 php56-session php56-xml php56-ctype php56-openssl php56-mcrypt php56-filter php56-gd php56-json php56-mysqli php56-mbstring php56-zlib php56-zip php56-bz2
Once the above packages are installed, copy the production PHP configuration to the default location of php.ini. Run the following command for same.
cp /usr/local/etc/php.ini-production /usr/local/etc/php.ini
You can check the version of PHP by running:
php -v
You should get following output:
# php -v
PHP 5.6.31 (cli) (built: Jul 13 2017 01:25:09)
Copyright (c) 1997-2016 The PHP Group
Zend Engine v2.6.0, Copyright (c) 1998-2016 Zend Technologies
Enable PHP to work with Apache by editing the Apache configuration file httpd.conf. Run the following command to edit Apache configuration.
nano /usr/local/etc/apache24/httpd.conf
If you do not have nano installed, you can run pkg install nano. Find the following lines:
<IfModule dir_module>
    DirectoryIndex index.html
</IfModule>
Add index.php to the directory index. Once the configuration is updated, it should look like:
<IfModule dir_module>
    DirectoryIndex index.php index.html
</IfModule>
Also, add the following lines at the end of the file:
<FilesMatch "\.php$">
    SetHandler application/x-httpd-php
</FilesMatch>
<FilesMatch "\.phps$">
    SetHandler application/x-httpd-php-source
</FilesMatch>
Restart the Apache web server by running:
service apache24 restart
Now, you can proceed further to install phpMyAdmin.
Install phpMyAdmin
phpMyAdmin is also available in default repository of FreeBSD. You can install phpMyAdmin directly by running the following command.
pkg install phpmyadmin
The above command will download and install phpMyAdmin. The application will be installed in /usr/local/www/phpMyAdmin/ directory.
Copy the sample phpMyAdmin configuration to its default location by running:
cp /usr/local/www/phpMyAdmin/config.sample.inc.php /usr/local/www/phpMyAdmin/config.inc.php
Edit the Apache configuration file using the following command.
nano /usr/local/etc/apache24/httpd.conf
Add the following lines at the end of the file.
Alias /phpmyadmin/ "/usr/local/www/phpMyAdmin/"

<Directory "/usr/local/www/phpMyAdmin/">
    Options None
    AllowOverride Limit
    Require all granted
</Directory>
Restart the Apache web server by running:
service apache24 restart
Accessing phpMyAdmin
You can now access the phpMyAdmin interface at the following web address.
http://Your_Server_IP/phpmyadmin/
You will see the following login dashboard.

Log in using the root username and password which you have set earlier. If you are successfully logged in, you will see the following screen.

Create a new database by clicking on New link at the left sidebar. Provide a filename for your database and choose a collation and click Create button.

You can run the SQL query on the database server by going to SQL tab. The result will be shown on the web interface.

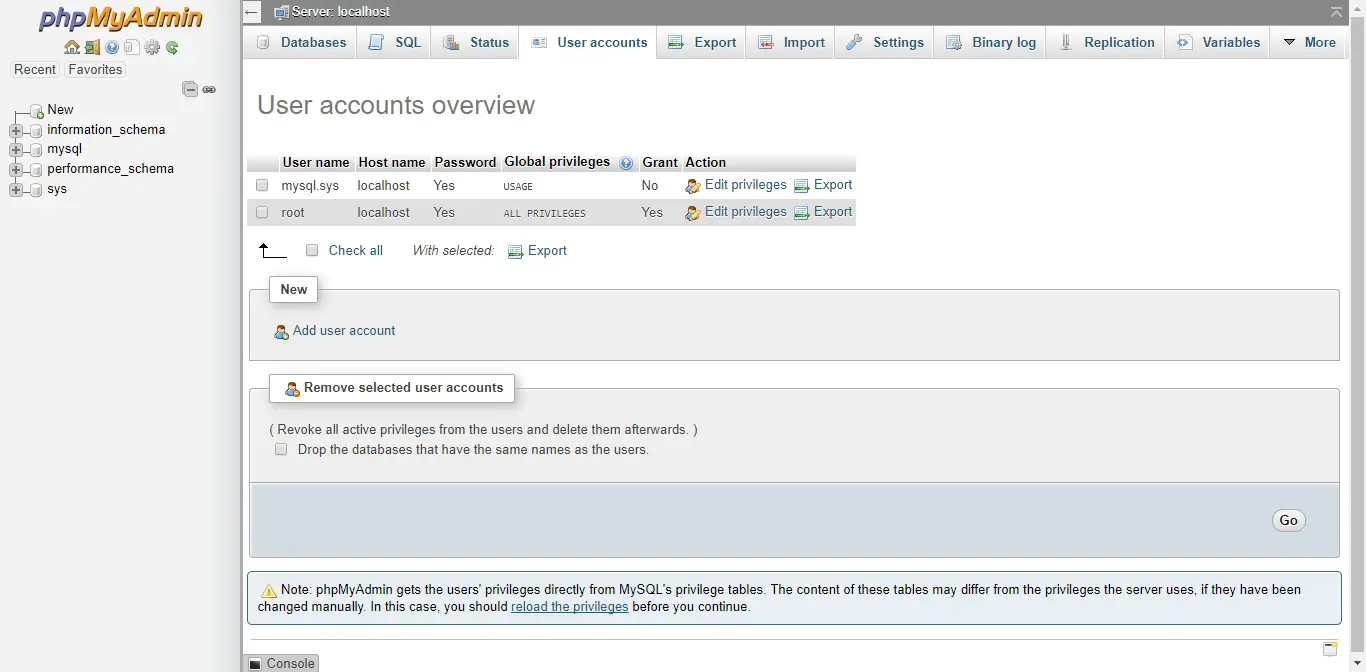
You can create a new database user or modify an existing one by going to Users tab.
To import a backup of the database, you can go to Import tab of the phpMyAdmin interface. Choose the file in any supported format and choose the character set of the file.

Conclusion
In this tutorial, we have learned to install MySQL with phpMyAdmin on FreeBSD 11. We also learned how to install Apache web server along with PHP 5.6.

